Page 54 of 259
DESTINATION SEARCH
55
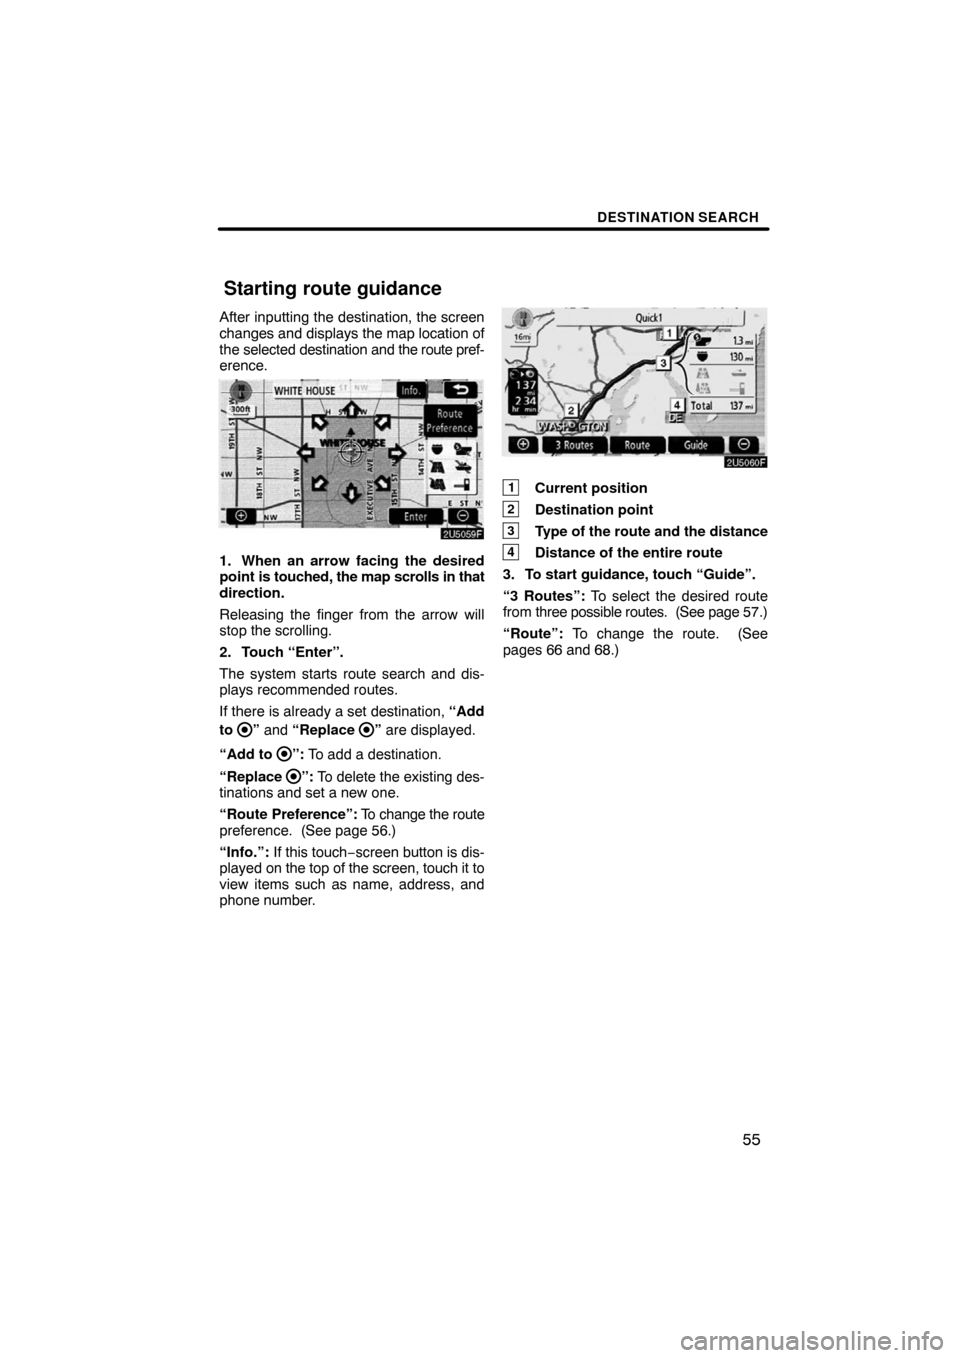
After inputting the destination, the screen
changes and displays the map location of
the selected destination and the route pref-
erence.
2U5059F
1. When an arrow facing the desired
point is touched, the map scrolls in that
direction.
Releasing the finger from the arrow will
stop the scrolling.
2. Touch “Enter”.
The system starts route search and dis-
plays recommended routes.
If there is already a set destination, “Add
to
” and “Replace ” are displayed.
“Add to
”: To add a destination.
“Replace
”: To delete the existing des-
tinations and set a new one.
“Route Preference”: To change the route
preference. (See page 56.)
“Info.”: If this touch−screen button is dis-
played on the top of the screen, touch it to
view items such as name, address, and
phone number.
2U5060F
1Current position
2Destination point
3Type of the route and the distance
4Distance of the entire route
3. To start guidance, touch “Guide”.
“3 Routes”: To select the desired route
from three possible routes. (See page 57.)
“Route”: To change the route. (See
pages 66 and 68.)
Starting route guidance
Page 55 of 259
DESTINATION SEARCH
56
INFORMATION
�Guidance can be suspended or
resumed. (See “Suspending and
resuming guidance” on page 82.)
�If “Guide” is touched until a beep
sounds, Demo mode will start.
Push the “MAP/VOICE” button to
finish Demo mode.
�The route for returning may not be
the same as that for going.
�The route guidance to the destina-
tion may not be the shortest route
nor a route without traffic conges-
tion.
�Route guidance may not be avail-
able if there is no road data for the
specified location.
�When setting the destination on a
map with a scale larger than 0.5
miles (800 m), the map scale
changes to 0.5 miles (800 m) auto-
matically. Set the destination
again.
�If a destination is entered, the road
nearest to the point you selected is
set as the destination.
CAUTION
Be sure to obey traffic regulations
and keep road conditions in mind
while driving. If a traffic sign on the
road has been changed, the route
guidance may provide wrong infor-
mation.
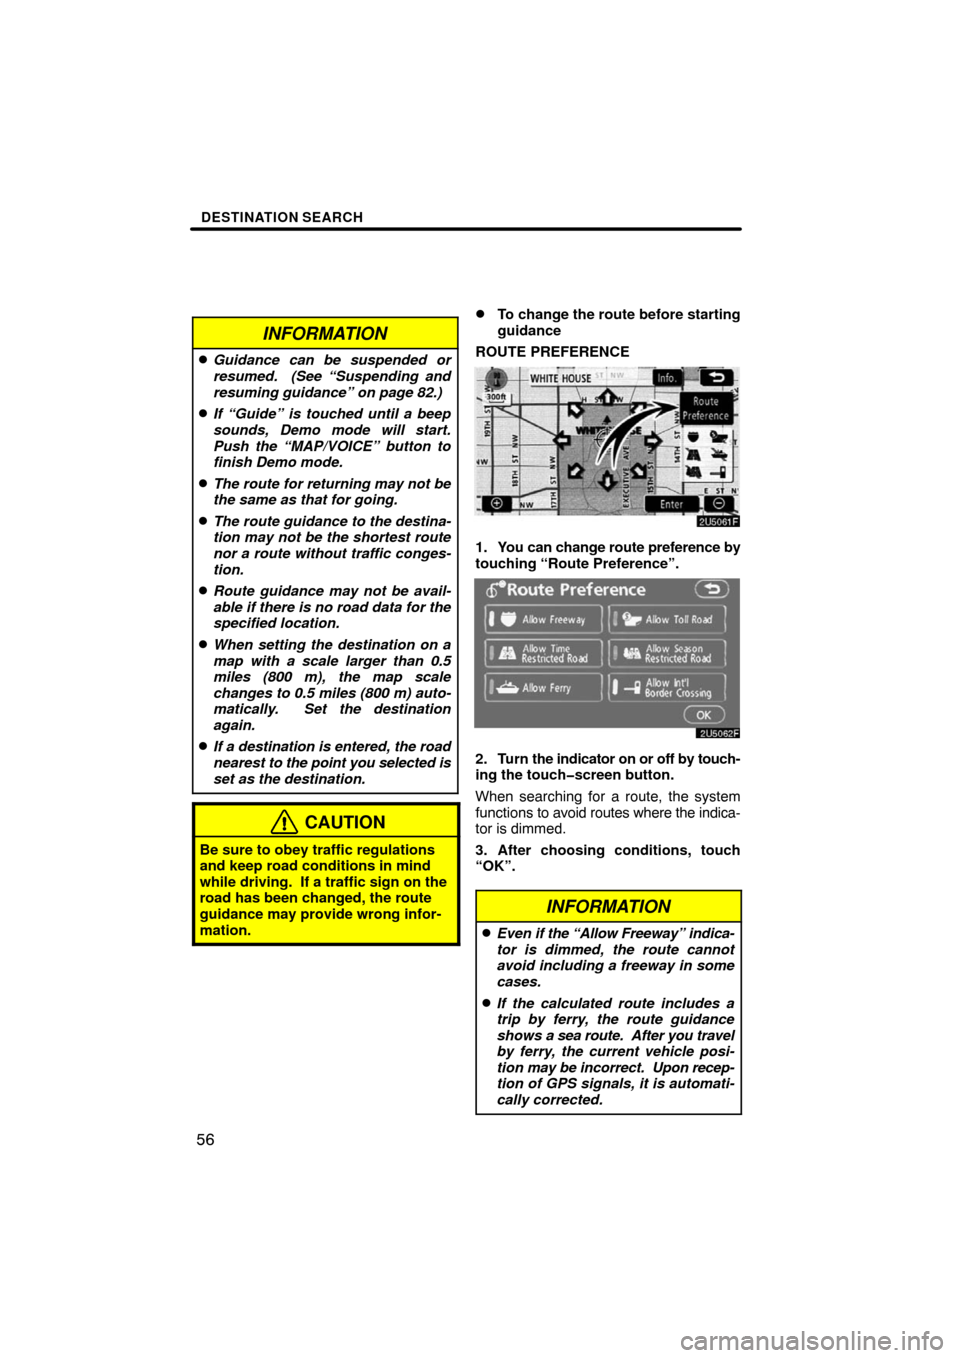
�To change the route before starting
guidance
ROUTE PREFERENCE
2U5061F
1. You can change route preference by
touching “Route Preference”.
2U5062F
2. Turn the indicator on or off by touch-
ing the touch�screen button.
When searching for a route, the system
functions to avoid routes where the indica-
tor is dimmed.
3. After choosing conditions, touch
“OK”.
INFORMATION
�Even if the “Allow Freeway” indica-
tor is dimmed, the route cannot
avoid including a freeway in some
cases.
�If the calculated route includes a
trip by ferry, the route guidance
shows a sea route. After you travel
by ferry, the current vehicle posi-
tion may be incorrect. Upon recep-
tion of GPS signals, it is automati-
cally corrected.
Page 63 of 259
ROUTE GUIDANCE
64
3U5121X
One−way road
One−way road
∗: The system indicates a U−turn if the dis-
tance between two one−way roads (of op-
posite directions) is less than 50 feet (15
m) in residential areas or 164 feet (50 m)
in non−residential areas.
1“In half of a mile, make a legal
U−turn.”
2“Make a legal U−turn ahead.”
3(Beep sound only)
3U5122X
The system announces the approach to
the final destination.
1“Your destination is ahead.”
2“You have arrived at your
destination. The route
guidance is now finished.”
INFORMATION
�If the system cannot determine the
current vehicle position correctly
(in cases of poor GPS signal recep-
tion), the voice guidance may be
made early or delayed.
�If you did not hear the voice guid-
ance command, push the “MAP/
VOICE” button to hear it again.
�To adjust the voice guidance vol-
ume, see “Volume” on page 83.
Page 64 of 259
ROUTE GUIDANCE
65
3U5007F
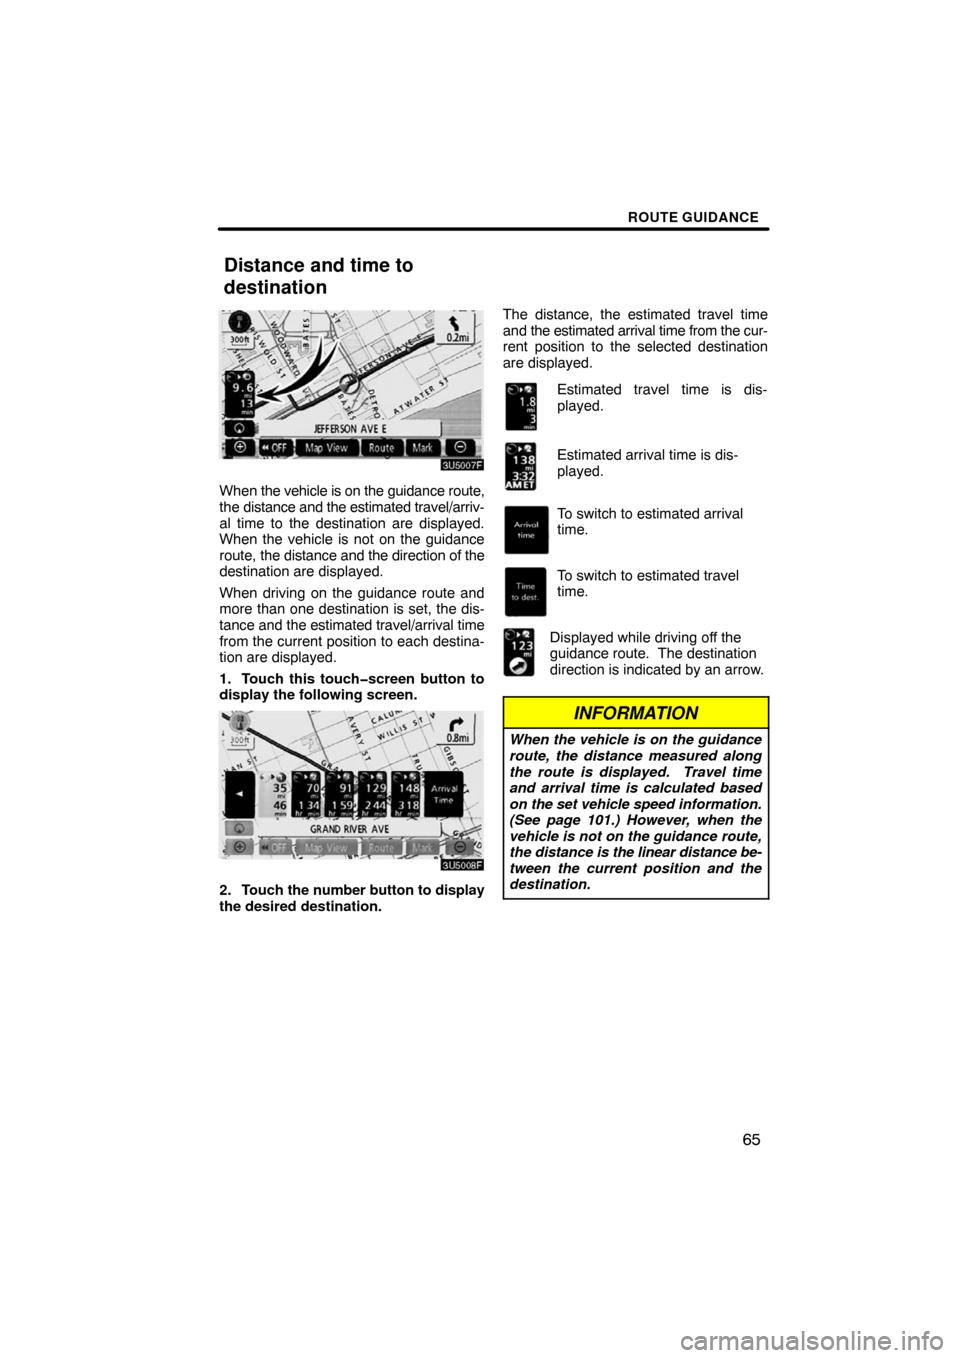
When the vehicle is on the guidance route,
the distance and the estimated travel/arriv-
al time to the destination are displayed.
When the vehicle is not on the guidance
route, the distance and the direction of the
destination are displayed.
When driving on the guidance route and
more than one destination is set, the dis-
tance and the estimated travel/arrival time
from the current position to each destina-
tion are displayed.
1. Touch this touch�screen button to
display the following screen.
3U5008F
2. Touch the number button to display
the desired destination.The distance, the estimated travel time
and the estimated arrival time from the cur-
rent position to the selected destination
are displayed.
Estimated travel time is dis-
played.
Estimated arrival time is dis-
played.
To switch to estimated arrival
time.
To switch to estimated travel
time.
Displayed while driving off the
guidance route. The destination
direction is indicated by an arrow.
INFORMATION
When the vehicle is on the guidance
route, the distance measured along
the route is displayed. Travel time
and arrival time is calculated based
on the set vehicle speed information.
(See page 101.) However, when the
vehicle is not on the guidance route,
the distance is the linear distance be-
tween the current position and the
destination.
Distance and time to
destination
Page 65 of 259
ROUTE GUIDANCE
66
Adding destinations and searching again
for the routes can be done.
3U5009F
1. Touch “Route”.
3U5010F
2. Touch “Add”.
3. Input an additional destination in
the same way as the destination
search. (See “Destination search” on
page 35.)
3U5011F
4. Touch the desired “Add” to deter-
mine the arrival order of the additional
destination.When more than one destination is set,
you can change the arrival order of the
destinations.
3U5012F
1. Touch “Route”.
3U5013F
2. Touch “Reorder”.
3U5014F
3. Select the destination in the order of
arrival by touching the destination but-
ton.
Reordered number of arrival is displayed
on the right side of the screen.
Touching “Undo” will cancel each se-
lected order number from the previously
input number.
Setting and deleting
destination —
— Adding destinations
— Reordering destinations
Page 68 of 259
ROUTE GUIDANCE
69
3U5021F
The entire route from the starting point to
the destination is displayed.
“Guide”: To start guidance.
“Route”: To change a route. (See pages
66 and 68.)While the route guidance is operating, you
can change the route to detour around a
section of the route where a delay is
caused by road repairs, or an accident,
etc.3U5022F
1. Touch “Route”.
3U5023F
2. Touch “Detour”.
— Detour setting
Page 71 of 259
ROUTE GUIDANCE
72
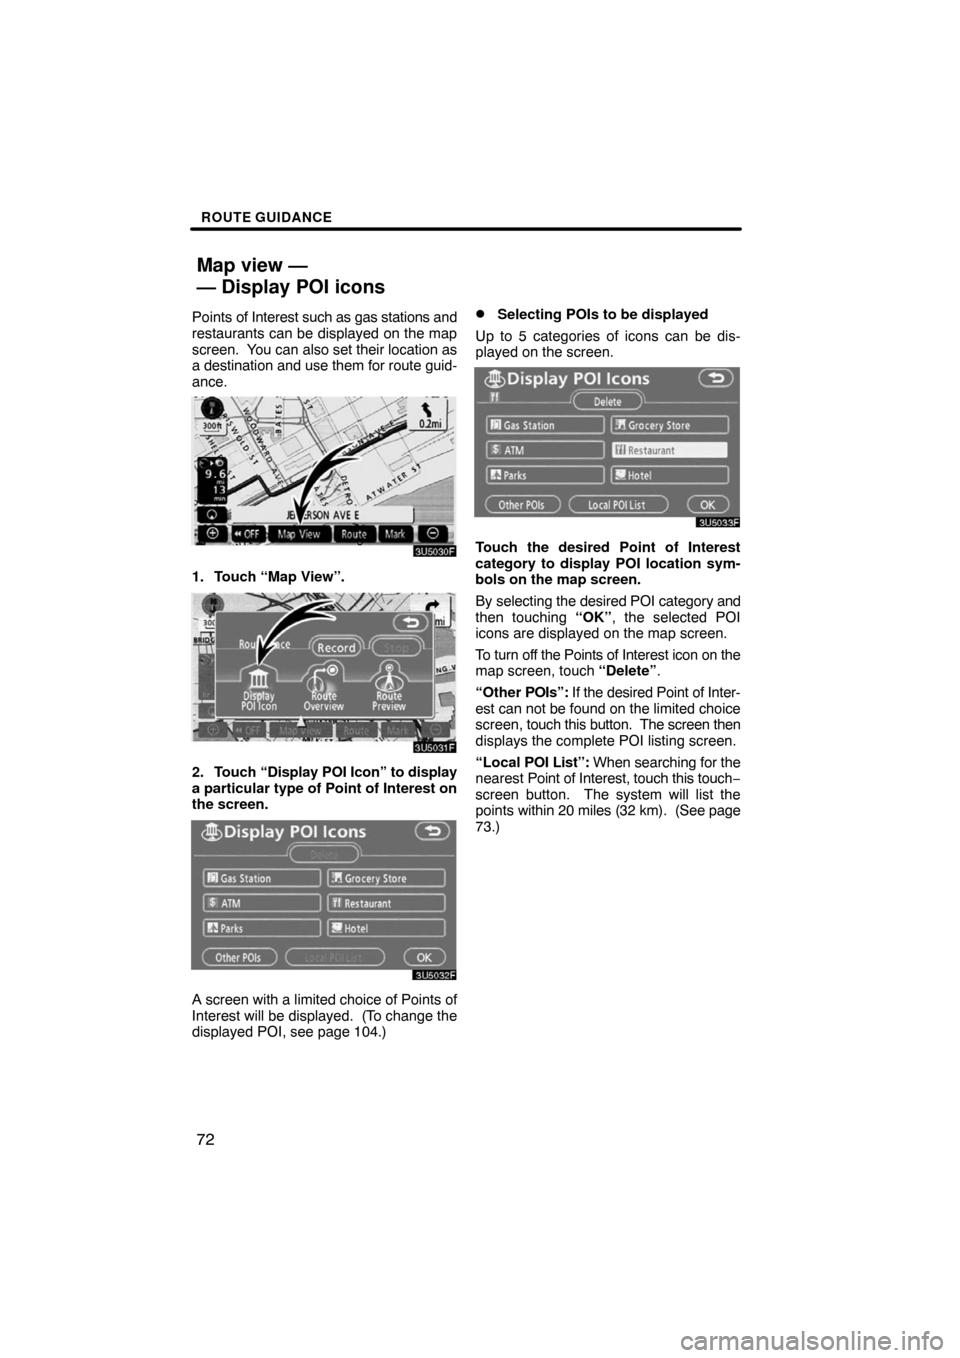
Points of Interest such as gas stations and
restaurants can be displayed on the map
screen. You can also set their location as
a destination and use them for route guid-
ance.
3U5030F
1. Touch “Map View”.
3U5031F
2. Touch “Display POI Icon” to display
a particular type of Point of Interest on
the screen.
3U5032F
A screen with a limited choice of Points of
Interest will be displayed. (To change the
displayed POI, see page 104.)
�Selecting POIs to be displayed
Up to 5 categories of icons can be dis-
played on the screen.
3U5033F
Touch the desired Point of Interest
category to display POI location sym-
bols on the map screen.
By selecting the desired POI category and
then touching “OK”, the selected POI
icons are displayed on the map screen.
To turn off the Points of Interest icon on the
map screen, touch “Delete”.
“Other POIs”: If the desired Point of Inter-
est can not be found on the limited choice
screen, touch this button. The screen then
displays the complete POI listing screen.
“Local POI List”: When searching for the
nearest Point of Interest, touch this touch−
screen button. The system will list the
points within 20 miles (32 km). (See page
73.)
Map view —
— Display POI icons
Page 73 of 259
ROUTE GUIDANCE
74 �
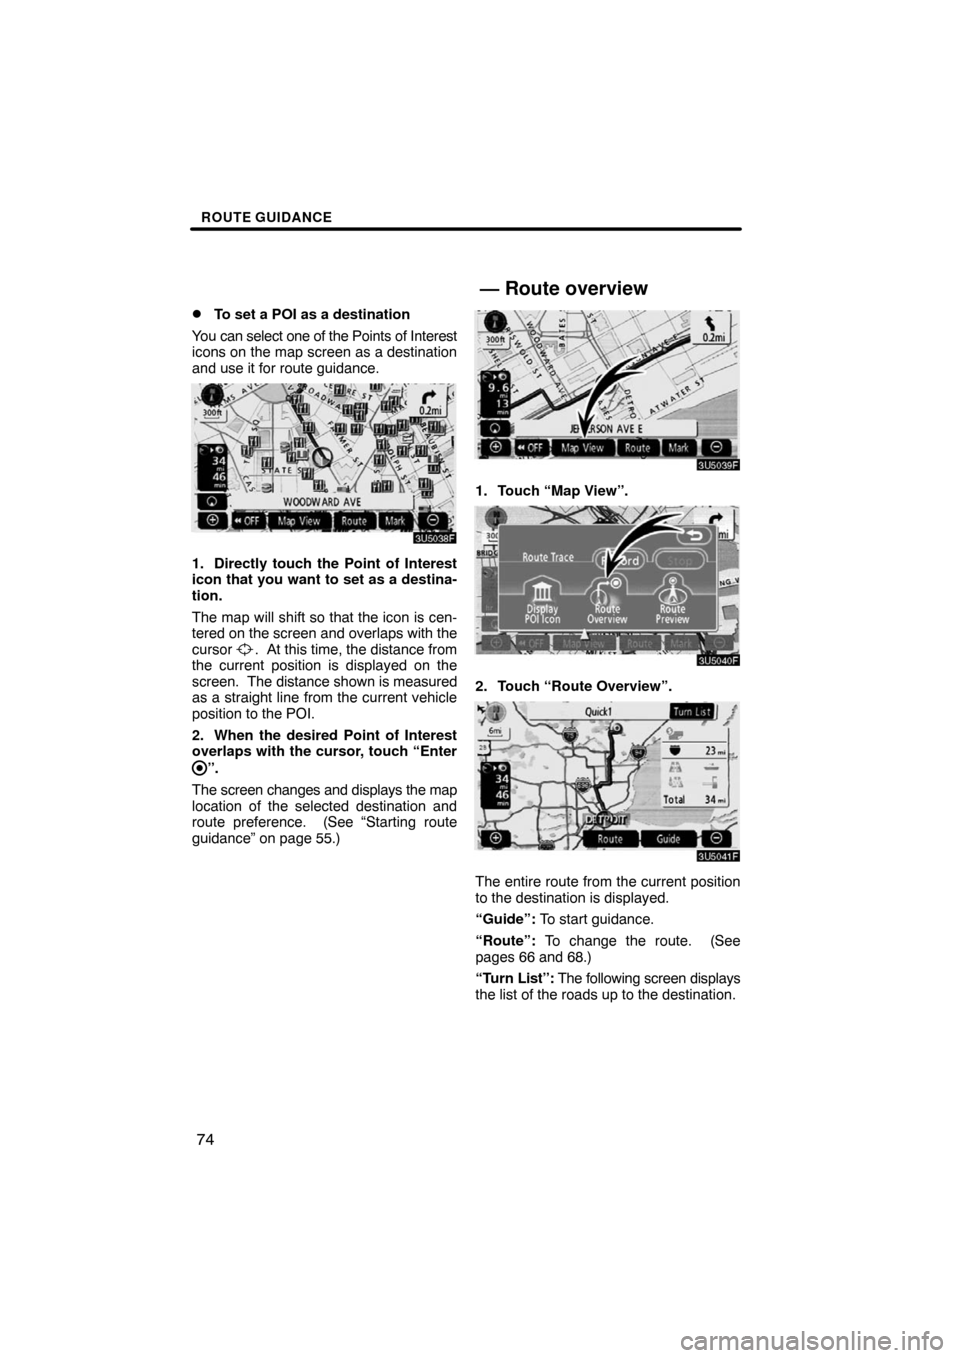
To set a POI as a destination
You can select one of the Points of Interest
icons on the map screen as a destination
and use it for route guidance.
3U5038F
1. Directly touch the Point of Interest
icon that you want to set as a destina-
tion.
The map will shift so that the icon is cen-
tered on the screen and overlaps with the
cursor
. At this time, the distance from
the current position is displayed on the
screen. The distance shown is measured
as a straight line from the current vehicle
position to the POI.
2. When the desired Point of Interest
overlaps with the cursor, touch “Enter
”.
The screen changes and displays the map
location of the selected destination and
route preference. (See
“Starting route
guidance” on page 55.)
3U5039F
1. Touch “Map View”.
3U5040F
2. Touch “Route Overview”.
3U5041F
The entire route from the current position
to the destination is displayed.
“Guide”: To start guidance.
“Route”: To change the route. (See
pages 66 and 68.)
“Turn List”: The following screen displays
the list of the roads up to the destination.
— Route overview