Page 13 of 496
1
OPERATION OF INSTRUMENTS AND
CONTROLS
Overview of instruments and controls
Instrument panel overview2
. . . . . . . . . . . . . . . . . . . . . . . . . . . . . . . . . . . . .\
Instrument cluster overview 6
. . . . . . . . . . . . . . . . . . . . . . . . . . . . . . . . . . . . \
Indicator symbols on the instrument panel 8
. . . . . . . . . . . . . . . . . . . . . . .
SECTION 1− 1
Page 14 of 496
2
1. Side vents
2. Side defroster outlets
3. Instrument cluster
4. Center vents
5. Personal lights
6. Electric moon roof switch
7. Garage door opener
8. Auxiliary boxes
9. Glove box
10. Automatic transmission selector lever
11. Power door lock switches
12. Power window switches
13. Seat heater switches
14. Rear height control air suspension switch
15. Rear vents
16. Trash holder
17. Toyota electronic modulated suspension mode select switch
18. Downhill assist control switch
19. Front cup holders
20. Tilt steering lock release lever
Instrument panel overview
CY11050y
Page 17 of 496
5
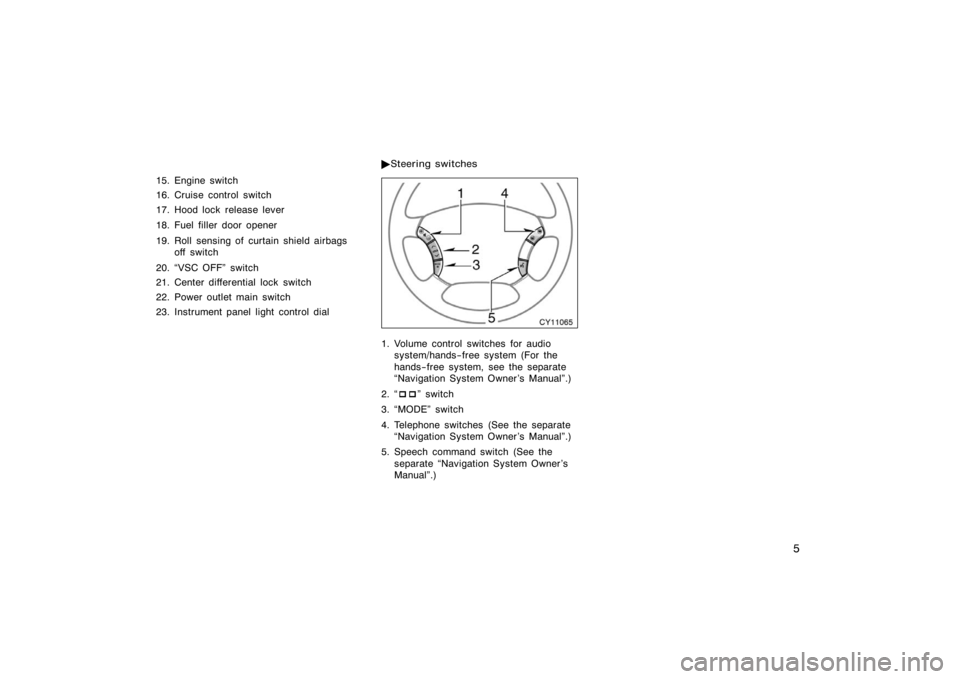
15. Engine switch
16. Cruise control switch
17. Hood lock release lever
18. Fuel filler door opener
19. Roll sensing of curtain shield airbags off switch
20. �VSC OFF" switch
21. Center differential lock switch
22. Power outlet main switch
23. Instrument panel light control dial
CY11065
1. Volume control switches for audio system/hands−free system (For the
hands−free system, see the separate
�Navigation System Owner ’s Manual".)
2. � ��" switch
3. �MODE" switch
4. Telephone switches (See the separate �Navigation System Owner ’s Manual".)
5. Speech command switch (See the separate �Navigation System Owner ’s
Manual".)
�
Steering switches
Page 20 of 496
8
or
Driver ’s seat belt reminder light∗1
Low engine oil pressure warning light∗1
Engine oil replacement reminder light∗1
(for vehicles sold in U.S.A.) Brake system warning light
∗ 1
Malfunction indicator lamp∗1
Charging system warning light∗1
Anti−lock brake system warning light∗1
SRS warning light∗1
Open door warning light∗1
Front passenger ’s seat belt reminder light∗1Automatic transmission fluid temperature
warning light∗1 (four−wheel drive models)
Tire pressure warning light∗1
Engine immobilizer/theft deterrent system
indicator light
Roll sensing of curtain shield airbags off
indicator light∗2
Low windshield washer fluid level warning
light∗1 (for vehicles sold in Canada)
Front passenger occupant classification indicator
light
Indicator symbols on the instrument panel
Page 42 of 496

30
CY12036
The back window can be operated with
the switch on the instrument panel or
the key operation in the back door key-
hole.
The power back window works when the
engine switch is in the �ON" position.
You can open the back window when the
back window wiper is working. At that
time, the wiper stops working until the
window is closed again.
If the back window is not fully closed, the
back window wiper, washer and defogger
will not work. (See �Back window wiper
and washer" on page 141 and �Back
window and outside rear view mirror
defoggers" on page 142 in Section 1−5.)If the battery is disconnected or run
down,
the power back window may not
operate automatically and the jam protec-
tion function will not function correctly af-
ter you reconnect, replace or recharge the
battery. In any of these cases, you should
normalize the power back window with the
power back window switch.
To normalize the power back window:
1. Push the � �" (down) switch and lower
the window halfway.
2. Push the � �" (up) switch until the win-
dow closes and hold the switch for a
second.
Make sure that the window opens and
closes automatically. If the power back
window cannot be operated properly, have
it checked by your Toyota dealer.
OPERATING FROM INSIDE
The engine switch must be in the �ON"
position.
Normal operation: To open or close the
back window, quickly push and release the
� � " (down) or � �" (up) switch. Automatic operation:
To open or close
the back window, push and hold the � �"
(down) or � �" (up) switch. The window
will fully open or close. To stop the win-
dow partway, push the switch on either
the � �" (down) or � �" (up) side briefly.
Key off operation: If both front doors are
closed, it works for 43 seconds even after
the engine switch is turned off. It stops
working when either front door is opened.
Jam protection function: During automat-
ic closing operation or key off closing op-
eration, the window stops and opens half
way if something gets caught between the
window and window frame.
If the window receives a strong impact,
this function may work even if nothing is
caught.
CAUTION
�Never try jamming any part of your
body to activate the jam protection
function intentionally, as it could re-
sult in death or serious injury.
�The jam protection function may
not work if something gets caught
just before the window is fully
closed.
Power back window
Page 54 of 496

42
While the vehicle is being driven, all ve-
hicle occupants should have the seatback
upright, sit well back in the seat and prop-
erly wear the seat belts provided.
CAUTION
�Do not drive the vehicle unless the
occupants are properly seated. Do
not allow any passengers to sit on
top of a folded−down seatback, or
in the luggage compartment or car-
go area. Persons not properly
seated and/or not properly re-
strained by seat belts can be killed
or severely injured in the event of
emergency braking or a collision.
�During driving, do not allow any
passengers to stand up or move
around between seats. Otherwise,
death or severe injuries can occur
in the event of emergency braking
or a collision.
Driver seat
CAUTION
The SRS driver airbag deploys with
considerable force, and can cause
death or serious injury especially if
the driver is very close to the airbag.
The National Highway Traffic Safety
Administration (�NHTSA") advises:
Since the risk zone for driver airbag
is the first 50�75 mm (2�3 in.) of
inflation, placing yourself 250 mm (10
in.) from your driver airbag provides
you with a clear margin of safety.
This distance is measured from the
center of the steering wheel to your
breastbone. If you sit less than 250
mm (10 in.) away now, you can
change your driving position in sever-
al ways:
�Move your seat to the rear as far
as you can while still reaching the
pedals comfortably.
�Slightly recline the back of the
seat. Although vehicle designs vary,
many drivers can achieve the 250
mm (10 in.) distance, even with the
driver seat all the way forward, sim-
ply by reclining the back of the
seat somewhat. If reclining the back
of your seat makes it hard to see
the road, raise yourself by using a
firm, non−slippery cushion, or raise
the seat if your vehicle has that
feature.
�If your steering wheel is adjustable,
tilt it downward. This points the air-
bag toward your chest instead of
your head and neck.
The seat should be adjusted as rec-
ommended by NHTSA above, while
still maintaining control of the foot
pedals, steering wheel, and your view
of the instrument panel controls.
Seats Front seats�
�Front seat precautions
Page 141 of 496

129
OPERATION OF INSTRUMENTS AND
CONTROLS
Lights, Wipers and Defogger
Headlights and turn signals130
. . . . . . . . . . . . . . . . . . . . . . . . . . . . . . . . . .
Emergency flashers 135
. . . . . . . . . . . . . . . . . . . . . . . . . . . . . . . . . . . . \
. . . . .
Instrument panel light control 135
. . . . . . . . . . . . . . . . . . . . . . . . . . . . . . . .
Front fog lights 136
. . . . . . . . . . . . . . . . . . . . . . . . . . . . . . . . . . . . \
. . . . . . . . .
Interior light 136
. . . . . . . . . . . . . . . . . . . . . . . . . . . . . . . . . . . . \
. . . . . . . . . . . .
Personal lights 138
. . . . . . . . . . . . . . . . . . . . . . . . . . . . . . . . . . . . \
. . . . . . . . .
Luggage compartment light 138
. . . . . . . . . . . . . . . . . . . . . . . . . . . . . . . . . .
Engine (ignition) switch light 139
. . . . . . . . . . . . . . . . . . . . . . . . . . . . . . . . .
Running board lights 140
. . . . . . . . . . . . . . . . . . . . . . . . . . . . . . . . . . . . \
. . . .
Windshield wipers and washer 141
. . . . . . . . . . . . . . . . . . . . . . . . . . . . . . .
Back window wiper and washer 141
. . . . . . . . . . . . . . . . . . . . . . . . . . . . . .
Back window and outside rear view mirror defoggers 142
. . . . . . . . . . .
SECTION 1− 5
Page 142 of 496

130
CY14036
For the U.S.A.
CY14037
For Canada
HEADLIGHTS
To turn on the following lights: Twist
the headlight/turn signal lever knob.
Position 1�Parking, tail, license plate,
side marker and instrument panel lights
For Canada�The tail light indicator (green
light) on the instrument panel will tell you
that the tail lights are on.
Position 2�Headlights and all of the
above
For the U.S.A.�The headlight low beam
indicator light (green light) on the instru-
ment panel will tell you that the low
beams are on.
Position 3 (�AUTO")�Headlights and/or all
of the lights in position 1
They automatically turn on or off depend-
ing on the darkness of the surroundings.
Manually twist the knob to the position 2
to turn on the headlights if they are need-
ed immediately when entering a dark tun-
nel, parking structure, etc.
CY14031
The automatic light control sensor is on
the top of the driver’s side instrument
panel.
Do not place anything on the instrument
panel, and/or do not affix anything on the
windshield to block this sensor.
The operating condition or sensitivity can
be changed. For details, contact your
Toyota dealer.
Automatic light cut off system
Position 1 or position 3 with the tail
lights on�
The lights automatically turn off when the
driver ’s door is opened with the engine
switch in the �ACC" or �LOCK" position.
Headlights and turn signals
(with automatic light control
system)


 Brake system warning light
∗ 1
Malfun")