Page 415 of 496

403
CY40025
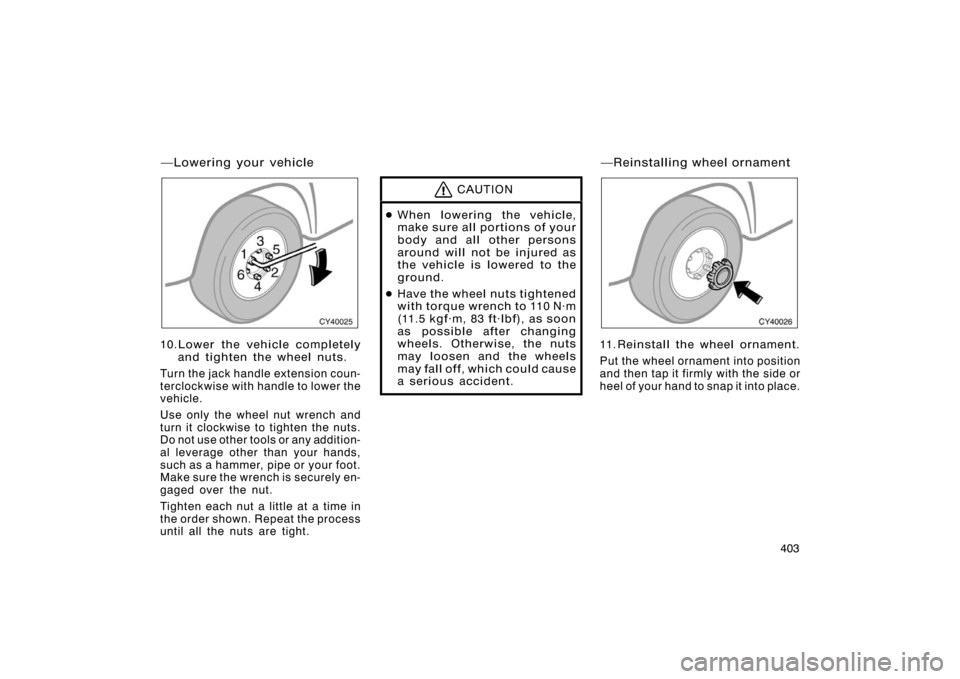
10.Lower the vehicle completelyand tighten the wheel nuts.
Turn the jack handle extension coun-
terclockwise with handle to lower the
vehicle.
Use only the wheel nut wrench and
turn it clockwise to tighten the nuts.
Do not use other tools or any addition-
al leverage other than your hands,
such as a hammer, pipe or your foot.
Make sure the wrench is securely en-
gaged over the nut.
Tighten each nut a little at a time in
the order shown. Repeat the process
until all the nuts are tight.
CAUTION
� When lowering the vehicle,
make sure all portions of your
body and all other persons
around will not be injured as
the vehicle is lowered to the
ground.
� Have the wheel nuts tightened
with torque wrench to 110 N·m
(11.5 kgf·m, 83 ft·lbf), as soon
as possible after changing
wheels. Otherwise, the nuts
may loosen and the wheels
may fall off, which could cause
a serious accident.
CY40026
11. Reinstall the wheel ornament.
Put the wheel ornament into position
and then tap it firmly with the side or
heel of your hand to snap it into place.
�Lowering your vehicle �Reinstalling wheel ornament
Page 416 of 496

404
CAUTION
�Take due care in handling the
ornament to avoid unexpected
personal injury.
� Do not attach a heavily dam-
aged plastic wheel ornament.
It may fly off the wheel and
cause accidents while the ve-
hicle is moving.
12.Check the air pressure of the re-
placed tire.
Adjust the air pressu re to the specifi-
cation designated on page 467 in
Section 8. If the pressure is lower,
drive slowly to the nearest service
station and fill to the correct pressure.
Do not forget to reinstall the tire infla-
tion valve cap as dirt and moisture
could get into the valve core and
possibly cause air leakage. If the cap
is missing, have a new one put on as
soon as possible.
13.Restow all the tools, jack and
flat tire securely.
As soon after changing wheels as
possible, tighten the wheel nuts to the
torque specified on page 467 in Sec-
tion 8 with a torque wrench. Have a
technician repair the flat tire.CAUTION
Before driving, make sure all the
tools, jack and flat tire are se-
curely in place in their storage
location to reduce the possibility
of personal injury during a colli-
sion or sudden braking.
�After changing wheels
Page 459 of 496

447
TIRE CHAIN SELECTION
Use the tire chains of correct size.
Regulations regarding the use of tire
chains vary according to location or
type of road, so always check local reg-
ulations before installing chains.
CHAIN INSTALLATION
Install the chains on the rear tires as
tightly as possible. Do not use tire
chains on the front tires. Retighten
chains after driving 0.5�1.0 km
(1/4�1/2 mile).
When installing chains on your tires, care-
fully follow the instructions of the chain
manufacturer.
If wheel covers are used, they will be
scratched by the chain band, so remove
the covers before putting on the chains.
CAUTION
�Do not exceed 50 km/h (30 mph) or
the chain manufacturer’s recom-
mended speed limit, whichever is
lower.
�Drive carefully avoiding bumps,
holes, and sharp turns, which may
cause the vehicle to bounce.
�Avoid sharp turns or locked−wheel
braking, as use of chains may ad-
versely affect vehicle handling.
�When driving with chains installed,
be sure to drive carefully. Slow
down before entering curves to
avoid losing control of the vehicle.
Otherwise an accident may occur.
As you might have difficulty in
identifying a flat or deflated tire, a tire
pressure warning system is provided on
this vehicle.
When replacing the wheels, be sure to
install tire pressure warning valves and
transmitters on the wheels. Consult your
Toyota dealer about how to set up the tire
pressure warning valves and transmitters.
CAUTION
�Have the tires, wheels or tire pres-
sure warning valves and transmit-
ters replaced and ID codes regis-
tered by Toyota dealer. If you need
tire pressure warning valves and
transmitters, purchase from Toyota
dealer.
�The tire pressure warning valve and
transmitter nuts should always be
tightened to a torque of 4 N·m (0.4
kg·fm, 2.9 ft·lbf).
�The use of non−genuine wheels may
result in the tire pressure warning
system failure or air−leak.
Replacing wheels
Page 479 of 496
467
Tire size, cold tire inflation pressure and wheel size:
Ti r e siz e
Cold tire inflation pressure kPa (kgf/cm2 or bar, psi)Wheel size
FrontRearSpare
P265/70R16 111S220�(2.2,�32)220�(2.2,�32)220�(2.2,�32)16�� �7J∗
1
16�� �7JJ∗
2
P265/65R17 110S220�(2.2,�32)220�(2.2,�32)220�(2.2,�32)17�� �7�1/2JJ
P265/60R18 109H220�(2.2,�32)220�(2.2,�32)220�(2.2,�32)18���7�1/2J
∗
1: Vehicles with steel wheels∗2: Vehicles with aluminum wheels
NOTE: For a complete information on tires (e.g. replacing ti res or replacing wheels), see �Checking tire inflation pres-
sure" through �Aluminum wheel precautions", pages 441 through 448 in Section 7−2.
Wheel nut torque, N·m (kgf·m, ft·lbf): 110�(11.5,�83)
Tires