Page 50 of 496
38
CY12056
3. The removed cap can be stored onthe back side of the fuel filler door.
Position the cap so that the hooks point
to the left and right or up and down, and
set it in the receptacle on the back side
of the door.
When installing the cap, turn the cap
clockwise until you hear a click. When
you hear the click, the cap is fully
closed.
If the cap is not installed securely, the
malfunction indicator lamp comes on.
Make sure the cap is tightened securely.
The indicator lamp goes off after driving
several times. If the indicator lamp does
not go off, contact your Toyota dealer as
soon as possible.
CAUTION
�Make sure the cap is installed se-
curely to prevent fuel spillage in
the event of an accident.
�Use only a genuine Toyota fuel tank
cap for replacement. It is designed
to regulate fuel tank pressure.
NOTICE
To prevent damage to the cap, apply
force only in the turning direction to
the cap. Do not pull or pry it.
Page 182 of 496
 and center differential
unlocked mode. Also, usi")
170
Use this for maximum power and traction.
Use this for hard pulling in situations the
vehicle cannot negotiate even in the �L4"
(low speed position) and center differential
unlocked mode. Also, using this mode
when driving down steep off−road inclines
will help contribute to increased vehicle
stability.
The indicator light tells when the differen-
tial lock is engaged. Note that the differ-
ential is not still locked as long as the
indicator light remains off.
When the operation is not completed, the
indicator blinks. If the indicator light does
not go off when you push the center
differential lock switch to unlock the cen-
ter differential, drive straight ahead while
accelerating or decelerating, or drive in
reverse.
If the center differential lock system op-
eration is not completed within 5 seconds
while the cruise control system is set,
cancel the cruise control system. To can-
cel the cruise control system, see �Cruise
control" on page 203 in Section 1−7.
If the indicator blinks even if doing so,
contact your Toyota dealer as soon as
possible. There may be a trouble in the
center differential lock system.See �(b) Shifting procedure" for further in-
structions.
SHIFTING BETWEEN �H4" (UNLOCKED)
AND �H4" (LOCKED)
To shift between unlock and lock
modes in �H4", push the center differen-
tial lock switch.
SHIFTING BETWEEN �L4" (UNLOCKED)
AND �L4" (LOCKED)
To shift between unlock and lock
modes in �L4", push the center differen-
tial lock switch.
SHIFTING BETWEEN �H4" AND �L4"
To shift from �H4" to �L4",
bring the
vehicle to a complete stop with the brake
pedal held down with your foot, shift the
automatic transmission selector lever into
�N" and push and turn the four−wheel
drive control switch knob fully clockwise.
To shift from �L4" to �H4", bring the
vehicle to a complete stop with the brake
pedal held down with your foot, shift the
automatic transmission selector lever into
�N" and turn the four−wheel drive control
switch knob fully counterclockwise.
(b) Shifting procedure
Page 250 of 496

Radio
Turn the knob clockwise to step up the
frequency. Turn the knob counterclockwise
to step down the frequency.
XM
� Satellite Radio∗�
Turn the �TUNE·FIL")
238
TUNE·FILE (Tuning and File up/down)
Radio
Turn the knob clockwise to step up the
frequency. Turn the knob counterclockwise
to step down the frequency.
XM
� Satellite Radio∗�
Turn the �TUNE·FILE" knob clockwise to
step up the channel. Turn the knob coun-
terclockwise to step down the channel.
∗: Use of satellite radio r equires XM�
tuner and service. Contact your Toyota
dealer for details.
MP3/WMA player
Turn the knob clockwise to file up. Turn
the knob counterclockwise to file down.
TYPE
XM
� Satellite Radio∗�
When you push the �� " or ��" side of
the �TYPE" button while receiving a XM
�
channel, the current channel category ap-
pears on the display.
When the channel category appears, push
either � �" or � �" side of the �TYPE" but-
ton to switch to the next or previous cate-
gory.
∗: Use of satellite radio r equires XM�
tuner and service. Contact your Toyota
dealer for details.
CY17029
Some parts of the audio system can be
adjusted using the switches on the steer-
ing wheel.
Details of the specific switches, controls,
and features are described below.
1. Volume control switches
2. � ��" switch
3. �MODE" switch 1. Volume control switches
Push the �+" side to increase the volume.
The volume continues to increase while
the switch is being pushed.
Push the �−" side to decrease the volume.
The volume continues to decrease while
the switch is being pushed. 2. � � � " switch
Radio
This switch has the following features�
To select a preset station:
Quickly push and release the � �" or � �"
side of the switch. Do this again to select
the next preset station.
To seek a station:
Push and hold the � �" or � �" side of the
switch until you hear a beep. Do this
again to find the next station. If you push
the switch on either side during the seek
mode, seeking will be cancelled.
To step up or down the frequency, push
and hold the switch even after you hear
a beep. When you release the switch, the
radio will begin seeking up or down for a
station. Do this again to find the next
station.
Audio remote controls
(steering switches)
Page 316 of 496
304
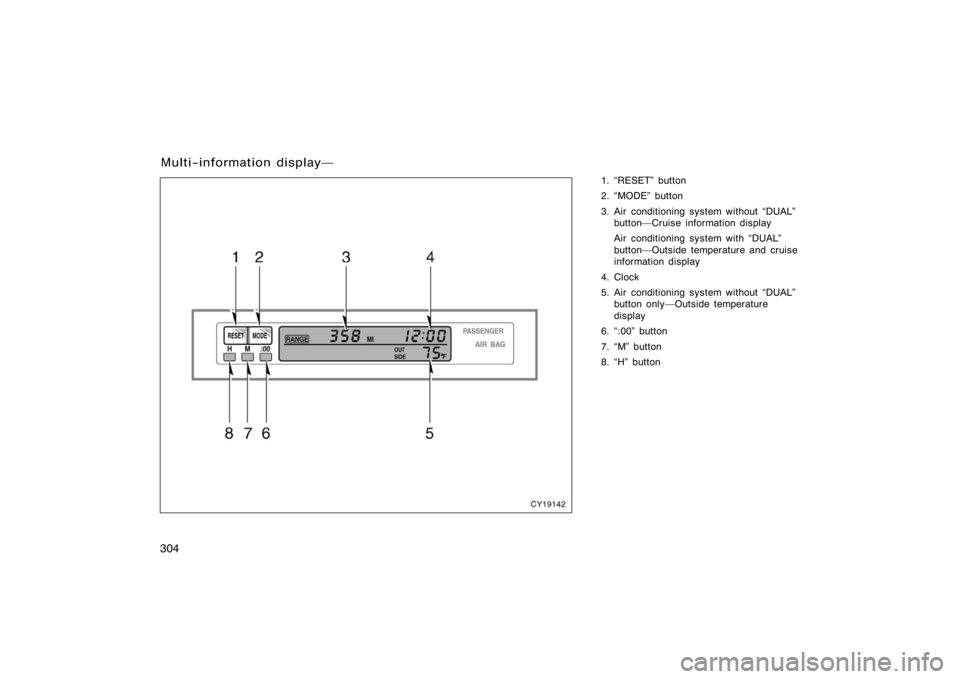
1. �RESET" button
2. �MODE" button
3. Air conditioning system without �DUAL"button�Cruise information display
Air conditioning system with �DUAL"
button�Outside temperature and cruise
information display
4. Clock
5. Air conditioning system without �DUAL" button only�Outside temperature
display
6. �:00" button
7. �M" button
8. �H" button
Multi−information display�
CY19142
Page 317 of 496

305
Operate the multi−information display
with the engine switch on.
When the engine switch is turned to �ON",
the last previously used mode displayed
just before the engine switch is turned off
will appear.
If the electrical power source has been
disconnected from the multi−information
display, the display will automatically be
set to the initial mode.
CAUTION
Do not adjust the display while the
vehicle is moving. Be sure to adjust
the display only when the vehicle is
stopped.
CY19001
To reset the hour: Push the �H" button.
To reset the minutes: Push the �M" button.
If quick adjustment to a full hour is de-
sired, push the �:00" button.
For example, if the �:00" button is de-
pressed when the time is between
1:01�1:29, the time will change to 1:00.
If the time is between 1:30�1:59, the
time will change to 2:00.
The engine switch must be in the �ACC"
or �ON" position.
If the electrical power source has been
disconnected from the clock, the time dis-
play will automatically be set to 1:00 (one
o’clock).
CY19082
The displayed temperature ranges from
−30�C (−22 �F) up to 50 �C (122 �F).
The engine switch must be in the �ON"
position.
If an abnormality exists in the connection
of the outside air temperature sensor,
�−− �C" (�−− �F") will appear on the display.
If �−− �C" (�−− �F") appears on the display,
contact your Toyota dealer.
There may be a case that �−− �C" (�−− �F")
appears momentarily when the engine
switch is quickly turned to �ON". It is
normal if it goes out soon.
�Before using the
multi−information display �Clock
�Outside temperature display
(air conditioning system
without �DUAL" button)
Page 468 of 496
456
CY73039
High beam
(inside)
Low beam
(outside)
1. Turn the bulb base counterclockwiseto the front of the vehicle as shown.
CY73004
2. Unplug the connector while depress-ing the lock release.
If the connector is tight, wiggle it.
CY73040
3. Install a new bulb and connector into the mounting hole and turn
them clockwise to the front of the
vehicle.
Aiming is not necessary after replacing
the bulb. When aiming adjustment is nec-
essary, contact your Toyota dealer.
�Headlights
Page 469 of 496
457
CY73041
1. Turn the bulb base counterclockwiseto the front of the vehicle as shown.
CY73009
2. Unplug the connector while depress-ing the lock release.
If the connector is tight, wiggle it.
CY73042
3. Install a new bulb and connector into the mounting hole and turn
them clockwise to the front of the
vehicle.
�Front fog lights


Low beam
(outside)
1. Turn the bulb base counterclockwiseto the front of the vehicle as shown.
CY73004
2. Unplug the connector while depress-ing the lock release.
If the")
