2008 NISSAN TITAN tow
[x] Cancel search: towPage 2 of 36
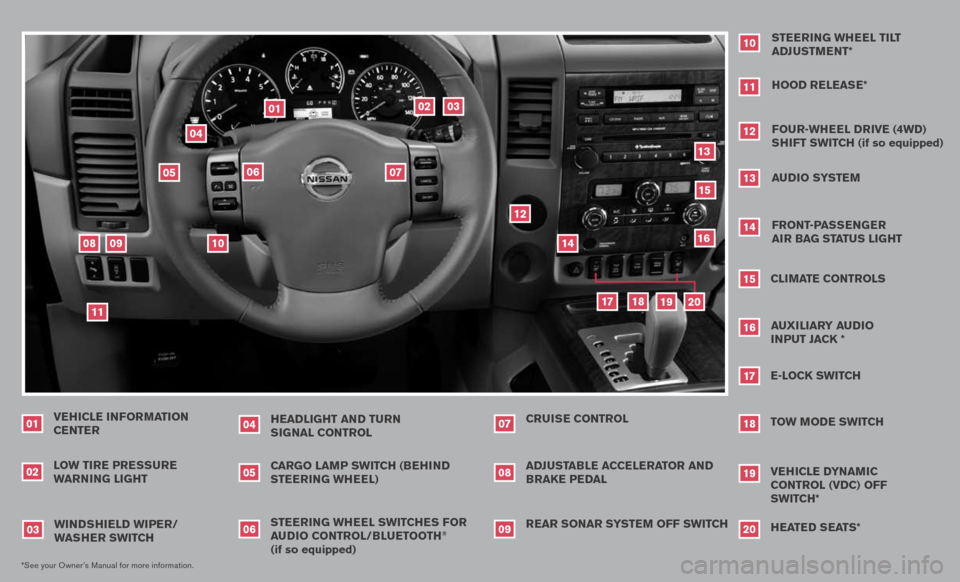
VEHICLE INFORMATION CENTER
LO w TIRE PRE ssuRE
wARNIN g LIgHT
01
HEADLI gHT AND Tu RN
s Ig NAL CONTROL
04
02*See your Owner’s Manual for more information.
sTEERIN g wHEEL swITCHE s FOR
A u DIO CONTROL/BLu ETOOTH
®
(if so equipped) CARgO LAMP swITCH (BEHIND
sTEERIN g wHEEL)
wIND sHIELD wIPER/
w As HER swITCH
03
0506
REAR sONAR sY sTEM OFF swITCH
ADJ
usTABLE ACCELERATOR AND BRAKE PEDAL CRuIs E CONTROL
070809
sTEERIN g wHEEL TILT
ADJ usTMENT*
10
HOOD RELEAs E*
11
FOuR-wHEEL DRIVE (4wD)
s HIFT swITCH (if so equipped)
12
Au DIO sY sTEM
13
FRONT-PAss ENgER
AIR BA g sTATus LI gHT
14
CLIMATE CONTROLs
15
E-LOCK swITCH
17
TOw MODE swITCH
18
11
09
03
02
04
06
01
05
15
18
19
17
14
13
12
07
08
10
VEHICLE DYNAMIC CONTROL (VDC) OFF
swITCH*
19
16
AuxILIARY Au DIO
I NPuT JACK *
16
H EATED s EATs*
20
20
Page 3 of 36
TAB LE O F C O NTE NTS
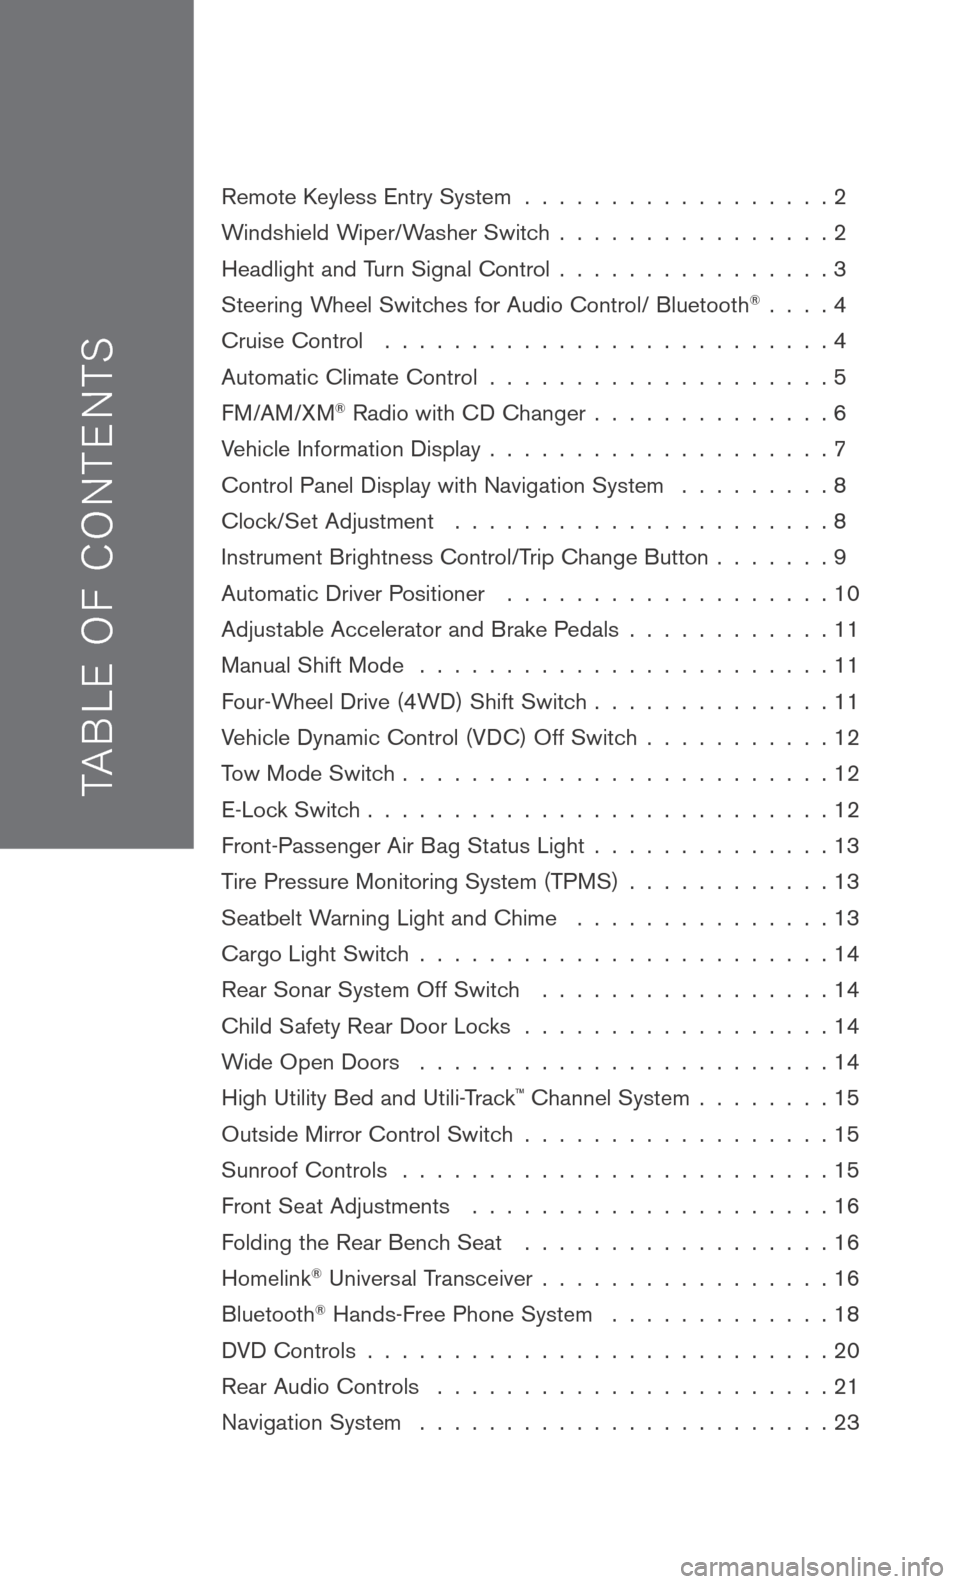
Remote Keyless Entry System . . . . . . . . . . . . . . . . . . 2
Windshield Wiper/Washer Switch
. . . . . . . . . . . . . . . . 2
Headlight and Turn Signal Control
. . . . . . . . . . . . . . . . 3
Steering Wheel Switches for Audio Control/ Bluetooth
® . . . . 4
Cruise Control
. . . . . . . . . . . . . . . . . . . . . . . . . . 4
Automatic Climate Control
. . . . . . . . . . . . . . . . . . . . 5
FM/AM/XM® Radio with CD Changer . . . . . . . . . . . . . . 6
Vehicle Information Display
. . . . . . . . . . . . . . . . . . . . 7
Control Panel Display with Navigation System
. . . . . . . . . 8
Clock/Set Adjustment
. . . . . . . . . . . . . . . . . . . . . . 8
Instrument Brightness Control/Trip Change Button
. . . . . . . 9
Automatic Driver Positioner
. . . . . . . . . . . . . . . . . . . 10
Adjustable Accelerator and Brake Pedals
. . . . . . . . . . . . 11
Manual Shift Mode
. . . . . . . . . . . . . . . . . . . . . . . . 11
Four-Wheel Drive (4WD) Shift Switch
. . . . . . . . . . . . . . 11
Vehicle Dynamic Control (VDC) Off Switch
. . . . . . . . . . . 12
Tow Mode Switch
. . . . . . . . . . . . . . . . . . . . . . . . . 12
E-Lock Switch
. . . . . . . . . . . . . . . . . . . . . . . . . . . 12
Front-Passenger Air Bag Status Light
. . . . . . . . . . . . . . 13
Tire Pressure Monitoring System (TPMS)
. . . . . . . . . . . . 13
Seatbelt Warning Light and Chime
. . . . . . . . . . . . . . . 13
Cargo Light Switch
. . . . . . . . . . . . . . . . . . . . . . . . 14
Rear Sonar System Off Switch
. . . . . . . . . . . . . . . . . 14
Child Safety Rear Door Locks
. . . . . . . . . . . . . . . . . . 14
Wide Open Doors
. . . . . . . . . . . . . . . . . . . . . . . . 14
High Utility Bed and Utili-Track
™ Channel System . . . . . . . . 15
Outside Mirror Control Switch
. . . . . . . . . . . . . . . . . . 15
Sunroof Controls
. . . . . . . . . . . . . . . . . . . . . . . . . 15
Front Seat Adjustments
. . . . . . . . . . . . . . . . . . . . . 16
Folding the Rear Bench Seat
. . . . . . . . . . . . . . . . . . 16
Homelink® Universal Transceiver . . . . . . . . . . . . . . . . . 16
Bluetooth® Hands-Free Phone System . . . . . . . . . . . . . 18
DVD Controls
. . . . . . . . . . . . . . . . . . . . . . . . . . . 20
Rear Audio Controls
. . . . . . . . . . . . . . . . . . . . . . . 21
Navigation System
. . . . . . . . . . . . . . . . . . . . . . . . 23
Page 4 of 36
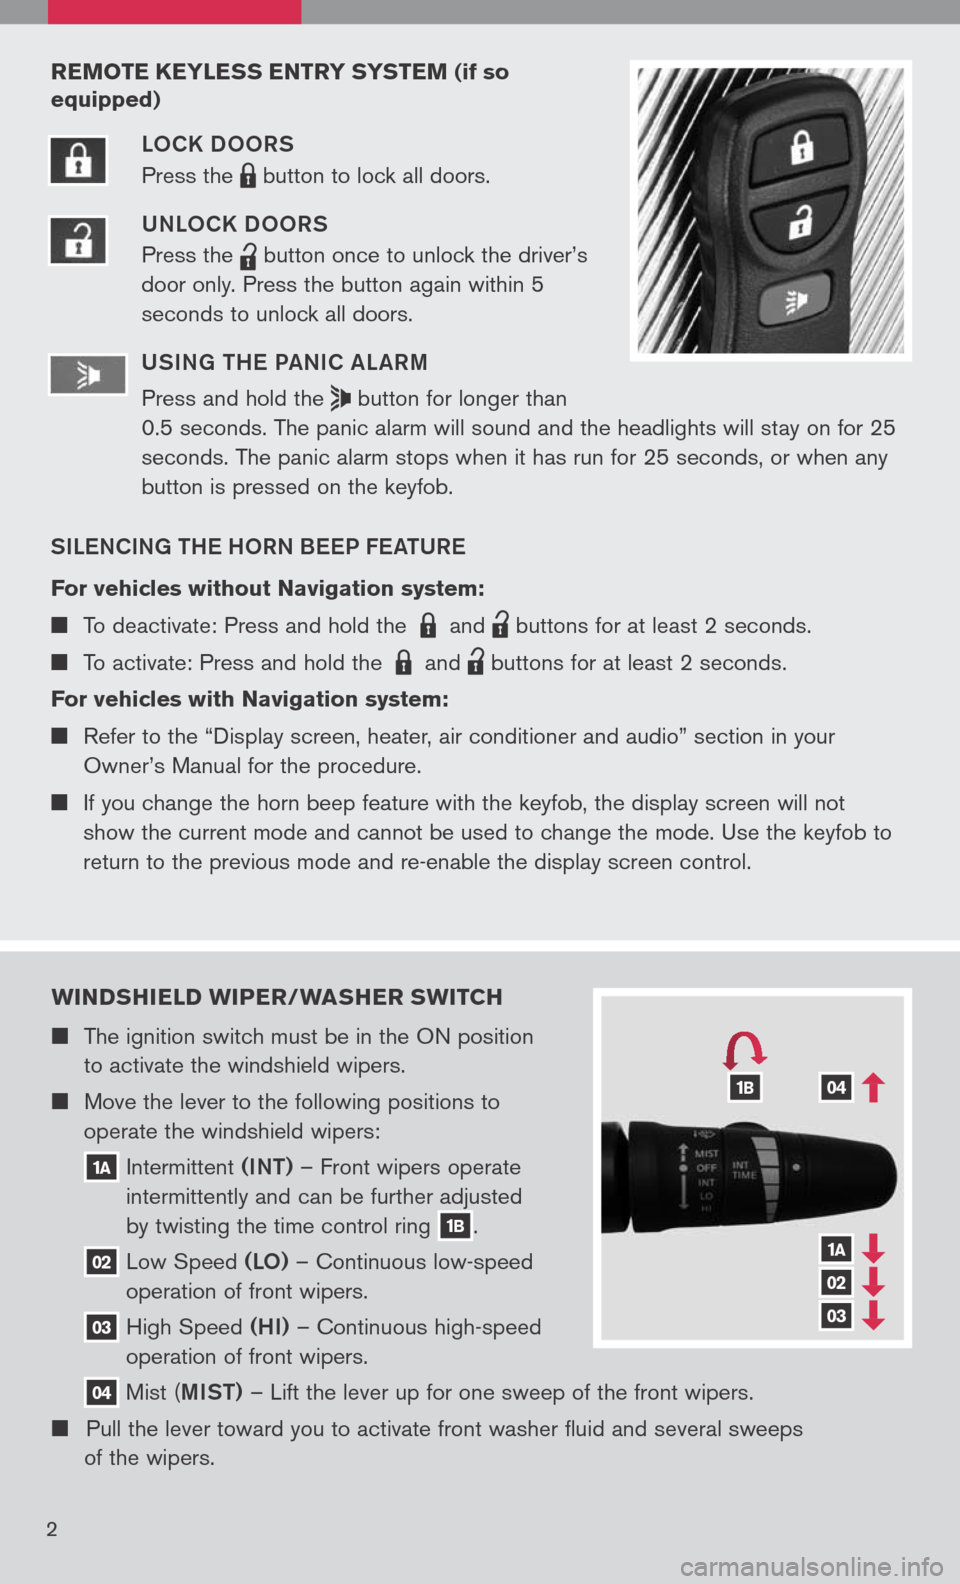
wIND sHIELD wIPER/ wAsHER swITCH
The ignition switch must be in the ON position
to activate the windshield wipers.
Move the lever to the following positions to
operate the windshield wipers:
1A Intermittent (INT)
– Front wipers operate
intermittently and can be further adjusted
by twisting the time control ring
1B.
02 Low
Speed (LO) – Continuous low-speed
operation of front wipers.
03 High
Speed (HI) – Continuous high-speed
operation of front wipers.
04 Mist
(MIST) – Lift the lever up for one sweep of the front wipers.
Pull the lever toward you to activate front washer fluid and several sweeps
of the wipers.
1A
02
03
041B
2
REMOTE KEYLE ss ENTRY sY s TEM (if so
equipped)
LOCK DOORS
Press the
LPD0150 button
to lock all doors.
UNLOCK DOORS
Press the
lpd0151
button
once to unlock the driver’s
door only. Press the button again within 5
seconds to unlock all doors.
U SIN g TH e Pa NIC aL aRM
Press and hold the
button for longer than
0.5 seconds. The panic alarm will sound and the headlights will stay on for 25
seconds. The panic alarm stops when it has run for 25 seconds, or when any
button is pressed on the keyfob.
SIL eNCIN g TH e HORN B eeP F eaTUR e
For vehicles without Navigation system:
To deactivate: Press and hold the LPD0150 and
lpd0151
buttons for at least 2 seconds.
To activate: Press and hold the LPD0150 and
lpd0151
buttons for at least 2 seconds.
For vehicles with Navigation system:
Refer to the “Display screen, heater, air conditioner and audio” section in your
Owner’s Manual for the procedure.
If you change the horn beep feature with the keyfob, the display screen will not
show the current mode and cannot be used to change the mode. Use the keyfob to
return to the previous mode and re-enable the display screen control.
Page 14 of 36
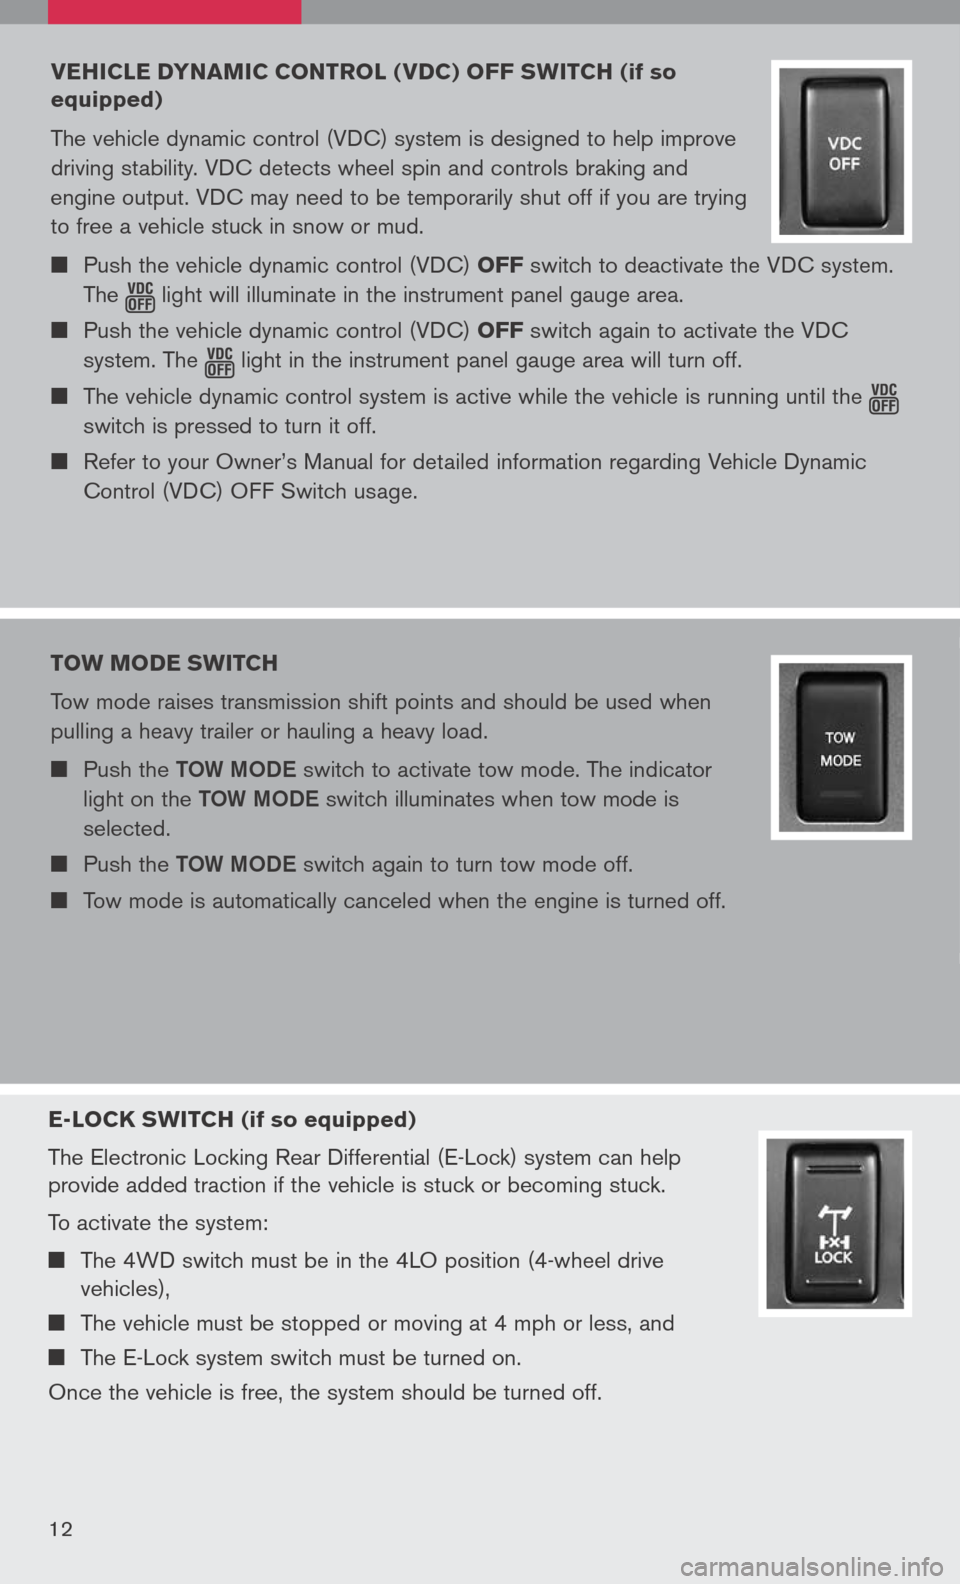
E-LOCK swITCH (if so equipped)
The Electronic Locking Rear Differential (E-Lock) system can help
provide added traction if the vehicle is stuck or becoming stuck.
To activate the system:
The 4WD switch must be in the 4LO position (4-wheel drive
vehicles),
The vehicle must be stopped or moving at 4 mph or less, and
The E-Lock system switch must be turned on.
Once the vehicle is free, the system should be turned off.
12
VEHICLE DYNAMIC CONTROL ( VDC) OFF sw ITCH (if so
equipped)
The vehicle dynamic control (VDC) system is designed to help improve
driving stability. VDC detects wheel spin and controls braking and
engine output. VDC may need to be temporarily shut off if you are trying
to free a vehicle stuck in snow or mud.
Push the vehicle dynamic control (VDC) OFF switch to deactivate the VDC system.
The light
will illuminate in the instrument panel gauge area. Push the vehicle dynamic control (VDC) OFF switch again to activate the VDC
system. The
light
in the instrument panel gauge area will turn off. The vehicle dynamic control system is active while the vehicle is running until the
switch is pressed to turn it off.
Refer to your Owner’s Manual for detailed information regarding Vehicle Dynamic
Control (VDC) OFF Switch usage.
TOw MODE swITCH
Tow mode raises transmission shift points and should be used when
pulling a heavy trailer or hauling a heavy load.
Push the TOW MODe switch to activate tow mode. The indicator
light on the TOW MODe switch illuminates when tow mode is
selected.
Push the TOW MODe switch again to turn tow mode off.
Tow mode is automatically canceled when the engine is turned off.
Page 16 of 36
14
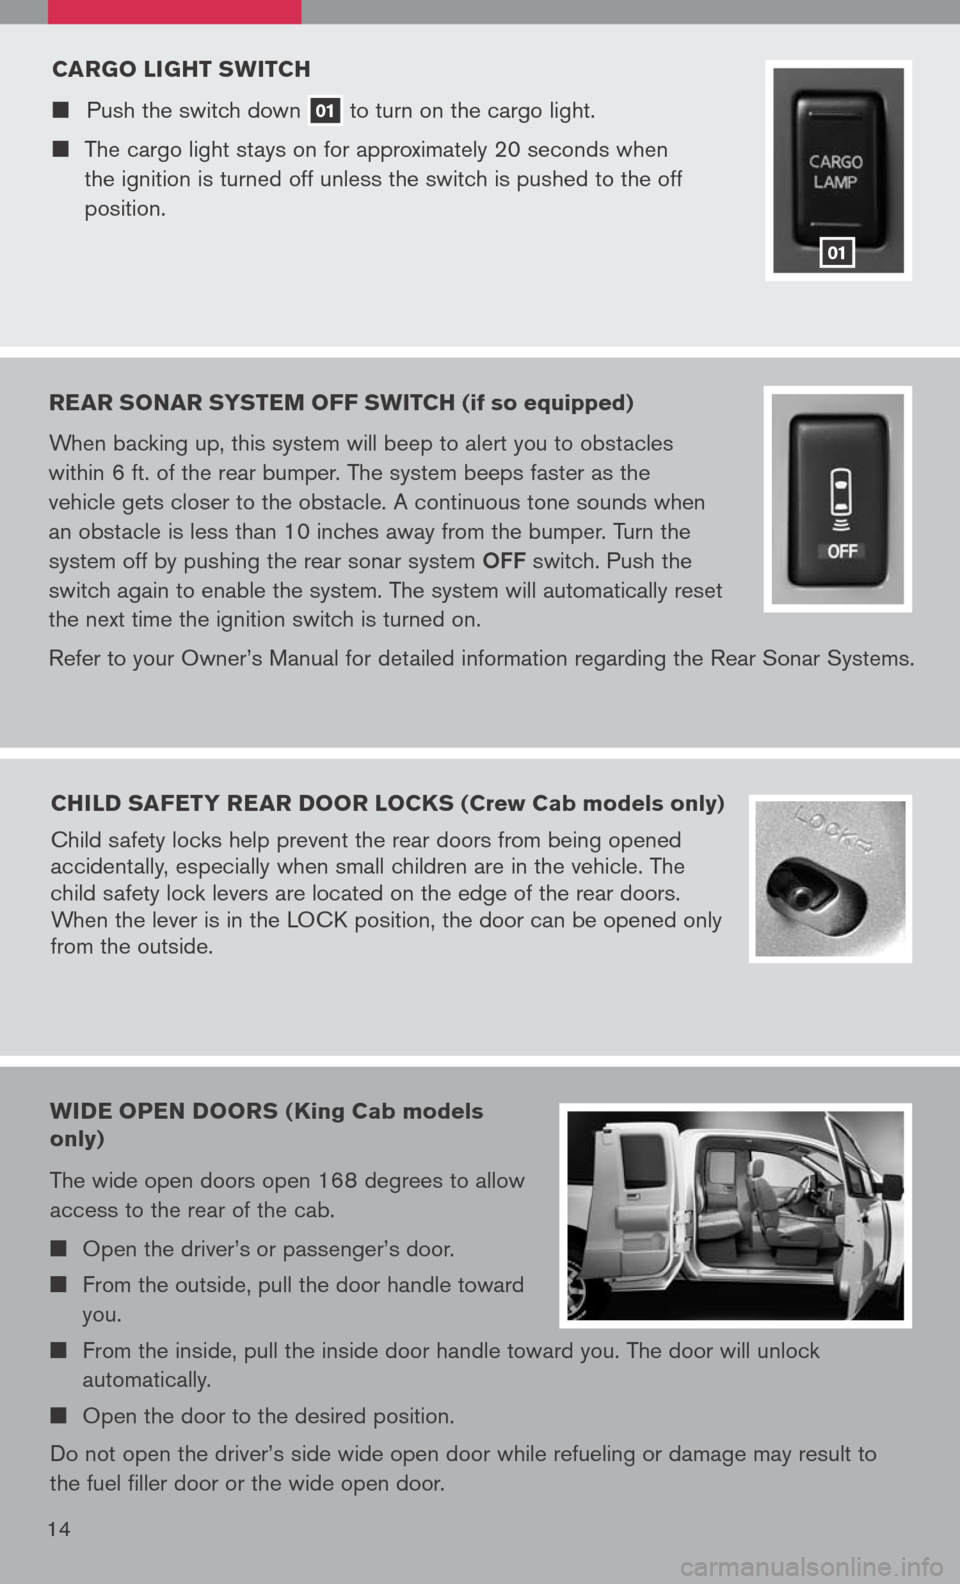
CARgO LI gHT sw ITCH
Push the switch down 01 to
turn on the cargo light.
The cargo light stays on for approximately 20 seconds when
the ignition is turned off unless the switch is pushed to the off
position.
01
REAR sONAR sY s TEM OFF swITCH (if so equipped)
When backing up, this system will beep to alert you to obstacles
within 6 ft. of the rear bumper. The system beeps faster as the
vehicle gets closer to the obstacle. A continuous tone sounds when
an obstacle is less than 10 inches away from the bumper. Turn the
system off by pushing the rear sonar system
OFF switch. Push the
switch again to enable the system. The system will automatically reset
the next time the ignition switch is turned on.
Refer to your Owner’s Manual for detailed information regarding the Rear Sonar Systems.
CHILD sAFETY REAR DOOR LOCK s (Crew Cab models only)
Child safety locks help prevent the rear doors from being opened
accidentally, especially when small children are in the vehicle. The
child safety lock levers are located on the edge of the rear doors.
When the lever is in the LOCK position, the door can be opened only
from the outside.
wIDE OPEN DOOR s (King Cab models
only)
The wide open doors open 168 degrees to allow
access to the rear of the cab.
Open the driver’s or passenger’s door.
From the outside, pull the door handle toward
you.
From the inside, pull the inside door handle toward you. The door will unlock
automatically.
Open the door to the desired position.
Do not open the driver’s side wide open door while refueling or damage may result to
the fuel filler door or the wide open door.
Page 17 of 36
HIg H uTILITY BED AND uTILI -TRACK™
CHANNEL sYs TEM
(if so equipped)
The Utili-track
™ channel system allows you to move
tie-down clamps in the bed to the best location to
secure a load.
The tie-down cleats must be installed so the
clamp is properly seated in the notches in the
rail. If the tie-down cleat is not seated in the
notches, it will not be flush with the rail and cannot be properly tightened. The bolt in
the center of the cleat must be tightened hand tight (20 – 40 inch pounds).
Check the tightness of the tie-down cleat periodically during a trip to make sure the
center bolt has not become loose.
The channel end stoppers can be used to help prevent cargo from sliding or shifting
off the end of the truck bed. They must be installed so they are properly seated in
the detents in the channel.
Refer to your Owner’s Manual for loading limits and tie-down recommendations.
15
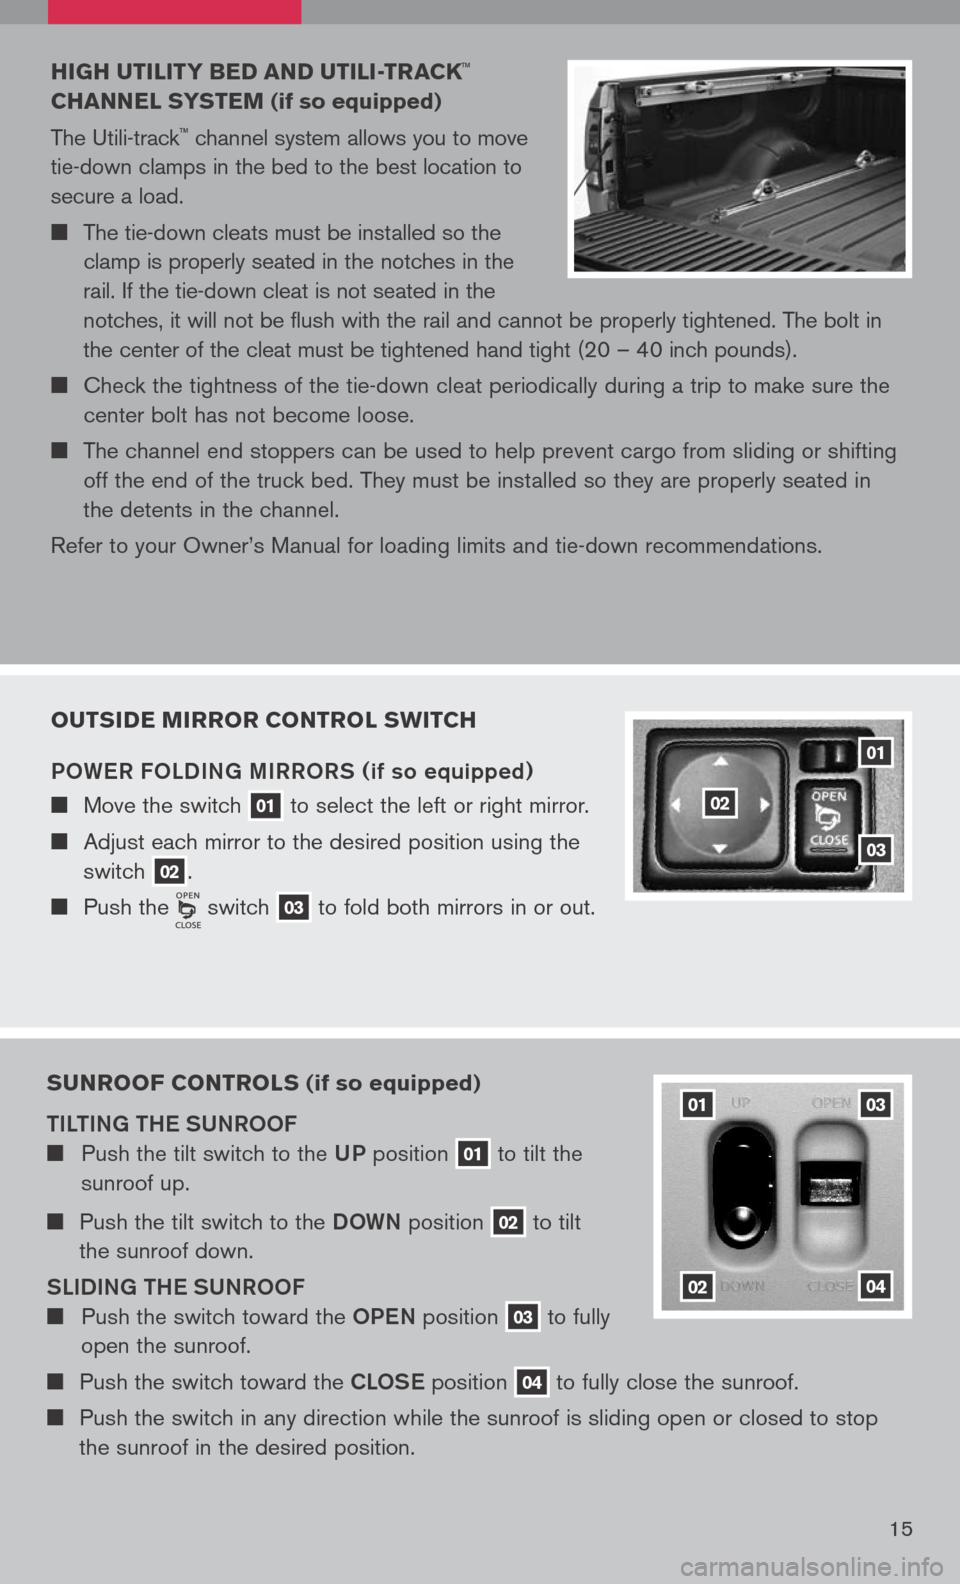
OuTs IDE MIRROR CONTROL swITCH
POW eR FOLDIN g MIRRORS
(if so equipped)
Move the switch 01 to
select the left or right mirror.
Adjust each mirror to the desired position using the
switch 02.
Push the switch 03 to
fold both mirrors in or out.
01
02
03
su NROOF CONTROL s (if so equipped)
TILTIN g TH e SUNROOF
Push the tilt switch to the UP position 01 to
tilt the
sunroof up.
Push the tilt switch to the DOWN position 02 to
tilt
the sunroof down.
SLIDIN g TH e SUNROOF
Push the switch toward the OPeN position 03 to
fully
open the sunroof.
Push the switch toward the CLOS e position 04 to
fully close the sunroof.
Push the switch in any direction while the sunroof is sliding open or closed to stop
the sunroof in the desired position.
01
02
03
04
Page 18 of 36
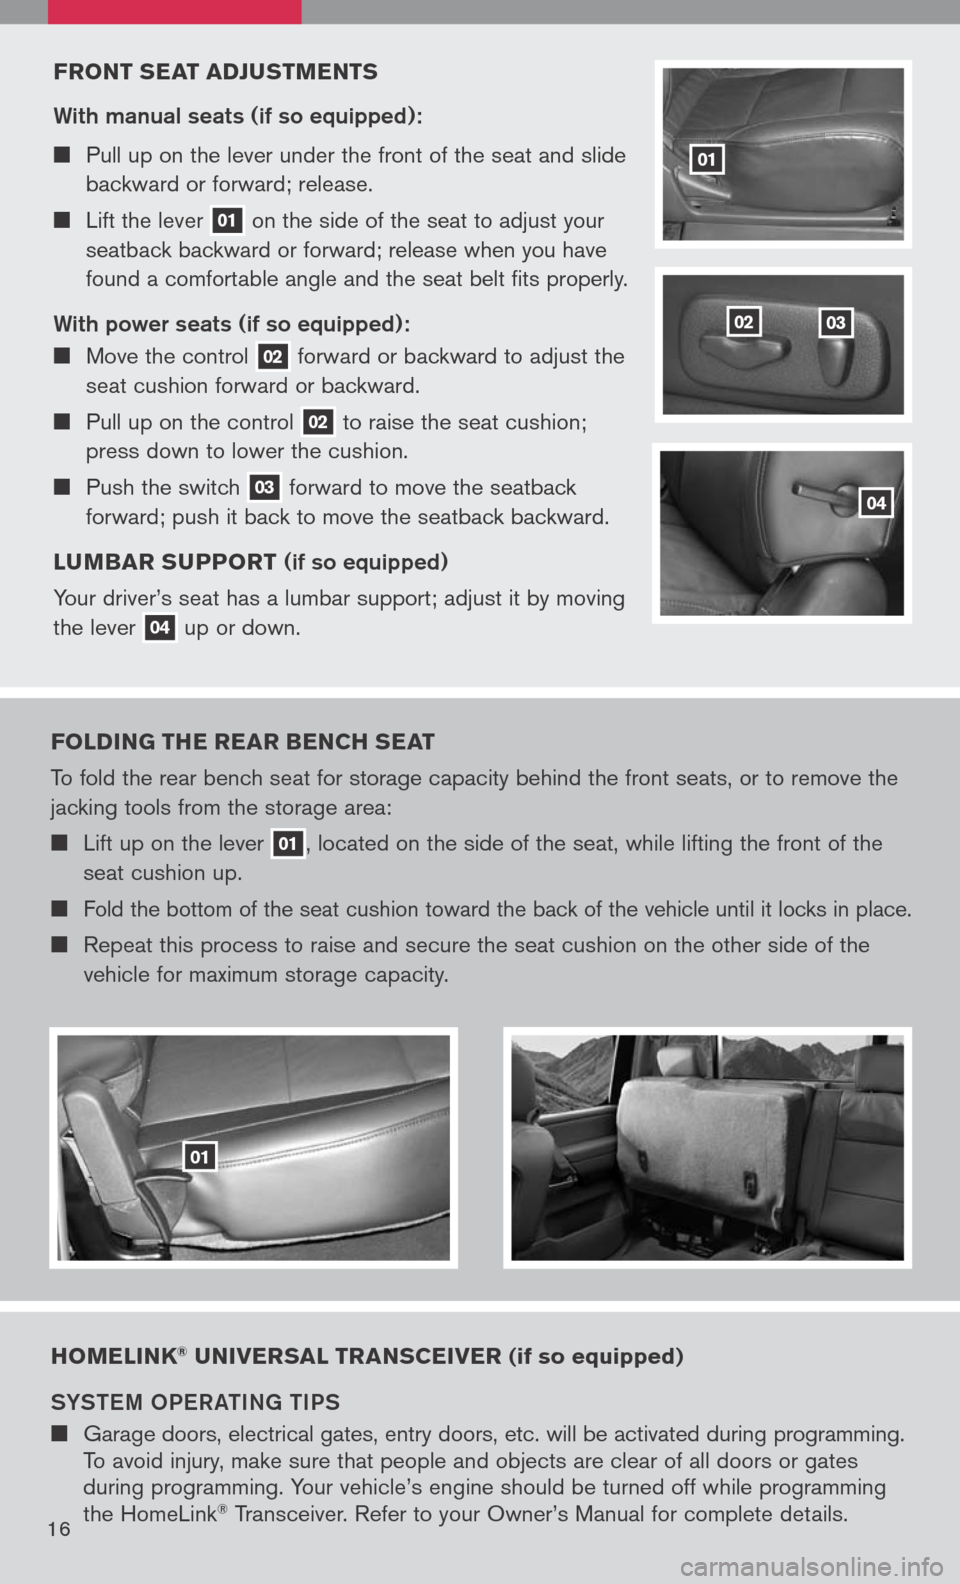
FRONT sEAT ADJ usTMENT s
With manual seats (if so equipped):
Pull up on the lever under the front of the seat and slide
backward or forward; release.
Lift the lever 01 on
the side of the seat to adjust your
seatback backward or forward; release when you have
found a comfortable angle and the seat belt fits properly.
With power seats (if so equipped):
Move the control 02 forward
or backward to adjust the
seat cushion forward or backward.
Pull up on the control 02 to
raise the seat cushion;
press down to lower the cushion.
Push the switch 03 forward
to move the seatback
forward; push it back to move the seatback backward.
L u MBAR suPPORT
(if so equipped)
Your driver’s seat has a lumbar support; adjust it by moving
the lever
04 up
or down.
0302
01
04
FOLDIN g THE REAR BENCH sEAT
To fold the rear bench seat for storage capacity behind the front seats, or to remove the
jacking tools from the storage area:
Lift up on the lever 01, located on the side of the seat, while lifting the front of the
seat cushion up.
Fold the bottom of the seat cushion toward the back of the vehicle until it locks in place.
Repeat this process to raise and secure the seat cushion on the other side of the
vehicle for maximum storage capacity.
01
HOMELINK® u NIVER sAL TRAN sCEIVER (if so equipped)
SYST eM OP eR aTIN g TIPS
Garage doors, electrical gates, entry doors, etc. will be activated during programming.
To avoid injury, make sure that people and objects are clear of all doors or gates
during programming. Your vehicle’s engine should be turned off while programming
the HomeLink
® Transceiver. Refer to your Owner’s Manual for complete details.16