2008 NISSAN TITAN buttons
[x] Cancel search: buttonsPage 4 of 36
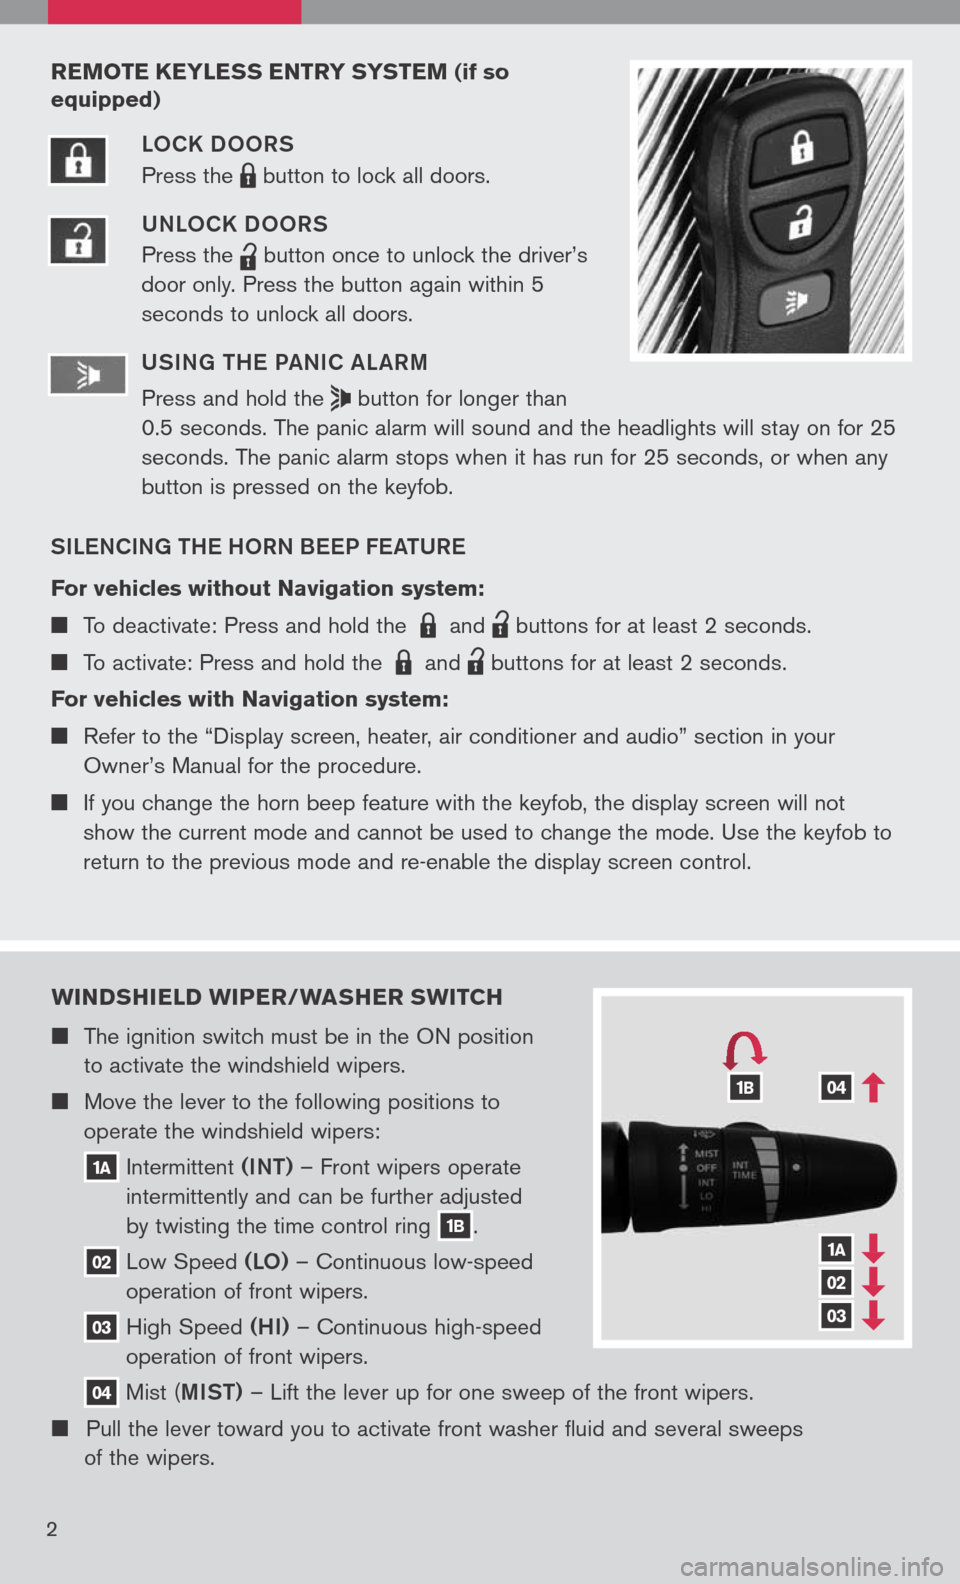
wIND sHIELD wIPER/ wAsHER swITCH
The ignition switch must be in the ON position
to activate the windshield wipers.
Move the lever to the following positions to
operate the windshield wipers:
1A Intermittent (INT)
– Front wipers operate
intermittently and can be further adjusted
by twisting the time control ring
1B.
02 Low
Speed (LO) – Continuous low-speed
operation of front wipers.
03 High
Speed (HI) – Continuous high-speed
operation of front wipers.
04 Mist
(MIST) – Lift the lever up for one sweep of the front wipers.
Pull the lever toward you to activate front washer fluid and several sweeps
of the wipers.
1A
02
03
041B
2
REMOTE KEYLE ss ENTRY sY s TEM (if so
equipped)
LOCK DOORS
Press the
LPD0150 button
to lock all doors.
UNLOCK DOORS
Press the
lpd0151
button
once to unlock the driver’s
door only. Press the button again within 5
seconds to unlock all doors.
U SIN g TH e Pa NIC aL aRM
Press and hold the
button for longer than
0.5 seconds. The panic alarm will sound and the headlights will stay on for 25
seconds. The panic alarm stops when it has run for 25 seconds, or when any
button is pressed on the keyfob.
SIL eNCIN g TH e HORN B eeP F eaTUR e
For vehicles without Navigation system:
To deactivate: Press and hold the LPD0150 and
lpd0151
buttons for at least 2 seconds.
To activate: Press and hold the LPD0150 and
lpd0151
buttons for at least 2 seconds.
For vehicles with Navigation system:
Refer to the “Display screen, heater, air conditioner and audio” section in your
Owner’s Manual for the procedure.
If you change the horn beep feature with the keyfob, the display screen will not
show the current mode and cannot be used to change the mode. Use the keyfob to
return to the previous mode and re-enable the display screen control.
Page 7 of 36
5
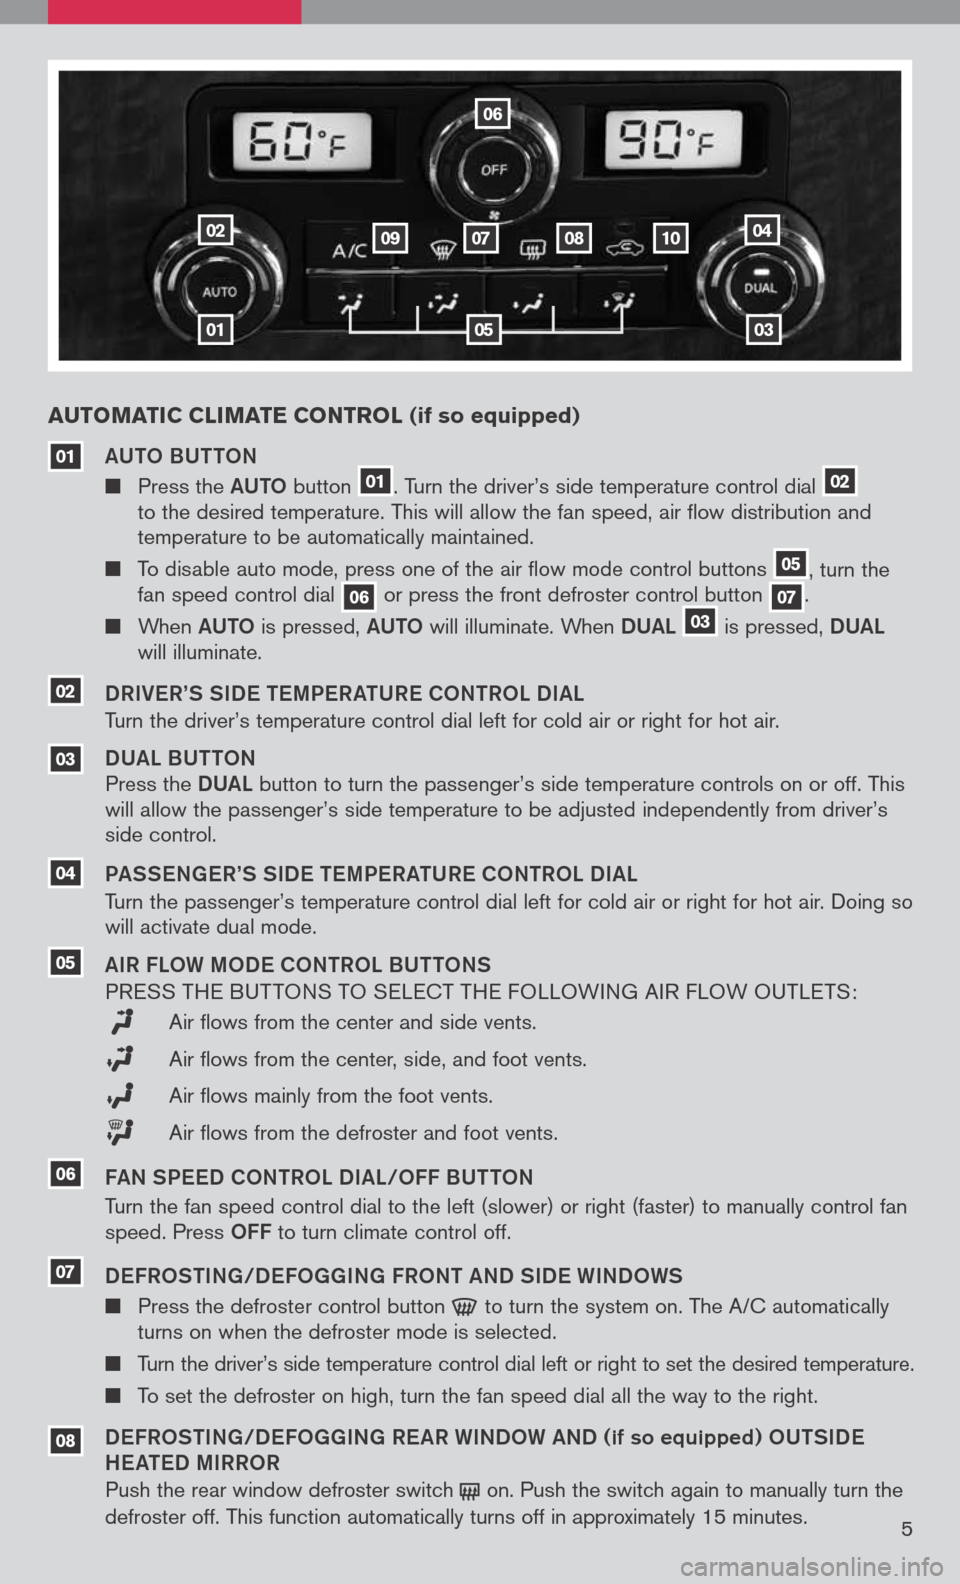
Au TOMATIC CLIMATE CONTROL (if so equipped)
01
02
03
04
06
07080910
05
aUTO BUTTON
Press the aUTO button
01. Turn the driver’s side temperature control dial 02
to the desired temperature. This will allow the fan speed, air flow distribution and
temperature to be automatically maintained.
To disable auto mode, press one of the air flow mode control buttons
05, turn the
fan speed control dial
06or press the front defroster control button 07.
When aUTO is pressed, aUTO will illuminate. When DUaL 03 is
pressed, DUaL
will illuminate.
DRIV eR’S SID e TeMP eR aTUR e CO NTROL DI aL
Turn the driver’s temperature control dial left for cold air or right for hot air.
DUa L BUTTON
Press the DUaL
button
to turn the passenger’s side temperature controls on or off. This
will allow the passenger’s side temperature to be adjusted independently from driver’s
side control.
P a SS eN ge R’S SID e TeMP eR aTUR e CONTROL DI aL
Turn the passenger’s temperature control dial left for cold air or right for hot air. Doing so
will activate dual mode.
a IR FLOW MOD e CONTROL BUTTONS
P RESS THE BUT TONS TO SELECT THE FOLLOWING AIR FLOW OUTLETS :
Air flows from the center and side vents.
Air flows from the center, side, and foot vents.
Air flows mainly from the foot vents.
Air flows from the defroster and foot vents.
F a N SP eeD CONTROL DI aL/OFF BUTTON
Turn the fan speed control dial to the left (slower) or right (faster) to manually control fan
speed. Press
OFF to turn climate control off.
D eFROSTIN g/D eFO gg INg FRONT aND SID e WINDOWS
Press the defroster control button to
turn the system on. The A/C automatically
turns on when the defroster mode is selected.
Turn the driver’s side temperature control dial left or right to set the desired temperature.
To set the defroster on high, turn the fan speed dial all the way to the right.
D eFROSTIN g/D eFO gg INg R eaR WINDOW aND (if so equipped) OUTSID e
H ea Te D MIRROR
Push the rear window defroster switch
on.
Push the switch again to manually turn the
defroster off. This function automatically turns off in approximately 15 minutes .
04
03
01
05
08
07
02
06
Page 8 of 36
6
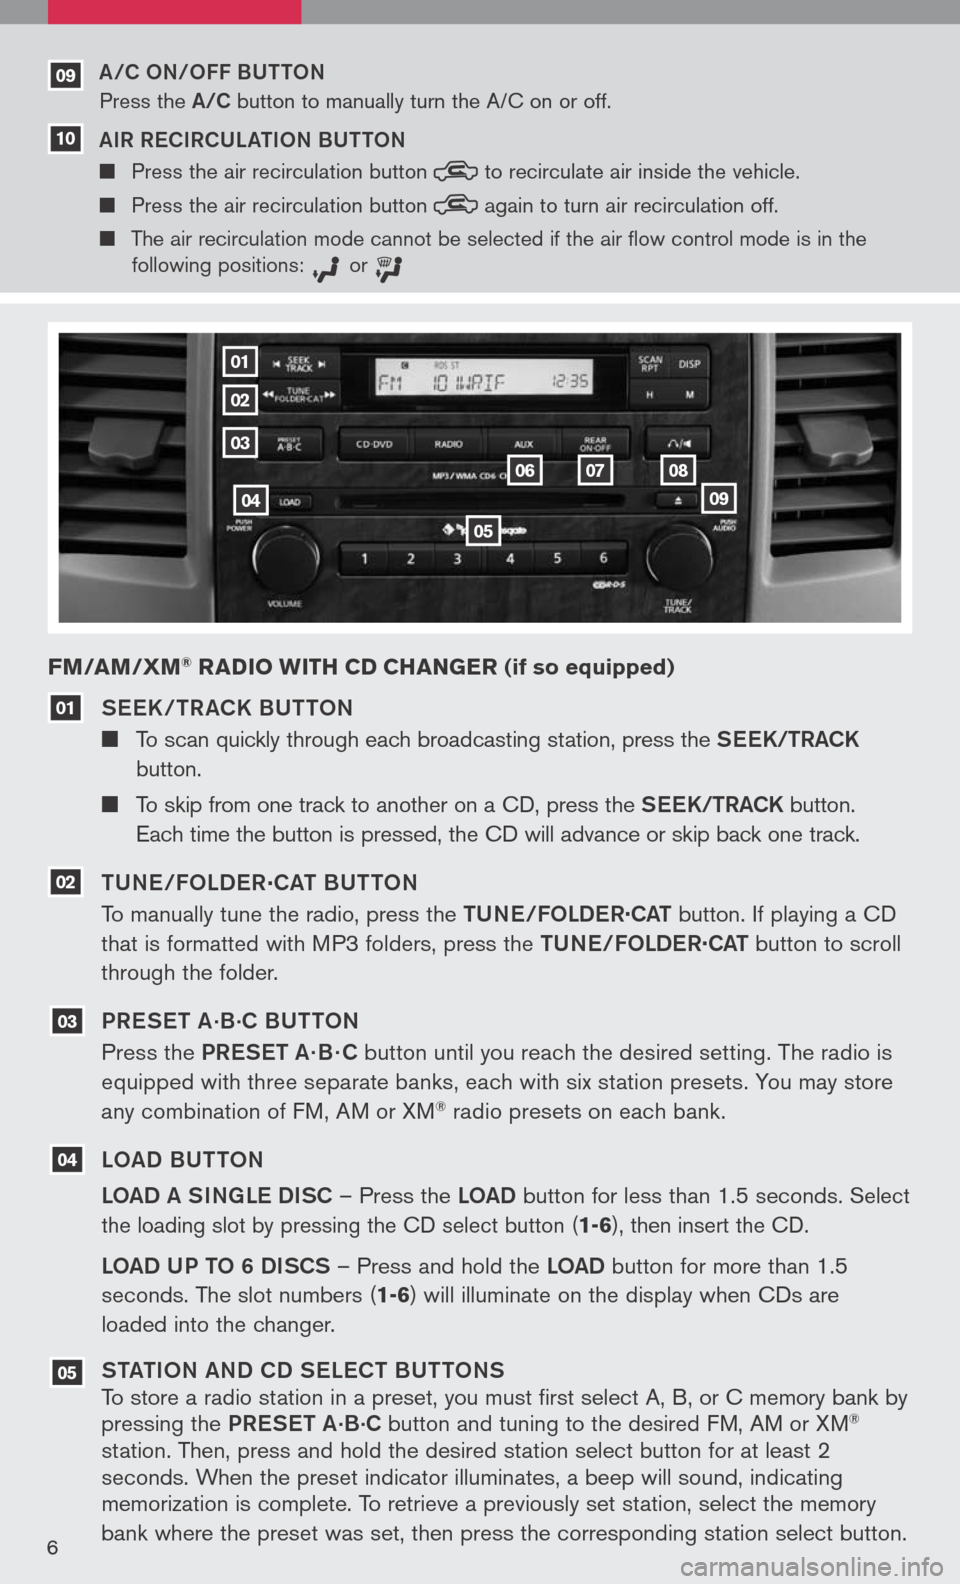
See K / TR aCK BUTTON
To scan quickly through each broadcasting station, press the S ee K/TR aCK
button.
To skip from one track to another on a CD, press the S ee K/TR aCK button.
Each time the button is pressed, the CD will advance or skip back one track.
TUN e/FOLD eR
.
C aT BUTTON
To manually tune the radio, press the TUN e/FOLDe R
.
C aT button. If playing a CD
that is formatted with MP3 folders, press the TUN e/FOLDe R
.
C aT button to scroll
through the folder.
PR eS eT a
.B.C BUTTON
Press the PR eS eT a· B · C button until you reach the desired setting. The radio is
equipped with three separate banks, each with six station presets. You may store
any combination of FM, AM or XM
® radio presets on each bank.
LO aD BUTTON
LO aD a SINg Le DISC – Press the LOaD button for less than 1.5 seconds.
Select
the loading slot by pressing the CD select button
(1-6), then insert the CD.
LOaD UP TO 6 DISCS – Press and hold the LOaD button for more than 1.5
seconds. The slot numbers (
1-6) will illuminate on the display when CDs are
loaded into the changer.
ST aTION aND CD S eLe CT BUTTONS
To store a radio station in a preset, you must first select A, B, or C memory bank by
pressing the PReS eT a
.B.C button and tuning to the desired FM, AM or XM®
station. Then, press and hold the desired station select button for at least 2
seconds. When the preset indicator illuminates, a beep will sound, indicating
memorization is complete. To retrieve a previously set station, select the memory
bank where the preset was set, then press the corresponding station select button.
FM/AM/ xM® RADIO wITH CD CHAN gER (if so equipped)
05
04
03
02
01
01
02
03
04
05
060708
09
a/C ON/OFF BUTTON
Press the a/C button to manually turn the A/C on or off.
a IR R eCIRCUL aTION BUTTON
Press the air recirculation button to
recirculate air inside the vehicle.
Press the air recirculation button again
to turn air recirculation off.
The air recirculation mode cannot be selected if the air
flow control mode is in the
following positions: or
09
10
Page 9 of 36
* XM® presets are only available on XM® Satellite Radio equipped vehicles.
07
06
08
09
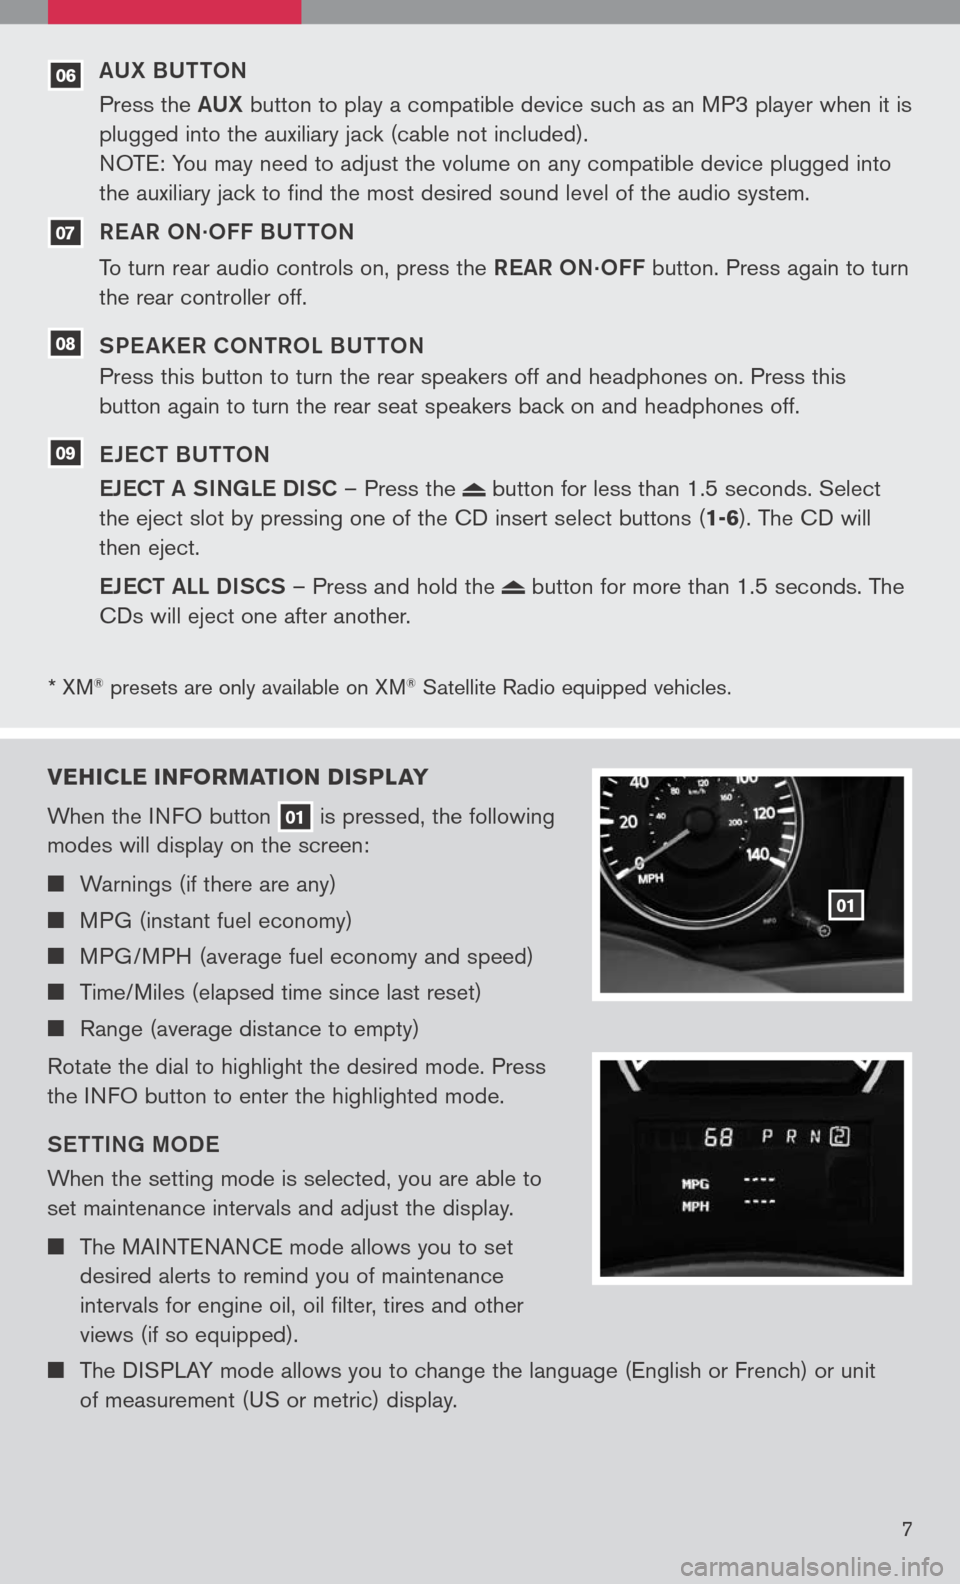
VEHICLE INFORMATION DI sPLAY
When the INFO button
01 is pressed, the following
modes will display on the screen:
Warnings (if there are any)
MPG (instant fuel economy)
MPG/MPH (average fuel economy and speed)
Time/Miles (elapsed time since last reset)
Range (average distance to empty)
Rotate the dial to highlight the desired mode. Press
the INFO button to enter the highlighted mode.
S eTTIN g MOD e
When the setting mode is selected, you are able to
set maintenance intervals and adjust the display.
The MAINTENANCE mode allows you to set
desired alerts to remind you of maintenance
intervals for engine oil, oil filter, tires and other
views (if so equipped).
The DISPLAY mode allows you to change the language (English or French) or unit
of measurement (US or metric) display.
01
7
aUX BUTTON
Press the aUX button to play a compatible device such as an MP3 player when it is
plugged into the auxiliary jack (cable not included).
NOTE: You may need to adjust the volume on any compatible device plugged into
the auxiliary jack to find the most desired sound level of the audio system.
R e a R ON
.OFF BUTTON
To turn rear audio controls on, press the ReaR
ON.OFF button. Press again to turn
the rear controller off.
SP e aKeR CONTROL BUTTON
Press this button to turn the rear speakers off and headphones on. Press this
button again to turn the rear seat speakers back on and headphones off.
e Je CT BUTTON
e JeCT a SINg Le DISC – Press the
button for less than 1.5 seconds. Select
the eject slot by pressing one of the CD insert select buttons (
1-6). The CD will
then eject.
e JeCT aLL DISCS – Press and hold the
button for more than 1.5 seconds. The
CDs will eject one after another.
Page 19 of 36
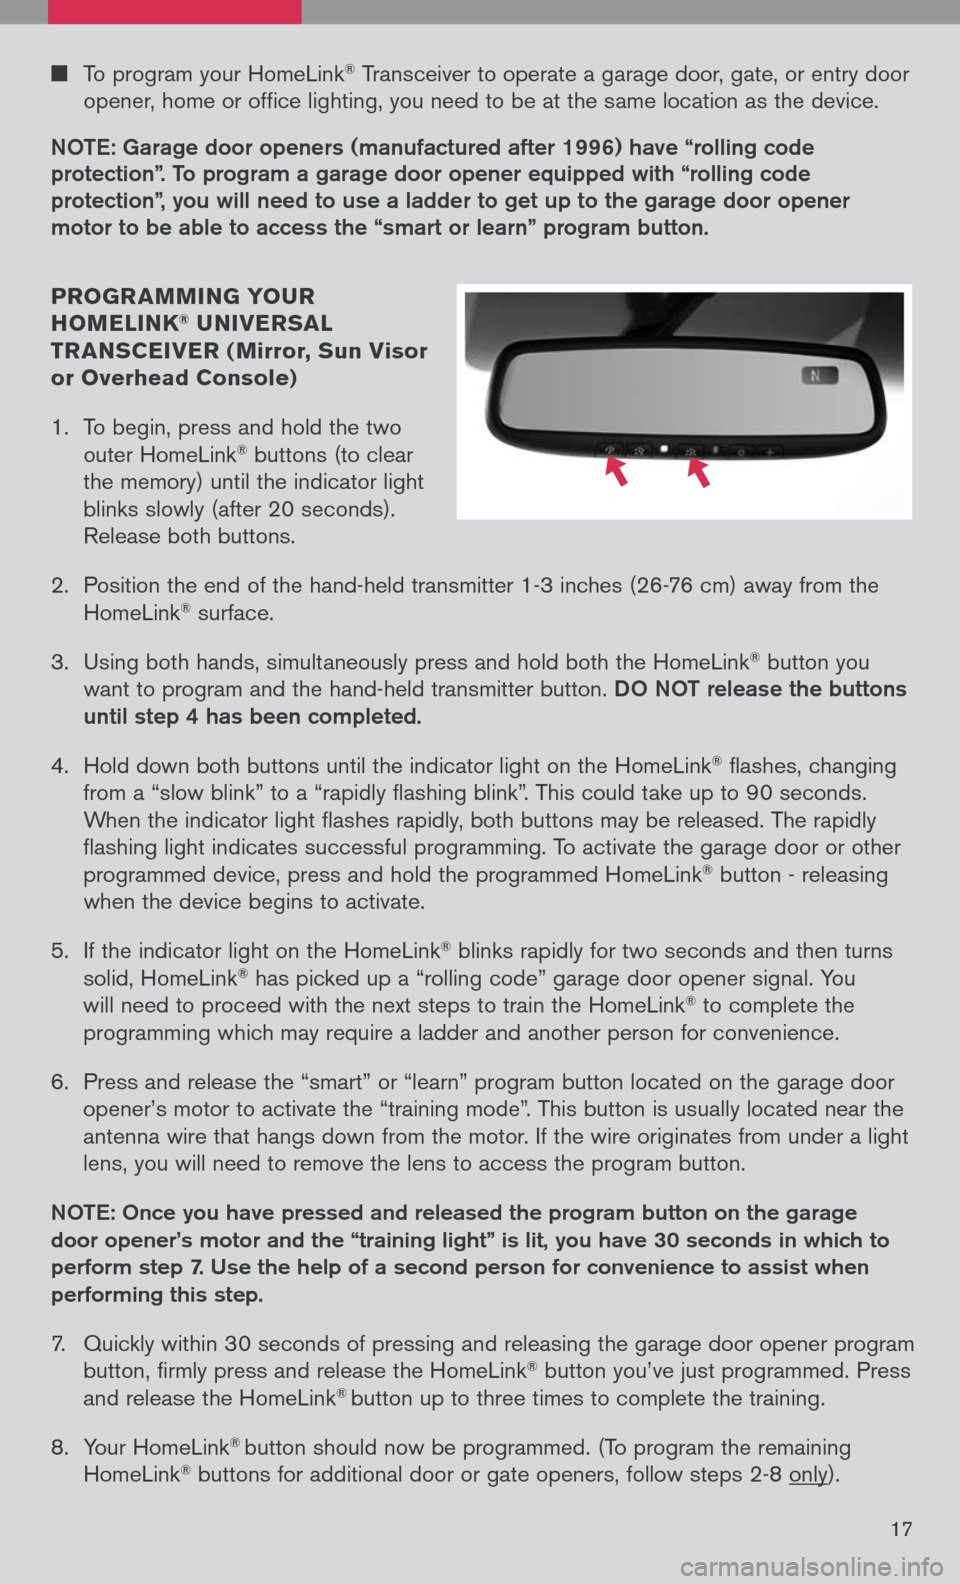
To program your HomeLink® Transceiver to operate a garage door, gate, or entry door
opener, home or office lighting, you need to be at the same location as the device.
NOTe: garage door openers (manufactured after 1996) have “rolling code
protection”. To program a garage door opener equipped with “rolling code protection”, you will need to use a ladder to get up to the garage door opener motor to be able to access the “smart or learn” program button.
PROgR AMMIN g YO uR
HOMELINK® u NIVER sAL
TR AN sCEIVER ( Mirror, sun Visor
or Overhead Console)
1. To begin, press and hold the two
outer HomeLink
® buttons (to clear
the memory) until the indicator light
blinks slowly (after 20 seconds).
Release both buttons.
2. Position the end of the hand-held transmitter 1-3 inches (26-76 cm) away from the
HomeLink® surface.
3. Using both hands, simultaneously press and hold both the HomeLink
® button you
want to program and the hand-held transmitter button.
DO NOT release the buttons
until step 4 has been completed.
4. Hold down both buttons until the indicator light on the HomeLink
® flashes, changing
from a “slow blink” to a “rapidly flashing blink”. This could take up to 90 seconds.
When the indicator light flashes rapidly, both buttons may be released. The rapidly
flashing light indicates successful programming. To activate the garage door or other
programmed device, press and hold the programmed HomeLink
® button - releasing
when the device begins to activate.
5. If the indicator light on the HomeLink
® blinks rapidly for two seconds and then turns
solid, HomeLink® has picked up a “rolling code” garage door opener signal. You
will need to proceed with the next steps to train the HomeLink® to complete the
programming which may require a ladder and another person for convenience.
6. Press and release the “smart” or “learn” program button located on the garage door
opener’s motor to activate the “training mode”. This button is usually located near the
antenna wire that hangs down from the motor. If the wire originates from under a light
lens, you will need to remove the lens to access the program button.
NOTe: Once you have pressed and released the program button on the garage
door opener’s motor and the “training light” is lit, you have 30 seconds in which to
perform step 7. Use the help of a second person for convenience to assist when
performing this step.
7. Quickly within 30 seconds of pressing and releasing the garage door opener program
button, firmly press and release the HomeLink® button you’ve just programmed. Press
and release the HomeLink® button up to three times to complete the training.
8. Your HomeLink
® button should now be programmed. (To program the remaining
HomeLink® buttons for additional door or gate openers, follow steps 2-8 only).
17
Page 22 of 36
18
0201
10
080706040503
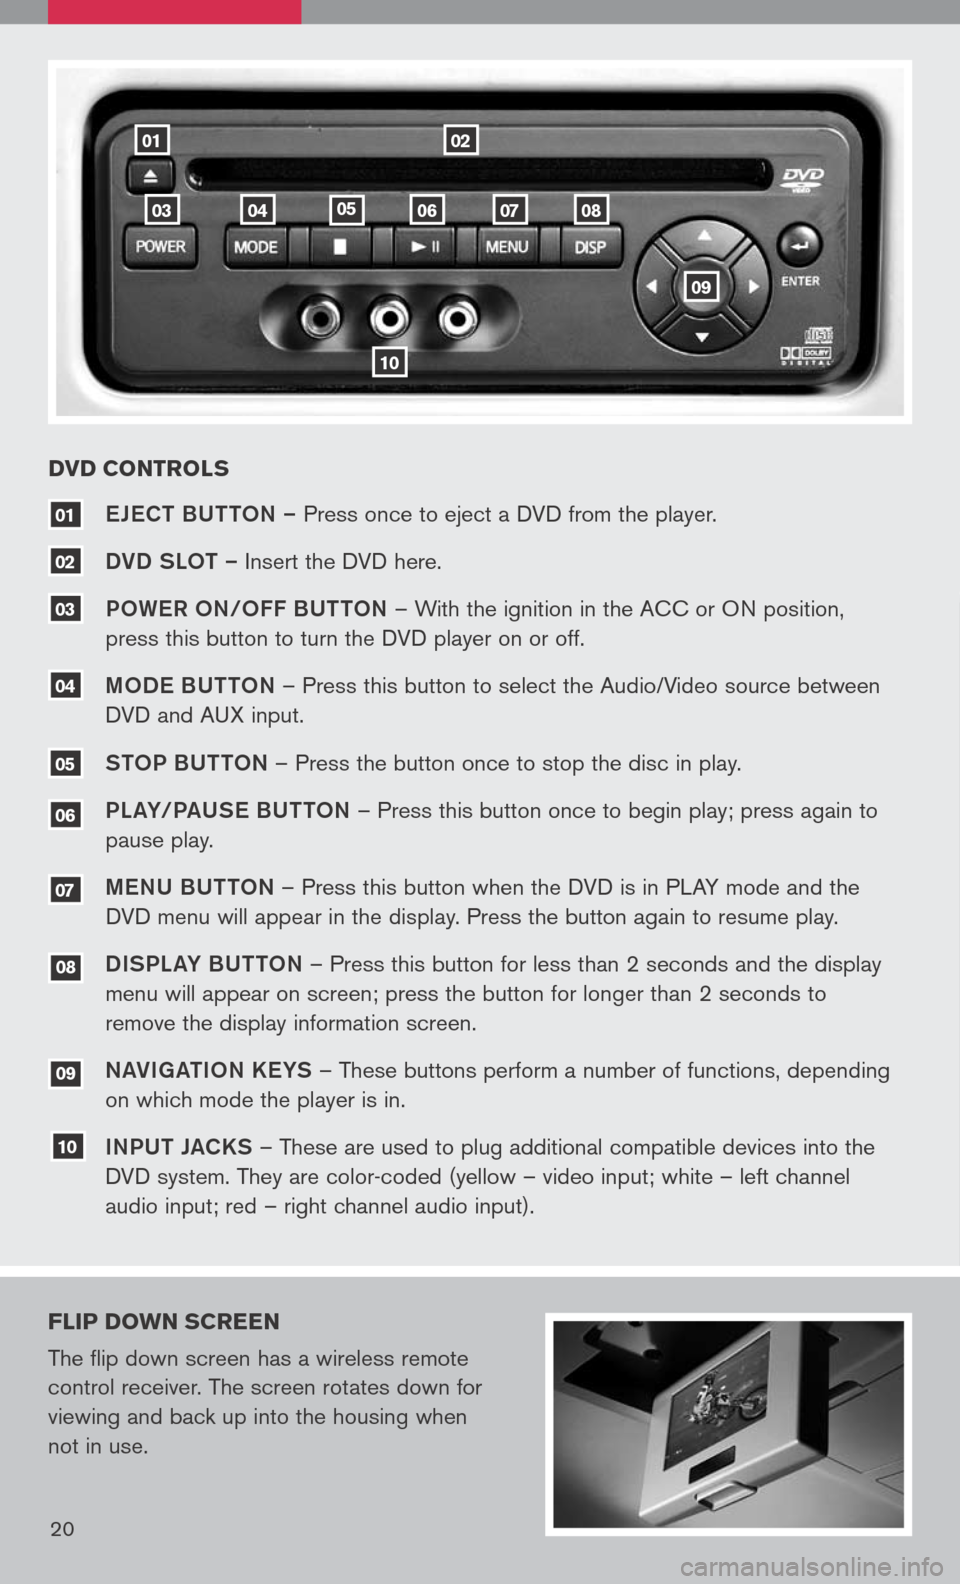
eJe CT BUTTON – Press once to eject a DVD from the player.
DVD SLOT – Insert the DVD here.
P OW eR O N/O FF BUTTON – With the ignition in the ACC or ON position,
press this button to turn the DVD player on or off.
M OD e BUTTON – Press this button to select the Audio/Video source between
DVD and AUX input.
S TOP BUTTON – Press the button once to stop the disc in play.
P La Y/Pa USe B UTTON – Press this button once to begin play; press again to
pause play.
Me NU BUTTON – Press this button when the DVD is in PLAY mode and the
DVD menu will appear in the display. Press the button again to resume play.
D ISPL aY B UTTON – Press this button for less than 2 seconds and the display
menu will appear on screen; press the button for longer than 2 seconds to
remove the display information screen.
Na VIga TION K eYS – These buttons perform a number of functions, depending
on which mode the player is in.
I NPUT JaCKS – These are used to plug additional compatible devices into the
DVD system. They are color-coded (yellow – video input; white – left channel
audio input; red – right channel audio input).
10
09
08
07
06
04
03
02
01
DVD CONTROL s
FLIP DO wN sCREEN
The flip down screen has a wireless remote
control receiver. The screen rotates down for
viewing and back up into the housing when
not in use.
20
09
05
Page 23 of 36
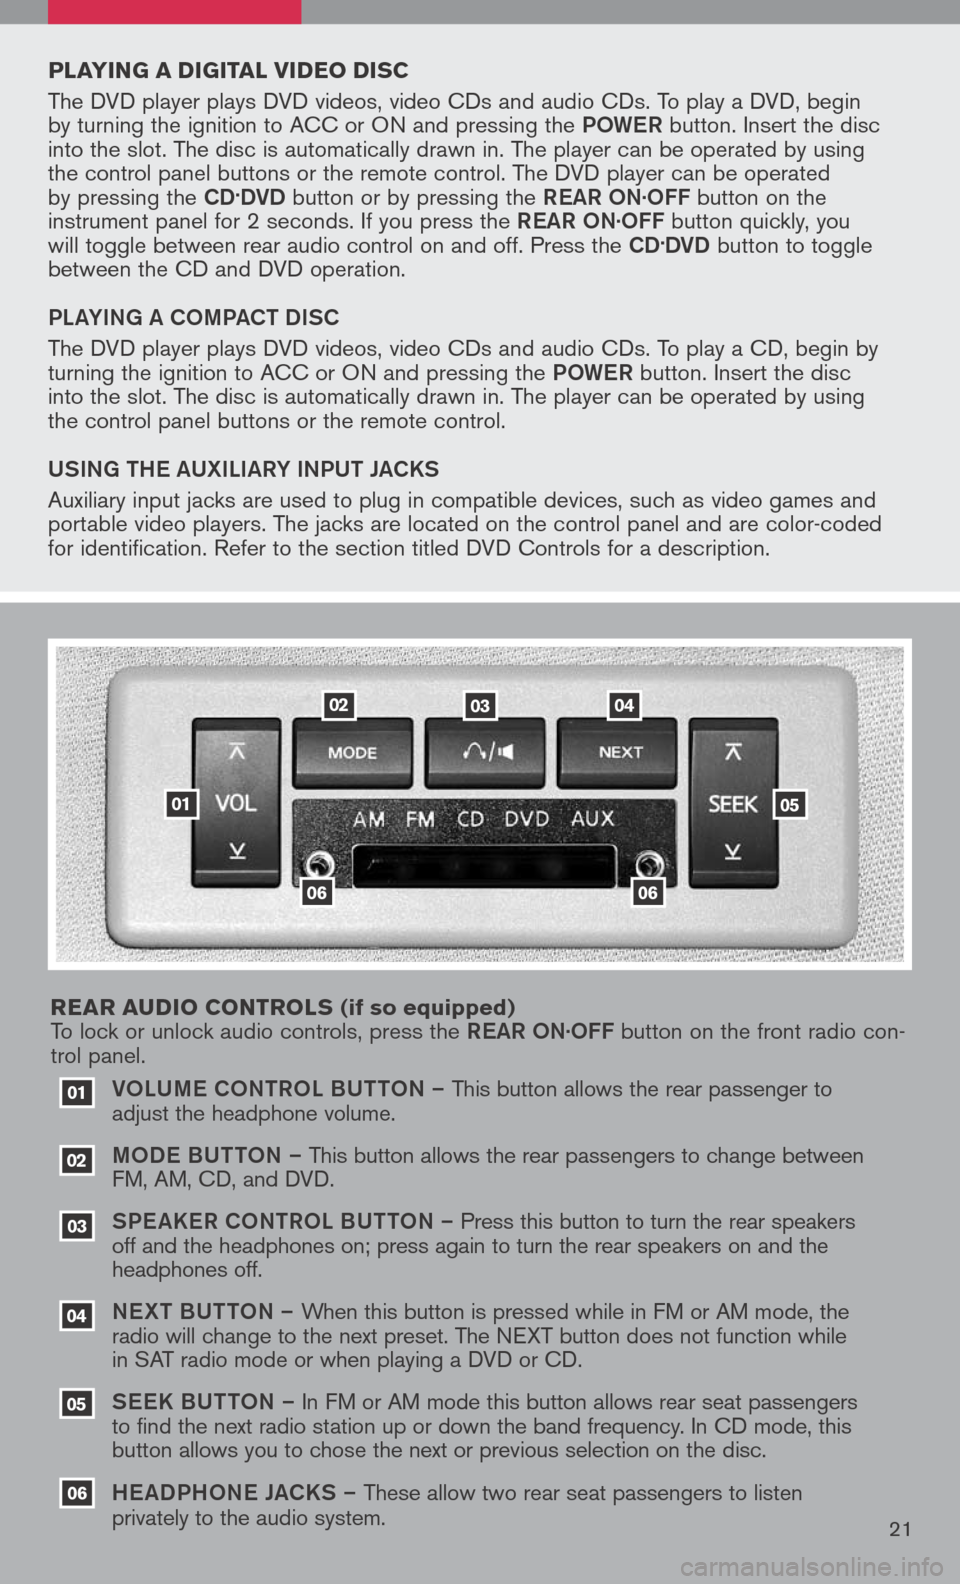
VOLUM e CONTROL BUTTON – This button allows the rear passenger to
adjust the headphone volume.
MOD e B UTTON – This button allows the rear passengers to change between
FM, AM, CD, and DVD.
SPe a KeR C ONTROL BUTTON – Press this button to turn the rear speakers
off and the headphones on; press again to turn the rear speakers on and the
headphones off.
NeXT BUTTON – When this button is pressed while in FM or AM mode, the
radio will change to the next preset. The NEXT button does not function while
in SAT radio mode or when playing a DVD or CD.
SeeK B UTTON – In FM or AM mode this button allows rear seat passengers
to find the next radio station up or down the band frequency. In CD mode, this
button allows you to chose the next or previous selection on the disc.
He aDPHON e JaCKS – These allow two rear seat passengers to listen
privately to the audio system.
03
02
01
06
06
05
04
020304
05
06
01
PLAYIN g A DI gITAL VIDEO DI sC
The DVD player plays DVD videos, video CDs and audio CDs. To play a DVD, begin
by turning the ignition to ACC or ON and pressing the POW eR button. Insert the disc
into the slot. The disc is automatically drawn in. The player can be operated by using
the control panel buttons or the remote control. The DVD player can be operated
by pressing the
CD.DVD button or by pressing the ReaR ON·OFF button on the
instrument panel for 2 seconds. If you press the ReaR ON·OFF button quickly, you
will toggle between rear audio control on and off. Press the
CD.DVD button to toggle
between the CD and DVD operation.
PL aYIN g a COMP aCT DISC
The DVD player plays DVD videos, video CDs and audio CDs. To play a CD, begin by
turning the ignition to ACC or ON and pressing the POW eR button. Insert the disc
into the slot. The disc is automatically drawn in. The player can be operated by using
the control panel buttons or the remote control.
USIN g TH e a UXILI aRY INPUT J aCKS
Auxiliary input jacks are used to plug in compatible devices, such as video games and
portable video players. The jacks are located on the control panel and are color-coded
for identification. Refer to the section titled DVD Controls for a description.
REAR A uDIO CONTROL s
(if so equipped)
To lock or unlock audio controls, press the ReaR ON·OFF button on the front radio con-
trol panel.
21
Page 24 of 36
20
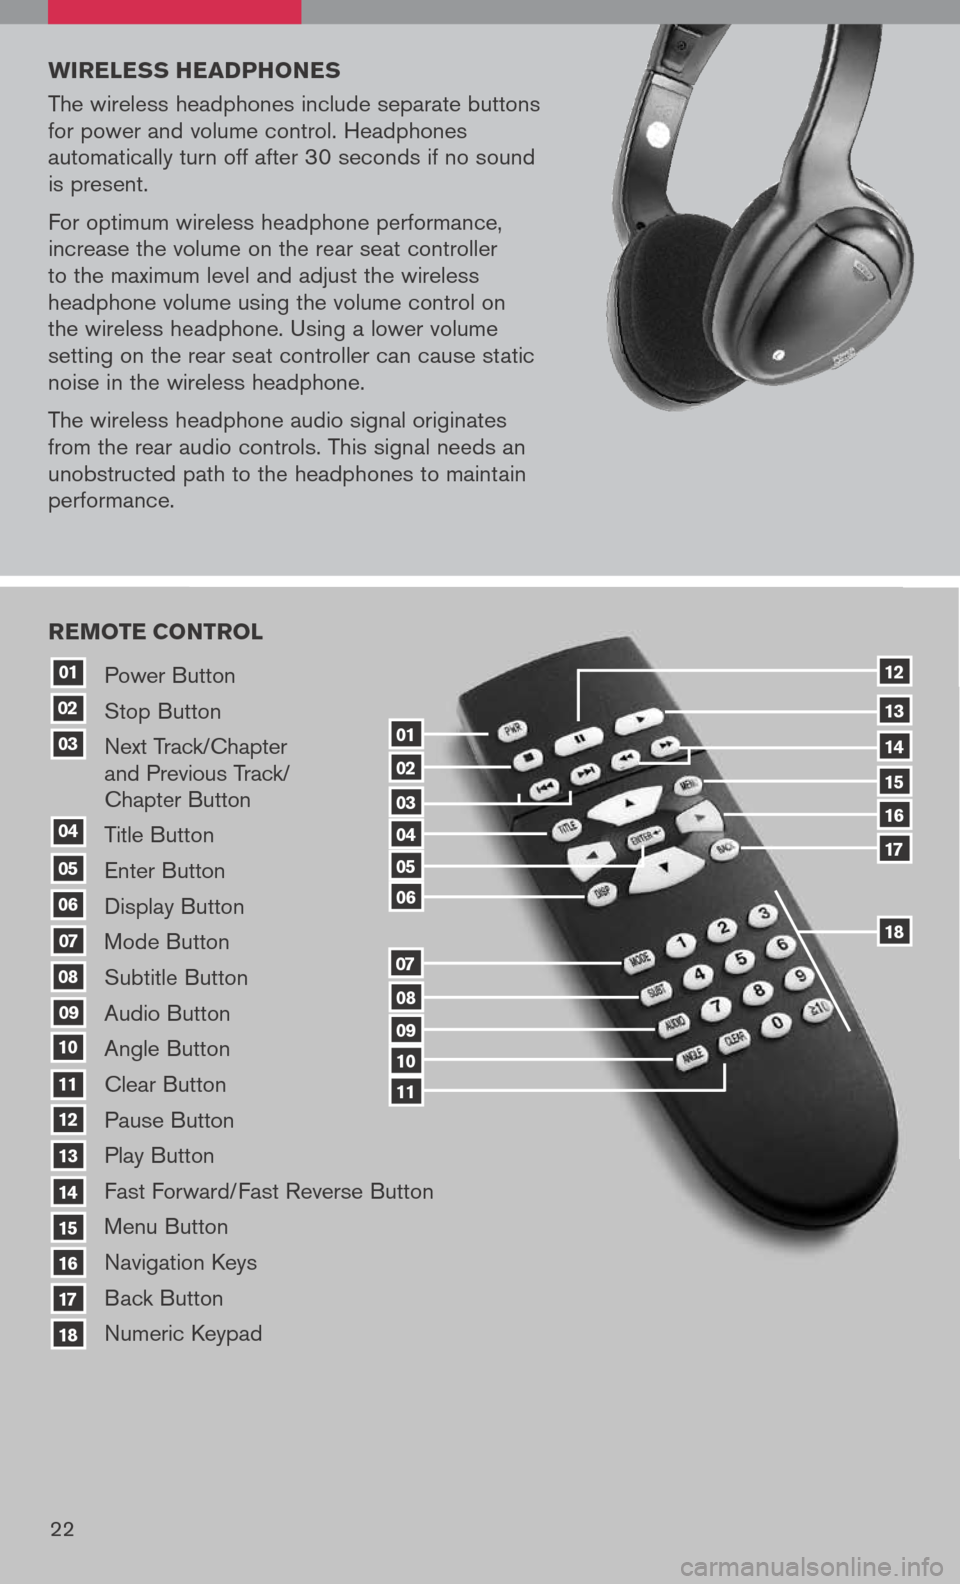
Power Button
Stop Button
Next Track/Chapter
and Previous Track/
Chapter Button
Title Button
Enter Button
Display Button
Mode Button
Subtitle Button
Audio Button
Angle Button
Clear Button
Pause Button
Play Button
Fast Forward/Fast Reverse Button
Menu Button
Navigation Keys
Back Button
Numeric Keypad
10
09
01
08
18
17
07
16
03
02
04
05
06
07
15
14
08
13
12
09
1110
11
06
05
04
03
02
18
17
16
15
14
13
12
REMOTE CONTROL
01
w IRELE ss HEADPHONE s
The wireless headphones include separate buttons
for power and volume control. Headphones
automatically turn off after 30 seconds if no sound
is present.
For optimum wireless headphone performance,
increase the volume on the rear seat controller
to the maximum level and adjust the wireless
headphone volume using the volume control on
the wireless headphone. Using a lower volume
setting on the rear seat controller can cause static
noise in the wireless headphone.
The wireless headphone audio signal originates
from the rear audio controls. This signal needs an
unobstructed path to the headphones to maintain
performance.
22