2008 NISSAN TITAN key
[x] Cancel search: keyPage 3 of 36
TAB LE O F C O NTE NTS
Remote Keyless Entry System . . . . . . . . . . . . . . . . . . 2
Windshield Wiper/Washer Switch
. . . . . . . . . . . . . . . . 2
Headlight and Turn Signal Control
. . . . . . . . . . . . . . . . 3
Steering Wheel Switches for Audio Control/ Bluetooth
® . . . . 4
Cruise Control
. . . . . . . . . . . . . . . . . . . . . . . . . . 4
Automatic Climate Control
. . . . . . . . . . . . . . . . . . . . 5
FM/AM/XM® Radio with CD Changer . . . . . . . . . . . . . . 6
Vehicle Information Display
. . . . . . . . . . . . . . . . . . . . 7
Control Panel Display with Navigation System
. . . . . . . . . 8
Clock/Set Adjustment
. . . . . . . . . . . . . . . . . . . . . . 8
Instrument Brightness Control/Trip Change Button
. . . . . . . 9
Automatic Driver Positioner
. . . . . . . . . . . . . . . . . . . 10
Adjustable Accelerator and Brake Pedals
. . . . . . . . . . . . 11
Manual Shift Mode
. . . . . . . . . . . . . . . . . . . . . . . . 11
Four-Wheel Drive (4WD) Shift Switch
. . . . . . . . . . . . . . 11
Vehicle Dynamic Control (VDC) Off Switch
. . . . . . . . . . . 12
Tow Mode Switch
. . . . . . . . . . . . . . . . . . . . . . . . . 12
E-Lock Switch
. . . . . . . . . . . . . . . . . . . . . . . . . . . 12
Front-Passenger Air Bag Status Light
. . . . . . . . . . . . . . 13
Tire Pressure Monitoring System (TPMS)
. . . . . . . . . . . . 13
Seatbelt Warning Light and Chime
. . . . . . . . . . . . . . . 13
Cargo Light Switch
. . . . . . . . . . . . . . . . . . . . . . . . 14
Rear Sonar System Off Switch
. . . . . . . . . . . . . . . . . 14
Child Safety Rear Door Locks
. . . . . . . . . . . . . . . . . . 14
Wide Open Doors
. . . . . . . . . . . . . . . . . . . . . . . . 14
High Utility Bed and Utili-Track
™ Channel System . . . . . . . . 15
Outside Mirror Control Switch
. . . . . . . . . . . . . . . . . . 15
Sunroof Controls
. . . . . . . . . . . . . . . . . . . . . . . . . 15
Front Seat Adjustments
. . . . . . . . . . . . . . . . . . . . . 16
Folding the Rear Bench Seat
. . . . . . . . . . . . . . . . . . 16
Homelink® Universal Transceiver . . . . . . . . . . . . . . . . . 16
Bluetooth® Hands-Free Phone System . . . . . . . . . . . . . 18
DVD Controls
. . . . . . . . . . . . . . . . . . . . . . . . . . . 20
Rear Audio Controls
. . . . . . . . . . . . . . . . . . . . . . . 21
Navigation System
. . . . . . . . . . . . . . . . . . . . . . . . 23
Page 4 of 36
wIND sHIELD wIPER/ wAsHER swITCH
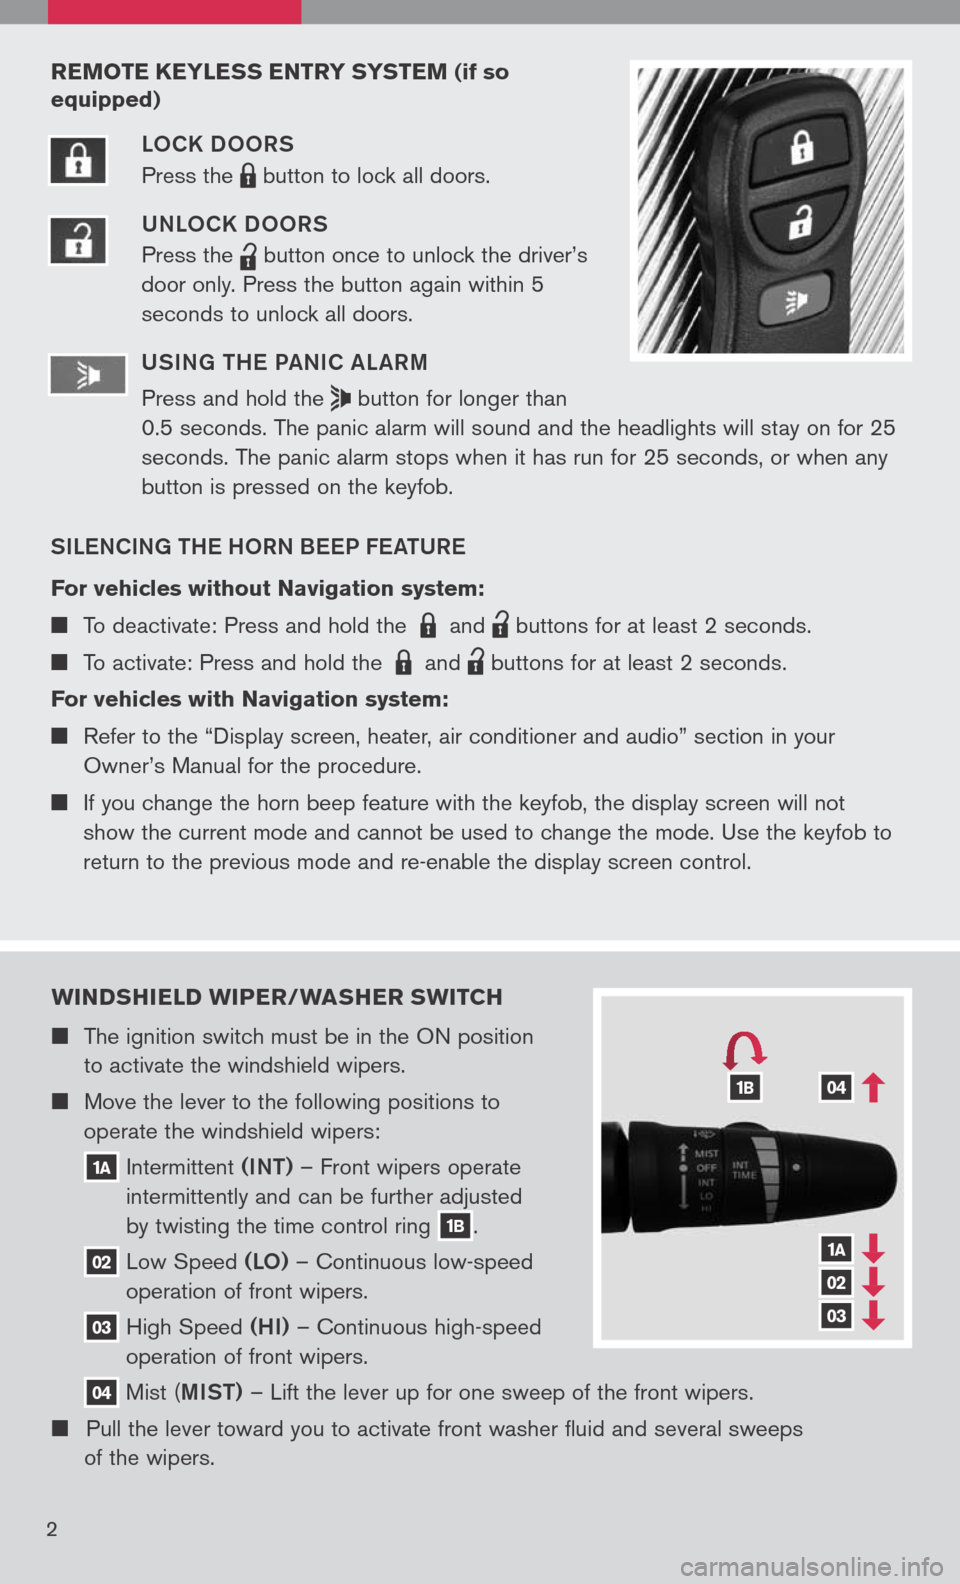
The ignition switch must be in the ON position
to activate the windshield wipers.
Move the lever to the following positions to
operate the windshield wipers:
1A Intermittent (INT)
– Front wipers operate
intermittently and can be further adjusted
by twisting the time control ring
1B.
02 Low
Speed (LO) – Continuous low-speed
operation of front wipers.
03 High
Speed (HI) – Continuous high-speed
operation of front wipers.
04 Mist
(MIST) – Lift the lever up for one sweep of the front wipers.
Pull the lever toward you to activate front washer fluid and several sweeps
of the wipers.
1A
02
03
041B
2
REMOTE KEYLE ss ENTRY sY s TEM (if so
equipped)
LOCK DOORS
Press the
LPD0150 button
to lock all doors.
UNLOCK DOORS
Press the
lpd0151
button
once to unlock the driver’s
door only. Press the button again within 5
seconds to unlock all doors.
U SIN g TH e Pa NIC aL aRM
Press and hold the
button for longer than
0.5 seconds. The panic alarm will sound and the headlights will stay on for 25
seconds. The panic alarm stops when it has run for 25 seconds, or when any
button is pressed on the keyfob.
SIL eNCIN g TH e HORN B eeP F eaTUR e
For vehicles without Navigation system:
To deactivate: Press and hold the LPD0150 and
lpd0151
buttons for at least 2 seconds.
To activate: Press and hold the LPD0150 and
lpd0151
buttons for at least 2 seconds.
For vehicles with Navigation system:
Refer to the “Display screen, heater, air conditioner and audio” section in your
Owner’s Manual for the procedure.
If you change the horn beep feature with the keyfob, the display screen will not
show the current mode and cannot be used to change the mode. Use the keyfob to
return to the previous mode and re-enable the display screen control.
Page 10 of 36
CONTROL PANEL DIsPLAY w ITH
N AVI gATION sY sTEM
(if so equipped)
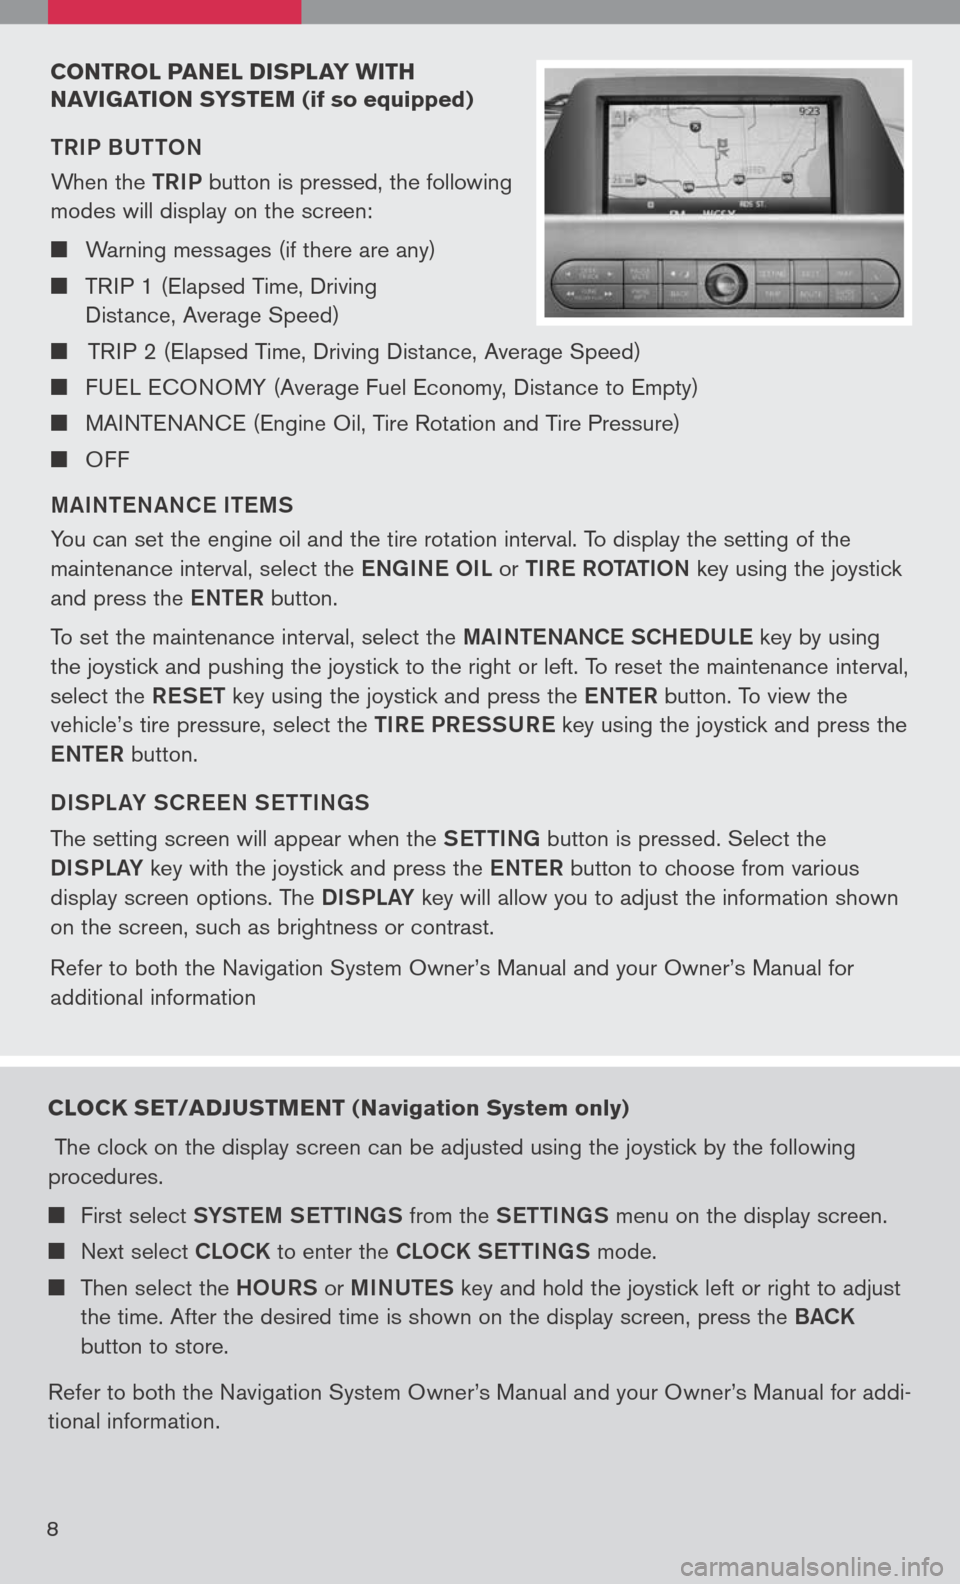
TRIP BUTTON
When the
TRIP button is pressed, the following
modes will display on the screen:
Warning messages (if there are any)
TRIP 1 (Elapsed Time, Driving
Distance, Average Speed)
TRIP 2 (Elapsed Time, Driving Distance, Average Speed)
FUEL ECONOMY (Average Fuel Economy, Distance to Empty)
MAINTENANCE (Engine Oil, Tire Rotation and Tire Pressure)
OFF
M aINT eN aNC e IT eMS
You can set the engine oil and the tire rotation interval. To display the setting of the
maintenance interval, select the eNg INe OIL or TIR e ROT aTION key using the joystick
and press the eNTe R button.
To set the maintenance interval, select the MaINTe NaNCe SCH eDUL e key by using
the joystick and pushing the joystick to the right or left. To reset the maintenance interval,
select the ReSeT key using the joystick and press the eNTe R button. To view the
vehicle’s tire pressure, select the TIRe PR eSSUR e key using the joystick and press the
e NTe R button.
DISPL aY SCR eeN S eTTIN gS
The setting screen will appear when the SeTTINg button is pressed. Select the
DISPLa Y key with the joystick and press the eNTe R button to choose from various
display screen options. The DISPLa Y key will allow you to adjust the information shown
on the screen, such as brightness or contrast.
Refer to both the Navigation System Owner’s Manual and your Owner’s Manual for
additional information
8
CLOCK sET/ADJ usTMENT ( Navigation system only)
The clock on the display screen can be adjusted using the joystick by the following
procedures.
First select SYSTe M SeTTINg S from the SeTTINg S menu on the display screen.
Next select CLOCK to enter the CLOCK S eTTINgS mode.
Then select the HOURS or MINUTe S key and hold the joystick left or right to adjust
the time. After the desired time is shown on the display screen, press the BaCK
button to store.
Refer to both the Navigation System Owner’s Manual and your Owner’s Manual for addi
-
tional information.
Page 12 of 36
10
Au TOMATIC DRIVER PO sITIONER (if so equipped)
The automatic driver positioner system has two features:
Memory storage function.
Entry/exit function.
M eMORY STOR age FUNCTION
Two positions for the driver’s seat, accelerator and brake
pedals, and outside mirrors can be stored in the automatic
driver positioner memory. Follow these procedures to set driver
preferences.
S eT TH e DeSIR eD POSITIONIN g
1. Set the automatic transmission lever to the P (Park) position.
2. Turn the ignition on and adjust the driver’s seat, accelerator and brake pedals, and
outside mirrors to the desired positions.
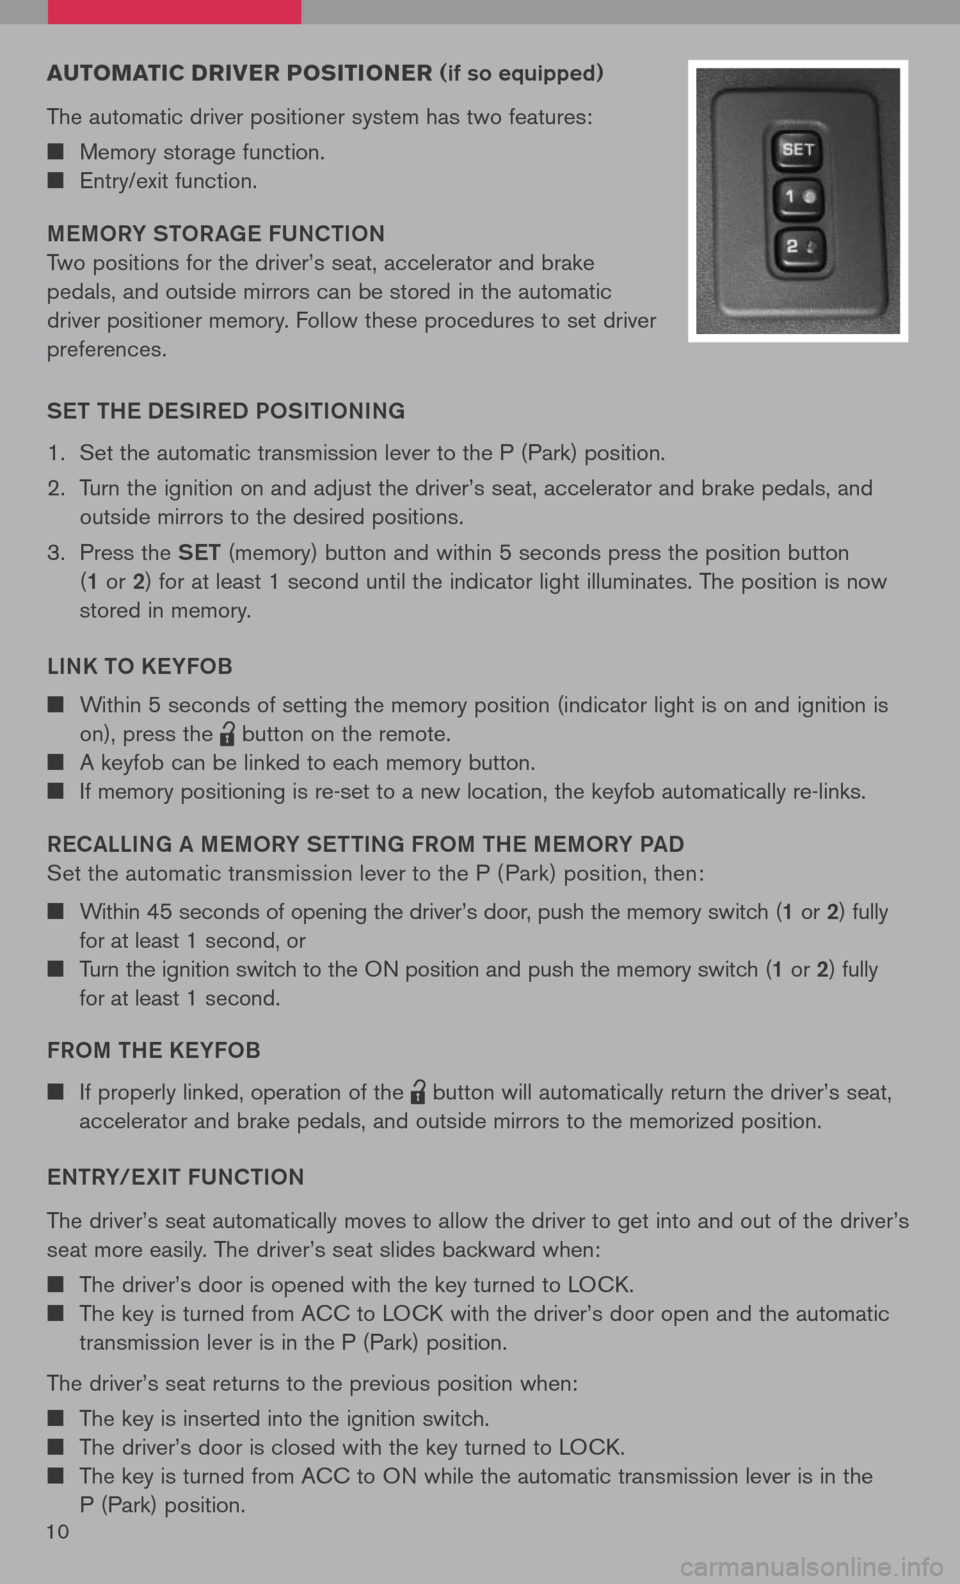
3. Press the SeT (memory) button and within 5 seconds press the position button
(1 or 2 ) for at least 1 second until the indicator light illuminates. The position is now
stored in memory.
LINK TO K eYFOB
Within 5 seconds of setting the memory position (indicator light is on and ignition is
on), press the
lpd0151
button on the remote.
A keyfob can be linked to each memory button.
If memory positioning is re-set to a new location, the keyfob automatically re-links.
R eC aLLIN g a M eMORY S eTTIN g FROM TH e MeMORY P aD
Set the automatic transmission lever to the P ( Park) position, then:
Within 45 seconds of opening the driver’s door, push the memory switch (1 or 2) fully
for at least 1 second, or
Turn the ignition switch to the ON position and push the memory switch (1 or 2) fully
for at least 1 second.
FROM TH e KeYFOB
If properly linked, operation of the
lpd0151
button will automatically return the driver’s seat,
accelerator and brake pedals, and outside mirrors to the memorized position.
e NTRY/ eXIT FUNCTION
The driver’s seat automatically moves to allow the driver to get into and out of the driver’s
seat more easily. The driver’s seat slides backward when:
The driver’s door is opened with the key turned to LOCK.
The key is turned from ACC to LOCK with the driver’s door open and the automatic
transmission lever is in the P (Park) position.
The driver’s seat returns to the previous position when:
The key is inserted into the ignition switch.
The driver’s door is closed with the key turned to LOCK.
The key is turned from ACC to ON while the automatic transmission lever is in the
P (Park) position.
Page 15 of 36
13
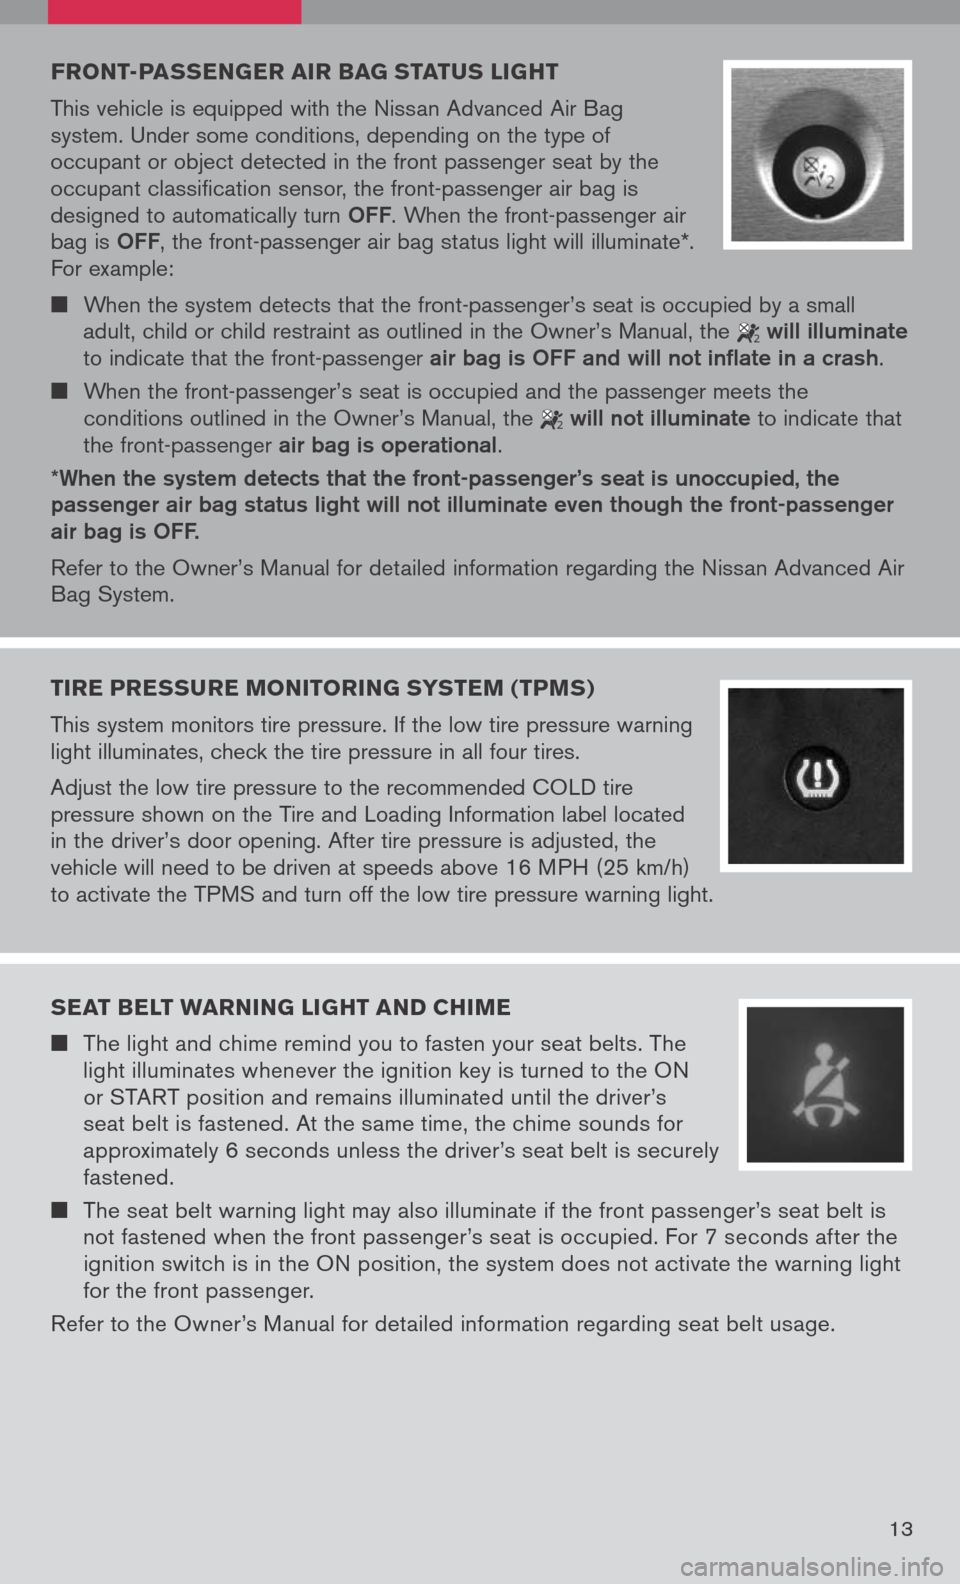
FRONT-PAssEN gER AIR BA g sTAT us LI gHT
This vehicle is equipped with the Nissan Advanced Air Bag
system. Under some conditions, depending on the type of
occupant or object detected in the front passenger seat by the
occupant classification sensor, the front-passenger air bag is
designed to automatically turn
OFF. When the front-passenger air
bag is OFF, the front-passenger air bag status light will illuminate*.
For example:
When the system detects that the front-passenger’s seat is occupied by a small
adult, child or child restraint as outlined in the Owner’s Manual, the
2 will illuminate
to indicate that the front-passenger air bag is OFF and will not inflate in a crash.
When the front-passenger’s seat is occupied and the passenger meets the
conditions outlined in the Owner’s Manual, the
2 will not illuminate to indicate that
the front-passenger air bag is operational.
*When the system detects that the front-passenger’s seat is unoccupied, the passenger air bag status light will not illuminate even though the front-passenger air bag is OFF.
Refer to the Owner’s Manual for detailed information regarding the Nissan Advanced Air
Bag System.
TIRE PRE ssuRE MONITORIN g sY s TEM (TPM s)
This system monitors tire pressure. If the low tire pressure warning
light illuminates, check the tire pressure in all four tires.
Adjust the low tire pressure to the recommended COLD tire
pressure shown on the Tire and Loading Information label located
in the driver’s door opening. After tire pressure is adjusted, the
vehicle will need to be driven at speeds above 16 MPH (25 km/h)
to activate the TPMS and turn off the low tire pressure warning light.
sEAT BELT wARNIN g LIgHT AND CHIME
The light and chime remind you to fasten your seat belts. The
light illuminates whenever the ignition key is turned to the ON
or START position and remains illuminated until the driver’s
seat belt is fastened. At the same time, the chime sounds for
approximately 6 seconds unless the driver’s seat belt is securely
fastened.
The seat belt warning light may also illuminate if the front passenger’s seat belt is
not fastened when the front passenger’s seat is occupied. For 7 seconds after the
ignition switch is in the ON position, the system does not activate the warning light
for the front passenger.
Refer to the Owner’s Manual for detailed information regarding seat belt usage.
Page 24 of 36
20
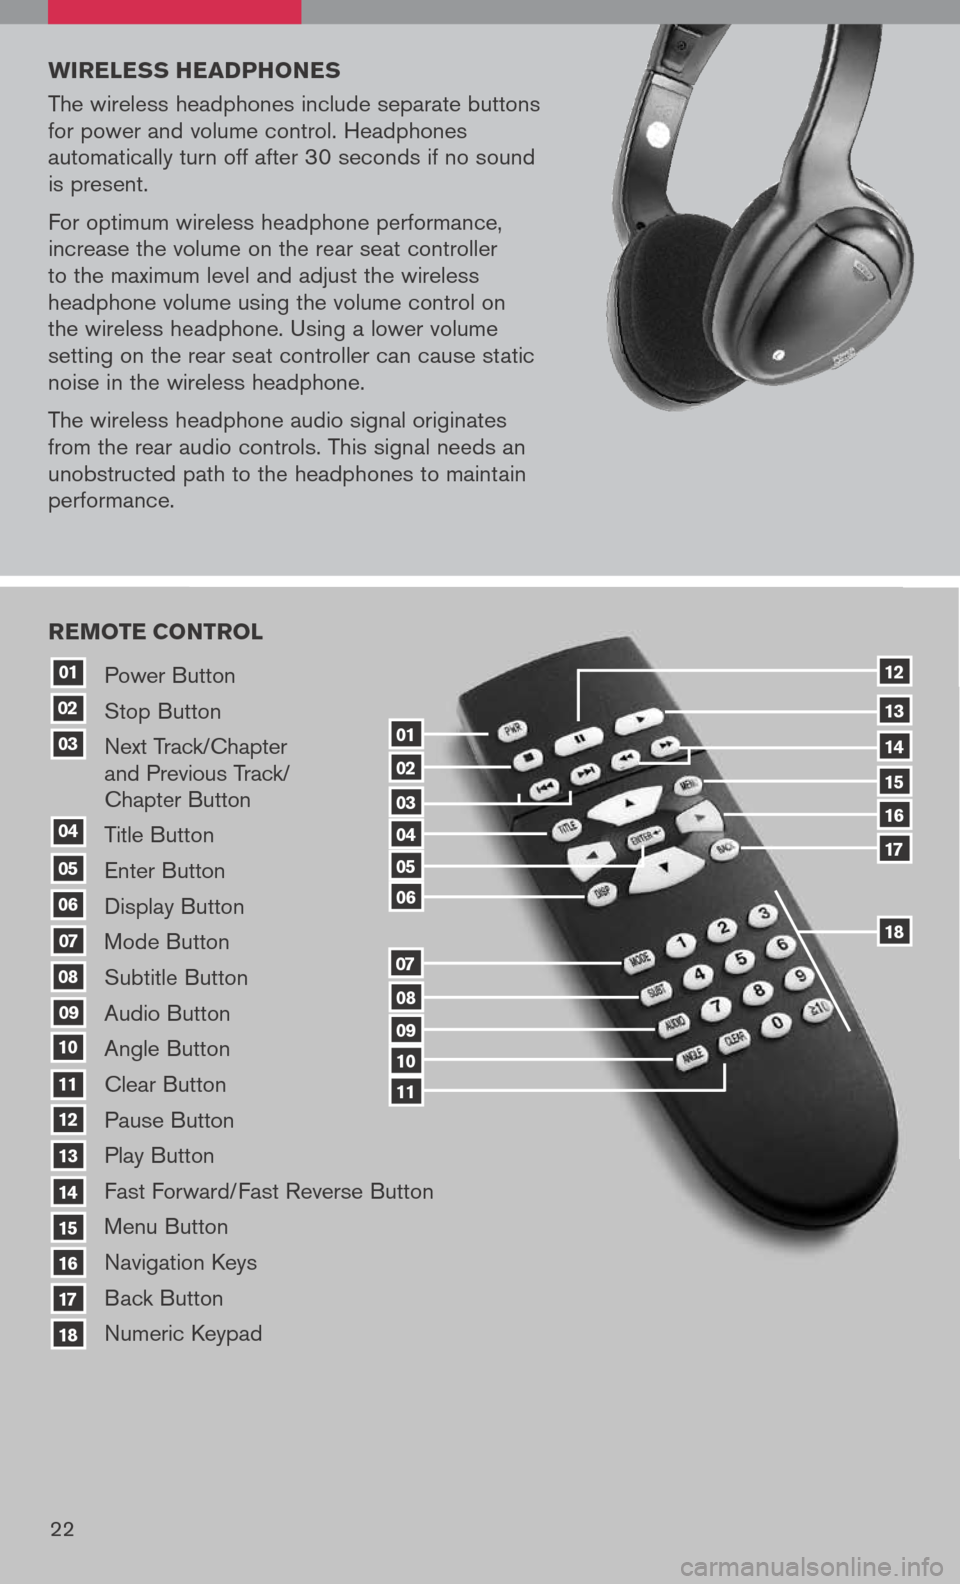
Power Button
Stop Button
Next Track/Chapter
and Previous Track/
Chapter Button
Title Button
Enter Button
Display Button
Mode Button
Subtitle Button
Audio Button
Angle Button
Clear Button
Pause Button
Play Button
Fast Forward/Fast Reverse Button
Menu Button
Navigation Keys
Back Button
Numeric Keypad
10
09
01
08
18
17
07
16
03
02
04
05
06
07
15
14
08
13
12
09
1110
11
06
05
04
03
02
18
17
16
15
14
13
12
REMOTE CONTROL
01
w IRELE ss HEADPHONE s
The wireless headphones include separate buttons
for power and volume control. Headphones
automatically turn off after 30 seconds if no sound
is present.
For optimum wireless headphone performance,
increase the volume on the rear seat controller
to the maximum level and adjust the wireless
headphone volume using the volume control on
the wireless headphone. Using a lower volume
setting on the rear seat controller can cause static
noise in the wireless headphone.
The wireless headphone audio signal originates
from the rear audio controls. This signal needs an
unobstructed path to the headphones to maintain
performance.
22
Page 25 of 36
23
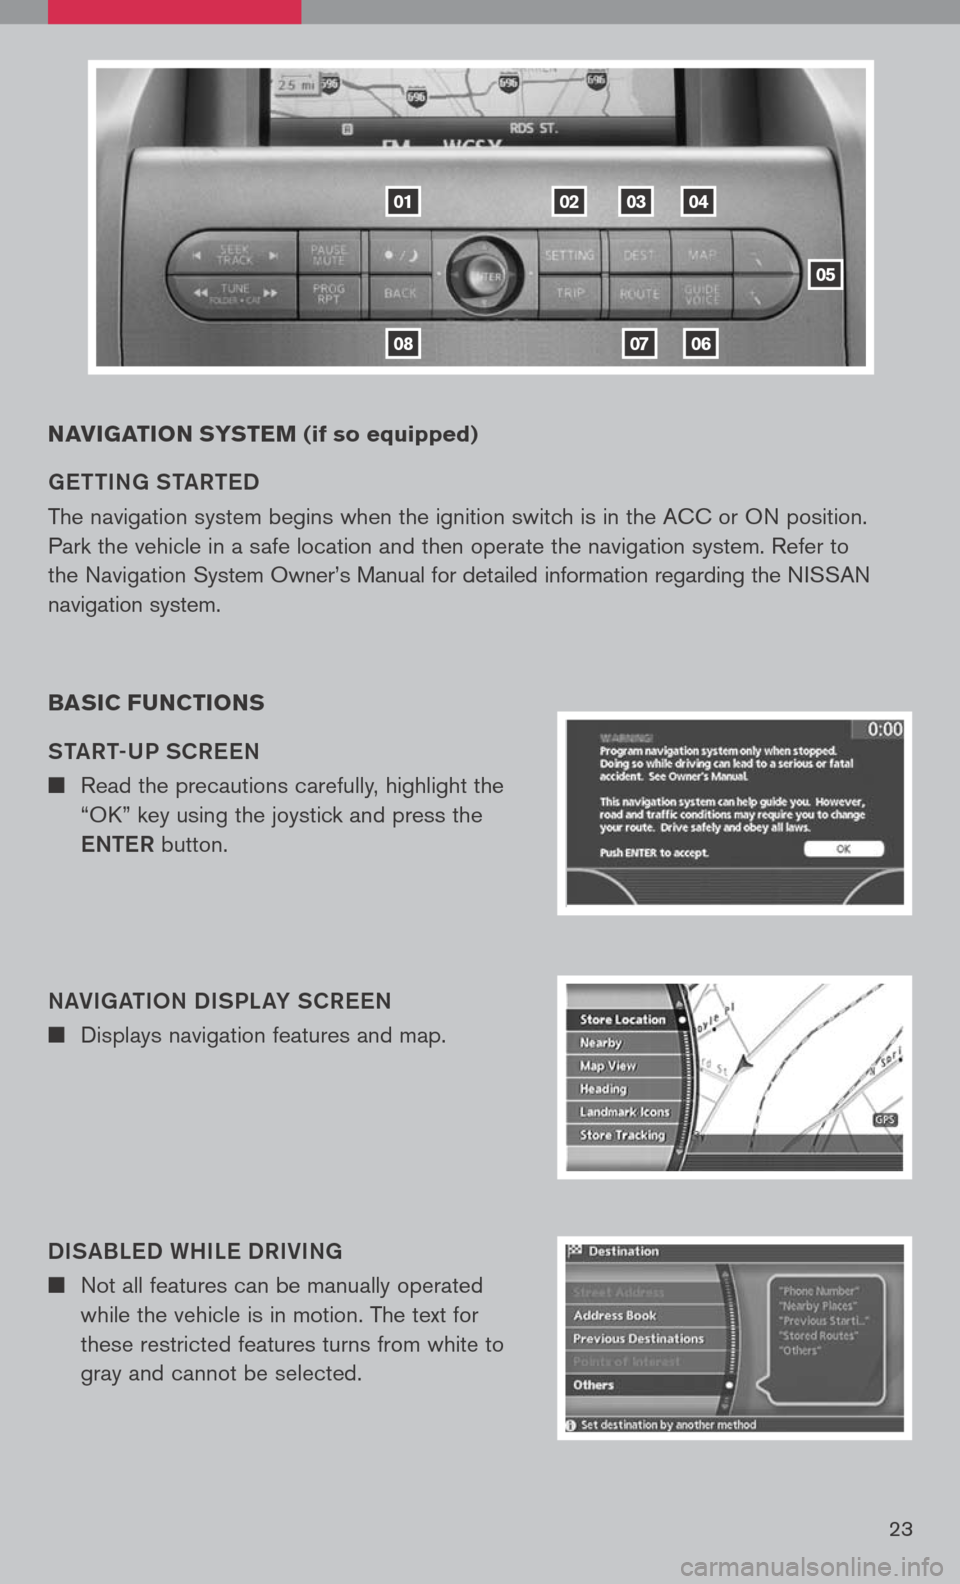
NAVIgATION sY s TEM (if so equipped)
ge TTIN g ST aRT eD
The navigation system begins when the ignition switch is in the ACC or ON position.
Park the vehicle in a safe location and then operate the navigation system. Refer to
the Navigation System Owner’s Manual for detailed information regarding the NISSAN
navigation system.
BA sIC F uNCTION s
ST aRT-UP SCR eeN
n Read the precautions carefully, highlight the
“OK” key using the joystick and press the
e NTe R button.
N aVI ga TION DISPL aY SCR eeN
n Displays navigation features and map.
DIS aBL eD WHIL e DRIVIN g
n Not all features can be manually operated
while the vehicle is in motion. The text for
these restricted features turns from white to
gray and cannot be selected.
01
0806
020304
05
07
Page 27 of 36
25
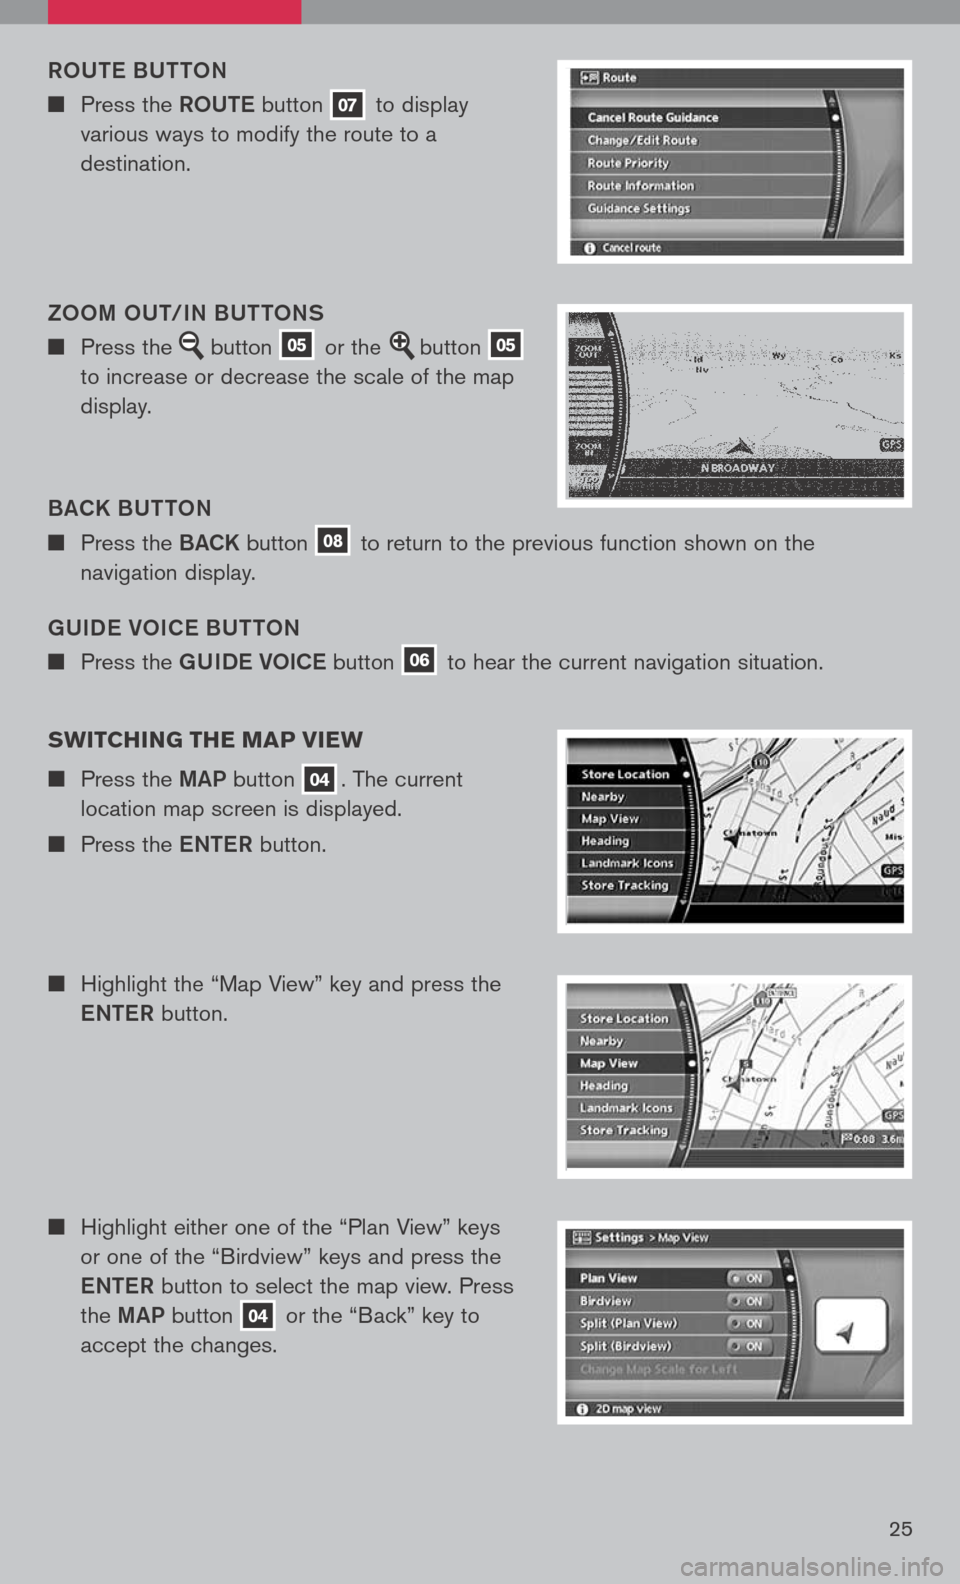
gUIDe VOIC e BUTTON
n Press the gUIDe VOICe button 06 to hear the current navigation situation.
ROUT
e B UTTON
n Press the ROUTe button 07 to display
various ways to modify the route to a
destination.
B aCK B UTTON
n Press the BaCK button 08 to return to the previous function shown on the
navigation display.
ZOOM OUT/IN BUTTONS
n Press the button 05 or the button 05
to increase or decrease the scale of the map
display.
sw ITCHIN g THE MAP VIEw
n Press the MaP button 04. The current
location map screen is displayed.
n Press the eNTe R button.
n Highlight the “Map View” key and press the
e NTe R button.
n Highlight either one of the “Plan View” keys
or one of the “Birdview” keys and press the
e NTe R button to select the map view. Press
the MaP button
04 or the “Back” key to
accept the changes.