Page 1173 of 5121

PASSENGER SIDE DOOR MIRROR DEFOGGER
DEF-23
< COMPONENT DIAGNOSIS >
C
D
E
F
G
H
I
J
K
MA
B
DEF
N
O
P
PASSENGER SIDE DOOR MIRROR DEFOGGER
DescriptionINFOID:0000000003857625
Heats the heating wire with the power supply from the rear window defogger relay to prevent the door mirror
from fogging up.
Component Function CheckINFOID:0000000003857626
1.CHECK FUNCTION
1. Perform Active Test (“REAR DEFOGGER”) with CONSULT-III.
2. Touch “ON”.
3. Check that the passenger side door mirror glass is getting warmer.
Is the inspection result normal?
YES >> Passenger side door mirror defogger function is OK.
NO >> Refer to DEF-23, "
Diagnosis Procedure"
Diagnosis ProcedureINFOID:0000000003857627
1.CHECK POWER SUPPLY CIRCUIT
1. Turn ignition switch OFF.
2. Disconnect door mirror (passenger side) connector.
3. Turn ignition switch ON.
4. Check voltage between door mirror (passenger side) harness connector and ground.
Is the inspection result normal?
YES >> GO TO 3.
NO >> GO TO 2.
2.CHECK PASSENGER SIDE DOOR MIRROR DEFOGGER CIRCUIT
1. Turn ignition switch OFF.
2. Disconnect fuse block (J/B) connector.
3. Check continuity between fuse block (J/B) harness connector and door mirror (passenger side) harness
connector.
4. Check continuity between fuse block (J/B) harness connector and ground.
Is the inspection result normal?
YES >> GO TO 4.
NO >> Repair or replace harness.
3.CHECK GROUND CIRCUIT
1. Turn ignition switch OFF.
2. Check continuity between door mirror (passenger side) harness connector and ground.
(+)
(–) ConditionVoltage (V)
(Approx.) Door mirror (Passenger side)
Connector Terminal
D43 3 GroundRear window de-
fogger switchON Battery voltage
OFF 0
Fuse block (J/B) Door mirror (passenger side)
Continuity
Connector Terminal Connector Terminal
M3 10C D43 3 Existed
Fuse block (J/B)
GroundContinuity
Connector Terminal
M3 10C Not existed
Page 1175 of 5121

REAR WINDOW DEFOGGER ON SIGNAL
DEF-25
< COMPONENT DIAGNOSIS >
C
D
E
F
G
H
I
J
K
MA
B
DEF
N
O
P
REAR WINDOW DEFOGGER ON SIGNAL
DescriptionINFOID:0000000003840834
Turns the indicator lamp in the rear window defogger switch ON when operating the rear window defogger.
Component Function CheckINFOID:0000000003840835
1.CHECK FUNCTION
Check that the indicator lamps of rear window defogger switch are illuminated when turning the rear window
defogger switch ON.
Is the inspection result normal?
YES >> Rear window defogger ON signal function is OK.
NO >> Refer to DEF-25, "
Diagnosis Procedure".
Diagnosis ProcedureINFOID:0000000003840836
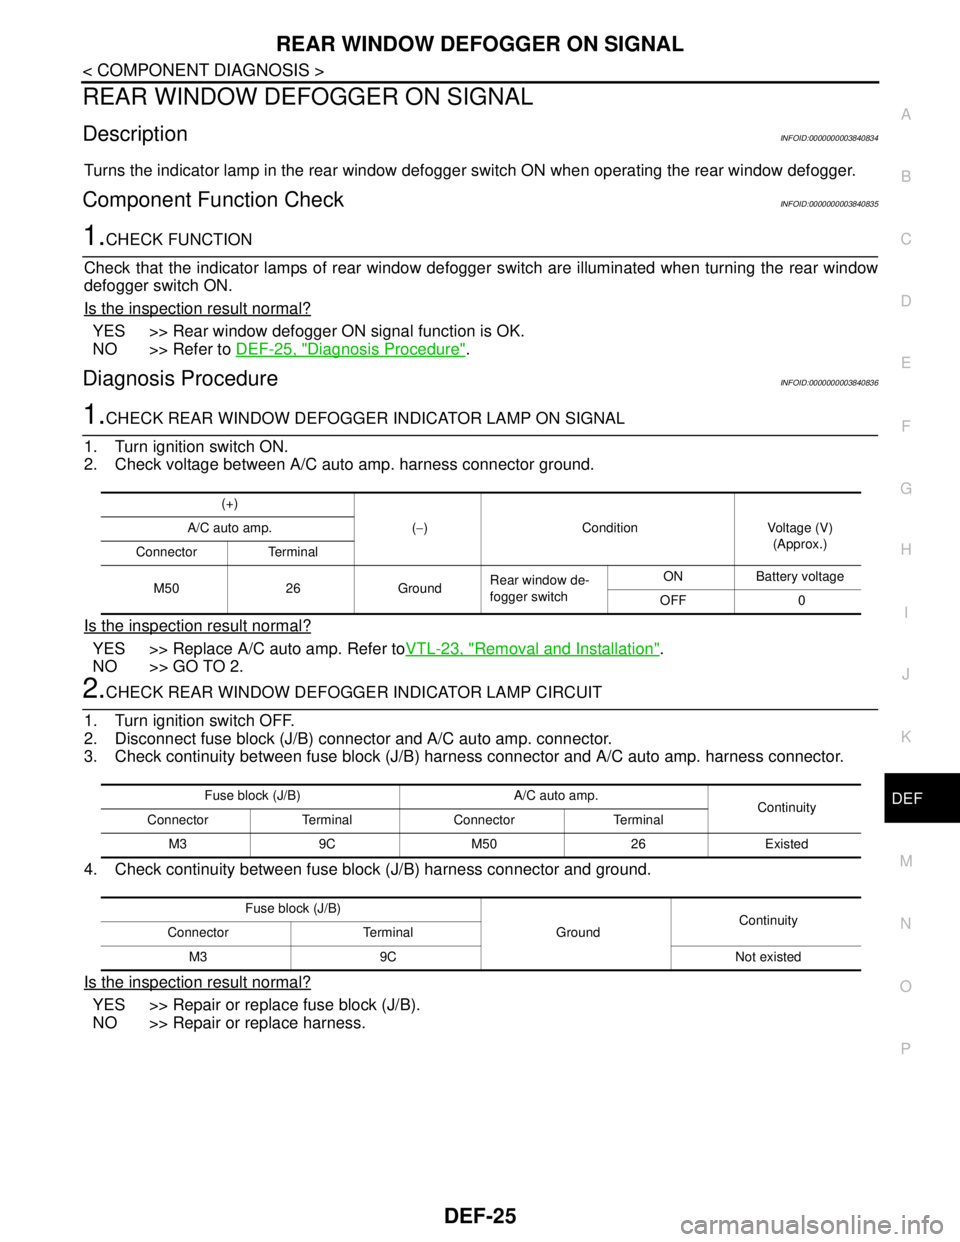
1.CHECK REAR WINDOW DEFOGGER INDICATOR LAMP ON SIGNAL
1. Turn ignition switch ON.
2. Check voltage between A/C auto amp. harness connector ground.
Is the inspection result normal?
YES >> Replace A/C auto amp. Refer toVTL-23, "Removal and Installation".
NO >> GO TO 2.
2.CHECK REAR WINDOW DEFOGGER INDICATOR LAMP CIRCUIT
1. Turn ignition switch OFF.
2. Disconnect fuse block (J/B) connector and A/C auto amp. connector.
3. Check continuity between fuse block (J/B) harness connector and A/C auto amp. harness connector.
4. Check continuity between fuse block (J/B) harness connector and ground.
Is the inspection result normal?
YES >> Repair or replace fuse block (J/B).
NO >> Repair or replace harness.
(+)
(−) Condition Voltage (V)
(Approx.) A/C auto amp.
Connector Terminal
M50 26 GroundRear window de-
fogger switchON Battery voltage
OFF 0
Fuse block (J/B) A/C auto amp.
Continuity
Connector Terminal Connector Terminal
M3 9C M50 26 Existed
Fuse block (J/B)
GroundContinuity
Connector Terminal
M3 9C Not existed
Page 1188 of 5121

DEF-38
< ECU DIAGNOSIS >
BCM (BODY CONTROL MODULE)
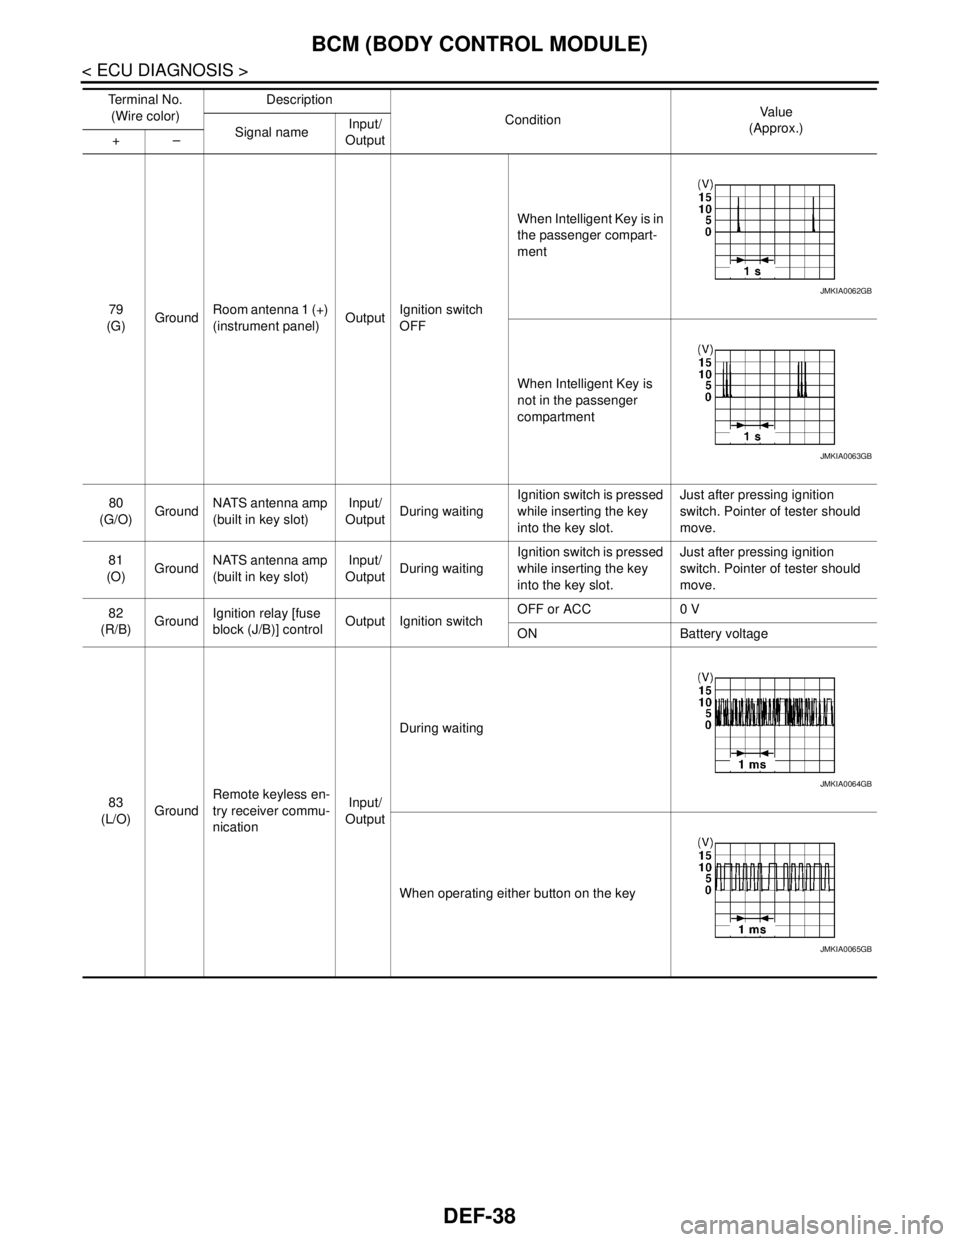
79
(G)GroundRoom antenna 1 (+)
(instrument panel)OutputIgnition switch
OFFWhen Intelligent Key is in
the passenger compart-
ment
When Intelligent Key is
not in the passenger
compartment
80
(G/O)GroundNATS antenna amp
(built in key slot)Input/
OutputDuring waitingIgnition switch is pressed
while inserting the key
into the key slot.Just after pressing ignition
switch. Pointer of tester should
move.
81
(O)GroundNATS antenna amp
(built in key slot)Input/
OutputDuring waitingIgnition switch is pressed
while inserting the key
into the key slot.Just after pressing ignition
switch. Pointer of tester should
move.
82
(R/B)GroundIgnition relay [fuse
block (J/B)] controlOutput Ignition switchOFF or ACC 0 V
ON Battery voltage
83
(L/O)GroundRemote keyless en-
try receiver commu-
nicationInput/
OutputDuring waiting
When operating either button on the key Te r m i n a l N o .
(Wire color)Description
ConditionVa l u e
(Approx.)
Signal nameInput/
Output +–
JMKIA0062GB
JMKIA0063GB
JMKIA0064GB
JMKIA0065GB
Page 1195 of 5121

BCM (BODY CONTROL MODULE)
DEF-45
< ECU DIAGNOSIS >
C
D
E
F
G
H
I
J
K
MA
B
DEF
N
O
P
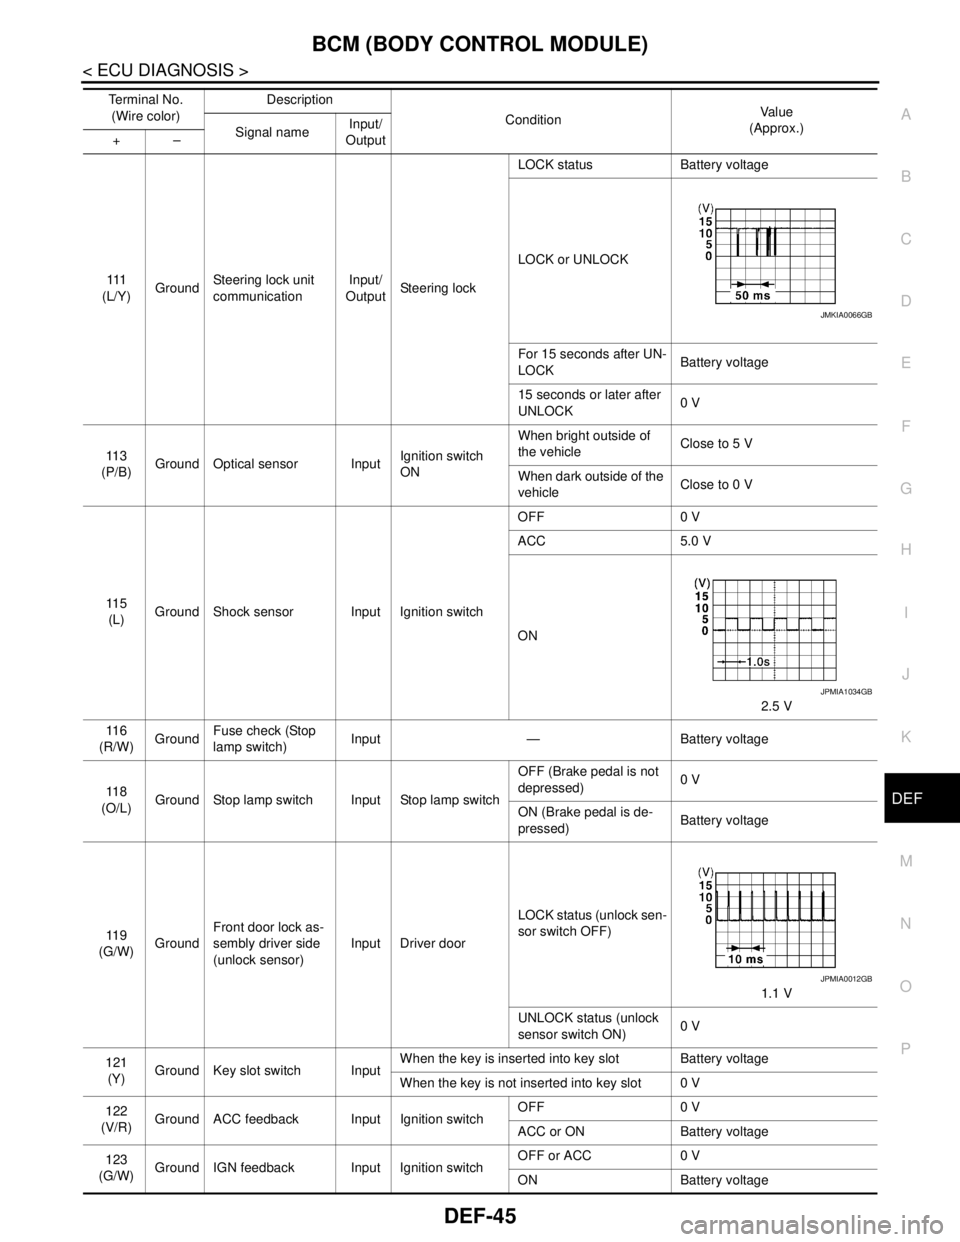
111
(L/Y)GroundSteering lock unit
communicationInput/
OutputSteering lockLOCK status Battery voltage
LOCK or UNLOCK
For 15 seconds after UN-
LOCKBattery voltage
15 seconds or later after
UNLOCK0 V
11 3
(P/B)Ground Optical sensor InputIgnition switch
ONWhen bright outside of
the vehicleClose to 5 V
When dark outside of the
vehicleClose to 0 V
11 5
(L)Ground Shock sensor Input Ignition switchOFF 0 V
ACC 5.0 V
ON
2.5 V
11 6
(R/W)GroundFuse check (Stop
lamp switch)Input — Battery voltage
11 8
(O/L)Ground Stop lamp switch Input Stop lamp switchOFF (Brake pedal is not
depressed)0 V
ON (Brake pedal is de-
pressed)Battery voltage
11 9
(G/W)GroundFront door lock as-
sembly driver side
(unlock sensor)Input Driver doorLOCK status (unlock sen-
sor switch OFF)
1.1 V
UNLOCK status (unlock
sensor switch ON)0 V
121
(Y)Ground Key slot switch InputWhen the key is inserted into key slot Battery voltage
When the key is not inserted into key slot 0 V
122
(V/R)Ground ACC feedback Input Ignition switchOFF 0 V
ACC or ON Battery voltage
123
(G/W)Ground IGN feedback Input Ignition switchOFF or ACC 0 V
ON Battery voltage Te r m i n a l N o .
(Wire color)Description
ConditionVa l u e
(Approx.)
Signal nameInput/
Output +–
JMKIA0066GB
JPMIA1034GB
JPMIA0012GB
Page 1208 of 5121

DEF-58
< SYMPTOM DIAGNOSIS >
REAR WINDOW DEFOGGER AND DOOR MIRROR DEFOGGER DO NOT OPER-
ATE.
SYMPTOM DIAGNOSIS
REAR WINDOW DEFOGGER AND DOOR MIRROR DEFOGGER DO NOT
OPERATE.
Diagnosis ProcedureINFOID:0000000003940018
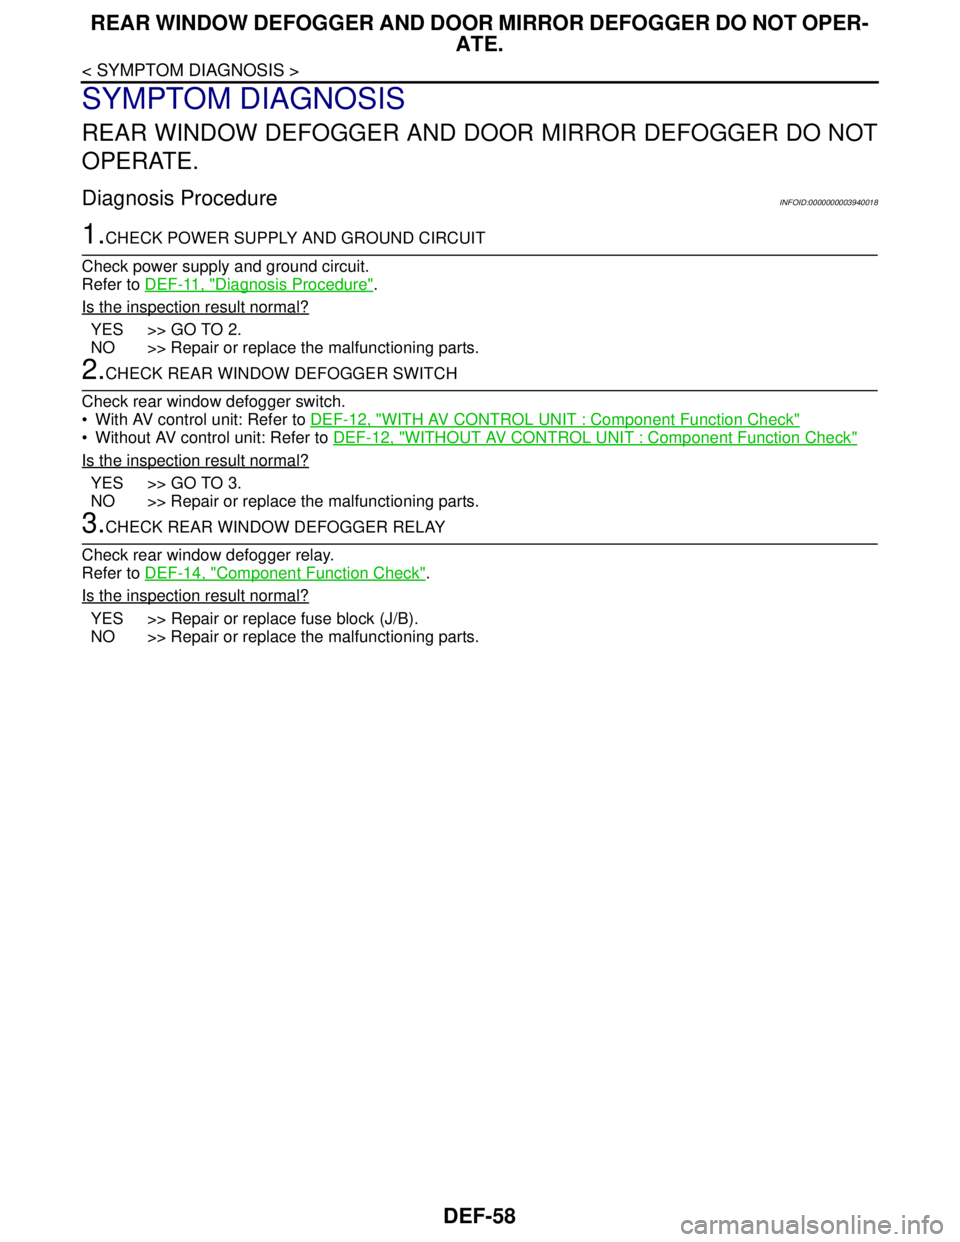
1.CHECK POWER SUPPLY AND GROUND CIRCUIT
Check power supply and ground circuit.
Refer to DEF-11, "
Diagnosis Procedure".
Is the inspection result normal?
YES >> GO TO 2.
NO >> Repair or replace the malfunctioning parts.
2.CHECK REAR WINDOW DEFOGGER SWITCH
Check rear window defogger switch.
With AV control unit: Refer to DEF-12, "
WITH AV CONTROL UNIT : Component Function Check"
Without AV control unit: Refer to DEF-12, "WITHOUT AV CONTROL UNIT : Component Function Check"
Is the inspection result normal?
YES >> GO TO 3.
NO >> Repair or replace the malfunctioning parts.
3.CHECK REAR WINDOW DEFOGGER RELAY
Check rear window defogger relay.
Refer to DEF-14, "
Component Function Check".
Is the inspection result normal?
YES >> Repair or replace fuse block (J/B).
NO >> Repair or replace the malfunctioning parts.
Page 1272 of 5121
![NISSAN TEANA 2008 Service Manual DLK-56
< COMPONENT DIAGNOSIS >[WITH INTELLIGENT KEY SYSTEM]
POWER SUPPLY AND GROUND CIRCUIT
POWER SUPPLY AND GROUND CIRCUIT
BCM (BODY CONTROL MODULE)
BCM (BODY CONTROL MODULE) : Diagnosis ProcedureINF NISSAN TEANA 2008 Service Manual DLK-56
< COMPONENT DIAGNOSIS >[WITH INTELLIGENT KEY SYSTEM]
POWER SUPPLY AND GROUND CIRCUIT
POWER SUPPLY AND GROUND CIRCUIT
BCM (BODY CONTROL MODULE)
BCM (BODY CONTROL MODULE) : Diagnosis ProcedureINF](/manual-img/5/57391/w960_57391-1271.png)
DLK-56
< COMPONENT DIAGNOSIS >[WITH INTELLIGENT KEY SYSTEM]
POWER SUPPLY AND GROUND CIRCUIT
POWER SUPPLY AND GROUND CIRCUIT
BCM (BODY CONTROL MODULE)
BCM (BODY CONTROL MODULE) : Diagnosis ProcedureINFOID:0000000003794832
1.CHECK FUSE AND FUSIBLE LINK
1. Turn ignition switch OFF.
2. Check that the following fuse and fusible link are not fusing.
Is the fuse fusing?
YES >> Replace the blown fuse or fusible link after repairing the affected circuit if a fuse or fusible link is
blown.
NO >> GO TO 2.
2.CHECK POWER SUPPLY CIRCUIT
1. Disconnect BCM connectors.
2. Check voltage between BCM harness connector and ground.
Is the inspection result normal?
YES >> GO TO 3.
NO >> Repair or replace harness.
3.CHECK GROUND CIRCUIT
Check continuity between BCM harness connector and ground.
Is the inspection result normal?
YES >> INSPECTION END
NO >> Repair or replace harness.
Terminal No. Signal name Fuse and fusible link No.
1
Battery power supplyI (40A)
1110 (10A)
(+)
(−)Vo l ta g e
(Approx.) BCM
Connector Terminal
M118 1
Ground Battery voltage
M119 11
BCM
GroundContinuity
Connector Terminal
M119 13 Existed
Page 1298 of 5121
![NISSAN TEANA 2008 Service Manual DLK-82
< COMPONENT DIAGNOSIS >[WITH INTELLIGENT KEY SYSTEM]
INTELLIGENT KEY WARNING BUZZER
INTELLIGENT KEY WARNING BUZZER
DescriptionINFOID:0000000003794889
Answers back and warns for an inappropriate NISSAN TEANA 2008 Service Manual DLK-82
< COMPONENT DIAGNOSIS >[WITH INTELLIGENT KEY SYSTEM]
INTELLIGENT KEY WARNING BUZZER
INTELLIGENT KEY WARNING BUZZER
DescriptionINFOID:0000000003794889
Answers back and warns for an inappropriate](/manual-img/5/57391/w960_57391-1297.png)
DLK-82
< COMPONENT DIAGNOSIS >[WITH INTELLIGENT KEY SYSTEM]
INTELLIGENT KEY WARNING BUZZER
INTELLIGENT KEY WARNING BUZZER
DescriptionINFOID:0000000003794889
Answers back and warns for an inappropriate operation.
Component Function CheckINFOID:0000000003794890
1.CHECK FUNCTION
Check Intelligent Key warning buzzer (“OUTSIDE BUZZER”) in Active Test mode.
Is the inspection result normal?
YES >> Intelligent Key warning buzzer (engine room) is OK.
NO >> Refer to DLK-82, "
Diagnosis Procedure".
Diagnosis ProcedureINFOID:0000000003794891
1.CHECK FUSE
1. Turn ignition switch OFF.
2. Check 10 A fuse, [No.6, located in fuse block (J/B)].
Is fuse fusing?
YES >> Replace the blown fuse after repairing the affected circuit if a fuse is blown.
NO >> GO TO 2.
2.CHECK INTELLIGENT KEY WARNING BUZZER POWER SUPPLY CIRCUIT
1. Disconnect Intelligent Key warning buzzer connector.
2. Check voltage between Intelligent Key warning buzzer harness connector and ground.
Is the inspection result normal?
YES >> GO TO 3.
NO >> Repair or replace Intelligent Key warning buzzer power supply circuit.
3.CHECK INTELLIGENT KEY WARNING BUZZER CIRCUIT
1. Disconnect BCM connector.
2. Check continuity between BCM harness connector and Intelligent Key warning buzzer harness connector.
3. Check continuity between BCM harness connector and ground.
Is the inspection result normal?
YES >> GO TO 4.
NO >> Repair or replace harness.
4.CHECK INTELLIGENT KEY WARNING BUZZER
Check DLK-83, "
Component Inspection".
Is the inspection result normal?
(+)
(–)Voltage (V)
(Approx.) Intelligent Key warning buzzer
Connector Terminal
E25 1 Ground Battery voltage
BCM Intelligent Key warning buzzer
Continuity
Connector Terminal Connector Terminal
M121 64 E25 3 Existed
BCM
GroundContinuity
Connector Terminal
M121 64 Not existed
Page 1302 of 5121
![NISSAN TEANA 2008 Service Manual DLK-86
< COMPONENT DIAGNOSIS >[WITH INTELLIGENT KEY SYSTEM]
KEY SLOT
KEY SLOT
DescriptionINFOID:0000000003794898
Detect whether Intelligent Key is inserted.
Immobilizer antenna amp checks Intelligent NISSAN TEANA 2008 Service Manual DLK-86
< COMPONENT DIAGNOSIS >[WITH INTELLIGENT KEY SYSTEM]
KEY SLOT
KEY SLOT
DescriptionINFOID:0000000003794898
Detect whether Intelligent Key is inserted.
Immobilizer antenna amp checks Intelligent](/manual-img/5/57391/w960_57391-1301.png)
DLK-86
< COMPONENT DIAGNOSIS >[WITH INTELLIGENT KEY SYSTEM]
KEY SLOT
KEY SLOT
DescriptionINFOID:0000000003794898
Detect whether Intelligent Key is inserted.
Immobilizer antenna amp checks Intelligent Key transponder.
Component Function CheckINFOID:0000000003794899
1.CHECK FUNCTION
Check key slot (“KEY SW -SLOT”) in Data Monitor mode with CONSULT-III.
Is the inspection result normal?
YES >> Key slot is OK.
NO >> Refer to DLK-86, "
Diagnosis Procedure".
Diagnosis ProcedureINFOID:0000000003794900
1.CHECK FUSE
1. Turn ignition switch OFF.
2. Check 10 A fuse, [No.9, located in fuse block (J/B)].
Is fuse fusing?
YES >> Replace the blown fuse after repairing the affected circuit if a fuse is blown.
NO >> GO TO 2.
2.CHECK KEY SLOT POWER SUPPLY CIRCUIT
1. Disconnect key slot connector.
2. Check voltage between slot harness connector and ground.
Is the inspection result normal?
YES >> GO TO 3.
NO >> Repair or replace key slot power supply circuit.
3.CHECK KEY SLOT GROUND CIRCUIT
Check continuity between key slot harness connector and ground.
Is the inspection result normal?
YES >> GO TO 4.
NO >> Repair or replace harness.
4.CHECK KEY SLOT CIRCUIT
1. Disconnect BCM connector.
2. Check continuity between BCM harness connector and key slot harness connector.
Monitor item Condition
KEY SW-SLOTKey is inserted in key slot: ON
Key is removed from key slot: OFF
(+)
(–)Voltage (V)
(Approx.) Key slot
Connector Terminal
M99 1 Ground Battery voltage
Key slot
GroundContinuity
Connector Terminal
M99 7 Existed