Page 2614 of 5121
HIGH-PRESSURE PIPE
HA-45
< ON-VEHICLE REPAIR >
C
D
E
F
G
H
J
K
L
MA
B
HA
N
O
P
3. Remove mounting bolt (A), and then disconnect high-pressure
flexible hose (1) and high-pressure pipe (2) from condenser pipe
assembly.
CAUTION:
Cap or wrap the joint of the A/C piping with suitable mate-
rial such as vinyl tape to avoid the entry of air.
4. Remove reservoir tank. refer to CO-13, "
Exploded View".
5. Remove mounting clips (A), and then remove high-pressure pipe (1).
INSTALLATION
Installation is basically the reverse order of removal.
CAUTION:
Replace O-rings with new ones. Then apply compressor oil to them when installing.
Check for leakages when recharging refrigerant.
JPIIA0979ZZ
JPIIA0974ZZ
Page 2615 of 5121
HA-46
< ON-VEHICLE REPAIR >
CONDENSER
CONDENSER
Exploded ViewINFOID:0000000003795846
Removal and InstallationINFOID:0000000003839914
REMOVAL
1. Remove condenser pipe assembly. Refer to HA-48, "Exploded View".
2. Remove mounting clip (A).
3. Disconnect hood lock cable (1), and then move hood lock pro-
tector (2) to a position where it does not inhibit work.
4. Disconnect refrigerant pressure sensor connector (A).
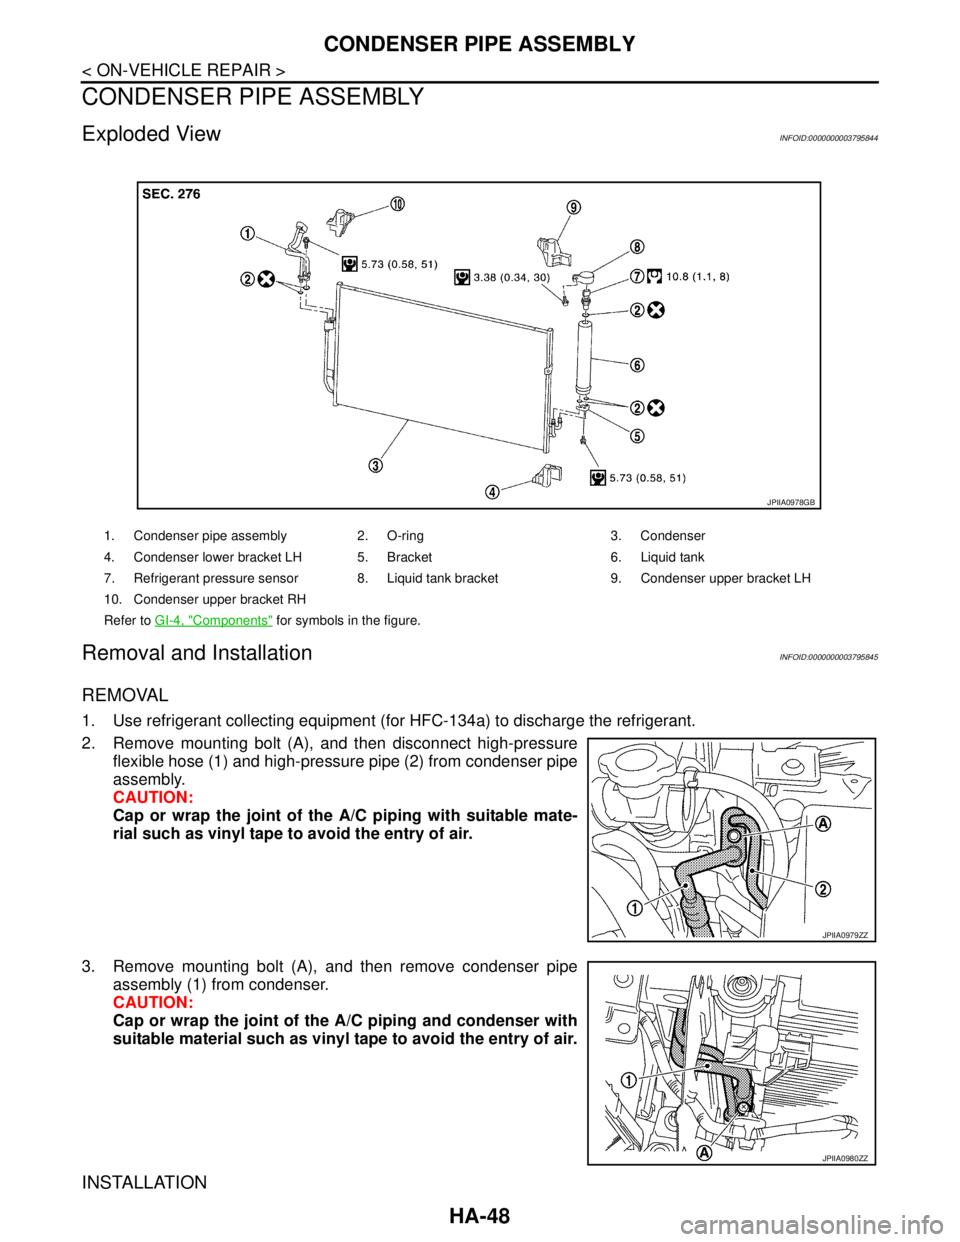
1. Condenser pipe assembly 2. O-ring 3. Condenser
4. Condenser lower bracket LH 5. Bracket 6. Liquid tank
7. Refrigerant pressure sensor 8. Liquid tank bracket 9. Condenser upper bracket LH
10. Condenser upper bracket RH
Refer to GI-4, "
Components" for symbols in the figure.
JPIIA0978GB
JPIIA0981ZZ
JPIIA0982ZZ
Page 2616 of 5121
CONDENSER
HA-47
< ON-VEHICLE REPAIR >
C
D
E
F
G
H
J
K
L
MA
B
HA
N
O
P
5. Disengage tabs (A).
6. Pull condenser (1) upward of vehicle, and then remove con-
denser (as shown in the figure).
CAUTION:
Be careful not to damage core surface of condenser.
INSTALLATION
Installation is basically the reverse order of removal.
CAUTION:
Replace O-rings with new ones. Then apply compressor oil to them when installing.
Check for leakages when recharging refrigerant.
JPIIA0983ZZ
Page 2617 of 5121

HA-48
< ON-VEHICLE REPAIR >
CONDENSER PIPE ASSEMBLY
CONDENSER PIPE ASSEMBLY
Exploded ViewINFOID:0000000003795844
Removal and InstallationINFOID:0000000003795845
REMOVAL
1. Use refrigerant collecting equipment (for HFC-134a) to discharge the refrigerant.
2. Remove mounting bolt (A), and then disconnect high-pressure
flexible hose (1) and high-pressure pipe (2) from condenser pipe
assembly.
CAUTION:
Cap or wrap the joint of the A/C piping with suitable mate-
rial such as vinyl tape to avoid the entry of air.
3. Remove mounting bolt (A), and then remove condenser pipe
assembly (1) from condenser.
CAUTION:
Cap or wrap the joint of the A/C piping and condenser with
suitable material such as vinyl tape to avoid the entry of air.
INSTALLATION
1. Condenser pipe assembly 2. O-ring 3. Condenser
4. Condenser lower bracket LH 5. Bracket 6. Liquid tank
7. Refrigerant pressure sensor 8. Liquid tank bracket 9. Condenser upper bracket LH
10. Condenser upper bracket RH
Refer to GI-4, "
Components" for symbols in the figure.
JPIIA0978GB
JPIIA0979ZZ
JPIIA0980ZZ
Page 2618 of 5121
CONDENSER PIPE ASSEMBLY
HA-49
< ON-VEHICLE REPAIR >
C
D
E
F
G
H
J
K
L
MA
B
HA
N
O
P
Installation is basically the reverse order of removal.
CAUTION:
Replace O-rings with new ones. Then apply compressor oil to them when installing.
Check for leakages when recharging refrigerant.
Page 2619 of 5121

HA-50
< ON-VEHICLE REPAIR >
LIQUID TANK
LIQUID TANK
Exploded ViewINFOID:0000000003795848
Removal and InstallationINFOID:0000000003795849
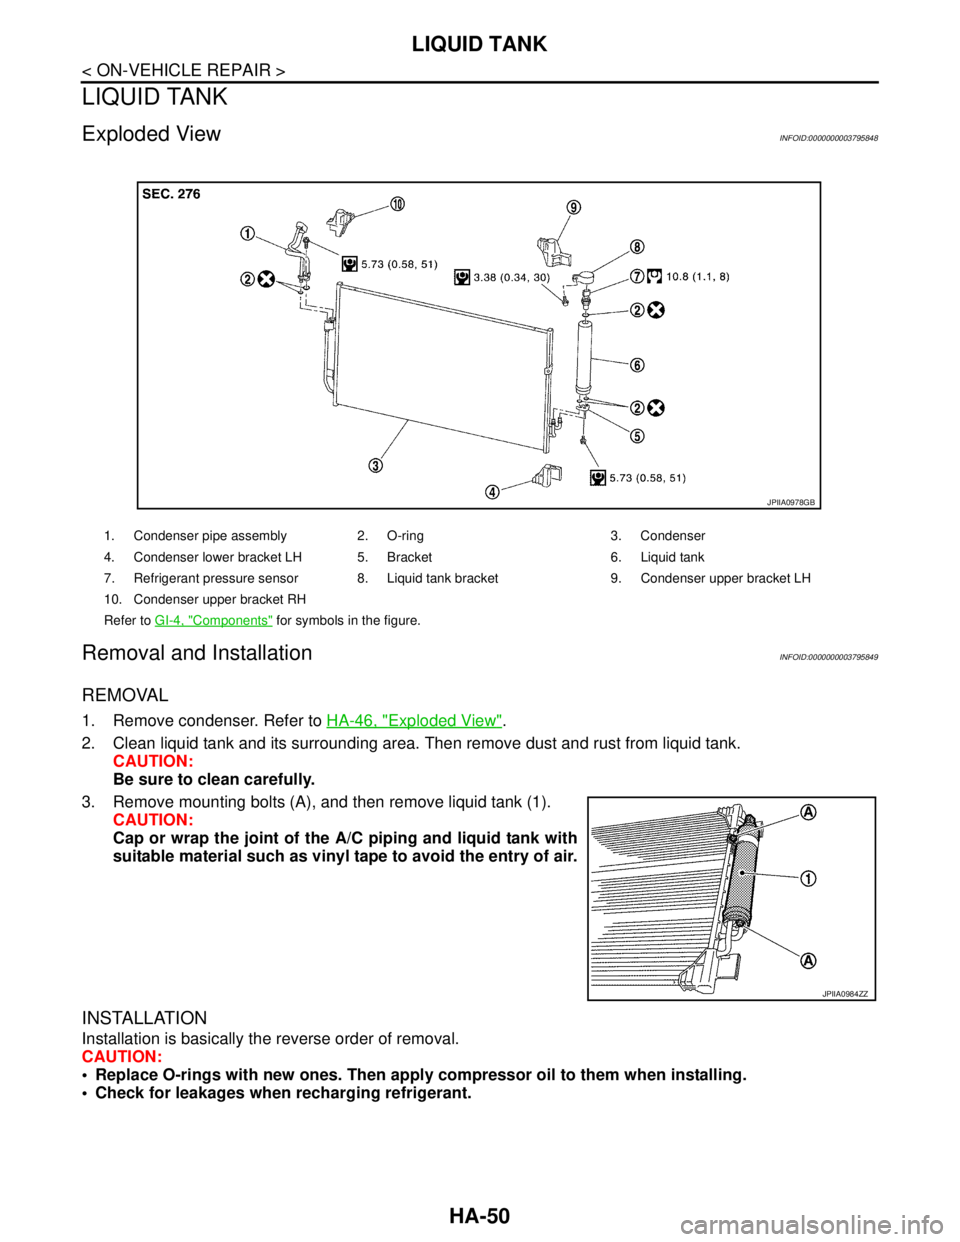
REMOVAL
1. Remove condenser. Refer to HA-46, "Exploded View".
2. Clean liquid tank and its surrounding area. Then remove dust and rust from liquid tank.
CAUTION:
Be sure to clean carefully.
3. Remove mounting bolts (A), and then remove liquid tank (1).
CAUTION:
Cap or wrap the joint of the A/C piping and liquid tank with
suitable material such as vinyl tape to avoid the entry of air.
INSTALLATION
Installation is basically the reverse order of removal.
CAUTION:
Replace O-rings with new ones. Then apply compressor oil to them when installing.
Check for leakages when recharging refrigerant.
1. Condenser pipe assembly 2. O-ring 3. Condenser
4. Condenser lower bracket LH 5. Bracket 6. Liquid tank
7. Refrigerant pressure sensor 8. Liquid tank bracket 9. Condenser upper bracket LH
10. Condenser upper bracket RH
Refer to GI-4, "
Components" for symbols in the figure.
JPIIA0978GB
JPIIA0984ZZ
Page 2620 of 5121
REFRIGERANT PRESSURE SENSOR
HA-51
< ON-VEHICLE REPAIR >
C
D
E
F
G
H
J
K
L
MA
B
HA
N
O
P
REFRIGERANT PRESSURE SENSOR
Exploded ViewINFOID:0000000003795850
Removal and InstallationINFOID:0000000003795851
REMOVAL
1. Remove liquid tank. Refer to HA-50, "Exploded View".
2. Fix the liquid tank (1) with a vise (A). Remove the refrigerant
pressure sensor (2) with a wrench (B).
CAUTION:
Be careful not to damage liquid tank.
INSTALLATION
Installation is basically the reverse order of removal.
CAUTION:
Replace O-rings with new ones. Then apply compressor oil to them when installing.
Check for leakages when recharging refrigerant.
1. Condenser pipe assembly 2. O-ring 3. Condenser
4. Condenser lower bracket LH 5. Bracket 6. Liquid tank
7. Refrigerant pressure sensor 8. Liquid tank bracket 9. Condenser upper bracket LH
10. Condenser upper bracket RH
Refer to GI-4, "
Components" for symbols in the figure.
JPIIA0978GB
JSIIA0075ZZ
Page 2728 of 5121
![NISSAN TEANA 2008 Service Manual HAC-100
< PRECAUTION >[WITHOUT 7 INCH DISPLAY]
PRECAUTIONS
CAUTION:
The new and former refrigerant connections use different O-ring configurations. Never confuse O-
rings since they are not interchang NISSAN TEANA 2008 Service Manual HAC-100
< PRECAUTION >[WITHOUT 7 INCH DISPLAY]
PRECAUTIONS
CAUTION:
The new and former refrigerant connections use different O-ring configurations. Never confuse O-
rings since they are not interchang](/manual-img/5/57391/w960_57391-2727.png)
HAC-100
< PRECAUTION >[WITHOUT 7 INCH DISPLAY]
PRECAUTIONS
CAUTION:
The new and former refrigerant connections use different O-ring configurations. Never confuse O-
rings since they are not interchangeable. Refrigerant may leak at the connection if a wrong O-ring is
installed.
O-Ring Part Numbers and Specifications
F. Former type refrigerant connection N. New type refrigerant connection
:O-ring size
JPIIA0453ZZ
Connection type Piping connection point Part number QTY O-ring size
NewLow-pressure flexible hose to low-pressure pipe 92474 N8210 1 19
High-pressure pipe to condenser pipe assembly (Outlet) 92471 N8210 1 8
Condenser pipe assembly (Inlet) to high-pressure flexible
hose (One-touch joint)92472 N8210 1 12
Condenser assembly to condenser pipe as-
semblyInlet 92472 N8210 1 12
Outlet 92471 N8210 1 8
Low-pressure pipe to expansion valve 92473 N8210 1 16
High-pressure pipe to expansion valve 92471 N8210 1 8
Compressor to low-pressure flexible hose 92474 N8210 1 19
Compressor to high-pressure flexible hose 92472 N8210 1 12
Liquid tank to condenser assemblyInlet
92471 N82101
8
Outlet 1
FormerRefrigerant pressure sensor to liquid tank J2476 89956 1 10
Expansion valve to evaporator pipe assemblyInlet 92475 71L00 1 12
Outlet 92475 72L00 1 16
Evaporator to evaporator pipe assemblyInlet 92475 71L00 1 12
Outlet 92475 72L00 1 16