2008 NISSAN TEANA air filter
[x] Cancel search: air filterPage 1913 of 5121
EM-38
< ON-VEHICLE REPAIR >
OIL PAN AND OIL STRAINER
OIL PAN AND OIL STRAINER
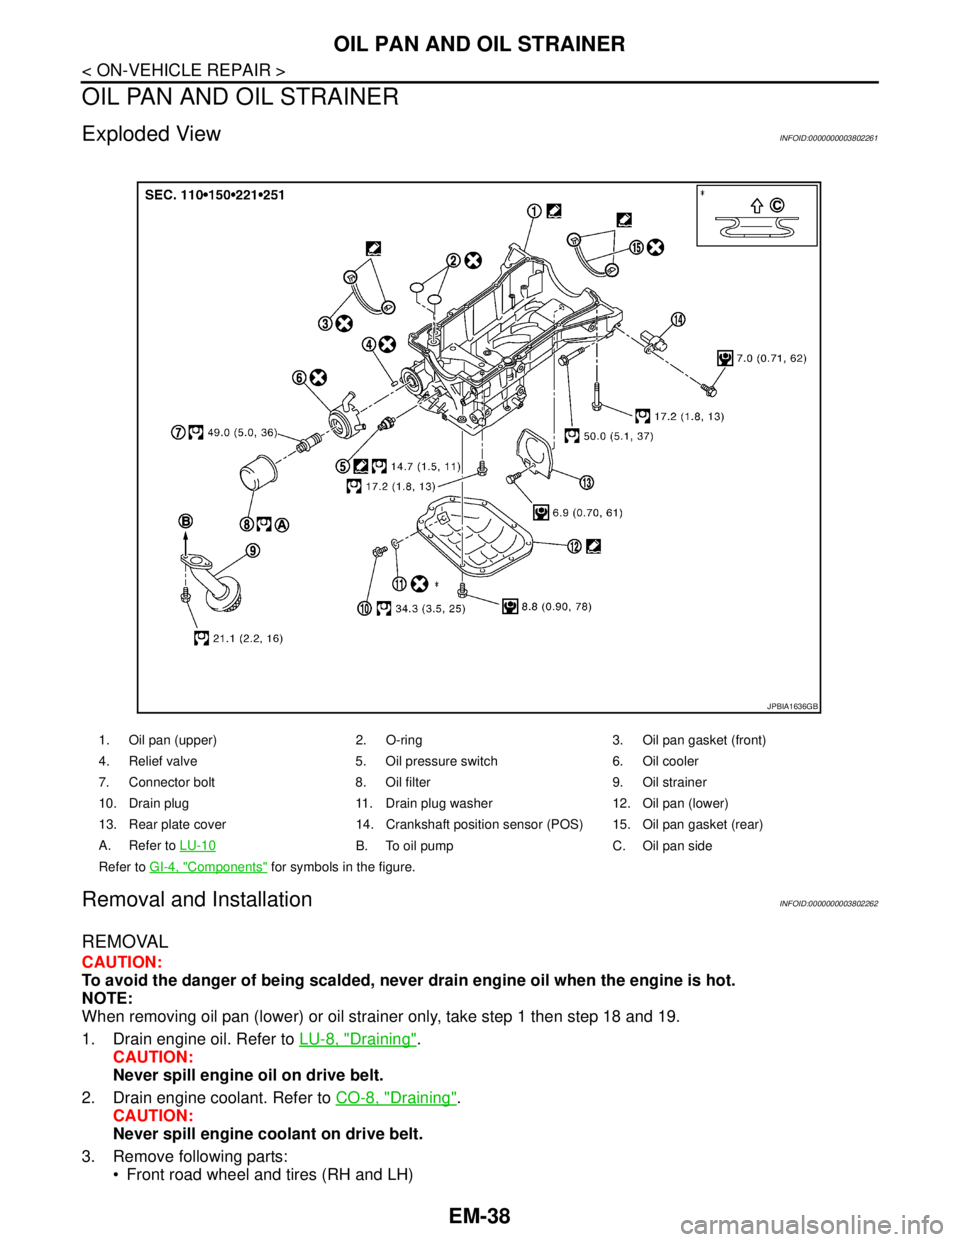
Exploded ViewINFOID:0000000003802261
Removal and InstallationINFOID:0000000003802262
REMOVAL
CAUTION:
To avoid the danger of being scalded, never drain engine oil when the engine is hot.
NOTE:
When removing oil pan (lower) or oil strainer only, take step 1 then step 18 and 19.
1. Drain engine oil. Refer to LU-8, "
Draining".
CAUTION:
Never spill engine oil on drive belt.
2. Drain engine coolant. Refer to CO-8, "
Draining".
CAUTION:
Never spill engine coolant on drive belt.
3. Remove following parts:
Front road wheel and tires (RH and LH)
1. Oil pan (upper) 2. O-ring 3. Oil pan gasket (front)
4. Relief valve 5. Oil pressure switch 6. Oil cooler
7. Connector bolt 8. Oil filter 9. Oil strainer
10. Drain plug 11. Drain plug washer 12. Oil pan (lower)
13. Rear plate cover 14. Crankshaft position sensor (POS) 15. Oil pan gasket (rear)
A. Refer to LU-10
B. To oil pump C. Oil pan side
Refer to GI-4, "
Components" for symbols in the figure.
JPBIA1636GB
Page 1914 of 5121
OIL PAN AND OIL STRAINER
EM-39
< ON-VEHICLE REPAIR >
C
D
E
F
G
H
I
J
K
L
MA
EM
N
P O
Splash guard (RH and LH): Refer to EXT-22, "FENDER PROTECTOR : Exploded View".
Exhaust front tube: Refer to EX-5, "
Exploded View".
Drive belt: Refer to EM-12, "
Removal and Installation".
4. Remove A/C compressor with piping connected, and temporarily secure it to aside. Refer to HA-36,
"Exploded View".
5. Remove oil level gauge. Refer to EM-96, "
Exploded View".
6. Remove front drive shaft (RH). Refer to FAX-16, "
Exploded View".
7. Remove three way catalyst (bank 1 and bank 2) from exhaust manifolds (bank 1 and bank 2). Refer to
EM-34, "
Exploded View".
8. Remove oil pressure switch.
9. Remove oil filter. Refer to LU-10, "
Removal and Installation".
10. Remove oil cooler and water pipes. Refer to LU-11, "
Exploded View".
11. Support transaxle assembly with a suitable jack.
CAUTION:
When setting the transmission jack, be careful not to allow it to collide against the drain plug.
12. Support front suspension member with a suitable jack.
13. Remove engine mounting insulator (rear). Refer to EM-67, "
Exploded View".
14. Remove engine mounting insulator (LH) mounting bolts from transaxle. Refer to EM-67, "
Exploded View".
15. Remove rear torque rod through bolts from rear torque rod bracket. Refer to EM-67, "
Exploded View".
16. Remove member stay, front suspension member fixing bolts and nuts. Refer to FSU-16, "
Exploded View".
17. Lower the jack for the front suspension member to the height.
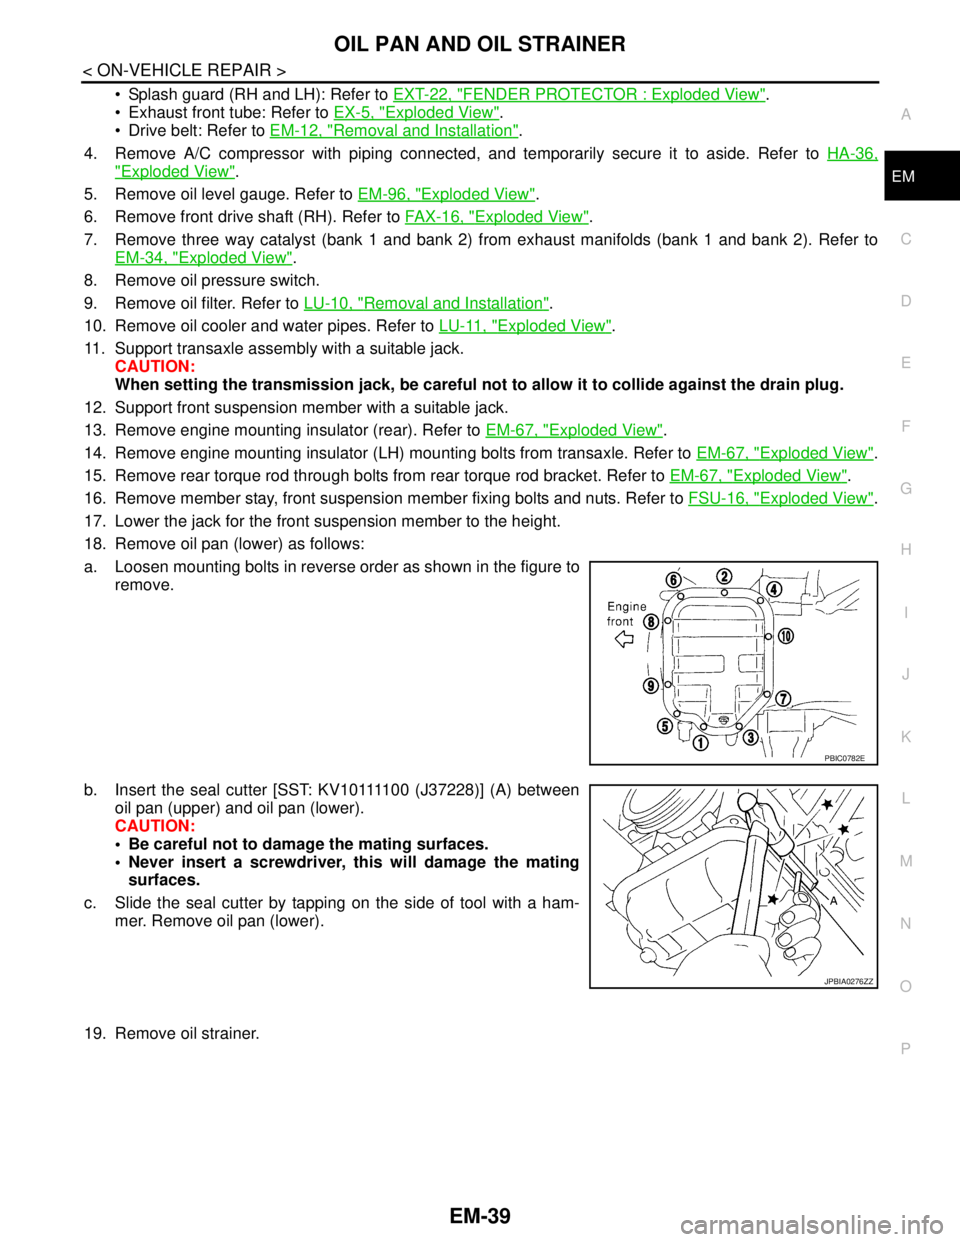
18. Remove oil pan (lower) as follows:
a. Loosen mounting bolts in reverse order as shown in the figure to
remove.
b. Insert the seal cutter [SST: KV10111100 (J37228)] (A) between
oil pan (upper) and oil pan (lower).
CAUTION:
Be careful not to damage the mating surfaces.
Never insert a screwdriver, this will damage the mating
surfaces.
c. Slide the seal cutter by tapping on the side of tool with a ham-
mer. Remove oil pan (lower).
19. Remove oil strainer.
PBIC0782E
JPBIA0276ZZ
Page 1967 of 5121
EM-92
< DISASSEMBLY AND ASSEMBLY >
CAMSHAFT
b. Disconnect ignition coil and injector harness connectors. Refer to EM-49, "Exploded View" and EM-44,
"Exploded View".
3. Remove intake valve timing control solenoid valve. Refer to EM-79, "
Exploded View".
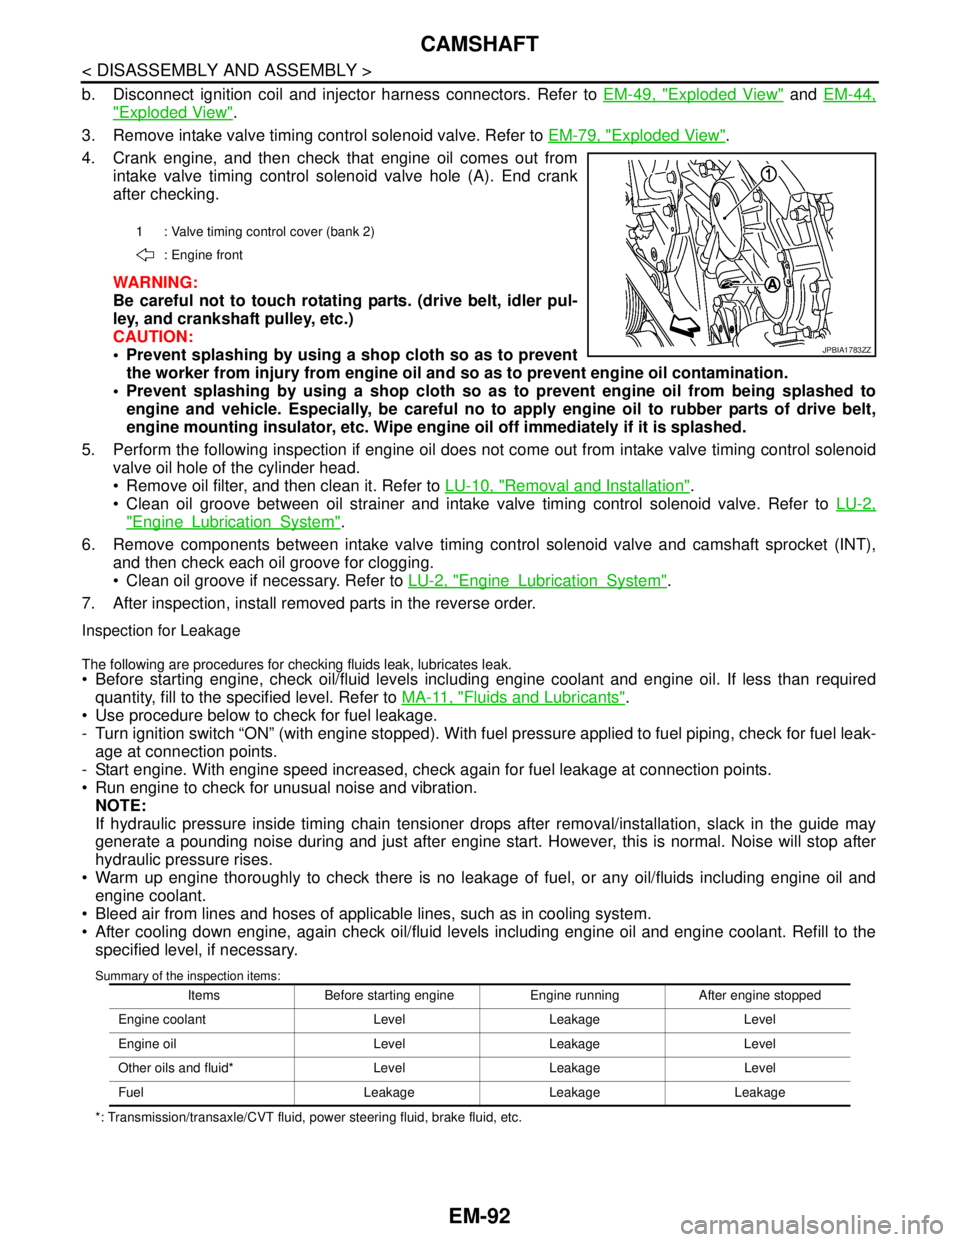
4. Crank engine, and then check that engine oil comes out from
intake valve timing control solenoid valve hole (A). End crank
after checking.
WARNING:
Be careful not to touch rotating parts. (drive belt, idler pul-
ley, and crankshaft pulley, etc.)
CAUTION:
Prevent splashing by using a shop cloth so as to prevent
the worker from injury from engine oil and so as to prevent engine oil contamination.
Prevent splashing by using a shop cloth so as to prevent engine oil from being splashed to
engine and vehicle. Especially, be careful no to apply engine oil to rubber parts of drive belt,
engine mounting insulator, etc. Wipe engine oil off immediately if it is splashed.
5. Perform the following inspection if engine oil does not come out from intake valve timing control solenoid
valve oil hole of the cylinder head.
Remove oil filter, and then clean it. Refer to LU-10, "
Removal and Installation".
Clean oil groove between oil strainer and intake valve timing control solenoid valve. Refer to LU-2,
"EngineLubricationSystem".
6. Remove components between intake valve timing control solenoid valve and camshaft sprocket (INT),
and then check each oil groove for clogging.
Clean oil groove if necessary. Refer to LU-2, "
EngineLubricationSystem".
7. After inspection, install removed parts in the reverse order.
Inspection for Leakage
The following are procedures for checking fluids leak, lubricates leak. Before starting engine, check oil/fluid levels including engine coolant and engine oil. If less than required
quantity, fill to the specified level. Refer to MA-11, "
Fluids and Lubricants".
Use procedure below to check for fuel leakage.
- Turn ignition switch “ON” (with engine stopped). With fuel pressure applied to fuel piping, check for fuel leak-
age at connection points.
- Start engine. With engine speed increased, check again for fuel leakage at connection points.
Run engine to check for unusual noise and vibration.
NOTE:
If hydraulic pressure inside timing chain tensioner drops after removal/installation, slack in the guide may
generate a pounding noise during and just after engine start. However, this is normal. Noise will stop after
hydraulic pressure rises.
Warm up engine thoroughly to check there is no leakage of fuel, or any oil/fluids including engine oil and
engine coolant.
Bleed air from lines and hoses of applicable lines, such as in cooling system.
After cooling down engine, again check oil/fluid levels including engine oil and engine coolant. Refill to the
specified level, if necessary.
Summary of the inspection items:
*: Transmission/transaxle/CVT fluid, power steering fluid, brake fluid, etc.1 : Valve timing control cover (bank 2)
: Engine front
JPBIA1783ZZ
Items Before starting engine Engine running After engine stopped
Engine coolant Level Leakage Level
Engine oil Level Leakage Level
Other oils and fluid* Level Leakage Level
Fuel Leakage Leakage Leakage
Page 2464 of 5121
FL-1
ENGINE
C
DE
F
G H
I
J
K L
M
SECTION FL
A
FL
N
O P
CONTENTS
FUEL SYSTEM
PRECAUTION ................ ...............................2
PRECAUTIONS .............................................. .....2
General Precautions ........................................... ......2
PREPARATION ............................................3
PREPARATION .............................................. .....3
Commercial Service Tool .................................... ......3
ON-VEHICLE MAINTENANCE .....................4
FUEL SYSTEM ............................................... .....4
Inspection ............................................................ ......4
Quick Connector .......................................................4
ON-VEHICLE REPAIR ..................................5
FUEL LEVEL SENSOR UNIT, FUEL FILTER
AND FUEL PUMP ASSEMBLY .........................
5
Exploded View ..................................................... .....5
Removal and Installation ..........................................5
Inspection .................................................................8
FUEL TANK ..................................... ..................9
Exploded View ..................................................... .....9
Removal and Installation ..........................................9
Inspection ................................................................10
SERVICE DATA AND SPECIFICATIONS
(SDS) ............... .............................................
11
SERVICE DATA AND SPECIFICATIONS
(SDS) .................................................................
11
Fuel Tank ............................................................. ....11
Page 2468 of 5121
FUEL LEVEL SENSOR UNIT, FUEL FILTER AND FUEL PUMP ASSEMBLY
FL-5
< ON-VEHICLE REPAIR >
C
D
E
F
G
H
I
J
K
L
MA
FL
N
P O
ON-VEHICLE REPAIR
FUEL LEVEL SENSOR UNIT, FUEL FILTER AND FUEL PUMP ASSEMBLY
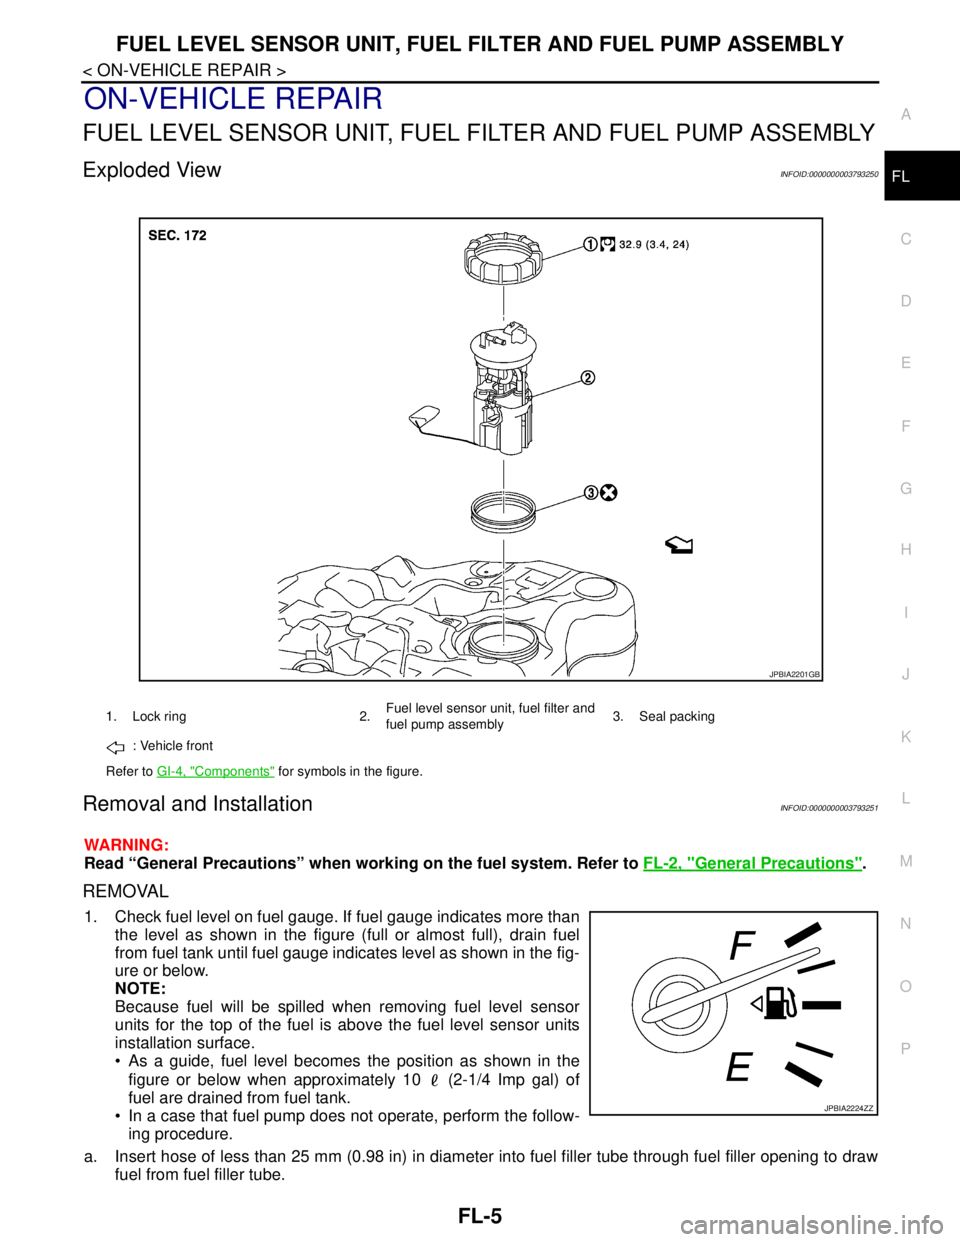
Exploded ViewINFOID:0000000003793250
Removal and InstallationINFOID:0000000003793251
WARNING:
Read “General Precautions” when working on the fuel system. Refer to FL-2, "
General Precautions".
REMOVAL
1. Check fuel level on fuel gauge. If fuel gauge indicates more than
the level as shown in the figure (full or almost full), drain fuel
from fuel tank until fuel gauge indicates level as shown in the fig-
ure or below.
NOTE:
Because fuel will be spilled when removing fuel level sensor
units for the top of the fuel is above the fuel level sensor units
installation surface.
• As a guide, fuel level becomes the position as shown in the
figure or below when approximately 10 (2-1/4 Imp gal) of
fuel are drained from fuel tank.
In a case that fuel pump does not operate, perform the follow-
ing procedure.
a. Insert hose of less than 25 mm (0.98 in) in diameter into fuel filler tube through fuel filler opening to draw
fuel from fuel filler tube.
1. Lock ring 2.Fuel level sensor unit, fuel filter and
fuel pump assembly3. Seal packing
: Vehicle front
Refer to GI-4, "
Components" for symbols in the figure.
JPBIA2201GB
JPBIA2224ZZ
Page 2469 of 5121

FL-6
< ON-VEHICLE REPAIR >
FUEL LEVEL SENSOR UNIT, FUEL FILTER AND FUEL PUMP ASSEMBLY
b. Disconnect fuel filler hose from fuel filler tube. Refer to FL-9, "Exploded View".
c. Insert hose into fuel tank through fuel filler hose to draw fuel from fuel tank.
2. Release the fuel pressure from the fuel lines. Refer to EC-411, "
Inspection".
3. Open fuel filler lid.
4. Open filler cap and release the pressure inside fuel tank.
5. Remove rear seat cushion. Refer to SE-98, "
Exploded View" (WITH VENTILATION SEAT) or SE-140,
"Exploded View" (WITHOUT VENTILATION SEAT).
6. Peel off floor carpet, then remove inspection hole cover units by
turning clips clockwise by 90 degrees.
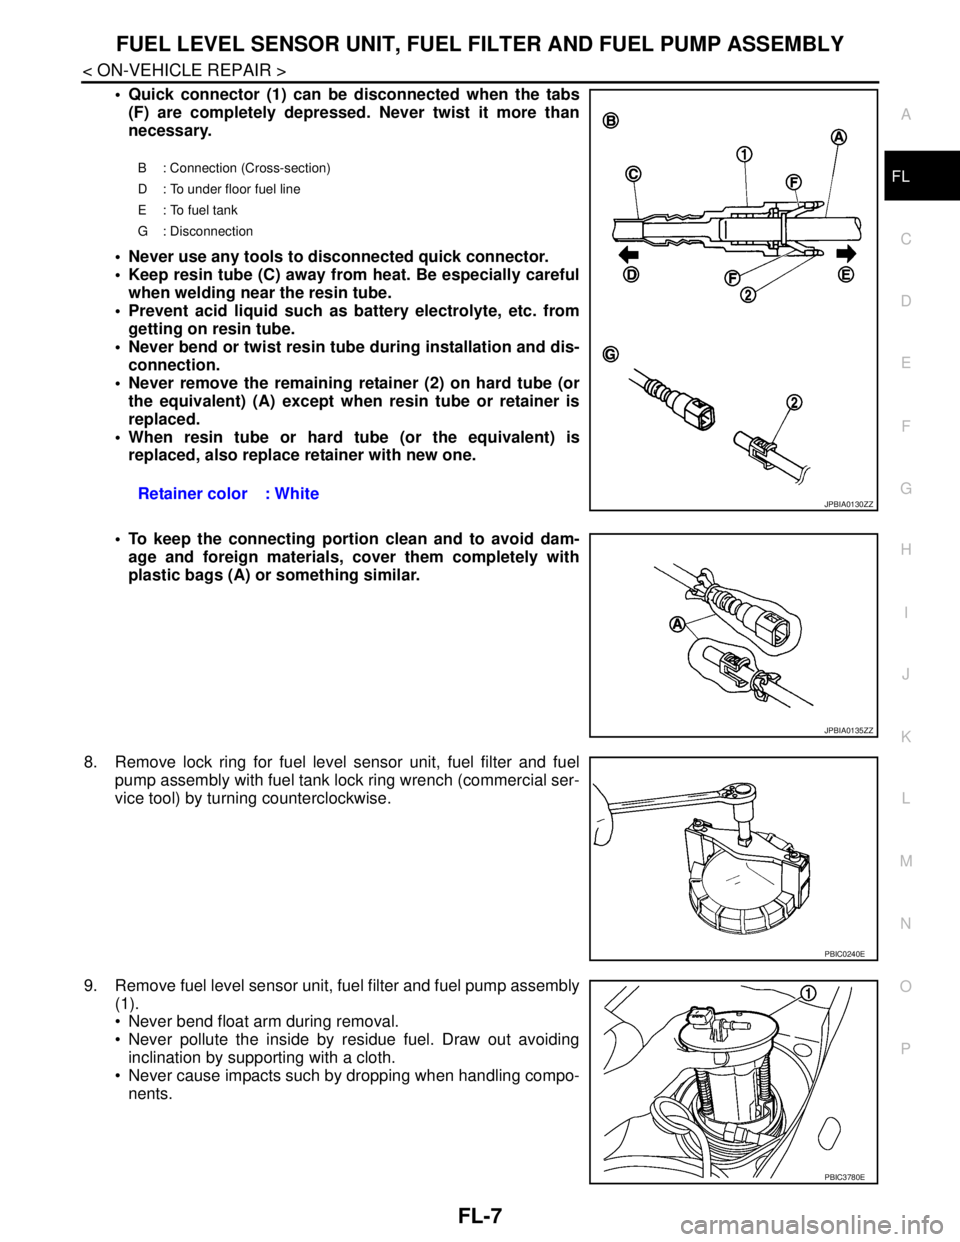
7. Disconnect harness connector and quick connector.
Disconnect quick connector as follows:
Hold the sides of connector, push in tabs (B) and pull out fuel
feed tube.
If quick connector sticks to tube of fuel level sensor unit, push
and pull quick connector several times until they start to move.
Then disconnect them by pulling.
CAUTION:
PBIC2520E
PBIC2521E
A: Pull
JPBIA0134ZZ
Page 2470 of 5121
FUEL LEVEL SENSOR UNIT, FUEL FILTER AND FUEL PUMP ASSEMBLY
FL-7
< ON-VEHICLE REPAIR >
C
D
E
F
G
H
I
J
K
L
MA
FL
N
P O
Quick connector (1) can be disconnected when the tabs
(F) are completely depressed. Never twist it more than
necessary.
Never use any tools to disconnected quick connector.
Keep resin tube (C) away from heat. Be especially careful
when welding near the resin tube.
Prevent acid liquid such as battery electrolyte, etc. from
getting on resin tube.
Never bend or twist resin tube during installation and dis-
connection.
Never remove the remaining retainer (2) on hard tube (or
the equivalent) (A) except when resin tube or retainer is
replaced.
When resin tube or hard tube (or the equivalent) is
replaced, also replace retainer with new one.
To keep the connecting portion clean and to avoid dam-
age and foreign materials, cover them completely with
plastic bags (A) or something similar.
8. Remove lock ring for fuel level sensor unit, fuel filter and fuel
pump assembly with fuel tank lock ring wrench (commercial ser-
vice tool) by turning counterclockwise.
9. Remove fuel level sensor unit, fuel filter and fuel pump assembly
(1).
Never bend float arm during removal.
Never pollute the inside by residue fuel. Draw out avoiding
inclination by supporting with a cloth.
Never cause impacts such by dropping when handling compo-
nents.
B : Connection (Cross-section)
D : To under floor fuel line
E : To fuel tank
G : Disconnection
Retainer color : WhiteJPBIA0130ZZ
JPBIA0135ZZ
PBIC0240E
PBIC3780E
Page 2471 of 5121
FL-8
< ON-VEHICLE REPAIR >
FUEL LEVEL SENSOR UNIT, FUEL FILTER AND FUEL PUMP ASSEMBLY
INSTALLATION
Note to the following, and install in the reverse order of removal.
Fuel Level Sensor Unit
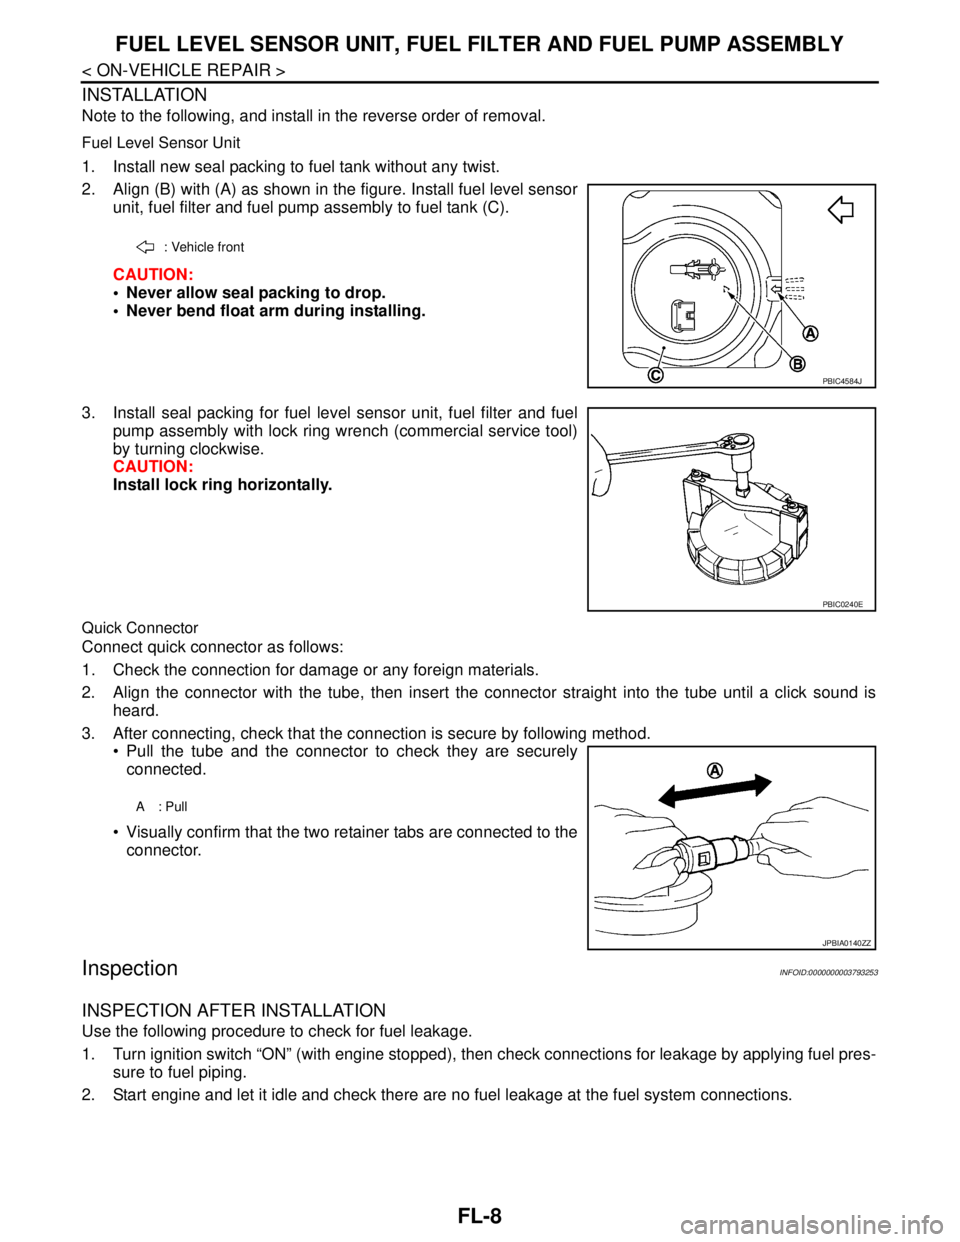
1. Install new seal packing to fuel tank without any twist.
2. Align (B) with (A) as shown in the figure. Install fuel level sensor
unit, fuel filter and fuel pump assembly to fuel tank (C).
CAUTION:
Never allow seal packing to drop.
Never bend float arm during installing.
3. Install seal packing for fuel level sensor unit, fuel filter and fuel
pump assembly with lock ring wrench (commercial service tool)
by turning clockwise.
CAUTION:
Install lock ring horizontally.
Quick Connector
Connect quick connector as follows:
1. Check the connection for damage or any foreign materials.
2. Align the connector with the tube, then insert the connector straight into the tube until a click sound is
heard.
3. After connecting, check that the connection is secure by following method.
Pull the tube and the connector to check they are securely
connected.
Visually confirm that the two retainer tabs are connected to the
connector.
InspectionINFOID:0000000003793253
INSPECTION AFTER INSTALLATION
Use the following procedure to check for fuel leakage.
1. Turn ignition switch “ON” (with engine stopped), then check connections for leakage by applying fuel pres-
sure to fuel piping.
2. Start engine and let it idle and check there are no fuel leakage at the fuel system connections.
: Vehicle front
PBIC4584J
PBIC0240E
A: Pull
JPBIA0140ZZ