Page 17 of 36
 s yste M oFF sWitch
(if so equipped)
The vehicle dynamic control (VDC) system is designed to help improve
driving stability. VDC detects wheel spin and controls")
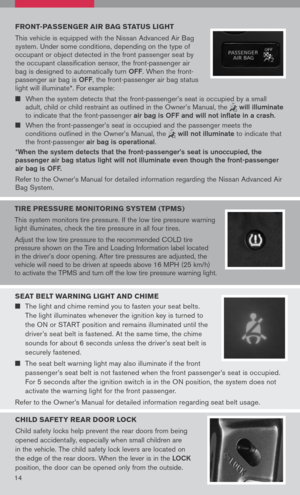
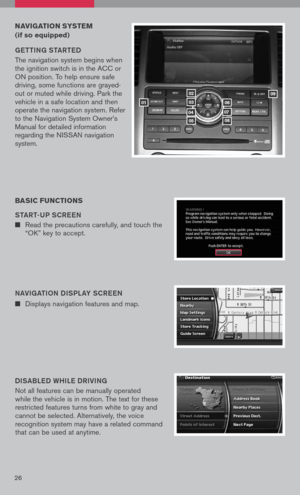
vehicle dyna Mic control ( vdc) s yste M oFF sWitch
(if so equipped)
The vehicle dynamic control (VDC) system is designed to help improve
driving stability. VDC detects wheel spin and controls braking and
engine output. VDC may need to be temporarily shut off if you are trying
to free a vehicle stuck in snow or mud.
Push the vehicle dynamic control (VDC) off switch to deactivate the VDC system.
The light will illuminate in the instrument panel gauge area.
Push the vehicle dynamic control (VDC) off switch again to activate the VDC system.
The light in the instrument panel gauge area will turn off.
Vehicle dynamic control system is active while the vehicle is running until the
switch is pressed to turn it off.
Refer to your Owner’s Manual for detailed information regarding Vehicle Dynamic
Control (VDC) OFF Switch usage.
15
02
01
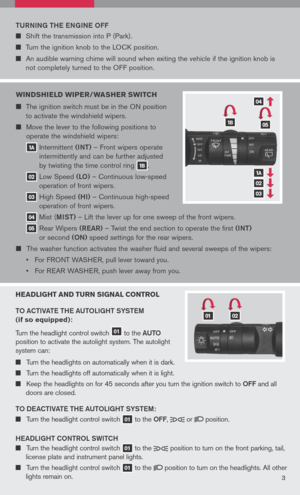
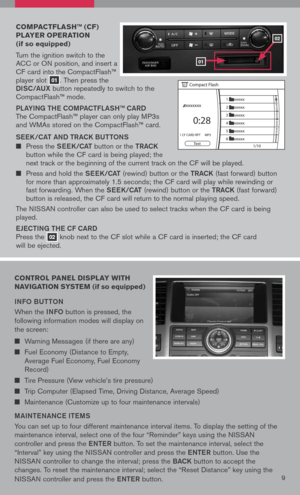
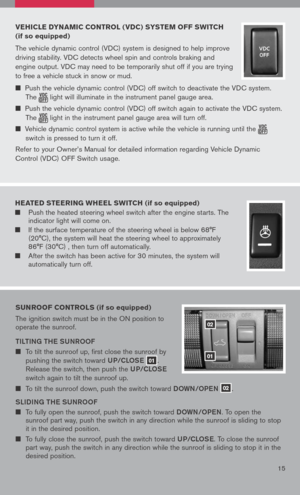
sunroo F controls (if so equipped)
The ignition switch must be in the ON position to operate the sunroof.
tiLti Ng the SUNROOF
To tilt the sunroof up, first close the sunroof by
pushing the switch toward UP/CLOSe 01.
Release the switch, then push the UP/CLOSe
switch again to tilt the sunroof up.
To tilt the sunroof down, push the switch toward DOWN/OPeN 02.
SL iD iN g the SUNROOF
To fully open the sunroof, push the switch toward DOWN/OPeN. To open the sunroof part way, push the switch in any direction while the sunroof is sliding to stop it in the desired position.
To fully close the sunroof, push the switch toward UP/CLOSe. To close the sunroof part way, push the switch in any direction while the sunroof is sliding to stop it in the desired position.
heated steering Wheel sWitch (if so equipped)
Push the heated steering wheel switch after the engine starts. The indicator light will come on.
If the surface temperature of the steering wheel is below 68°F (20°C), the system will heat the steering wheel to approximately 86°F (30°C) , then turn off automatically.
After the switch has been active for 30 minutes, the system will automatically turn off.
Page 18 of 36
:
Pull up on the lever under the front of the seat and slide backward or forward; release.
Lift the lever o")
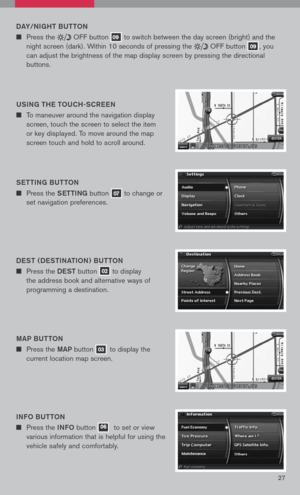
Front seat ad Just Ments
With manual seats (passenger’s side, if so equipped):
Pull up on the lever under the front of the seat and slide backward or forward; release.
Lift the lever on the side of the seat to adjust your seatback backward or forward; release when you have found a comfortable angle and the seat belt fits properly.
With power seats (if so equipped):
Move the control 01 forward or backward to adjust the seat cushion forward or backward.
Pull up 01 to raise the seat cushion; press down to lower the cushion.
Push the switch 02 forward to move the seatback forward; push it back to move the seatback backward.
LU mBaR SUPPOR t (if so equipped)
Your driver’s seat has a lumbar support; adjust it by moving the lever 03 up or down.
0102
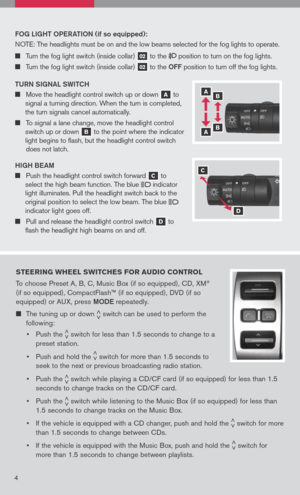
g lass hatch
The liftgate must be unlocked in order to open the glass hatch.
To open, press the small release lever 01 to release the glass hatch, then pull up on the glass hatch 02. To close, lower and push the glass hatch down securely.
l iF tgate
The power door lock system allows you to lock or unlock all doors including the liftgate.
Liftgate handle is located to the far right under the trunk handle.
To open the liftgate, press the large release lever 01 and pull up
on the handle. To close, lower and push the liftgate down securely.
01
02
01
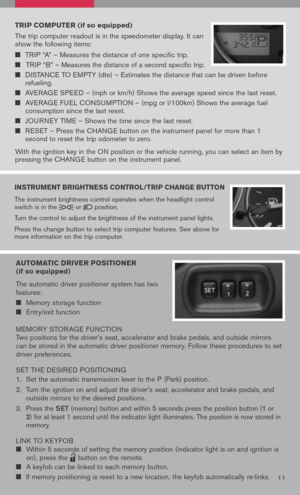
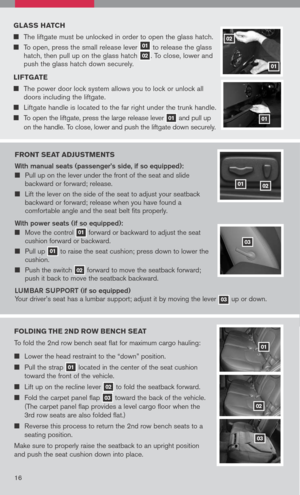
Folding the 2nd ro W bench seat
To fold the 2nd row bench seat flat for maximum cargo hauling:
Lower the head restraint to the “down” position.
Pull the strap 01 located in the center of the seat cushion
toward the front of the vehicle.
Lift up on the recline lever 02 to fold the seatback forward.
Fold the carpet panel flap 03 toward the back of the vehicle.
(The carpet panel flap provides a level cargo floor when the
3rd row seats are also folded flat.)
Reverse this process to return the 2nd row bench seats to a
seating position.
Make sure to properly raise the seatback to an upright position
and push the seat cushion down into place.
01
02
03
03
16
Page 19 of 36

SYS tem OPeR ati Ng ti PS
Garage doors, electrical gates, entry doors, etc. will be activated during programming. To avoid injury, make sure")
hoMelink® universal transceiver (if so equipped)
SYS tem OPeR ati Ng ti PS
Garage doors, electrical gates, entry doors, etc. will be activated during programming. To avoid injury, make sure that people and objects are clear of all doors or gates during programming. Your vehicle’s engine should be turned off while programming the HomeLink® Transceiver. Refer to your Owner’s Manual for complete details.
To program your HomeLink® Transceiver to operate a garage door, gate, or entry door
opener, home or office lighting, you need to be at the same location as the device.
NO te: g arage door openers (manufactured after 1996) have “rolling code
protection”. to program a garage door opener equipped with “rolling code
protection”, you will need to use a ladder to get up to the garage door opener
motor to be able to access the “smart or learn” program button.
PRO gRammi Ng YOUR hO me LiNK
®
UNi Ve RS aL tR aNSC eiVe R ( mirror,
Sun Visor or Overhead Console)
1. To begin, press and hold the two
outer HomeLink® buttons (to clear the memory) until the indicator light blinks slowly (after 20 seconds). Release both buttons.
2. Position the end of the hand-held
transmitter 1-3 inches (26-76 cm) away from the HomeLink® surface.
3. Using both hands, simultaneously press and hold both the HomeLink
® button you want to program and the hand-held transmitter button. DO NOt release the buttons until step 4 has been completed.
17
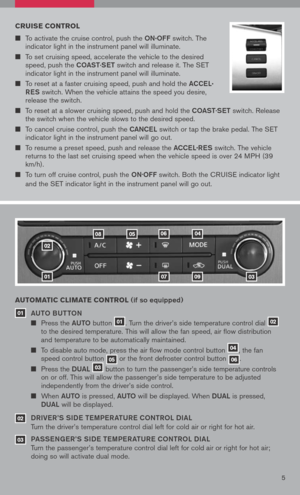
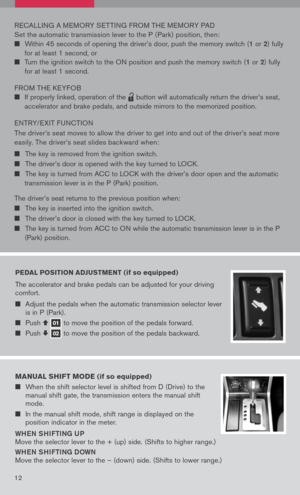
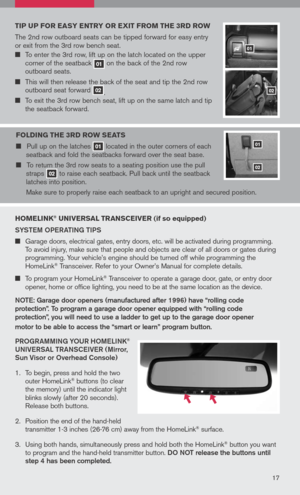
tip up For easy entry or exit Fro M the 3rd ro W
The 2nd row outboard seats can be tipped forward for easy entry or exit from the 3rd row bench seat.
To enter the 3rd row, lift up on the latch located on the upper corner of the seatback 01 on the back of the 2nd row outboard seats.
This will then release the back of the seat and tip the 2nd row outboard seat forward 02. To exit the 3rd row bench seat, lift up on the same latch and tip the seatback forward.
F olding the 3rd ro W seats
Pull up on the latches 01 located in the outer corners of each seatback and fold the seatbacks forward over the seat base.
To return the 3rd row seats to a seating position use the pull straps 02 to raise each seatback. Pull back until the seatback latches into position.
Make sure to properly raise each seatback to an upright and secured position.
01
02
01
02
Page 20 of 36

With an overhead microphone and sound transmitted through the audio system speaker, the Bluetooth® Hands-Free Phone System ut")
16
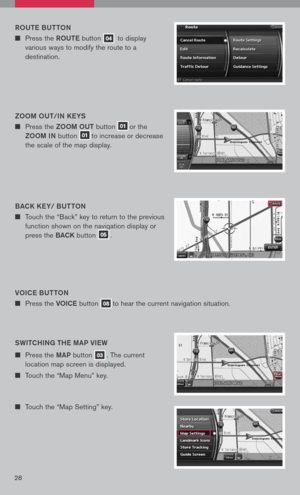
bluetooth® hands -Free phone syste M
( n avigation system only)
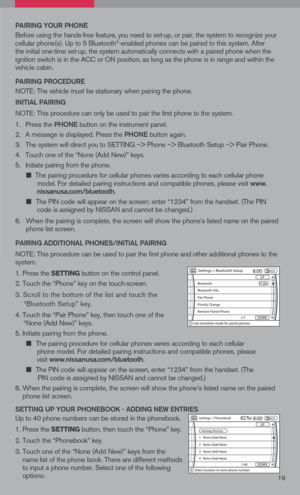
With an overhead microphone and sound transmitted through the audio system speaker, the Bluetooth® Hands-Free Phone System utilizes Bluetooth® wireless technology, touch-screen and voice recognition to provide hands-free cellular phone communication.
SYS tem OPeR ati Ng ti PS
Close all windows. Surrounding noises may interfere with system operation.
Press the button on the steering wheel to activate voice recognition.
Wait for the “Please say a command” prompt and the listening tone before speaking.
Begin speaking a command within 3.5 seconds of the listening tone.
To cancel a voice recognition session, press and hold the button for 2 seconds.
To increase or decrease the volume of the voice prompts, press the VOL (volume) control button on the steering wheel or turn the ON.OFF/VOL knob on the audio system while the system is responding.
Speak in a clear and natural voice without pausing between words.
Some commands are not available while the vehicle is in motion.
The “Help” command will bring up the voice recognition command list.
For recommended phones and detailed instructions, please visit www.nissanusa.com/bluetooth.
Bluetooth® controls location
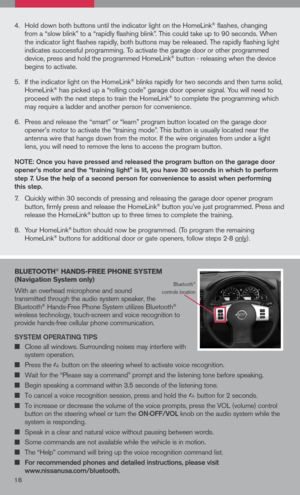
4. Hold down both buttons until the indicator light on the HomeLink® flashes, changing from a “slow blink” to a “rapidly flashing blink”. This could take up to 90 seconds. When the indicator light flashes rapidly, both buttons may be released. The rapidly flashing light indicates successful programming. To activate the garage door or other programmed device, press and hold the programmed HomeLink® button - releasing when the device begins to activate.
5. If the indicator light on the HomeLink
® blinks rapidly for two seconds and then turns solid, HomeLink® has picked up a “rolling code” garage door opener signal. You will need to proceed with the next steps to train the HomeLink® to complete the programming which may require a ladder and another person for convenience.
6. Press and release the “smart” or “learn” program button located on the garage door
opener’s motor to activate the “training mode”. This button is usually located near the antenna wire that hangs down from the motor. If the wire originates from under a light lens, you will need to remove the lens to access the program button.
NO te: Once you have pressed and released the program button on the garage door opener’s motor and the “training light” is lit, you have 30 seconds in which to perform step 7. Use the help of a second person for convenience to assist when performing this step.
7. Quickly within 30 seconds of pressing and releasing the garage door opener program button, firmly press and release the HomeLink® button you’ve just programmed. Press and release the HomeLink® button up to three times to complete the training.
8. Your HomeLink
® button should now be programmed. (To program the remaining HomeLink® buttons for additional door or gate openers, follow steps 2-8 only).
18
Page 21 of 36
. Up to 5 Bluetooth®-enabled phones can be paired to this s")
19
Pai RiN g YOUR P hON e
Before using the hands-free feature, you need to set-up, or pair, the system to recognize your cellular phone(s). Up to 5 Bluetooth®-enabled phones can be paired to this system. After the initial one-time set-up, the system automatically connects with a paired phone when the ignition switch is in the ACC or ON position, as long as the phone is in range and within the vehicle cabin.
Pai RiN g PROC eDUR e
NOTE: The vehicle must be stationary when pairing the phone.
iN itia L PaiRiN g
NOTE: This procedure can only be used to pair the first phone to the system.
1. Press the Ph ON e
button on the instrument panel.
2. A message is displayed. Press the Ph ON e
button again.
3. The system will direct you to SETTING
–> Phone –> Bluetooth Setup –> Pair Phone.
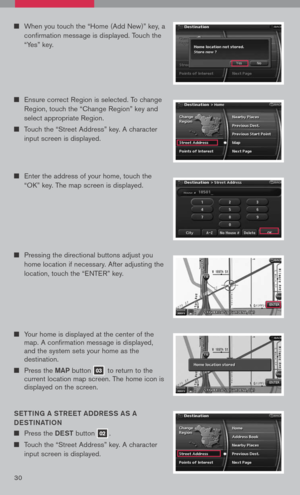
4. Touch one of the “None (Add New)” keys.
5. Initiate pairing from the phone.
The pairing procedure for cellular phones varies according to each cellular phone model. For detailed pairing instructions and compatible phones, please visit www.nissanusa.com/bluetooth.
The PIN code will appear on the screen; enter “1234” from the handset. (The PIN code is assigned by NISSAN and cannot be changed.)
6. When the pairing is complete, the screen will show the phone’s listed name on the paired
phone list screen.
P ai RiN g a DD itiON aL P hON eS/ iN itia L PaiRiN g
NOTE: This procedure can be used to pair the first phone and other additional phones to the system.
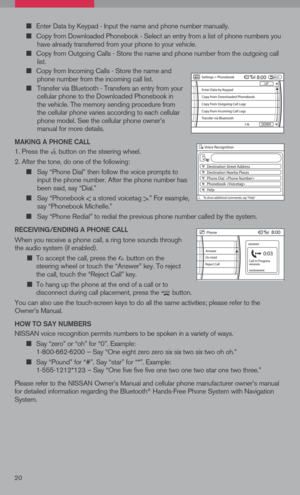
1. Press the setting button on the control panel.
2. Touch the “Phone” key on the touch-screen.
3. Scroll to the bottom of the list and touch the
“Bluetooth Setup” key.
4. Touch the “Pair Phone” key, then touch one of the “None (Add New)” keys.
5. Initiate pairing from the phone.
The pairing procedure for cellular phones varies according to each cellular
phone model. For detailed pairing instructions and compatible phones, please
visit www.nissanusa.com/bluetooth.
The PIN code will appear on the screen, enter “1234” from the handset. (The
PIN code is assigned by NISSAN and cannot be changed.)
6. When the pairing is complete, the screen will show the phone’s listed name on the paired
phone list screen.
S etti Ng UP YOUR P hON eBOOK - aDD iN g N eW eN tR ie S
Up to 40 phone numbers can be stored in the phonebook.
1. Press the setting button, then touch the “Phone” key.
2. Touch the “Phonebook” key.
3. Touch one of the “None (Add New)” keys from the
name list of the phone book. There are different methods to input a phone number. Select one of the following options:
Page 22 of 36

Enter Data by Keypad - Input the name and phone number manually.
Copy from Downloaded Phonebook - Select an entry from a list of phone numbers you have already transferred from your phone to your vehicle.
Copy from Outgoing Calls - Store the name and phone number from the outgoing call list.
Copy from Incoming Calls - Store the name and phone number from the incoming call list.
Transfer via Bluetooth - Transfers an entry from your cellular phone to the Downloaded Phonebook in the vehicle. The memory sending procedure from the cellular phone varies according to each cellular phone model. See the cellular phone owner’s manual for more details.
ma KiN g a P hON e C aLL
1. Press the button on the steering wheel.
2. After the tone, do one of the following:
Say “Phone Dial” then follow the voice prompts to input the phone number. After the phone number has been said, say “Dial.”
Say “Phonebook < a stored voicetag >.” For example, say “Phonebook Michelle.”
Say “Phone Redial” to redial the previous phone number called by the system.
R eC ei ViN g /e ND iN g a P hON e C aLL
When you receive a phone call, a ring tone sounds through the audio system (if enabled).
To accept the call, press the button on the steering wheel or touch the “Answer” key. To reject the call, touch the “Reject Call” key.
To hang up the phone at the end of a call or to disconnect during call placement, press the button.
You can also use the touch-screen keys to do all the same activities; please refer to the Owner’s Manual.
h OW tO S aY NU mBeRS
NISSAN voice recognition permits numbers to be spoken in a variety of ways.
Say “zero” or “oh” for “0”. Example: 1-800-662-6200 – Say “One eight zero zero six six two six two oh oh.”
Say “Pound” for “#”. Say “star” for “*”. Example: 1-555-1212*123 – Say “One five five five one two one two star one two three.”
Please refer to the NISSAN Owner’s Manual and cellular phone manufacturer owner’s manual for detailed information regarding the Bluetooth® Hands-Free Phone System with Navigation System.
20
Page 23 of 36

The NISSAN Mobile Entertainment System can be played on the front control panel screen by inserting a DVD and placing the shift selector lever i")
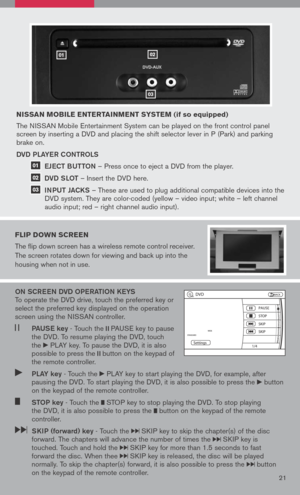
nissan Mobile entertain Ment syste M (if so equipped)
The NISSAN Mobile Entertainment System can be played on the front control panel screen by inserting a DVD and placing the shift selector lever in P (Park) and parking brake on.
DVD PLa YeR CONtROLS
e JeC t BUtt ON
– Press once to eject a DVD from the player.
DVD SLO t
– Insert the DVD here.
iNPUt Ja CKS
– These are used to plug additional compatible devices into the
DVD system. They are color-coded (yellow – video input; white – left channel
audio input; red – right channel audio input).
Flip doWn screen
The flip down screen has a wireless remote control receiver.
The screen rotates down for viewing and back up into the
housing when not in use.
ON SCR eeN DVD OP eRatiON K eYS To operate the DVD drive, touch the preferred key or select the preferred key displayed on the operation screen using the NISSAN controller.
Pa US e key - Touch the PAUSE key to pause the DVD. To resume playing the DVD, touch the PLAY key. To pause the DVD, it is also possible to press the button on the keypad of the remote controller.
PLa Y key - Touch the PLAY key to start playing the DVD, for example, after pausing the DVD. To start playing the DVD, it is also possible to press the button on the keypad of the remote controller.
StOP key - Touch the STOP key to stop playing the DVD. To stop playing the DVD, it is also possible to press the button on the keypad of the remote controller.
SK iP (forward) key - Touch the SKIP key to skip the chapter(s) of the disc forward. The chapters will advance the number of times the SKIP key is touched. Touch and hold the SKIP key for more than 1.5 seconds to fast forward the disc. When thee SKIP key is released, the disc will be played normally. To skip the chapter(s) forward, it is also possible to press the button on the keypad of the remote controller.21
0102
03
01
02
03
Page 24 of 36
 key - Touch the SKIP key to skip the chapter(s) of the disc backward. The chapters will go back the number of times the SKIP key is touched. Touch and hold the SKIP key for m")
22
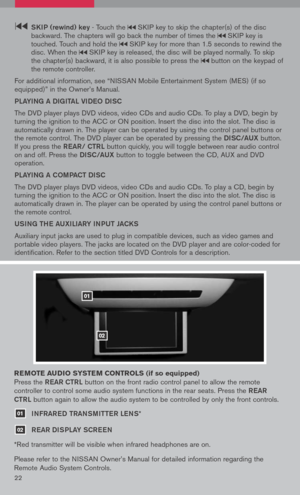
SK iP (rewind) key - Touch the SKIP key to skip the chapter(s) of the disc backward. The chapters will go back the number of times the SKIP key is touched. Touch and hold the SKIP key for more than 1.5 seconds to rewind the disc. When the SKIP key is released, the disc will be played normally. To skip the chapter(s) backward, it is also possible to press the button on the keypad of the remote controller.
For additional information, see “NISSAN Mobile Entertainment System (MES) (if so equipped)” in the Owner’s Manual.
PLaYiNg a DigitaL Vi DeO DiSC
The DVD player plays DVD videos, video CDs and audio CDs. To play a DVD, begin by turning the ignition to the ACC or ON position. Insert the disc into the slot. The disc is automatically drawn in. The player can be operated by using the control panel buttons or the remote control. The DVD player can be operated by pressing the DiSC/a UX button. If you press the ReaR/ C tRL button quickly, you will toggle between rear audio control on and off. Press the DiSC/a UX button to toggle between the CD, AUX and DVD operation.
PLaYiNg a COm Pa C t Di SC
The DVD player plays DVD videos, video CDs and audio CDs. To play a CD, begin by turning the ignition to the ACC or ON position. Insert the disc into the slot. The disc is automatically drawn in. The player can be operated by using the control panel buttons or the remote control.
USiNg the aUX iL iaRY iNPUt Ja CKS
Auxiliary input jacks are used to plug in compatible devices, such as video games and portable video players. The jacks are located on the DVD player and are color-coded for identification. Refer to the section titled DVD Controls for a description.
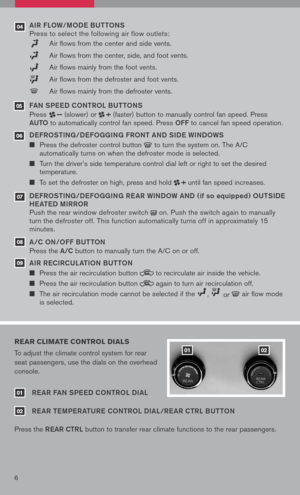
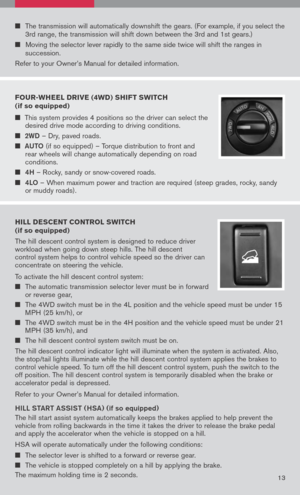
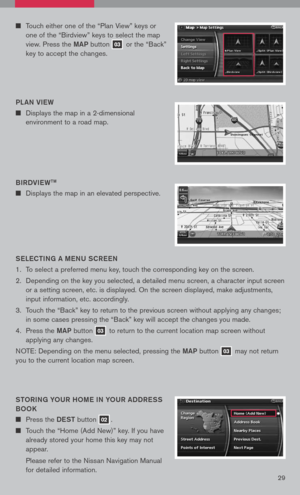
reM ote audio syste M controls (if so equipped)
Press the ReaR C tRL button on the front radio control panel to allow the remote
controller to control some audio system functions in the rear seats. Press the ReaR
C tRL
button again to allow the audio system to be controlled by only the front controls.
01 iNFRaR eD tRaNS mitteR LeNS*
02 ReaR Di SPLaY SCR eeN
*Red transmitter will be visible when infrared headphones are on.
Please refer to the NISSAN Owner’s Manual for detailed information regarding the
Remote Audio System Controls.
01
02