2008 NISSAN PATHFINDER ECO mode
[x] Cancel search: ECO modePage 3 of 36
TAB LE O F C O NTE NTS
Remote Keyless Entry System . . . . . . . . . . . . . . . . . . 2
Intelligent Key System. . . . . . . . . . . . . . . . . . . . . . . 2
Windshield Wiper/Washer Switch . . . . . . . . . . . . . . . . 3
Headlight and Turn Signal Control . . . . . . . . . . . . . . . . 3
Steering Wheel Switches for Audio Control . . . . . . . . . . . 4
Cruise Control . . . . . . . . . . . . . . . . . . . . . . . . . . . 5
Automatic Climate Control . . . . . . . . . . . . . . . . . . . . 5
Rear Climate Control Dials . . . . . . . . . . . . . . . . . . . . 6
FM/AM/XM® Radio with CD Changer . . . . . . . . . . . . . . 7
Music Box Hard-Disk Drive Audio System . . . . . . . . . . . . 8
CompactFlash™ (CF) Player Operation . . . . . . . . . . . . . 9
Control Panel Display with Navigation System . . . . . . . . . . 9
Rearview Monitor (Navigation System Only) . . . . . . . . . . . 10
Clock/Set Adjustment . . . . . . . . . . . . . . . . . . . . . . . 10
Trip Computer . . . . . . . . . . . . . . . . . . . . . . . . . . . 11
Instrument Brightness Control/Trip Change Button . . . . . . . 11
Automatic Driver Positioner . . . . . . . . . . . . . . . . . . . . 11
Pedal Position Adjustment . . . . . . . . . . . . . . . . . . . . 12
Manual Shift Mode . . . . . . . . . . . . . . . . . . . . . . . . 12
Four-Wheel Drive (4WD) Shift Switch . . . . . . . . . . . . . . 13
Hill Descent Control Switch . . . . . . . . . . . . . . . . . . . 13
Front-Passenger Air Bag Status Light . . . . . . . . . . . . . . 14
Tire Pressure Monitoring System (TPMS) . . . . . . . . . . . . 14
Seat Belt Warning Light and Chime . . . . . . . . . . . . . . . 14
Child Safety Rear Door Lock . . . . . . . . . . . . . . . . . . . 14
Vehicle Dynamic Control (VDC) System Off Switch . . . . . . . 15
Heated Steering Wheel Switch . . . . . . . . . . . . . . . . . . 15
Sunroof Controls . . . . . . . . . . . . . . . . . . . . . . . . . 15
Liftgate . . . . . . . . . . . . . . . . . . . . . . . . . . . . . . . 16
Front Seat Adjustments . . . . . . . . . . . . . . . . . . . . . . 16
Folding the 2nd Row Bench Seat . . . . . . . . . . . . . . . . 16
Tip Up for Easy Entry or Exit From the 3rd Row . . . . . . . . . 17
Folding the 3rd Row Seats . . . . . . . . . . . . . . . . . . . . 17
Homelink® Universal Transceiver . . . . . . . . . . . . . . . . . 17
Bluetooth® Hands-Free Phone System . . . . . . . . . . . . . . 18
N ISSAN
Mobile Entertainment System . . . . . . . . . . . . . 21
Remote Audio System Controls . . . . . . . . . . . . . . . . . 22
NISSAN Voice Recognition System . . . . . . . . . . . . . . . 24
Navigation System . . . . . . . . . . . . . . . . . . . . . . . . . 26
Page 4 of 36
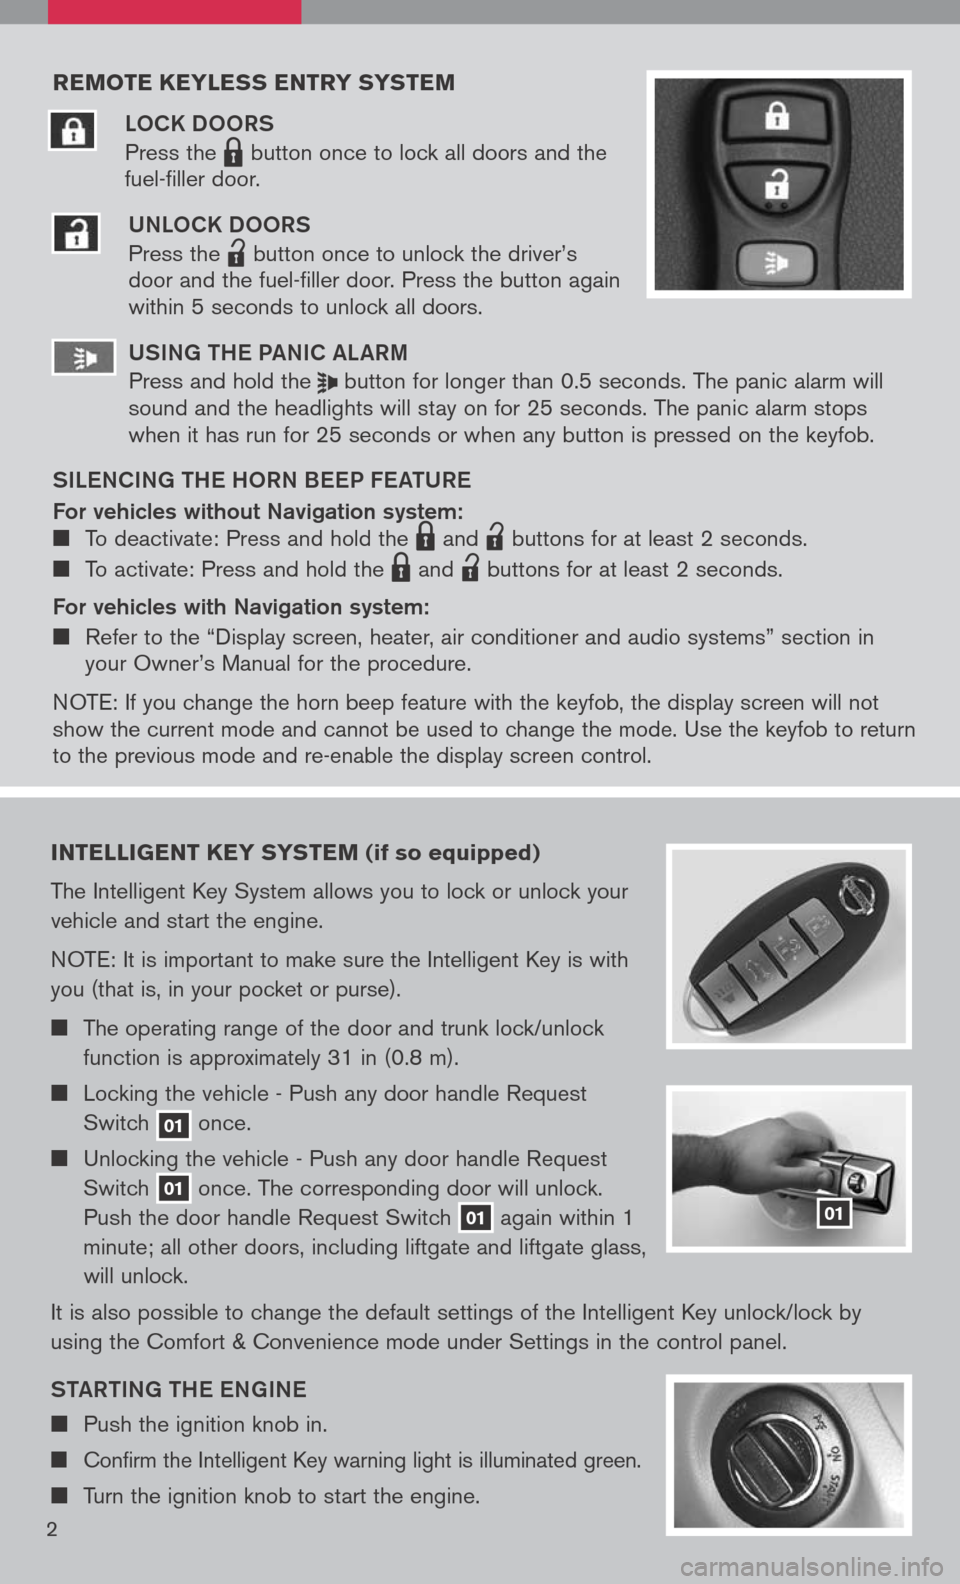
reMote keyless entry systeM
LOCK DOORS
Press the LPD0150 button once to lock all doors and the
fuel-filler door.
UNLOCK DOORS
Press the
lpd0151
button once to unlock the driver’s door and the fuel-filler door. Press the button again within 5 seconds to unlock all doors.
U SiN g the Pa NiC aL aR m
Press and hold the button for longer than 0.5 seconds. The panic alarm will sound and the headlights will stay on for 25 seconds. The panic alarm stops when it has run for 25 seconds or when any button is pressed on the keyfob.
S iL e NC iN g the h ORN B eeP F eat URe
For vehicles without Navigation system: To deactivate: Press and hold the LPD0150 and
lpd0151
buttons for at least 2 seconds.
To activate: Press and hold the LPD0150 and
lpd0151
buttons for at least 2 seconds.
For vehicles with Navigation system:
Refer to the “Display screen, heater, air conditioner and audio systems” section in your Owner’s Manual for the procedure.
N OTE: If you change the horn beep feature with the keyfob, the display screen will not show the current mode and cannot be used to change the mode. Use the keyfob to return to the previous mode and re-enable the display screen control.
intelligent key syste M (if so equipped)
The Intelligent Key System allows you to lock or unlock your
vehicle and start the engine.
NOTE: It is important to make sure the Intelligent Key is with
you (that is, in your pocket or purse).
The operating range of the door and trunk lock/unlock
function is approximately 31 in (0.8 m).
Locking the vehicle - Push any door handle Request
Switch 01 once.
Unlocking the vehicle - Push any door handle Request
Switch 01 once. The corresponding door will unlock.
Push the door handle Request Switch 01 again within 1
minute; all other doors, including liftgate and liftgate glass,
will unlock.
It is also possible to change the default settings of the Intelligent Key unlock/lock by
using the Comfort & Convenience mode under Settings in the control panel.
Sta Rti Ng the eN gi Ne
Push the ignition knob in.
Confirm the Intelligent Key warning light is illuminated green.
Turn the ignition knob to start the engine.
01
2
Page 6 of 36
FO g L ight OPeR ati ON (if so equipped):
N OTE :
The headlights must be on and the low beams selected for the fog lights to operate.
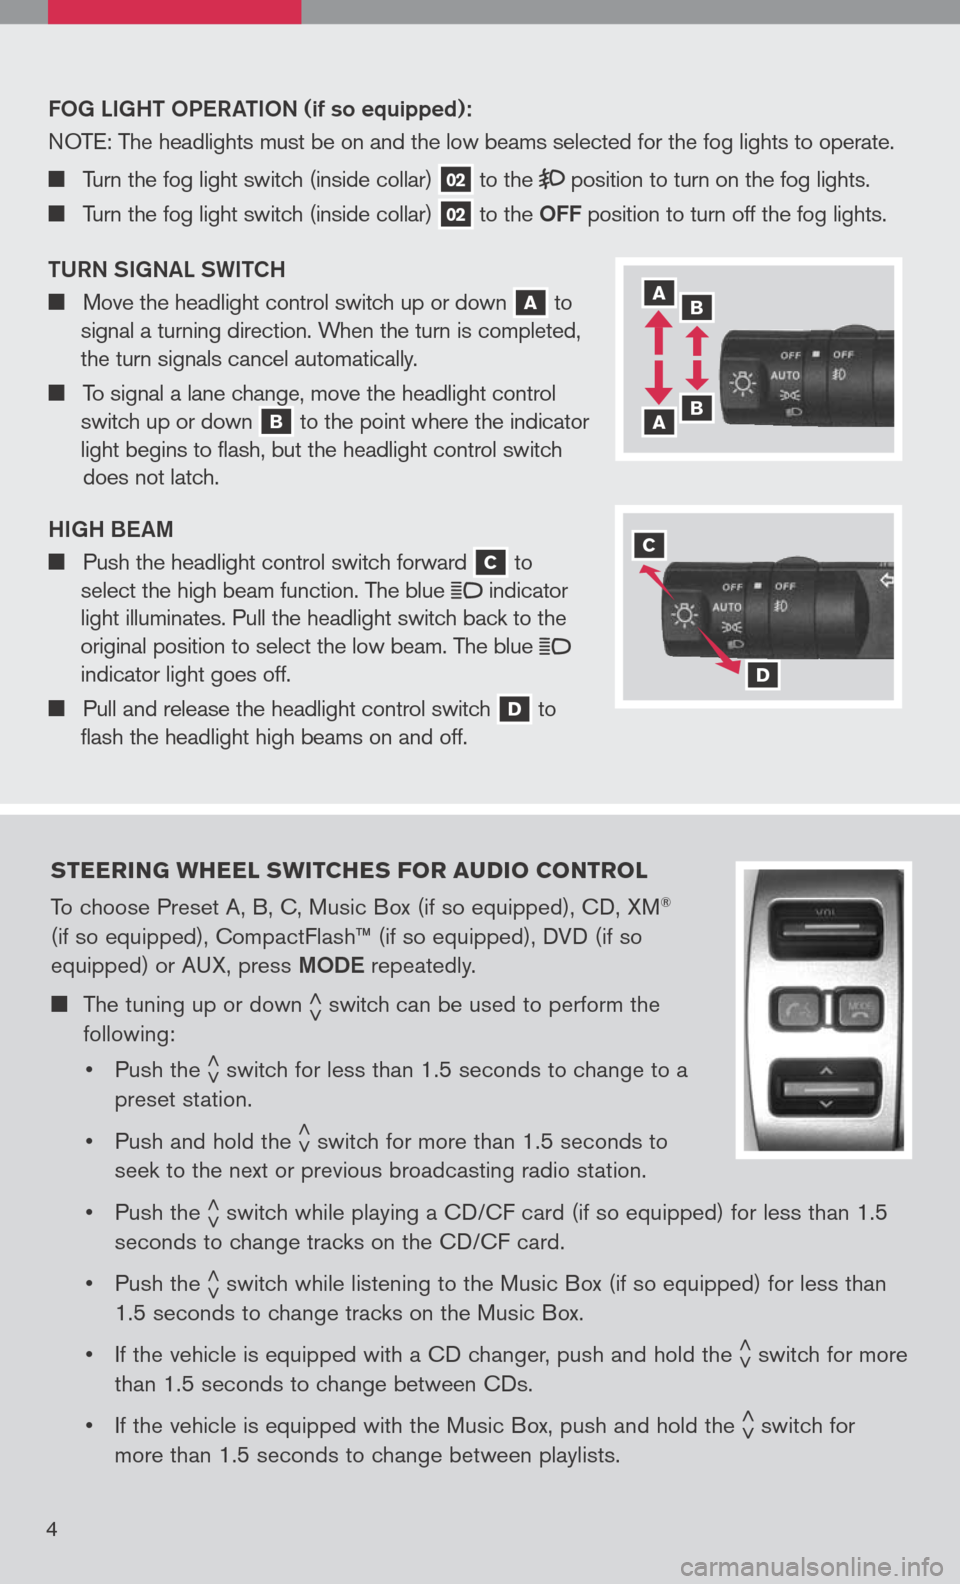
Turn the fog light switch (inside collar) 02 to the position to turn on the fog lights.
Turn the fog light switch (inside collar) 02 to the OFF position to turn off the fog lights.
t URN S igNaL SW itCh
Move the headlight control switch up or down a to
signal a turning direction. When the turn is completed,
the turn signals cancel automatically.
To signal a lane change, move the headlight control
switch up or down b to the point where the indicator
light begins to flash, but the headlight control switch
does not latch.
high Beam
Push the headlight control switch forward c to
select the high beam function. The blue indicator
light illuminates. Pull the headlight switch back to the
original position to select the low beam. The blue indicator light goes off.
Pull and release the headlight control switch d to
flash the headlight high beams on and off.
steering W heel sW itches F or audio control
To choose Preset A, B, C, Music Box (if so equipped), CD, XM®
(if so equipped), CompactFlash™ (if so equipped), DVD (if so
equipped) or AUX, press mODe repeatedly.
The tuning up or down < >switch can be used to perform the
following:
• Push the
< >switch for less than 1.5 seconds to change to a
preset station.
• Push and hold the
< >switch for more than 1.5 seconds to
seek to the next or previous broadcasting radio station.
• Push the
< >switch while playing a CD/CF card (if so equipped) for less than 1.5
seconds to change tracks on the CD/CF card.
• Push the
< >switch while listening to the Music Box (if so equipped) for less than
1.5 seconds to change tracks on the Music Box.
• If the vehicle is equipped with a CD changer, push and hold the
< >switch for more
than 1.5 seconds to change between CDs.
• If the vehicle is equipped with the Music Box, push and hold the
< >switch for
more than 1.5 seconds to change between playlists.
4
a b
b a
c
d
Page 9 of 36
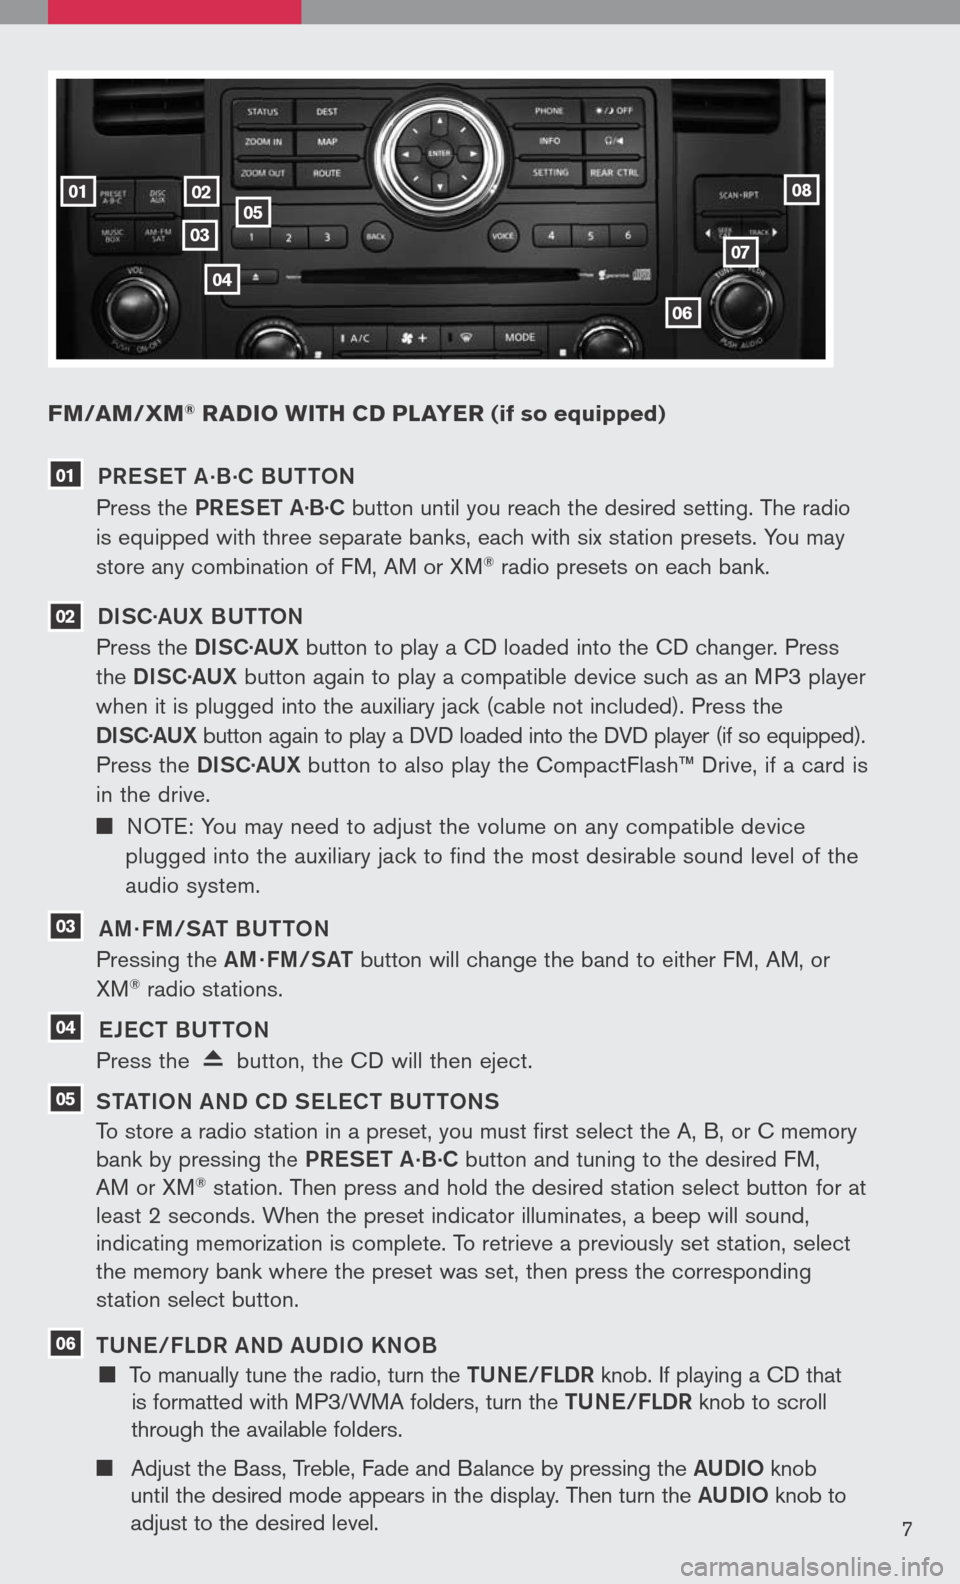
FM/aM/ xM® radio W ith cd player (if so equipped)
02
0307
06
05
04
0108
7
01 PR eS et a.B.
C BU ttON
Press the PReS et a·B·C button until you reach the desired setting. The radio
is equipped with three separate banks, each with six station presets. You may
store any combination of FM, AM or XM® radio presets on each bank.
02 DiSC· aUX B U ttON
Press the DiSC·a UX button to play a CD loaded into the CD changer. Press
the DiSC·a UX button again to play a compatible device such as an MP3 player
when it is plugged into the auxiliary jack (cable not included). Press the
D iSC· aUX
button again to play a DVD loaded into the DVD player (if so equipped).
Press the DiSC·a UX button to also play the CompactFlash™ Drive, if a card is
in the drive.
NOTE: You may need to adjust the volume on any compatible device
plugged into the auxiliary jack to find the most desirable sound level of the
audio system.
03 am · Fm/S at BU ttON
Pressing the am· Fm/S at button will change the band to either FM, AM, or
XM® radio stations.
04 eJe C t BU ttON
Press the button, the CD will then eject.
05 S tati ON aND CD S eLe C t BU ttONS
To store a radio station in a preset, you must first select the A, B, or C memory
bank by pressing the PReS et a.B.C button and tuning to the desired FM,
AM or XM® station. Then press and hold the desired station select button for at
least 2 seconds. When the preset indicator illuminates, a beep will sound,
indicating memorization is complete. To retrieve a previously set station, select
the memory bank where the preset was set, then press the corresponding
station select button.
06 tUN e/FLDR aND a UD iO KNOB
To manually tune the radio, turn the tUN e/FLDR knob. If playing a CD that
is formatted with MP3/WMA folders, turn the tUN e/FLDR knob to scroll
through the available folders.
Adjust the Bass, Treble, Fade and Balance by pressing the aUD iO knob
until the desired mode appears in the display. Then turn the aUD iO knob to
adjust to the desired level.
Page 10 of 36
07 S ee K /C at a ND tR aCK BU ttONS
To scan quickly through each broadcasting station, press the S ee K/C at button or the tR aCK button.
To skip from one track to another on a CD, press the S ee K/C at button or the
tR aCK button.
08 S C aN ·R P t BU ttON
Press the SCaN ·R P t button while listening to the radio. The radio will stop at each station that has significant signal strength for 5 seconds. If listening to a CD, it will select the previous/next selections.
To change the play pattern of a CD, Press the SCaN ·R P t button.
XM® presets are only available on XM® Satellite Radio equipped vehicles.
Music box hard -disk drive audio syste M
(if so equipped)
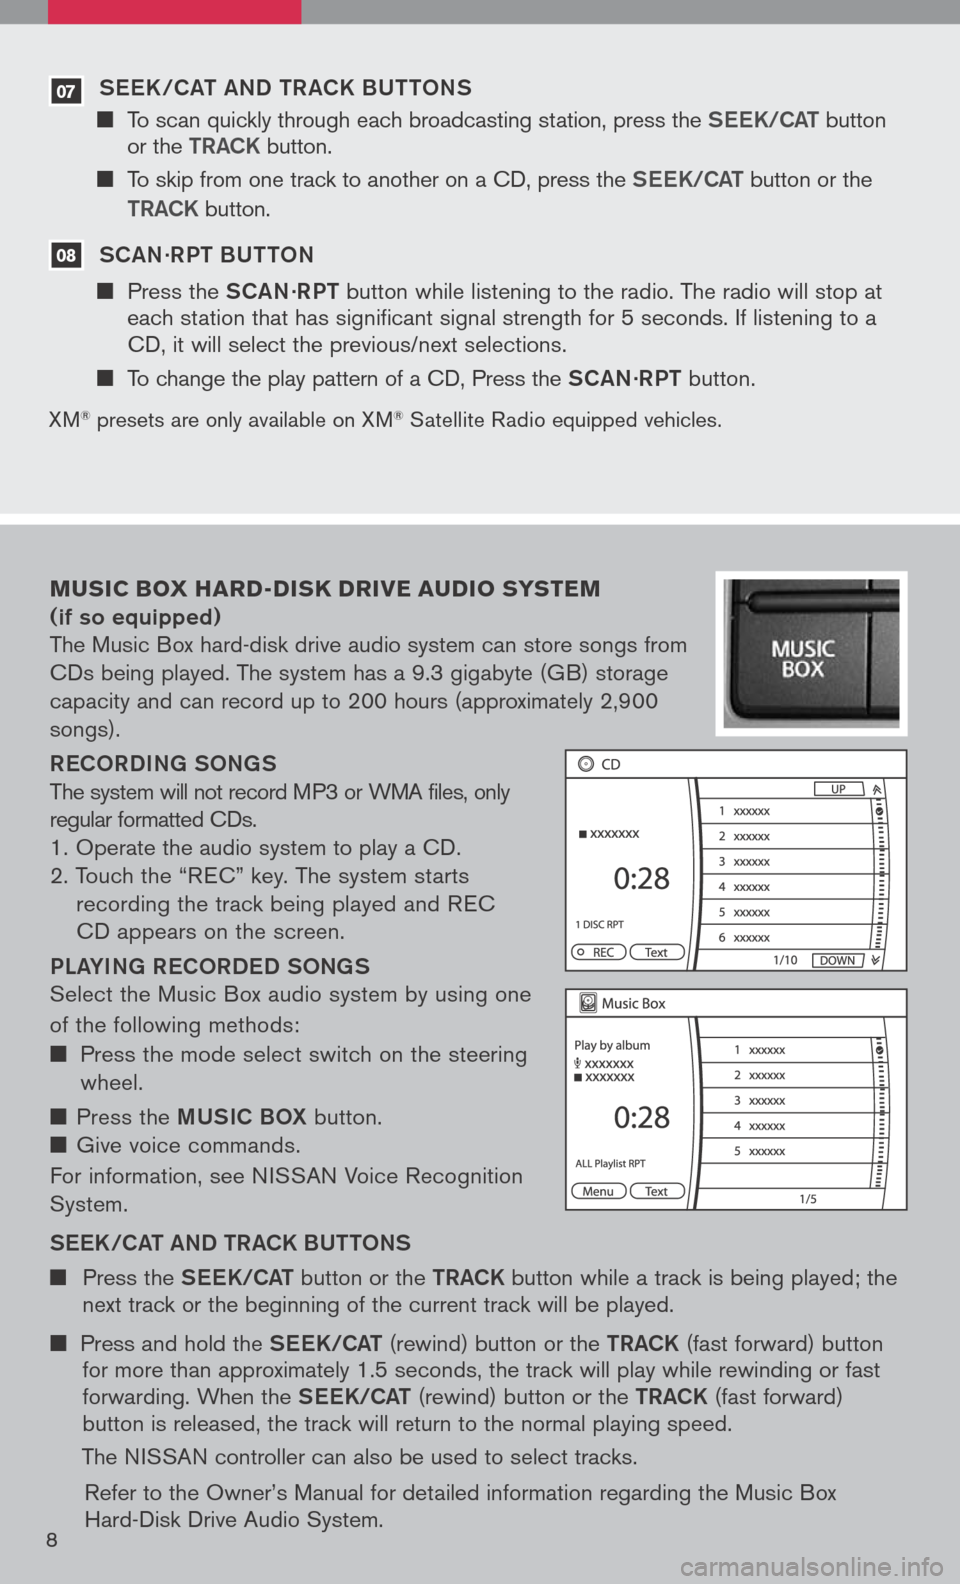
The Music Box hard-disk drive audio system can store songs from
CDs being played. The system has a 9.3 gigabyte (GB) storage
capacity and can record up to 200 hours (approximately 2,900
songs).
ReCOR D iN g SON gS
The system will not record MP3 or WMA files, only
regular formatted CDs.
1. Operate the audio system to play a CD.
2. Touch the “R EC” key. The system starts
recording the track being played and R EC
CD appears on the screen.
PL aY iN g R eCOR D eD SON gS
Select the Music Box audio system by using one
of the following methods:
Press the mode select switch on the steering
wheel.
Press the mUS iC BOX button.
Give voice commands.
For information, see N ISSAN Voice Recognition
System.
S ee K/C at a ND tR aCK BU ttONS
Press the See K/C at button or the tRaCK button while a track is being played; the next track or the beginning of the current track will be played.
Press and hold the See K/C at (rewind) button or the tRaCK (fast forward) button for more than approximately 1.5 seconds, the track will play while rewinding or fast forwarding. When the See K/C at (rewind) button or the tRaCK (fast forward) button is released, the track will return to the normal playing speed.
The NISSAN controller can also be used to select tracks.
Refer to the Owner’s Manual for detailed information regarding the Music Box Hard-Disk Drive Audio System.8
Page 11 of 36
coMpact Flash ™ (cF)
player operation
(if so equipped)
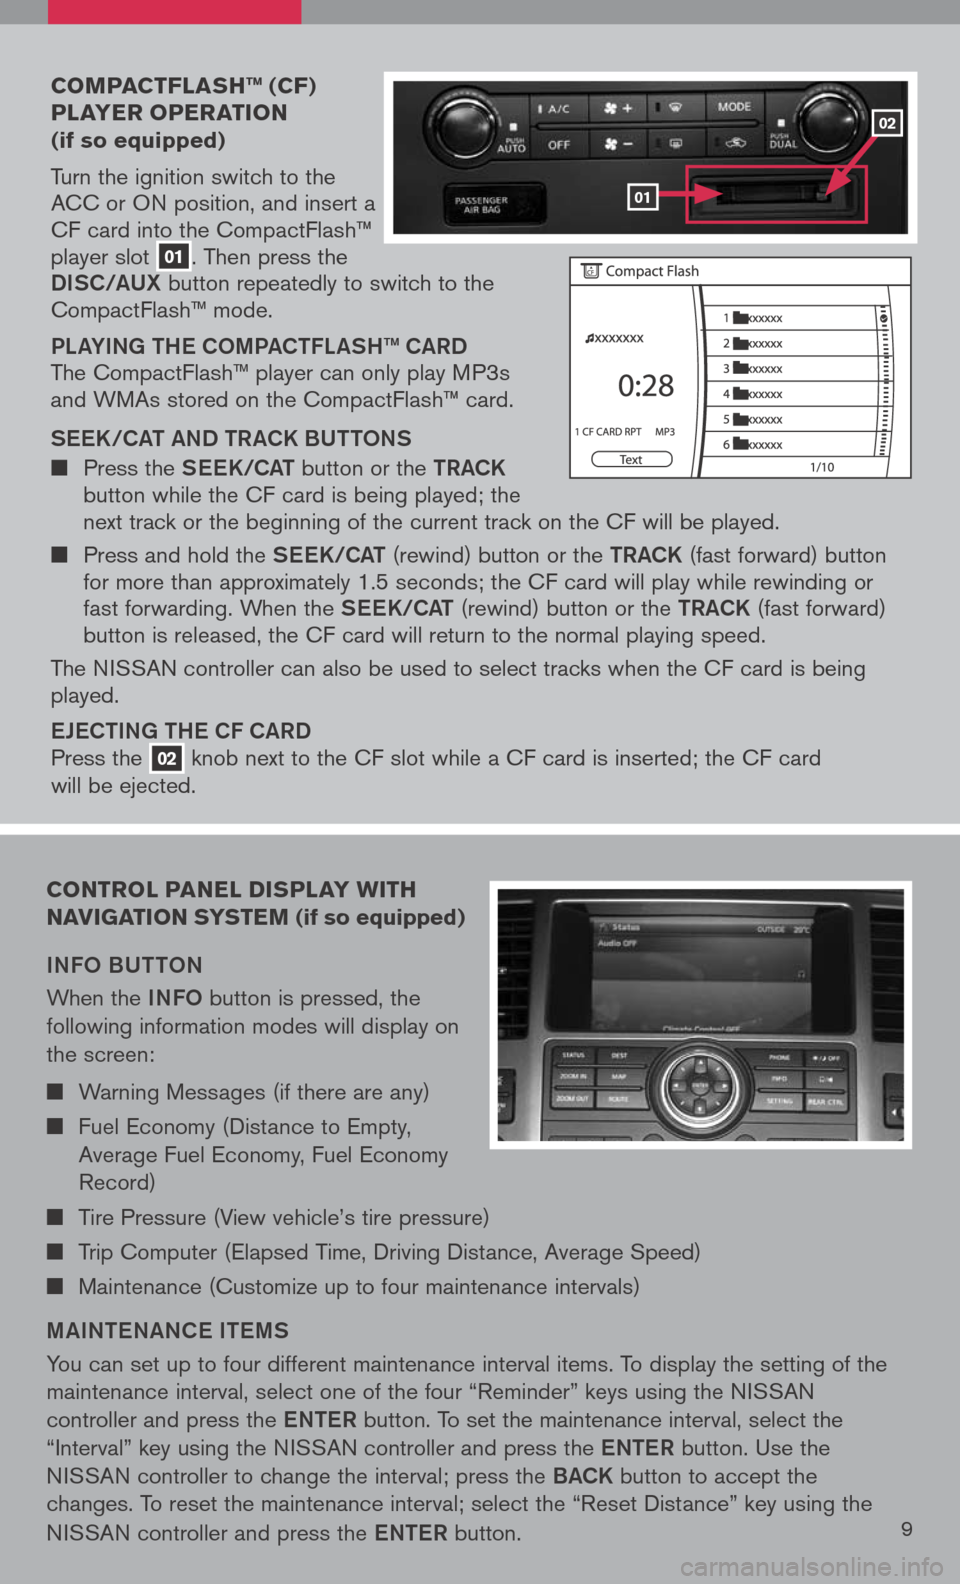
Turn the ignition switch to the ACC or ON position, and insert a CF card into the CompactFlash™ player slot 01. Then press the
Di SC/a UX button repeatedly to switch to the CompactFlash™ mode.
PLaY iN g the COmPa C tFL aS h ™ C aRD
The CompactFlash™ player can only play MP3s and WMAs stored on the CompactFlash™ card.
S ee K/C at a ND tR aCK BU ttONS
Press the See K/C at button or the tRaCK button while the CF card is being played; the next track or the beginning of the current track on the CF will be played.
Press and hold the See K/C at (rewind) button or the tRaCK (fast forward) button for more than approximately 1.5 seconds; the CF card will play while rewinding or fast forwarding. When the See K/C at (rewind) button or the tRaCK (fast forward) button is released, the CF card will return to the normal playing speed.
The NISSAN controller can also be used to select tracks when the CF card is being played.
eJe C ti Ng the CF C aRD
Press the 02 knob next to the CF slot while a CF card is inserted; the CF card
will be ejected.
control panel display W ith
navigation syste M (if so equipped)
iNFO BU ttON
When the iNFO button is pressed, the
following information modes will display on
the screen:
Warning Messages (if there are any)
Fuel Economy (Distance to Empty,
Average Fuel Economy, Fuel Economy
Record)
Tire Pressure (View vehicle’s tire pressure)
Trip Computer (Elapsed Time, Driving Distance, Average Speed)
Maintenance (Customize up to four maintenance intervals)
mai Nte NaNC e item S
You can set up to four different maintenance interval items. To display the setting of the
maintenance interval, select one of the four “Reminder” keys using the NISSAN
controller and press the eNte R button. To set the maintenance interval, select the
“Interval” key using the NISSAN controller and press the eNte R button. Use the
NISSAN controller to change the interval; press the BaCK button to accept the
changes. To reset the maintenance interval; select the “Reset Distance” key using the
NISSAN controller and press the eNte R button.9
01
02
Page 14 of 36
pedal position adJust Ment (if so equipped)
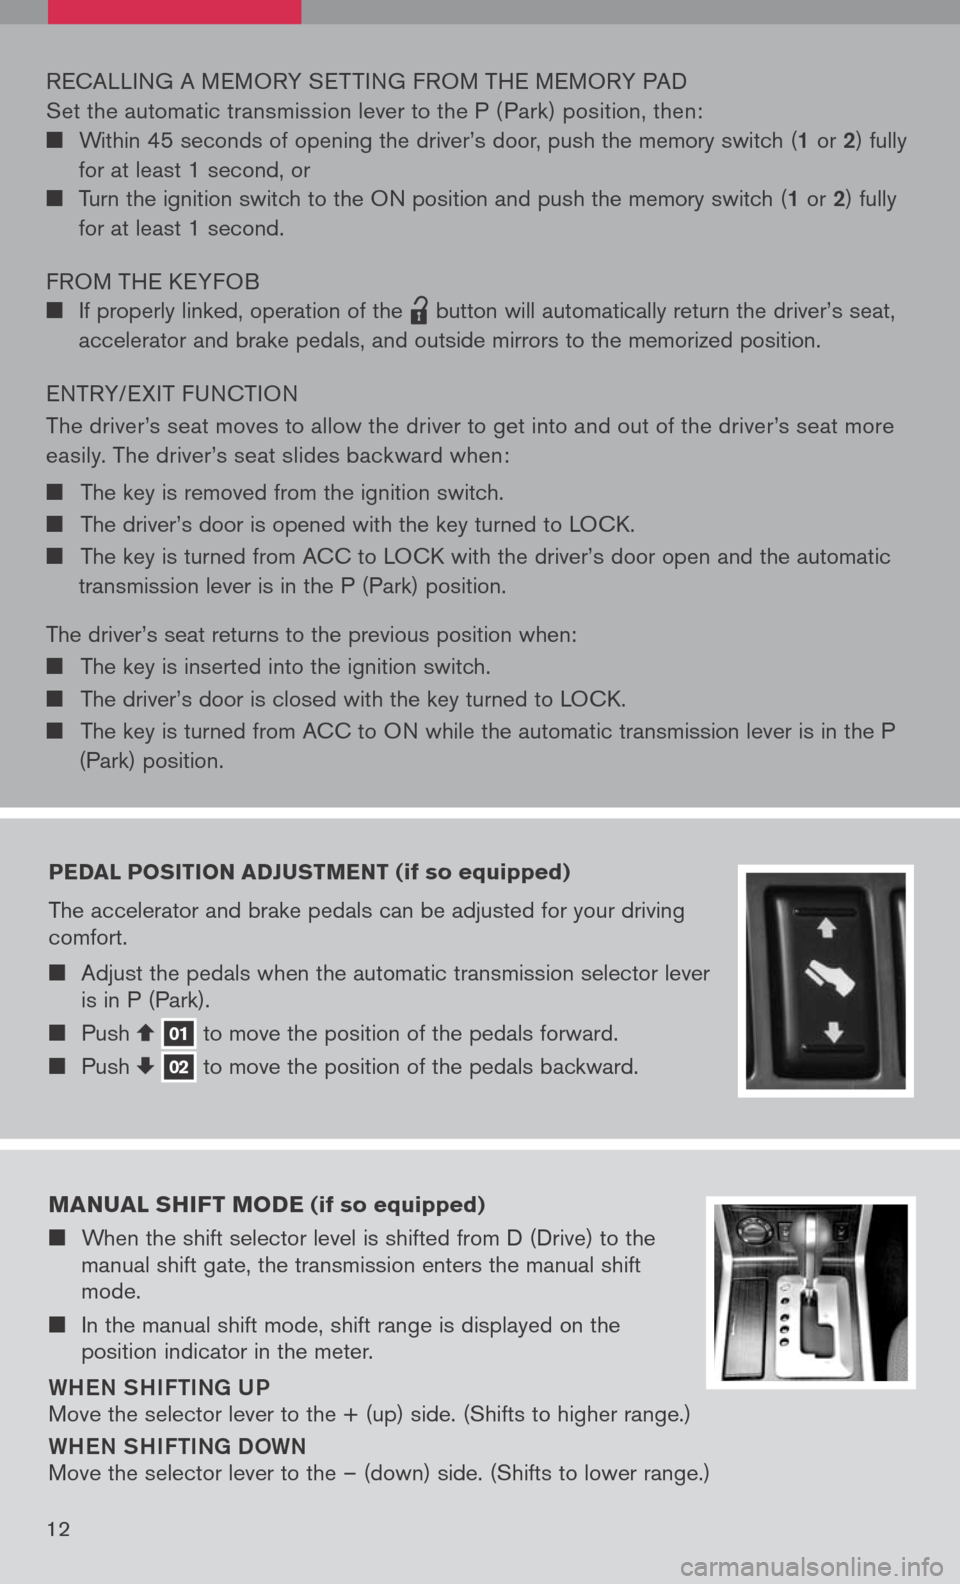
The accelerator and brake pedals can be adjusted for your driving comfort.
Adjust the pedals when the automatic transmission selector lever is in P (Park).
Push 01 to move the position of the pedals forward. Push 02 to move the position of the pedals backward.
RECALLING A MEMORY SET TING FROM THE MEMORY PAD
Set the automatic transmission lever to the P ( Park) position, then:
Within 45 seconds of opening the driver’s door, push the memory switch (1 or 2) fully
for at least 1 second, or
Turn the ignition switch to the ON position and push the memory switch (1 or 2) fully
for at least 1 second.
FROM THE KEYFOB
If properly linked, operation of the
lpd0151
button will automatically return the driver’s seat,
accelerator and brake pedals, and outside mirrors to the memorized position.
ENTRY/ EXIT FUNCTION
The driver’s seat moves to allow the driver to get into and out of the driver’s seat more
easily. The driver’s seat slides backward when:
The key is removed from the ignition switch.
The driver’s door is opened with the key turned to LOCK.
The key is turned from ACC to LOCK with the driver’s door open and the automatic
transmission lever is in the P (Park) position.
The driver’s seat returns to the previous position when:
The key is inserted into the ignition switch.
The driver’s door is closed with the key turned to LOCK.
The key is turned from ACC to ON while the automatic transmission lever is in the P
(Park) position.
M anual shiFt M ode (if so equipped)
When the shift selector level is shifted from D (Drive) to the manual shift gate, the transmission enters the manual shift mode.
In the manual shift mode, shift range is displayed on the position indicator in the meter.
Whe N Shi Fti Ng U P
Move the selector lever to the + (up) side. (Shifts to higher range.)
WheN Shi Fti Ng D OWN
Move the selector lever to the – (down) side. (Shifts to lower range.)
12
Page 15 of 36
Four -Wheel drive (4W d) shi Ft sW itch
(if so equipped)
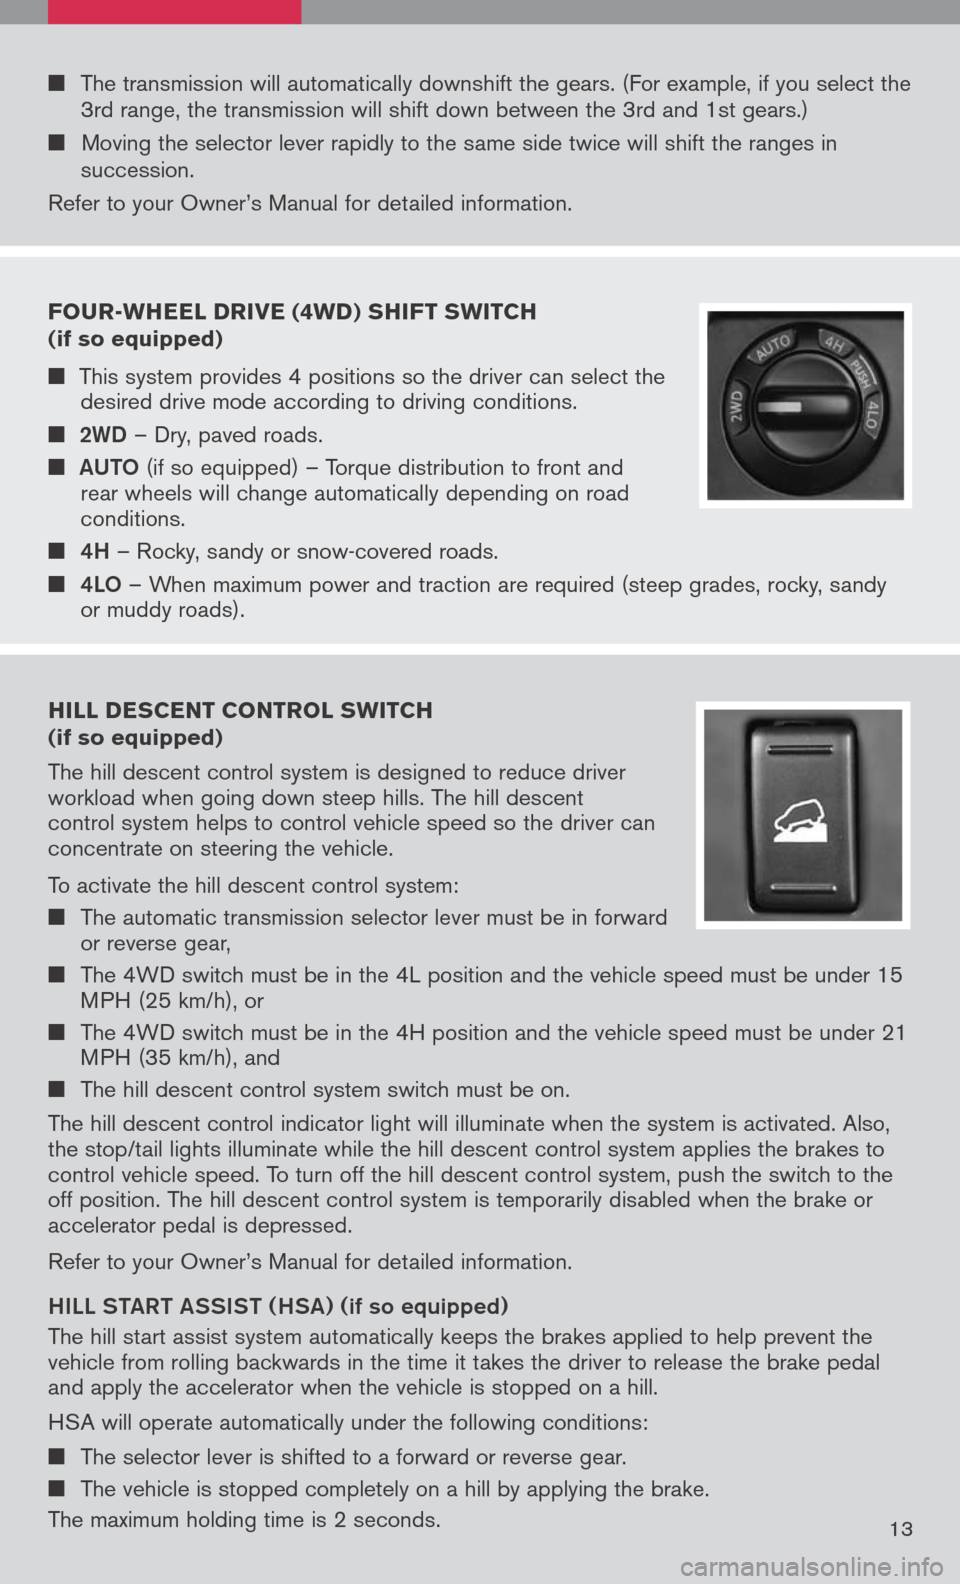
This system provides 4 positions so the driver can select the desired drive mode according to driving conditions.
2WD – Dry, paved roads.
aUt O
(if so equipped) – Torque distribution to front and rear wheels will change automatically depending on road conditions.
4h – Rocky, sandy or snow-covered roads.
4LO – When maximum power and traction are required (steep grades, rocky, sandy or muddy roads).
hill descent control s W itch (if so equipped)
The hill descent control system is designed to reduce driver workload when going down steep hills. The hill descent control system helps to control vehicle speed so the driver can concentrate on steering the vehicle.
To activate the hill descent control system:
The automatic transmission selector lever must be in forward or reverse gear,
The 4WD switch must be in the 4L position and the vehicle speed must be under 15 MPH (25 km/h), or
The 4WD switch must be in the 4H position and the vehicle speed must be under 21 MPH (35 km/h), and
The hill descent control system switch must be on.
The hill descent control indicator light will illuminate when the system is activated. Also, the stop/tail lights illuminate while the hill descent control system applies the brakes to control vehicle speed. To turn off the hill descent control system, push the switch to the off position. The hill descent control system is temporarily disabled when the brake or accelerator pedal is depressed.
Refer to your Owner’s Manual for detailed information.
hiLL Sta Rt aSS iS t ( hSa) (
if so equipped)
The hill start assist system automatically keeps the brakes applied to help prevent the vehicle from rolling backwards in the time it takes the driver to release the brake pedal and apply the accelerator when the vehicle is stopped on a hill.
HSA will operate automatically under the following conditions:
The selector lever is shifted to a forward or reverse gear.
The vehicle is stopped completely on a hill by applying the brake.
The maximum holding time is 2 seconds.13
The transmission will automatically downshift the gears. (For example, if you select the 3rd range, the transmission will shift down between the 3rd and 1st gears.)
Moving the selector lever rapidly to the same side twice will shift the ranges in succession.
Refer to your Owner’s Manual for detailed information.