2008 NISSAN PATHFINDER mirror
[x] Cancel search: mirrorPage 2 of 36

10
*See your Owner’s Manual for more information.
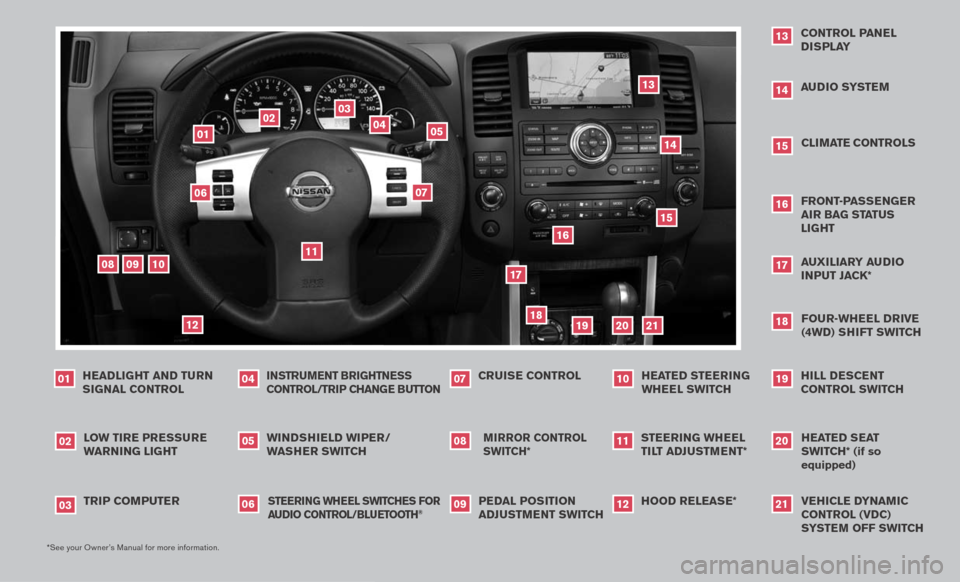
Windshield Wiper/
W asher sWitch
05
Mirror control
sWitch*
08
l o W tire pressure
Warning light
02
cruise control
07
audio syste M
1418
Four-Wheel drive
(4Wd) shi Ft sWitch
headlight and turn
signal control
01
13
control panel display
a uxiliary audio
i nput Jack*
17
01
02
03
04
05
09
08
06
07
11
12
13
trip coMputer
03
instru Ment brightness control/trip change button
04
hood release*
12
Front-p assenger air bag status light
1620
heated seat
sWitch*
(if so
equipped
)
pedal position
ad JustM ent sWitch
09
steering Wheel
tilt ad JustM ent*
11
15
cliMate controls
h ill descent
control sWitch
19
1415
16
17
18
19
20
h eated steering
Wheel sWitch
10
s teering Wheel s Witches For
audio control/ bluetooth
®
06
10
21
21
vehicle dynaM ic
control (vdc)
s yste M oFF sWitch
Page 13 of 36

instruMent brightness control /trip change button
The instrument brightness control operates when the headlight control switch is in the or position.
Turn the control to adjust the brightness of the instrument panel lights.
Press the change button to select trip computer features. See above for more information on the trip computer.
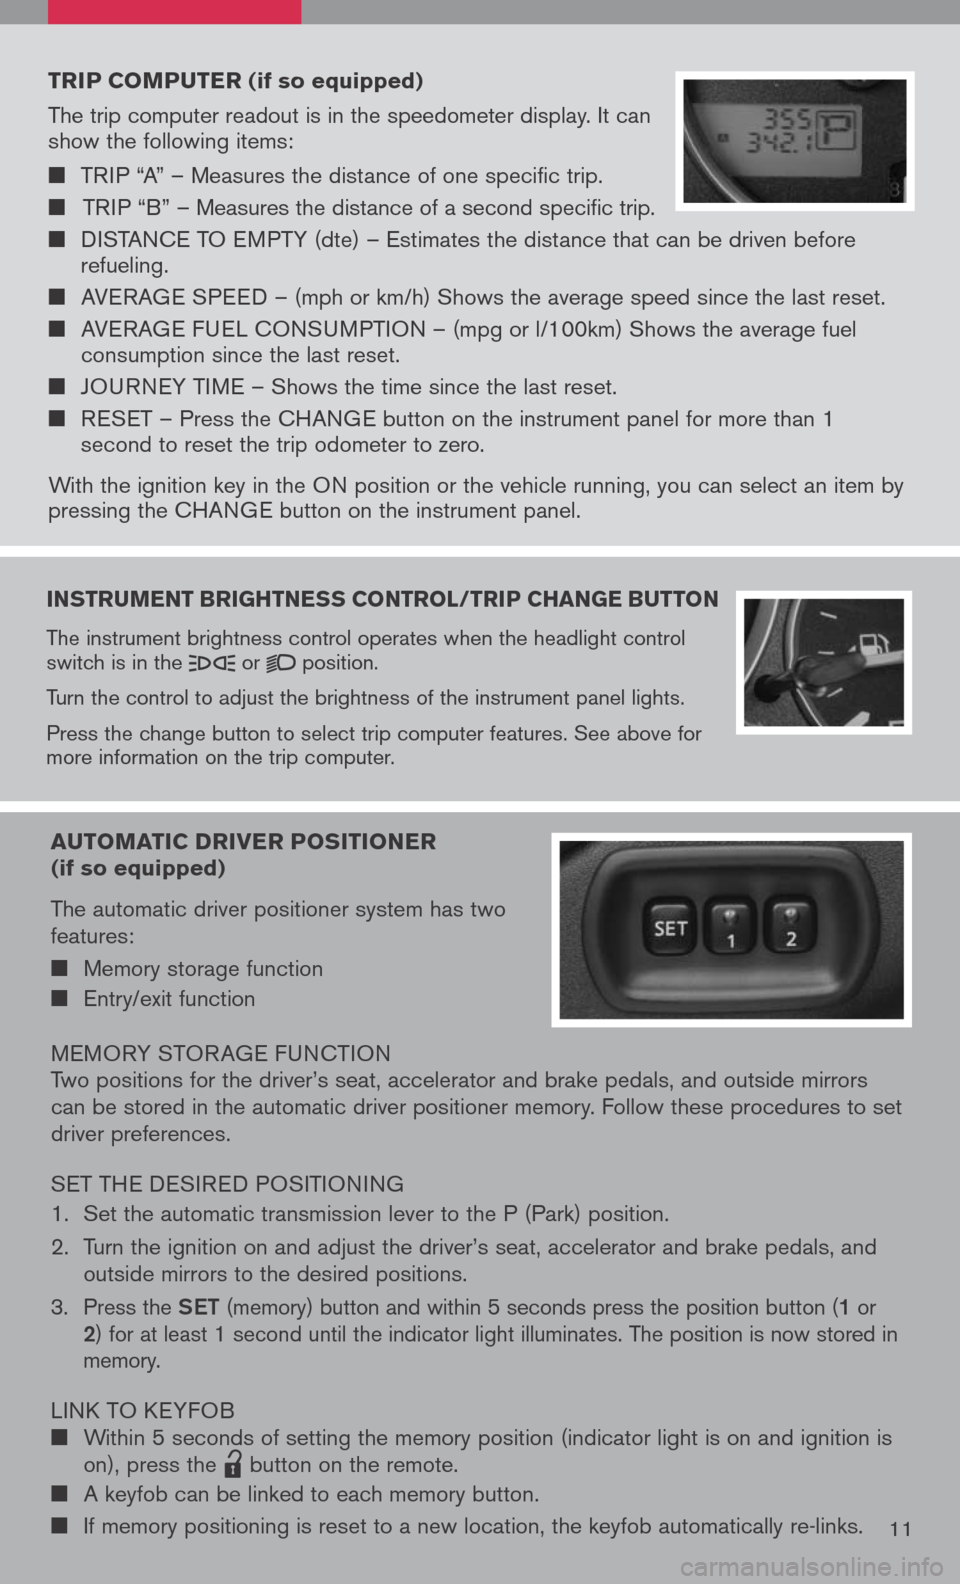
trip coMputer (if so equipped)
The trip computer readout is in the speedometer display. It can show the following items:
TRIP “A” – Measures the distance of one specific trip.
TRIP “B” – Measures the distance of a second specific trip.
DISTANCE TO EMPTY (dte) – Estimates the distance that can be driven before refueling.
AVERAGE SPEED – (mph or km/h) Shows the average speed since the last reset.
AVERAGE FUEL CONSUMPTION – (mpg or l/100km) Shows the average fuel consumption since the last reset.
JOURNEY TIME – Shows the time since the last reset.
RESET – Press the CHANGE button on the instrument panel for more than 1 second to reset the trip odometer to zero.
With the ignition key in the ON position or the vehicle running, you can select an item by pressing the CHANGE button on the instrument panel.
auto Matic driver positioner (if so equipped)
The automatic driver positioner system has two features:
Memory storage function
Entry/exit function
MEMORY STOR AGE FUNCTIONTwo positions for the driver’s seat, accelerator and brake pedals, and outside mirrors can be stored in the automatic driver positioner memory. Follow these procedures to set driver preferences.
SET THE DESIRED POSITIONING
1. Set the automatic transmission lever to the P (Park) position.
2. Turn the ignition on and adjust the driver’s seat, accelerator and brake pedals, and
outside mirrors to the desired positions.
3. Press the Set (memory) button and within 5 seconds press the position button (1 or 2) for at least 1 second until the indicator light illuminates. The position is now stored in memory.
LINK TO KEYFOB Within 5 seconds of setting the memory position (indicator light is on and ignition is on), press the
lpd0151
button on the remote.
A keyfob can be linked to each memory button.
If memory positioning is reset to a new location, the keyfob automatically re-links.11
Page 14 of 36

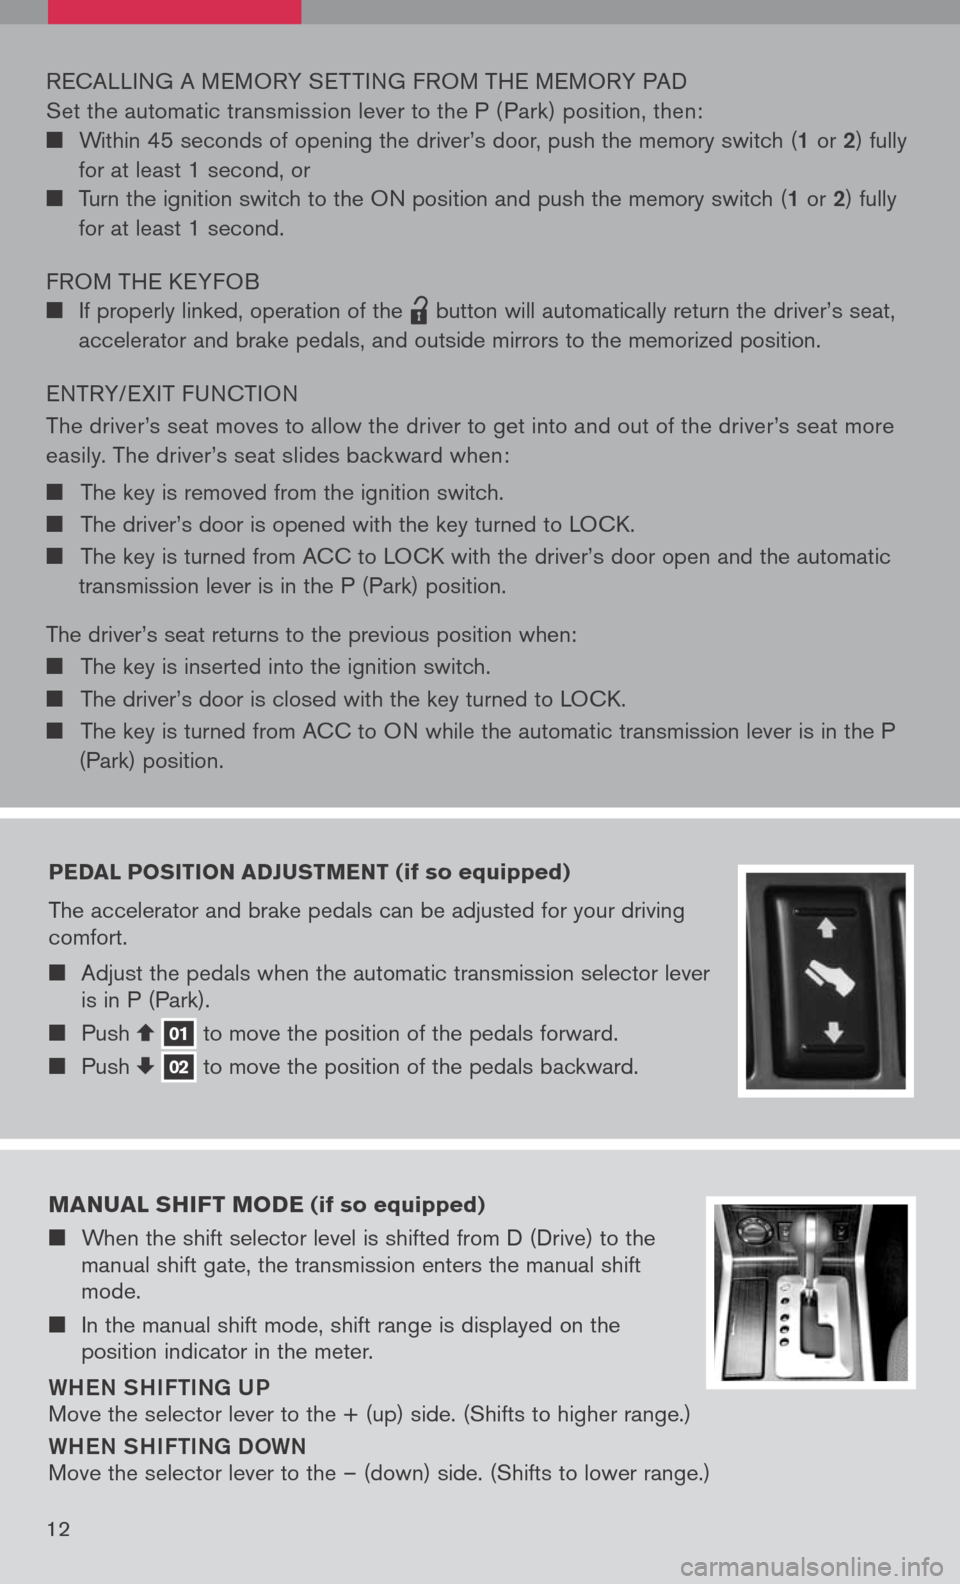
pedal position adJust Ment (if so equipped)
The accelerator and brake pedals can be adjusted for your driving comfort.
Adjust the pedals when the automatic transmission selector lever is in P (Park).
Push 01 to move the position of the pedals forward. Push 02 to move the position of the pedals backward.
RECALLING A MEMORY SET TING FROM THE MEMORY PAD
Set the automatic transmission lever to the P ( Park) position, then:
Within 45 seconds of opening the driver’s door, push the memory switch (1 or 2) fully
for at least 1 second, or
Turn the ignition switch to the ON position and push the memory switch (1 or 2) fully
for at least 1 second.
FROM THE KEYFOB
If properly linked, operation of the
lpd0151
button will automatically return the driver’s seat,
accelerator and brake pedals, and outside mirrors to the memorized position.
ENTRY/ EXIT FUNCTION
The driver’s seat moves to allow the driver to get into and out of the driver’s seat more
easily. The driver’s seat slides backward when:
The key is removed from the ignition switch.
The driver’s door is opened with the key turned to LOCK.
The key is turned from ACC to LOCK with the driver’s door open and the automatic
transmission lever is in the P (Park) position.
The driver’s seat returns to the previous position when:
The key is inserted into the ignition switch.
The driver’s door is closed with the key turned to LOCK.
The key is turned from ACC to ON while the automatic transmission lever is in the P
(Park) position.
M anual shiFt M ode (if so equipped)
When the shift selector level is shifted from D (Drive) to the manual shift gate, the transmission enters the manual shift mode.
In the manual shift mode, shift range is displayed on the position indicator in the meter.
Whe N Shi Fti Ng U P
Move the selector lever to the + (up) side. (Shifts to higher range.)
WheN Shi Fti Ng D OWN
Move the selector lever to the – (down) side. (Shifts to lower range.)
12
Page 19 of 36

hoMelink® universal transceiver (if so equipped)
SYS tem OPeR ati Ng ti PS
Garage doors, electrical gates, entry doors, etc. will be activated during programming. To avoid injury, make sure that people and objects are clear of all doors or gates during programming. Your vehicle’s engine should be turned off while programming the HomeLink® Transceiver. Refer to your Owner’s Manual for complete details.
To program your HomeLink® Transceiver to operate a garage door, gate, or entry door
opener, home or office lighting, you need to be at the same location as the device.
NO te: g arage door openers (manufactured after 1996) have “rolling code
protection”. to program a garage door opener equipped with “rolling code
protection”, you will need to use a ladder to get up to the garage door opener
motor to be able to access the “smart or learn” program button.
PRO gRammi Ng YOUR hO me LiNK
®
UNi Ve RS aL tR aNSC eiVe R ( mirror,
Sun Visor or Overhead Console)
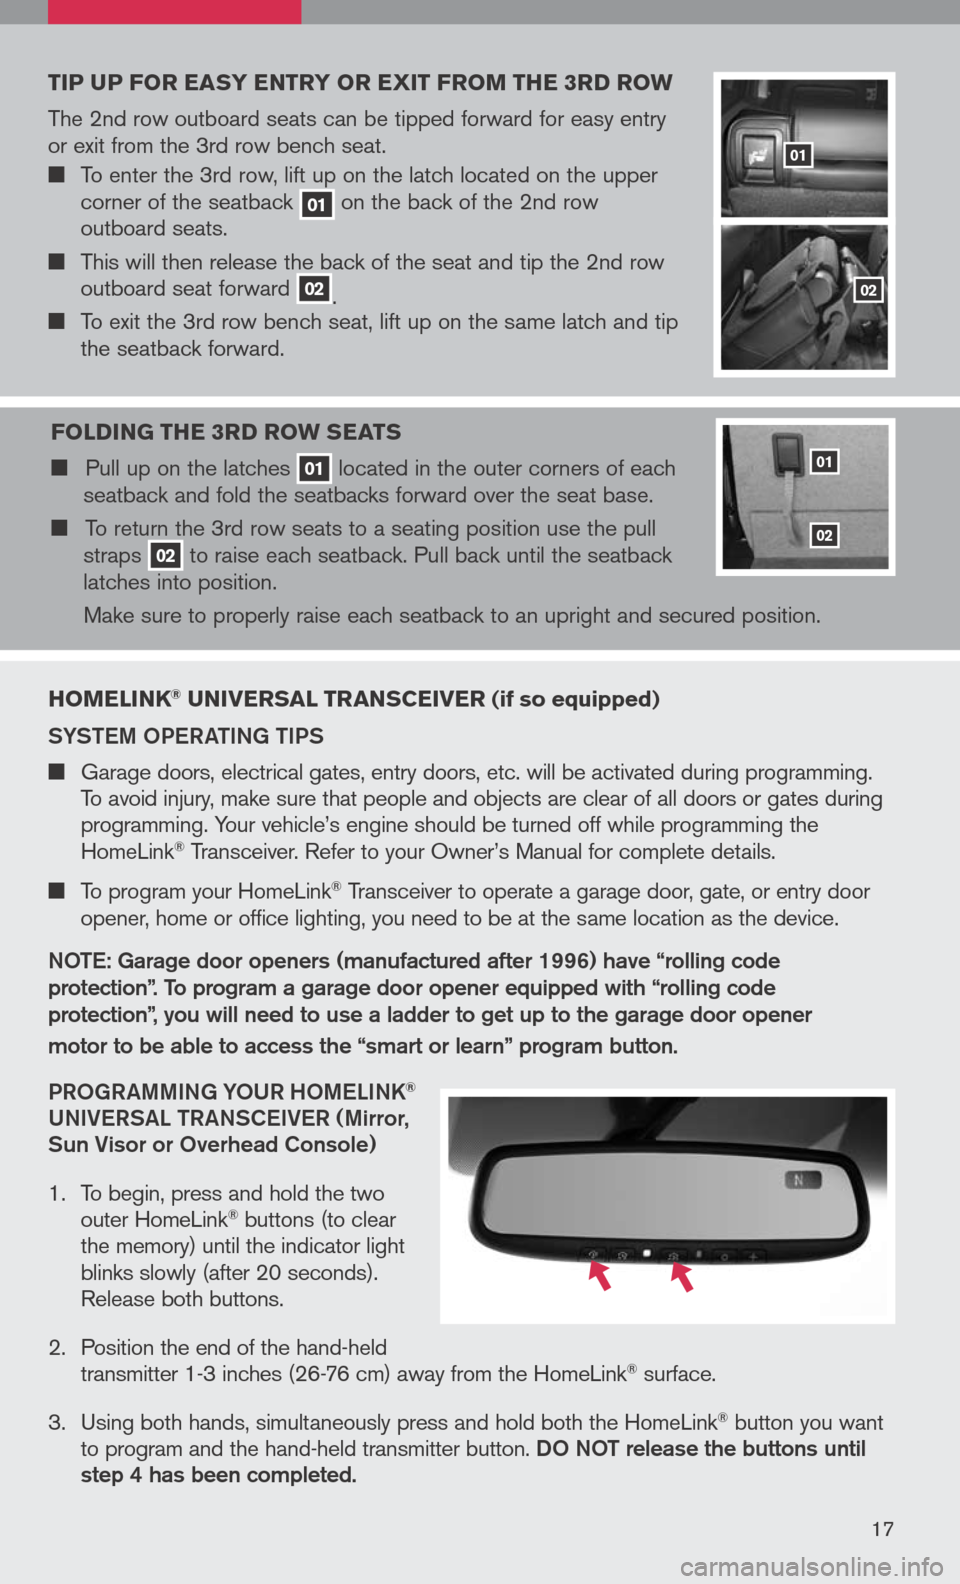
1. To begin, press and hold the two
outer HomeLink® buttons (to clear the memory) until the indicator light blinks slowly (after 20 seconds). Release both buttons.
2. Position the end of the hand-held
transmitter 1-3 inches (26-76 cm) away from the HomeLink® surface.
3. Using both hands, simultaneously press and hold both the HomeLink
® button you want to program and the hand-held transmitter button. DO NOt release the buttons until step 4 has been completed.
17
tip up For easy entry or exit Fro M the 3rd ro W
The 2nd row outboard seats can be tipped forward for easy entry or exit from the 3rd row bench seat.
To enter the 3rd row, lift up on the latch located on the upper corner of the seatback 01 on the back of the 2nd row outboard seats.
This will then release the back of the seat and tip the 2nd row outboard seat forward 02. To exit the 3rd row bench seat, lift up on the same latch and tip the seatback forward.
F olding the 3rd ro W seats
Pull up on the latches 01 located in the outer corners of each seatback and fold the seatbacks forward over the seat base.
To return the 3rd row seats to a seating position use the pull straps 02 to raise each seatback. Pull back until the seatback latches into position.
Make sure to properly raise each seatback to an upright and secured position.
01
02
01
02