2008 NISSAN PATHFINDER radio
[x] Cancel search: radioPage 3 of 36
TAB LE O F C O NTE NTS
Remote Keyless Entry System . . . . . . . . . . . . . . . . . . 2
Intelligent Key System. . . . . . . . . . . . . . . . . . . . . . . 2
Windshield Wiper/Washer Switch . . . . . . . . . . . . . . . . 3
Headlight and Turn Signal Control . . . . . . . . . . . . . . . . 3
Steering Wheel Switches for Audio Control . . . . . . . . . . . 4
Cruise Control . . . . . . . . . . . . . . . . . . . . . . . . . . . 5
Automatic Climate Control . . . . . . . . . . . . . . . . . . . . 5
Rear Climate Control Dials . . . . . . . . . . . . . . . . . . . . 6
FM/AM/XM® Radio with CD Changer . . . . . . . . . . . . . . 7
Music Box Hard-Disk Drive Audio System . . . . . . . . . . . . 8
CompactFlash™ (CF) Player Operation . . . . . . . . . . . . . 9
Control Panel Display with Navigation System . . . . . . . . . . 9
Rearview Monitor (Navigation System Only) . . . . . . . . . . . 10
Clock/Set Adjustment . . . . . . . . . . . . . . . . . . . . . . . 10
Trip Computer . . . . . . . . . . . . . . . . . . . . . . . . . . . 11
Instrument Brightness Control/Trip Change Button . . . . . . . 11
Automatic Driver Positioner . . . . . . . . . . . . . . . . . . . . 11
Pedal Position Adjustment . . . . . . . . . . . . . . . . . . . . 12
Manual Shift Mode . . . . . . . . . . . . . . . . . . . . . . . . 12
Four-Wheel Drive (4WD) Shift Switch . . . . . . . . . . . . . . 13
Hill Descent Control Switch . . . . . . . . . . . . . . . . . . . 13
Front-Passenger Air Bag Status Light . . . . . . . . . . . . . . 14
Tire Pressure Monitoring System (TPMS) . . . . . . . . . . . . 14
Seat Belt Warning Light and Chime . . . . . . . . . . . . . . . 14
Child Safety Rear Door Lock . . . . . . . . . . . . . . . . . . . 14
Vehicle Dynamic Control (VDC) System Off Switch . . . . . . . 15
Heated Steering Wheel Switch . . . . . . . . . . . . . . . . . . 15
Sunroof Controls . . . . . . . . . . . . . . . . . . . . . . . . . 15
Liftgate . . . . . . . . . . . . . . . . . . . . . . . . . . . . . . . 16
Front Seat Adjustments . . . . . . . . . . . . . . . . . . . . . . 16
Folding the 2nd Row Bench Seat . . . . . . . . . . . . . . . . 16
Tip Up for Easy Entry or Exit From the 3rd Row . . . . . . . . . 17
Folding the 3rd Row Seats . . . . . . . . . . . . . . . . . . . . 17
Homelink® Universal Transceiver . . . . . . . . . . . . . . . . . 17
Bluetooth® Hands-Free Phone System . . . . . . . . . . . . . . 18
N ISSAN
Mobile Entertainment System . . . . . . . . . . . . . 21
Remote Audio System Controls . . . . . . . . . . . . . . . . . 22
NISSAN Voice Recognition System . . . . . . . . . . . . . . . 24
Navigation System . . . . . . . . . . . . . . . . . . . . . . . . . 26
Page 6 of 36
FO g L ight OPeR ati ON (if so equipped):
N OTE :
The headlights must be on and the low beams selected for the fog lights to operate.
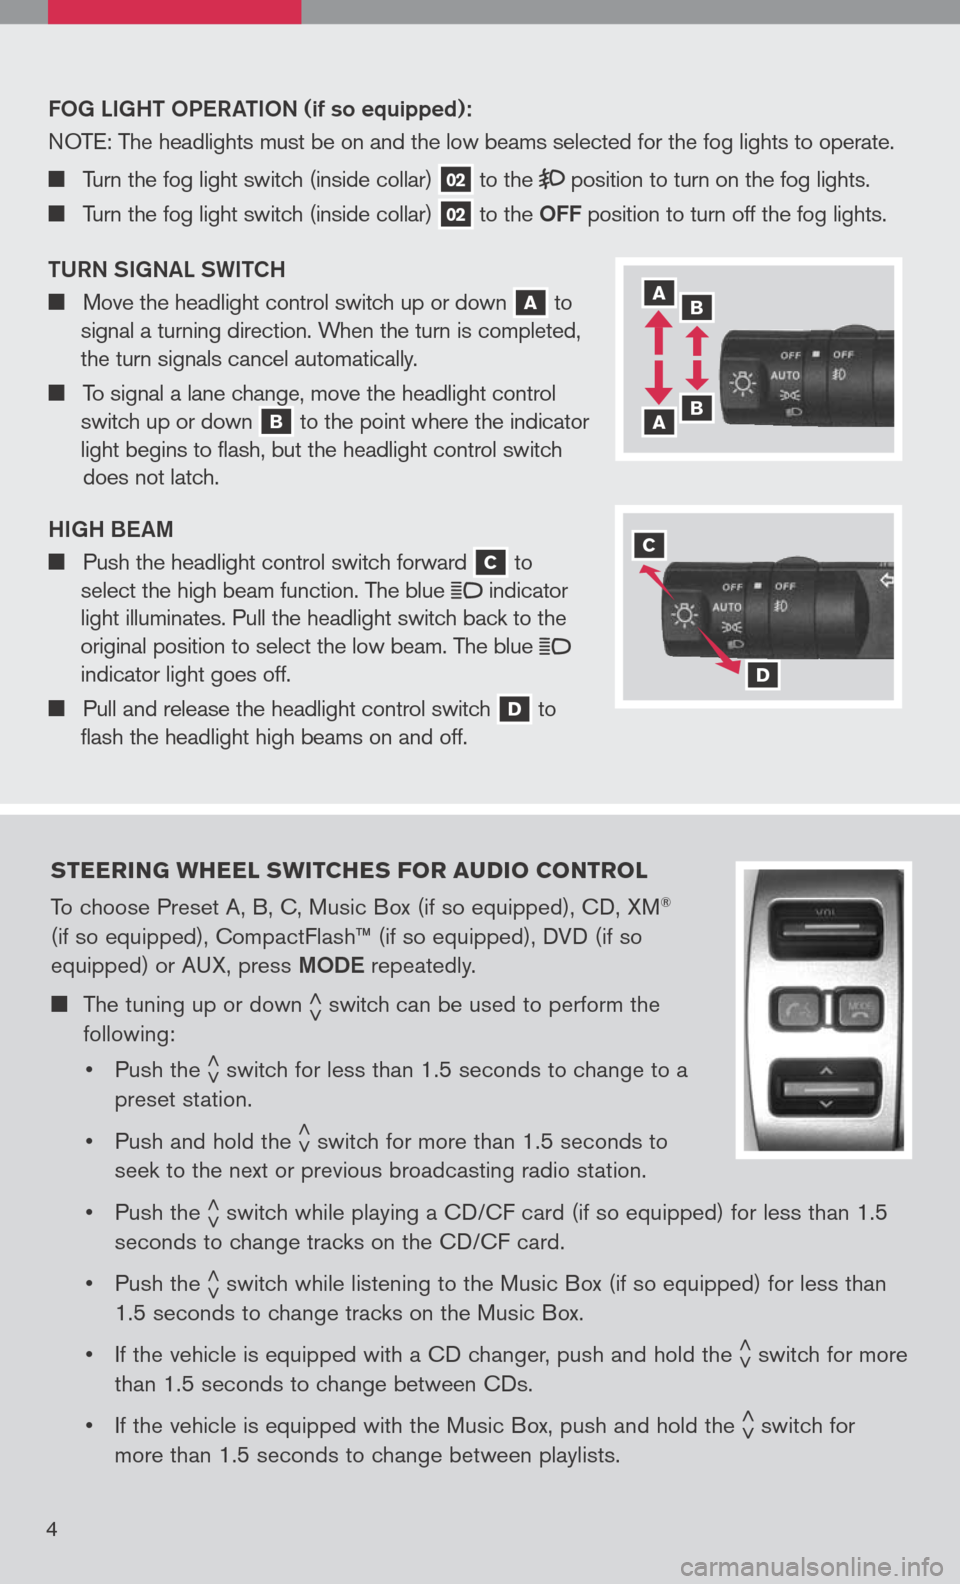
Turn the fog light switch (inside collar) 02 to the position to turn on the fog lights.
Turn the fog light switch (inside collar) 02 to the OFF position to turn off the fog lights.
t URN S igNaL SW itCh
Move the headlight control switch up or down a to
signal a turning direction. When the turn is completed,
the turn signals cancel automatically.
To signal a lane change, move the headlight control
switch up or down b to the point where the indicator
light begins to flash, but the headlight control switch
does not latch.
high Beam
Push the headlight control switch forward c to
select the high beam function. The blue indicator
light illuminates. Pull the headlight switch back to the
original position to select the low beam. The blue indicator light goes off.
Pull and release the headlight control switch d to
flash the headlight high beams on and off.
steering W heel sW itches F or audio control
To choose Preset A, B, C, Music Box (if so equipped), CD, XM®
(if so equipped), CompactFlash™ (if so equipped), DVD (if so
equipped) or AUX, press mODe repeatedly.
The tuning up or down < >switch can be used to perform the
following:
• Push the
< >switch for less than 1.5 seconds to change to a
preset station.
• Push and hold the
< >switch for more than 1.5 seconds to
seek to the next or previous broadcasting radio station.
• Push the
< >switch while playing a CD/CF card (if so equipped) for less than 1.5
seconds to change tracks on the CD/CF card.
• Push the
< >switch while listening to the Music Box (if so equipped) for less than
1.5 seconds to change tracks on the Music Box.
• If the vehicle is equipped with a CD changer, push and hold the
< >switch for more
than 1.5 seconds to change between CDs.
• If the vehicle is equipped with the Music Box, push and hold the
< >switch for
more than 1.5 seconds to change between playlists.
4
a b
b a
c
d
Page 9 of 36
FM/aM/ xM® radio W ith cd player (if so equipped)
02
0307
06
05
04
0108
7
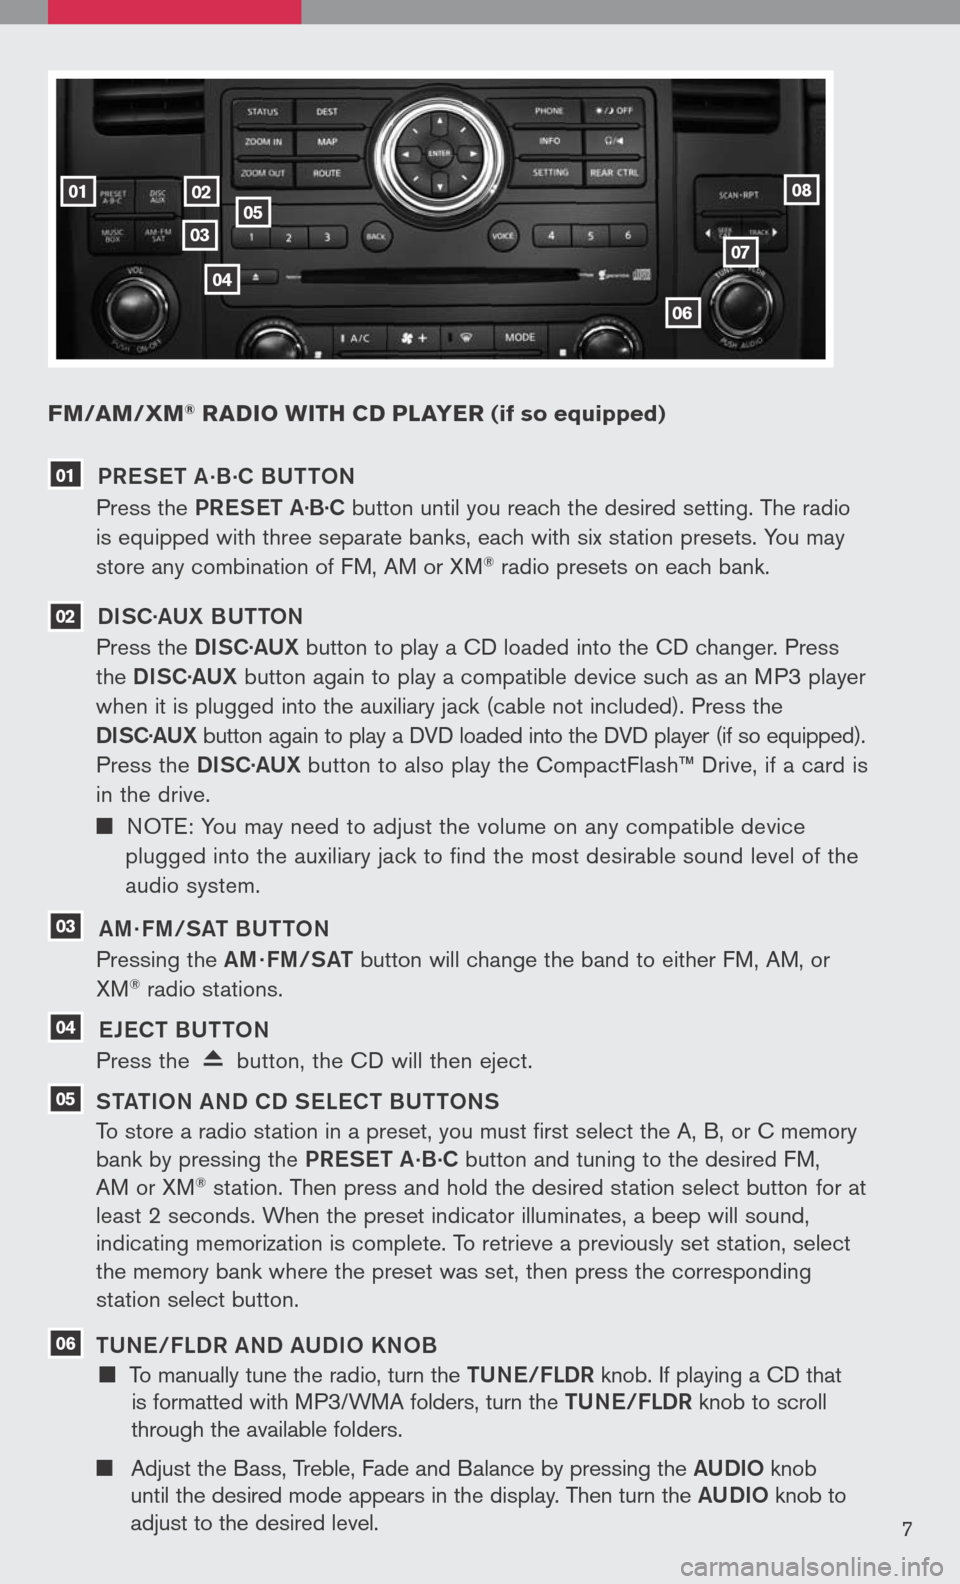
01 PR eS et a.B.
C BU ttON
Press the PReS et a·B·C button until you reach the desired setting. The radio
is equipped with three separate banks, each with six station presets. You may
store any combination of FM, AM or XM® radio presets on each bank.
02 DiSC· aUX B U ttON
Press the DiSC·a UX button to play a CD loaded into the CD changer. Press
the DiSC·a UX button again to play a compatible device such as an MP3 player
when it is plugged into the auxiliary jack (cable not included). Press the
D iSC· aUX
button again to play a DVD loaded into the DVD player (if so equipped).
Press the DiSC·a UX button to also play the CompactFlash™ Drive, if a card is
in the drive.
NOTE: You may need to adjust the volume on any compatible device
plugged into the auxiliary jack to find the most desirable sound level of the
audio system.
03 am · Fm/S at BU ttON
Pressing the am· Fm/S at button will change the band to either FM, AM, or
XM® radio stations.
04 eJe C t BU ttON
Press the button, the CD will then eject.
05 S tati ON aND CD S eLe C t BU ttONS
To store a radio station in a preset, you must first select the A, B, or C memory
bank by pressing the PReS et a.B.C button and tuning to the desired FM,
AM or XM® station. Then press and hold the desired station select button for at
least 2 seconds. When the preset indicator illuminates, a beep will sound,
indicating memorization is complete. To retrieve a previously set station, select
the memory bank where the preset was set, then press the corresponding
station select button.
06 tUN e/FLDR aND a UD iO KNOB
To manually tune the radio, turn the tUN e/FLDR knob. If playing a CD that
is formatted with MP3/WMA folders, turn the tUN e/FLDR knob to scroll
through the available folders.
Adjust the Bass, Treble, Fade and Balance by pressing the aUD iO knob
until the desired mode appears in the display. Then turn the aUD iO knob to
adjust to the desired level.
Page 10 of 36
07 S ee K /C at a ND tR aCK BU ttONS
To scan quickly through each broadcasting station, press the S ee K/C at button or the tR aCK button.
To skip from one track to another on a CD, press the S ee K/C at button or the
tR aCK button.
08 S C aN ·R P t BU ttON
Press the SCaN ·R P t button while listening to the radio. The radio will stop at each station that has significant signal strength for 5 seconds. If listening to a CD, it will select the previous/next selections.
To change the play pattern of a CD, Press the SCaN ·R P t button.
XM® presets are only available on XM® Satellite Radio equipped vehicles.
Music box hard -disk drive audio syste M
(if so equipped)
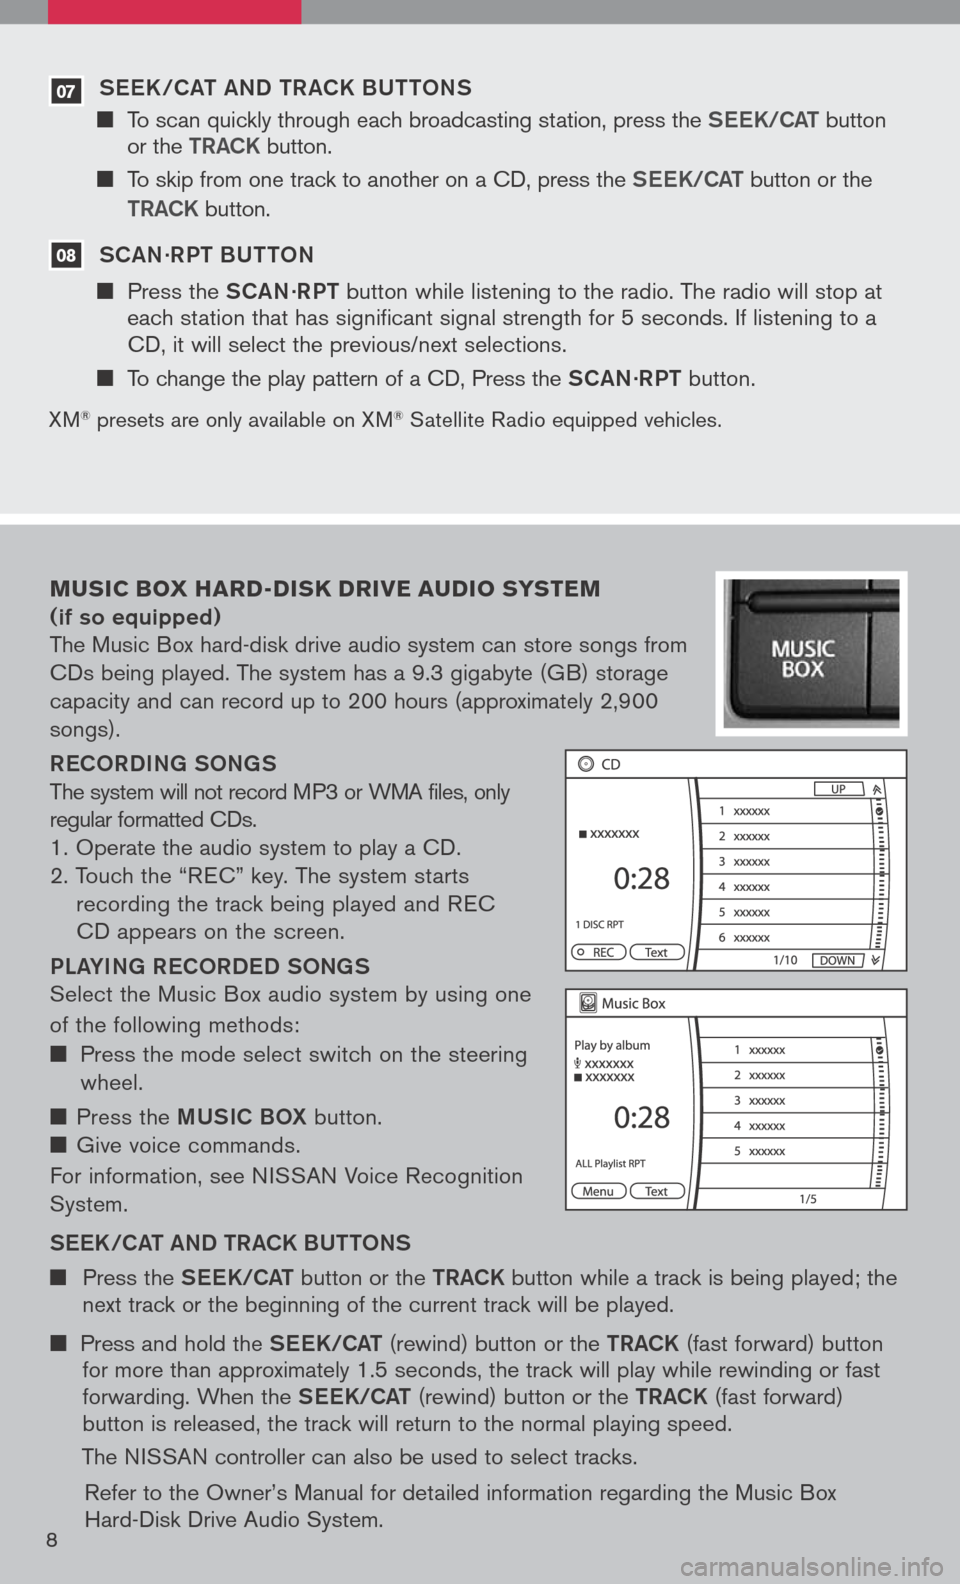
The Music Box hard-disk drive audio system can store songs from
CDs being played. The system has a 9.3 gigabyte (GB) storage
capacity and can record up to 200 hours (approximately 2,900
songs).
ReCOR D iN g SON gS
The system will not record MP3 or WMA files, only
regular formatted CDs.
1. Operate the audio system to play a CD.
2. Touch the “R EC” key. The system starts
recording the track being played and R EC
CD appears on the screen.
PL aY iN g R eCOR D eD SON gS
Select the Music Box audio system by using one
of the following methods:
Press the mode select switch on the steering
wheel.
Press the mUS iC BOX button.
Give voice commands.
For information, see N ISSAN Voice Recognition
System.
S ee K/C at a ND tR aCK BU ttONS
Press the See K/C at button or the tRaCK button while a track is being played; the next track or the beginning of the current track will be played.
Press and hold the See K/C at (rewind) button or the tRaCK (fast forward) button for more than approximately 1.5 seconds, the track will play while rewinding or fast forwarding. When the See K/C at (rewind) button or the tRaCK (fast forward) button is released, the track will return to the normal playing speed.
The NISSAN controller can also be used to select tracks.
Refer to the Owner’s Manual for detailed information regarding the Music Box Hard-Disk Drive Audio System.8
Page 24 of 36
22
SK iP (rewind) key - Touch the SKIP key to skip the chapter(s) of the disc backward. The chapters will go back the number of times the SKIP key is touched. Touch and hold the SKIP key for more than 1.5 seconds to rewind the disc. When the SKIP key is released, the disc will be played normally. To skip the chapter(s) backward, it is also possible to press the button on the keypad of the remote controller.
For additional information, see “NISSAN Mobile Entertainment System (MES) (if so equipped)” in the Owner’s Manual.
PLaYiNg a DigitaL Vi DeO DiSC
The DVD player plays DVD videos, video CDs and audio CDs. To play a DVD, begin by turning the ignition to the ACC or ON position. Insert the disc into the slot. The disc is automatically drawn in. The player can be operated by using the control panel buttons or the remote control. The DVD player can be operated by pressing the DiSC/a UX button. If you press the ReaR/ C tRL button quickly, you will toggle between rear audio control on and off. Press the DiSC/a UX button to toggle between the CD, AUX and DVD operation.
PLaYiNg a COm Pa C t Di SC
The DVD player plays DVD videos, video CDs and audio CDs. To play a CD, begin by turning the ignition to the ACC or ON position. Insert the disc into the slot. The disc is automatically drawn in. The player can be operated by using the control panel buttons or the remote control.
USiNg the aUX iL iaRY iNPUt Ja CKS
Auxiliary input jacks are used to plug in compatible devices, such as video games and portable video players. The jacks are located on the DVD player and are color-coded for identification. Refer to the section titled DVD Controls for a description.
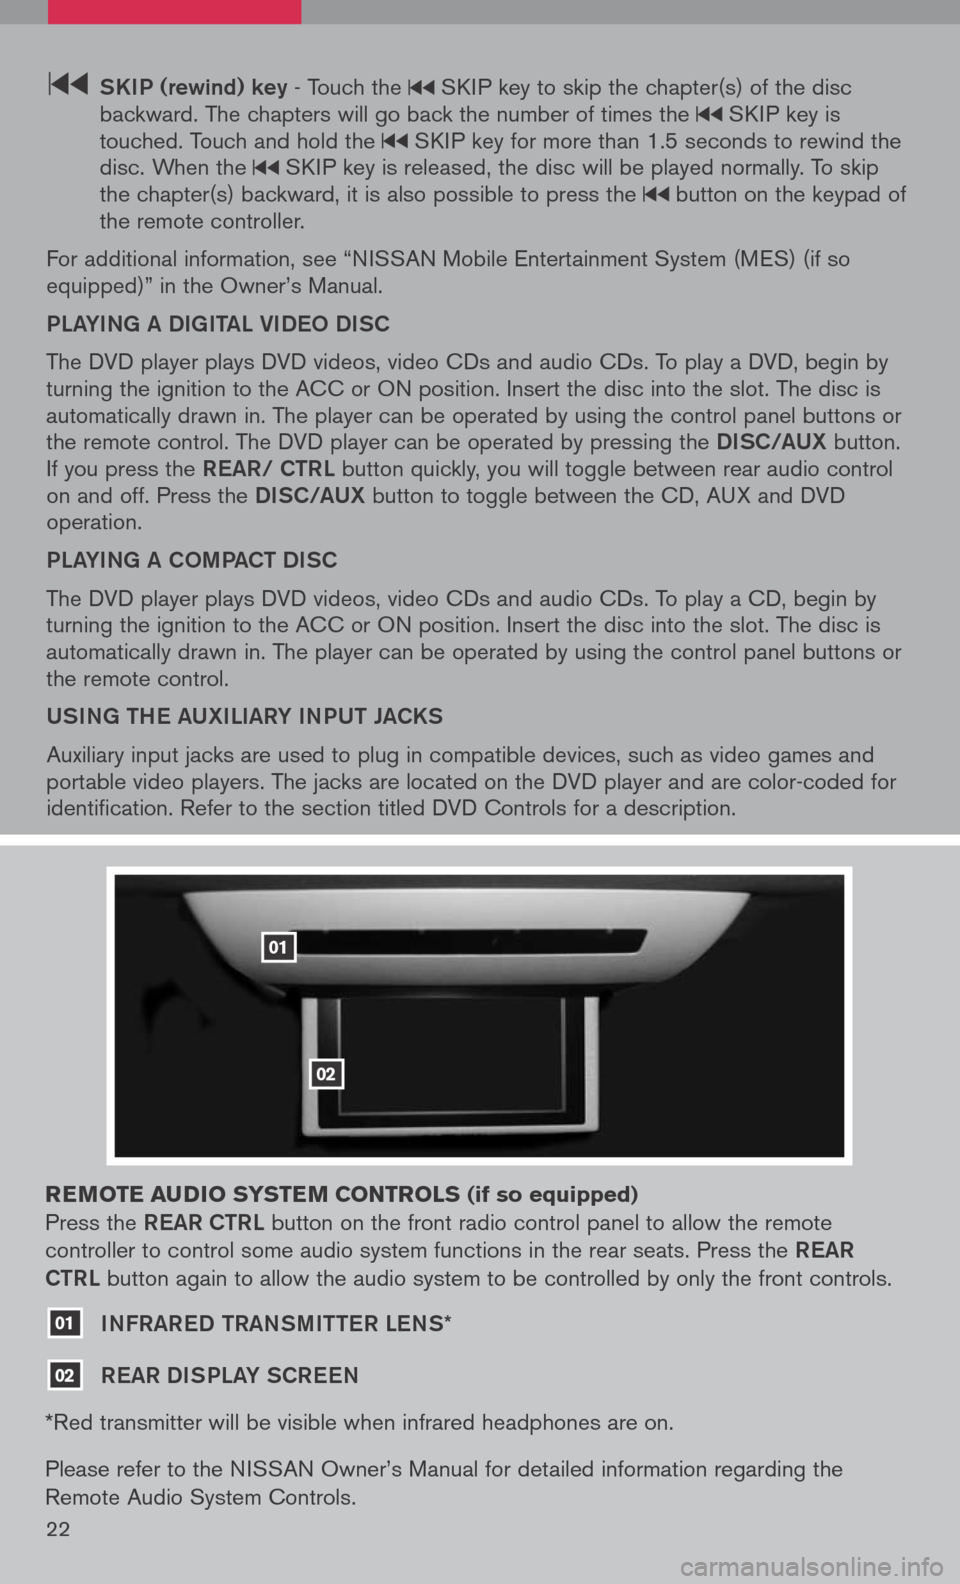
reM ote audio syste M controls (if so equipped)
Press the ReaR C tRL button on the front radio control panel to allow the remote
controller to control some audio system functions in the rear seats. Press the ReaR
C tRL
button again to allow the audio system to be controlled by only the front controls.
01 iNFRaR eD tRaNS mitteR LeNS*
02 ReaR Di SPLaY SCR eeN
*Red transmitter will be visible when infrared headphones are on.
Please refer to the NISSAN Owner’s Manual for detailed information regarding the
Remote Audio System Controls.
01
02
Page 27 of 36
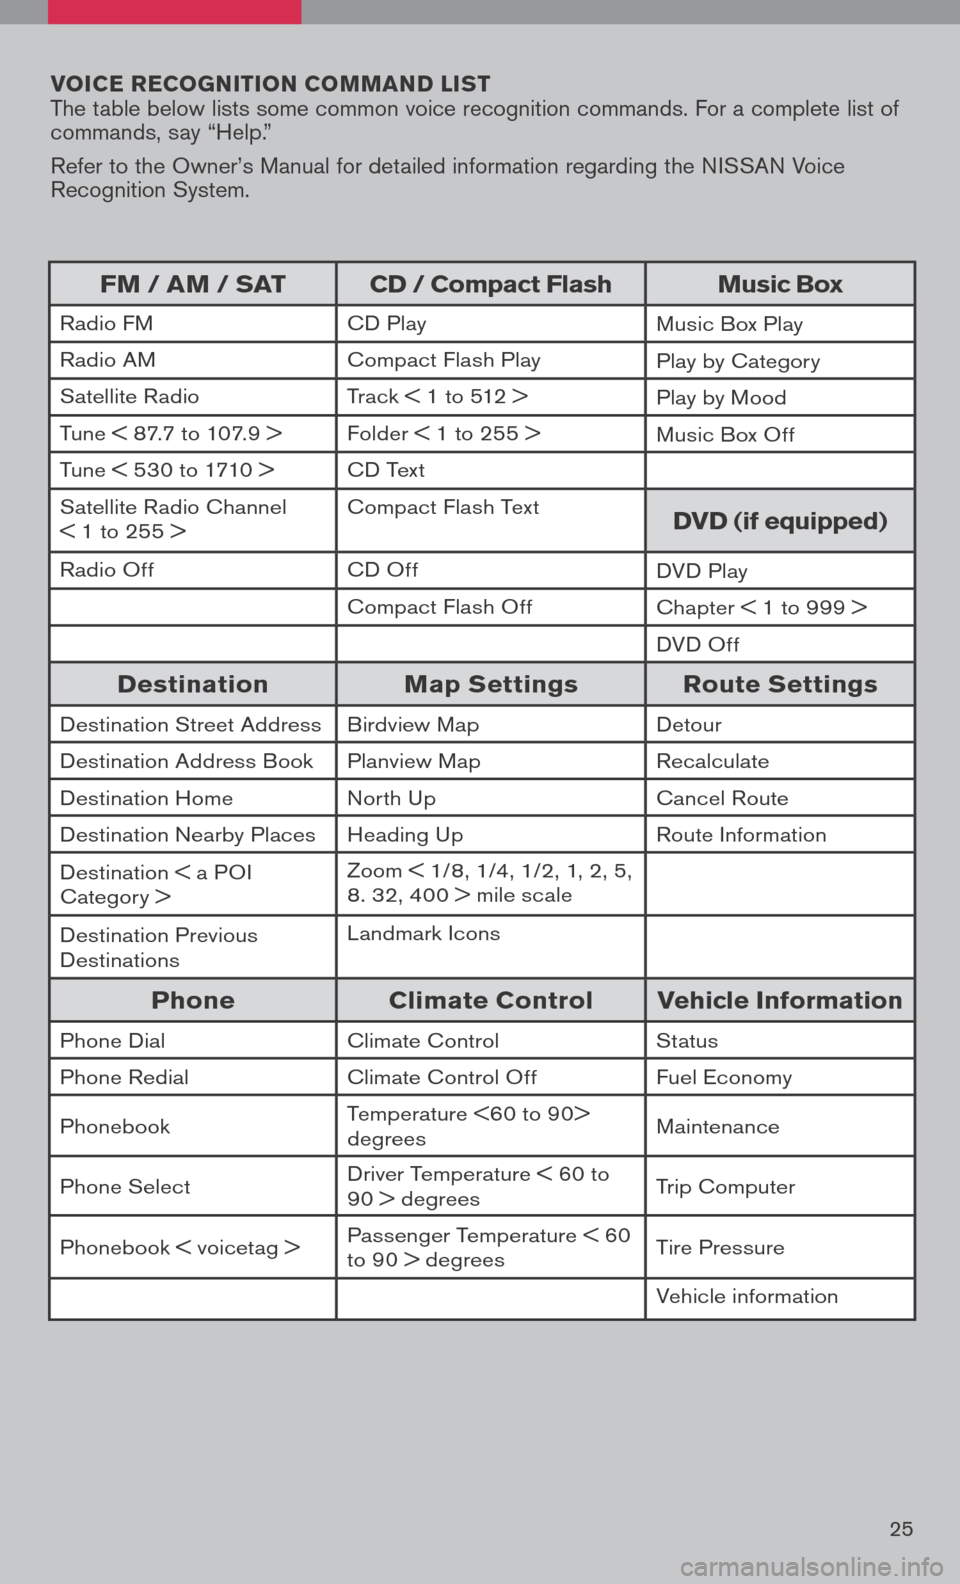
voice r ecognition co MM and list The table below lists some common voice recognition commands. For a complete list of commands, say “Help.”
Refer to the Owner’s Manual for detailed information regarding the NISSAN Voice Recognition System.
25
FM / aM / sat cd / compact Flash Music box
Radio FMCD PlayMusic Box Play
Radio AMCompact Flash PlayPlay by Category
Satellite RadioTrack < 1 to 512 > Play by Mood
Tune < 87.7 to 107.9 >Folder < 1 to 255 > Music Box Off
Tune < 530 to 1710 >CD Text
Satellite Radio Channel < 1 to 255 >Compact Flash Textdvd (if equipped)
Radio OffCD OffDVD Play
Compact Flash OffChapter < 1 to 999 >
DVD Off
destination Map settings route settings
Destination Street AddressBirdview MapDetour
Destination Address BookPlanview MapRecalculate
Destination HomeNorth UpCancel Route
Destination Nearby PlacesHeading UpRoute Information
Destination < a POI Category >Zoom < 1/8, 1/4, 1/2, 1, 2, 5, 8. 32, 400 > mile scale
Destination Previous DestinationsLandmark Icons
phone climate control vehicle information
Phone DialClimate ControlStatus
Phone RedialClimate Control OffFuel Economy
PhonebookTemperature <60 to 90> degreesMaintenance
Phone SelectDriver Temperature < 60 to 90 > degreesTrip Computer
Phonebook < voicetag >Passenger Temperature < 60 to 90 > degreesTire Pressure
Vehicle information