Page 9 of 32

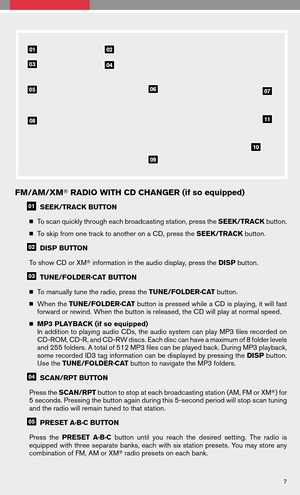
SEEK/TRACK BUTTON
� To scan quickly through each broadcasting station, press the SEEK/TRACKbutton.
� To skip from one track to another on a CD, pres")
FM/AM/XM�RADIO WITH CD CHANGER (if so equipped)
SEEK/TRACK BUTTON
� To scan quickly through each broadcasting station, press the SEEK/TRACKbutton.
� To skip from one track to another on a CD, press the SEEK/TRACKbutton.
DISP BUTTON
To show CD or XM �information in the audio display, press the DISPbutton.
TUNE/FOLDER·CAT BUTTON
� To manually tune the radio, press the TUNE/FOLDER·CATbutton.
� When the TUNE/FOLDER·CAT button is pressed while a CD is playing, it will fast
forward or rewind. When the button is released, the CD will play at normal speed.
� MP3 PLAYBACK (if so equipped)
In addition to playing audio CDs, the audio system can play MP3 files recorded on
CD-ROM, CD-R, and CD-RW discs. Each disc can have a maximum of 8 folder levels
and 255 folders. A total of 512 MP3 files can be played back. During MP3 playback,
some recorded ID3 tag information can be displayed by pressing the DISPbutton.
Use the TUNE/FOLDER·CAT button to navigate the MP3 folders.
SCAN/RPT BUTTON
Press the SCAN/RPT button to stop at each broadcasting station (AM, FM or XM �) for
5 seconds. Pressing the button again during this 5-second period will stop scan tuning
and the radio will remain tuned to that station.
PRESET A·B·C BUTTON
Press the PRESET A·B·Cbutton untilyoureach thedesired setting.Theradio is
equipped with three separate banks, each with six station presets. You may store any
combination of FM, AM or XM �radio presets on each bank.
7
Page 10 of 32

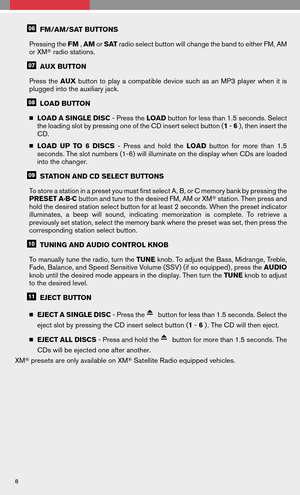
FM/AM/SAT BUTTONS
Pressing the FM,AM orSAT radio select button will change the band to either FM, AM
or XM �radio stations.
AUX BUTTON
Press the AUX button toplay acompatible devicesuchasan MP3 player whenitis
plugged into the auxiliary jack.
LOAD BUTTON
� LOAD A SINGLE DISC - Press theLOADbutton for less than 1.5 seconds. Select
the loading slot by pressing one of the CD insert select button ( 1-6 ) , then insert the
CD.
� LOAD UPTO6DISCS -Press andhold theLOAD buttonformore than1.5
seconds. The slot numbers (1-6) will illuminate on the display when CDs are loaded
into the changer.
STATION AND CD SELECT BUTTONS
To store a station in a preset you must first select A, B, or C memory bank by pressing the
PRESET A·B·C button and tune to the desired FM, AM or XM �station. Then press and
hold the desired station select button for at least 2 seconds. When the preset indicator
illuminates, abeep willsound, indicating memorization iscomplete. Toretrieve a
previously set station, select the memory bank where the preset was set, then press the
corresponding station select button.
TUNING AND AUDIO CONTROL KNOB
To manually tune the radio, turn the TUNEknob. To adjust the Bass, Midrange, Treble,
Fade, Balance, and Speed Sensitive Volume (SSV) (if so equipped) , press the AUDIO
knob until the desired mode appears in the display. Then turn the TUNEknob to adjust
to the desired level.
EJECT BUTTON
� EJECT A SINGLE DISC - Press the
button for less than 1.5 seconds. Select the
eject slot by pressing the CD insert select button ( 1-6 ) . The CD will then eject.
� EJECT ALL DISCS - Press and hold the
button for more than 1.5 seconds. The
CDs will be ejected one after another.
XM � presets are only available on XM �Satellite Radio equipped vehicles.
8
Page 11 of 32

Press and hold the CLOCK DISPbutton for more than approximately 1.5 seconds.
� Hour Adjust will appear on the screen and the hours w")
CLOCK SET/ADJUSTMENT
NON-NAVIGATION SYSTEM ONLY (if so equipped)
Press and hold the CLOCK DISPbutton for more than approximately 1.5 seconds.
� Hour Adjust will appear on the screen and the hours will start flashing.
� Press the SEEKorTUNE button to adjust the hour.
� Press the CLOCK DISP button again. Minute Adjust will appear on the screen and the
minutes will start flashing.
� Press the SEEKorTUNE button to adjust the minutes.
� Press the CLOCK DISP button again. “Clock Is Set” will appear on the screen.
NAVIGATION SYSTEM ONLY (if so equipped)
Press theSETTING button, then select SYSTEM
SETTINGS withthejoystick andpress theEN-
TER button. Nextselect CLOCK andpress the
ENTER button to access the following clock set-
tings:
� Hours –Adjust thetime byincreasing or
decreasing by hour.
� Minutes –Adjust thetime byincreasing or
decreasing by minute.
� Auto Adjust –The time willbereset tothe
GPS time.
� Daylight Saving Time – Turn this item on for daylight savings time application.
� Select Time Zone – Choose the time zone.
CONTROL PANEL DISPLAY WITH NAVIGATION SYSTEM (if so
equipped)
TRIP BUTTON
When the TRIPbutton is pressed, the
following modeswilldisplay onthe
screen:
� Warning messages (ifthere are
any)
� TRIP 1 (Elapsed Time, Driving Dis-
tance, Average Speed)
� TRIP 2 (Elapsed Time, Driving Dis-
tance, Average Speed)
� FUEL ECONOMY (Average Fuel Economy, Distance to Empty)
� MAINTENANCE (Engine Oil, Tire Rotation and Tire Pressure)
� OFF
9
Page 12 of 32

MAINTENANCE ITEMS
Youcansetthe engine oiland thetirerotation interval. Todisplay thesetting ofthe
maintenance interval, select the ENGINE OILorTIRE ROTATION key using the joystick and
press the ENTER button.Toset the maintenance interval,selecttheMAINTENANCE
SCHEDULE keyusing thejoystick andpush thejoystick tothe right orleft. Toreset the
maintenance interval, select the RESETkey using the joystick and press the ENTERbutton.
DISPLAY SCREEN SETTINGS
The SETTING screenwillappear whentheSETTING buttonispressed. Selectthe
DISPLAY key with the joystick and press the ENTERbutton to choose from various display
screen options. The DISPLAYkey will allow you to personalize the information shown on the
display screen, such as climate control or audio system display.
AUTOMATIC DRIVER POSITIONER (if so equipped)
The automatic driver positioner system has two
features:
� Memory storage function.
� Entry/exit function.
MEMORY STORAGE FUNCTION
Two positions forthe driver’s seat,steering
column, andoutside mirrorscanbestored in
the automatic driver positioner memory. Follow
these procedures to set driver preferences.
SET THE DESIRED POSITIONING
1.Set theshift selector levertothe P
(Park) position.
2. Turn the ignition on and adjust the driver’s seat, steering column, and outside mirrors
to the desired positions.
3. Press the SET(memory) button and within 5 seconds press the position button ( 1or
2 ) for at least 1 second until the indicator light illuminates. The position is now stored
in memory.
LINK TO KEYFOB
� Within 5 seconds of setting the memory position (indicator light is on and ignition is on) ,
press the
button on the remote.
� A keyfob can be linked to each memory button.
� If memory positioning is reset to a new location, the keyfob automatically re-links.
RECALLING A MEMORY SETTING FROM THE MEMORY PAD
� With the shift selector lever in the P (Park) position, press the position button ( 1or 2) for
at least 1 second.
FROM THE KEYFOB
� If properly linked, operation of the
button will automatically return the driver’s seat,
steering column and outside mirrors to the memorized position.
10
Page 13 of 32

ENTRY/EXIT FUNCTION
The driver’s seat and steering column automatically move to allow the driver to get into and
out of the driver’s seat more easily. The driver’s seat slides backward and the steering column
moves up when: � The driver’s doorisopened, theignition switchisin the LOCK position andtheshift
selector lever is in the P (Park) position.
The driver’s seat and steering column return to the previous position when:
� The driver’s door is closed and the ignition switch is pushed.
XTRONIC CONTINUOUSLY VARIABLE TRANSMISSION (CVT)
�The Xtronic CVTdoes notproduce agear
change sensation liketraditional automatic
transmissions.
� The transmission in your vehicle requires a spe-
cial fluid available onlyatyour NISSAN dealer.
No other fluid will meet the exact requirements of
the Xtronic CVT.
MANUAL SHIFT MODE
� When theshift selector leverisshifted fromD
(Drive) to the manual shift gate, the transmission
enters the manual shift mode.
� In the manual shift mode, shift range is displayed
on the position indicator in the meter.
� When shifting up, move the shift selector lever to
the + (up) side. (Shifts to higher range.)
� When shifting down, move the shift selector lever to the - (down) side. (Shifts to lower
range.)
� In manual shift mode, the transmission automatically shifts down to M1 (first) before the
vehicle comes to a stop. When accelerating again, it is necessary to shift to the desired
range.
� When canceling the manual shift mode, return the shift selector lever to the D (Drive)
position. The transmission returns to the normal driving mode.
11
Page 14 of 32
 OFF SWITCH
The Vehicle Dynamic Control (VDC) system is designed to help improve
driving stability. VDC detects wheel spin and controls braking and engine
output. VDC may")
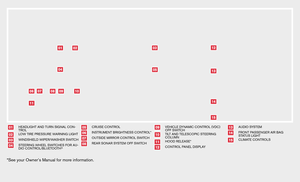
VEHICLE DYNAMIC CONTROL (VDC) OFF SWITCH
The Vehicle Dynamic Control (VDC) system is designed to help improve
driving stability. VDC detects wheel spin and controls braking and engine
output. VDC may need to be temporarily shut off if you are trying to free a
vehicle stuck in snow or mud. � Push the Vehicle Dynamic Control (VDC) off switch to deactivate the
VDC system. The
lightwillilluminate inthe instrument panel
gauge area.
� Push the Vehicle Dynamic Control (VDC) off switch again to activate the VDC system.
The
light in the instrument panel gauge area will turn off.
� The VDC system is active while the vehicle is running until the switch is pressed to turn
it off.
FRONT-PASSENGER AIR BAG STATUS LIGHT
This vehicle is equipped with the Nissan Advanced Air
Bag System. Under some conditions, depending on the
type ofoccupant orobject detected inthe front pas-
senger seat by the occupant classification sensor, the
front-passenger airbag isdesigned toautomatically
turn OFF. When thefront-passenger airbag isOFF,
the front-passenger air bag status light will illuminate*.
For example:
� When the system detects that the front-passenger’s seat is occupied by a small adult,
child orchild restraint asoutlined inthe Owner’s Manual,the
will illuminate to
indicate that the front-passenger air bag is OFF and will not inflate in a crash .
� When the front-passenger’s seat is occupied and the passenger meets the conditions
outlined inthe Owner’s Manual,the
willnotilluminate toindicate thatthe
front-passenger air bag is operational .
*When thesystem detects thatthefront-passenger’s seatisunoccupied, the
passenger air bag status light will not illuminate even though the front-passenger
air bag is OFF.
TIRE PRESSURE MONITORING SYSTEM (TPMS)
This system monitors tirepressure. Ifthe low tirepressure warning
light illuminates, check the tire pressure in all four tires.
Adjust the low tire pressure to the recommended COLD tire pressure
shown on the Tire and Loading Information label located in the driver’s
door opening. After tire pressures are adjusted, the vehicle will need
to be driven at speeds above 16 MPH (25 km/h) to activate the TPMS
and turn off the low tire pressure warning light.
12
Page 15 of 32

SEAT BELT WARNING LIGHT AND CHIME
�The light and chime remind you to fasten your seat belts. The light
illuminates whenevertheignition keyisturned tothe ON or
START position andremains illuminated untilthedriver’s seat
belt is fastened. At the same time, the chime sounds for approxi-
mately 6seconds unlessthedriver’s seatbeltissecurely fas-
tened.
� The seat beltwarning lightmayalso illuminate ifthe front pas-
senger’s seatbeltisnot fastened whenthefront passenger’s
seat is occupied. For 7 seconds after the ignition switch is in the ON position, the system
does not activate the warning light for the front passenger.
REAR SONAR SYSTEM OFF SWITCH (if so equipped)
When backing up, this system will beep to alert you to obstacles within 6
ft (1.8 m) of the rear bumper. The system beeps faster as the vehicle gets
closer to the obstacle. A continuous tone sounds when an obstacle is less
than 10 in (25 cm) away from the bumper. Turn the system off by pushing
the rear sonar system OFFswitch. Push the switch again to enable the
system. Thesystem willautomatically resetthenext time theignition
switch is turned on.
CHILD SAFETY REAR DOOR LOCK
Child safety locks help prevent the rear doors from
being opened accidentally, especially when small
children areinthe vehicle. Thechild safety lock
levers arelocated onthe edge ofthe rear doors.
When the lever is in the LOCK position, the door
can only be opened from the outside.
FUEL-FILLER CAP
� To tighten, turn the fuel-filler cap clockwise until ratcheting
clicks are heard. If the cap is not fully tightened, the service
engine soon light may illuminate.
� If
light illuminates becausefuelcap isloose or
missing, tighten or install the cap. The
should turn
off after a few driving trips.
13
Page 16 of 32

FUEL-FILLER DOOR AND TRUNK LID RELEASE SWITCHES
FUEL-FILLER DOOR RELEASE SWITCH
Thefuel-filler doorrelease islocated onthe driver’s
door.
� To open the fuel-filler door, push the release.
� To lock, close the fuel-filler door securely.
TRUNK LID OPENER
The trunk lid opener lever is located on the driver’s door.
� To open the trunk lid, pull the opener lever out.
� To close the trunk lid, lower and push the trunk lid down securely.
TRUNK LID CANCEL SWITCH
�When the cancel switch (located inside the glove box)
is OFF, the trunk lid cannot be opened with the trunk lid
opener (located on the driver’s door) , the trunk request
switch button or the Intelligent Key button.
� It can be opened by using the Emergency Inside Trunk
Release.
TILT AND TELESCOPIC STEERING COLUMN (if so equipped)
POWER TILT OPERATION
Push the switchup or down to adjust the steering
wheel to the desired position.
POWER TELESCOPIC OPERATION
Push the switchforward or backward to adjust the
steering wheel to the desired position.
OUTSIDE MIRROR CONTROL SWITCH
POWER FOLDING MIRRORS (if so equipped)
� Move the switch
to select the left or right mirror.
� Adjust eachmirror tothe desired position usingthe
switch
.
� Push the
OPEN
CLOSEswitchto fold both mirrors inor
out.
14