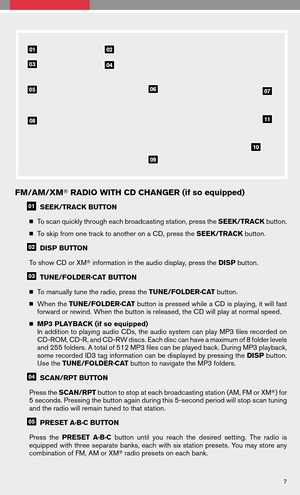
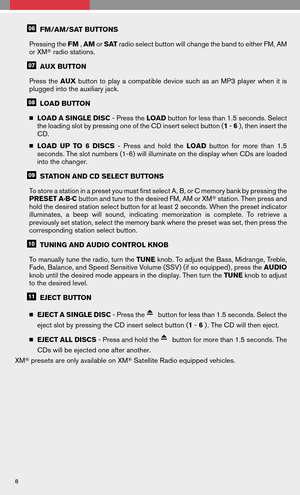
Page 17 of 32

Thereverse tilt-down featurewillturn theselected outsidemirrorsurface downward to
provide better rear visibility close to the vehicle.
� Turn the outside")
REVERSE TILT-DOWN FEATURE (if so equipped)
Thereverse tilt-down featurewillturn theselected outsidemirrorsurface downward to
provide better rear visibility close to the vehicle.
� Turn the outside mirror control switch to the left or right position
when the ignition
switch is in the ON position.
� Move the shift selector lever to R (Reverse) . The selected mirror will turn downward.
The selected mirror surface will return to its original position when any of the following have
occurred:
� The shift selector lever is moved to any position other than R (Reverse) .
� The outside mirror control switch is set to the neutral position.
� The ignition switch is turned to the OFF position.
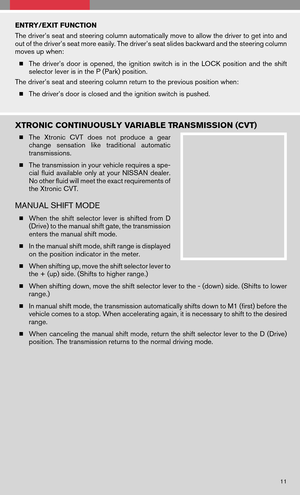
MOONROOF CONTROLS (if so equipped)
The ignition switch must be in the ON position to operate
the moonroof controls.
TILTING THE MOONROOF
� To tiltthe moonroof up,push thetiltswitch tothe
UP
position. If the roof is open, it will automati-
cally close and then tilt up.
� To tilt the moonroof down, push the tilt switch to the
DOWN
position.
SLIDING THE MOONROOF
� To open the roof, slide the switch to the OPENposition. If the roof is tilted up, it will
automatically tilt down and then open.
� To close the roof, slide the switch to the CLOSE
position.
� The position of the sliding roof lid can be chosen by the position of the sliding switch.
� Tofully open orclose theroof, move theswitch completely tothe OPEN orCLOSE
position.
FRONT SEAT ADJUSTMENTS
With manual seats (passenger’s seat if so equipped):
FORWARD AND BACKWARD
� Pull up on the lever under the front of the seat and slide forward or backward. Release the
lever to lock the seat in position.
RECLINING
� Lift the lever on the side of the seat to adjust your seatback forward or backward; release
the lever when you have found a comfortable angle and the seat belt fits properly.
15
Page 18 of 32
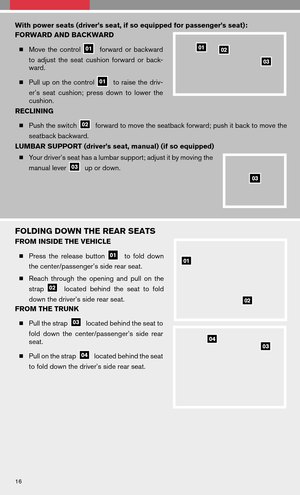
With power seats (driver’s seat, if so equipped for passenger’s seat):
FORWARD AND BACKWARD � Move thecontrol
forward orbackward
to adjust theseat cushion forwardorback-
ward.
� Pull uponthe control
toraise thedriv-
er’s seat cushion; pressdowntolower the
cushion.
RECLINING
� Push the switch
forward to move the seatback forward; push it back to move the
seatback backward.
LUMBAR SUPPORT (driver’s seat, manual) (if so equipped)
� Your driver’s seat has a lumbar support; adjust it by moving the
manual lever
up or down.
FOLDING DOWN THE REAR SEATS
FROM INSIDE THE VEHICLE
� Press therelease button
tofold down
the center/passenger’s side rear seat.
� Reach through theopening andpullonthe
strap
located behindtheseat tofold
down the driver’s side rear seat.
FROM THE TRUNK
� Pull the strap
located behind the seat to
fold down thecenter/passenger’s siderear
seat.
� Pull on the strap
located behind the seat
to fold down the driver’s side rear seat.
16
Page 19 of 32

SYSTEM OPERATING TIPS
� Garage doors, electrical gates, entry doors, etc. will be activated during programming.
To avoid injury, make sure that peopl")
HOMELINK�UNIVERSAL TRANSCEIVER (if so equipped)
SYSTEM OPERATING TIPS
� Garage doors, electrical gates, entry doors, etc. will be activated during programming.
To avoid injury, make sure that people and objects are clear of all doors or gates during
programming. Yourvehicle’s engineshouldbeturned offwhile programming the
HomeLink �Transceiver.
� To program your HomeLink �Transceiver to operate a garage door, gate, or entry door
opener, home or office lighting, you need to be at the same location as the device.
NOTE: Garage dooropeners (manufactured after1996) have“rolling codepro-
tection”. Toprogram agarage dooropener equipped with“rolling codeprotec-
tion”, you will need to use a ladder to get up to the garage door opener motor to
be able to access the “smart or learn” program button.
PROGRAMMING YOUR HOMELINK � UNIVERSAL TRANSCEIVER (Mirror,
Sun Visor or Overhead Console)
1. To begin, press and hold the two
outer HomeLink �buttons (to
clear the memory) until the indi-
cator light blinks slowly (after 20
seconds) . Releasebothbut-
tons.
2. Position theend ofthe hand-
held transmitter 1-3inches
(26-76 mm)away fromthe
HomeLink �surface
3. Using bothhands, simultaneously pressandhold both theHomeLink �button you
want toprogram andthehand-held transmitter button. DONOT release the
buttons until step 4 has been completed.
4. Hold down both buttons until the indicator light on the HomeLink �flashes, changing
from a“slow blink” to a“rapidly flashing blink”.Thiscould takeupto90 seconds.
When the indicator light flashes rapidly, both buttons may be released. The rapidly
flashing light indicates successful programming. To activate the garage door or other
programmed device, press and hold the programmed HomeLink �button - releasing
when the device begins to activate.
5. If the indicator light on the HomeLink �blinks rapidly for two seconds and then turns
solid, HomeLink �has picked up a “rolling code” garage door opener signal. You will
need toproceed withthenext steps totrain theHomeLink �to complete the
programming which may require a ladder and another person for convenience.
6. Press and release the “smart” or “learn” program button located on the garage door
opener’s motor to activate the “training mode”. This button is usually located near the
antenna wire that hangs down from the motor. If the wire originates from under a light
lens, you will need to remove the lens to access the program button.
NOTE: Onceyouhave pressed andreleased theprogram buttononthe garage
door opener’s motor and the “training light” is lit, you have 30 seconds in which to
perform step 7. Use the help of a second person for convenience to assist when
performing this step.
17
Page 20 of 32

7.Quickly within30seconds ofpressing andreleasing thegarage dooropener
program button,firmlypress andrelease theHomeLink �button you’vejustpro-
grammed. Press and release the HomeLink �button up to three times to complete the
training.
8. Your HomeLink �button should nowbeprogrammed. (Toprogram theremaining
HomeLink �buttons for additional door or gate openers, follow steps 2-8 only) .
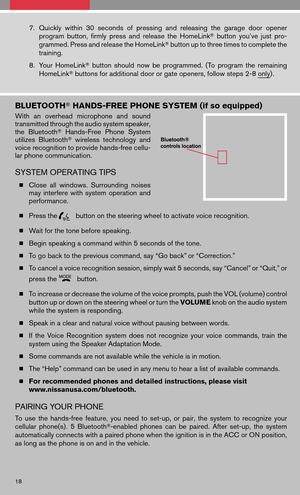
BLUETOOTH� HANDS-FREE PHONE SYSTEM (if so equipped)
Withanoverhead microphone andsound
transmitted through the audio system speaker,
the Bluetooth �Hands-Free PhoneSystem
utilizes Bluetooth �wireless technology and
voice recognition to provide hands-free cellu-
lar phone communication.
SYSTEM OPERATING TIPS
� Close allwindows. Surrounding noises
may interfere withsystem operation and
performance.
� Press the
button on the steering wheel to activate voice recognition.
� Wait for the tone before speaking.
� Begin speaking a command within 5 seconds of the tone.
� To go back to the previous command, say “Go back” or “Correction.”
� To cancel a voice recognition session, simply wait 5 seconds, say “Cancel” or “Quit,” or
press the
button.
� To increase or decrease the volume of the voice prompts, push the VOL (volume) control
button up or down on the steering wheel or turn the VOLUMEknob on the audio system
while the system is responding.
� Speak in a clear and natural voice without pausing between words.
� Ifthe Voice Recognition systemdoesnotrecognize yourvoice commands, trainthe
system using the Speaker Adaptation Mode.
� Some commands are not available while the vehicle is in motion.
� The “Help” command can be used in any menu to hear a list of available commands.
� For recommended phones and detailed instructions, please visit
www.nissanusa.com/bluetooth.
PAIRING YOUR PHONE
To use thehands-free feature,youneed toset-up, orpair, thesystem torecognize your
cellular phone(s) . 5Bluetooth �-enabled phonescanbepaired. Afterset-up, thesystem
automatically connects with a paired phone when the ignition is in the ACC or ON position,
as long as the phone is on and in the vehicle.
18
Page 21 of 32

PAIRING PROCEDURE
NOTE:The vehicle must be stationary when pairing the phone.
1. Press the
button on the steering wheel and wait for the tone.
2. Say “Setup.”
3. Wait for the tone, then say “Pair phone.”
4. Wait for the tone, then say “New phone.”
5. Initiate pairing from the phone.
� The pairing procedure variesaccording toeach cellular phonemodel. Fordetailed
pairing instructions and compatible phones, please visit
www.nissanusa.com/bluetooth .
� When prompted for a PASSKEY code, enter “1234” from the handset. (The PASS-
KEY code is assigned by NISSAN and cannot be changed.)
6. Say a name for the phone when the system asks you to provide one. You can give the
phone a name of your choice.
7. Say anumber between 1and 5when thesystem asksyouforapriority level.The
priority leveldetermines whichphone interacts withthesystem whentwoormore
paired phones are active in the vehicle at the same time. Choose 1 if this is the only
phone or the primary phone.
8. Say “Yes” or “No” when the system asks if you would like to select a custom ring tone.
Follow the instructions provided by the system to choose a ring tone.
SETTING UP YOUR PHONEBOOK – ADDING NEW ENTRIES
Each paired phone has its own dedicated phone book. Each phone book can store up to 40
names. Each name can have up to 4 locations/numbers: Home, Office, Mobile, and Other.
NOTE: The vehicle must be stationary when adding new entries.
1. Press the
button and wait for the tone.
2. Say “Phone book.”
3. Wait for the tone, then say “New entry.”
4. When prompted, say the name for the new entry. For example, say “Michelle.” If the
name istoo short ortoo long, orifit sounds toomuch likeaname thatisalready
stored in the phone book, the system tells you and prompts you to say a name again.
Choose a new name.
5. Say “Yes” or “No” when the system asks you to confirm the name is correct.
6. Say a location (“Home,” “Office,” “Mobile” or “Other”) when the system asks you to
provide one. The system acknowledges the location.
� By Voice command -When prompted, sayaphone number forthe location. For
example, say“five fivefiveone twoone two.” The systemrepeats thenumber and
prompts you for the next command.
� By Bluetooth �transfer -Say “Transfer entry.” The systemacknowledges thecom-
mand and asks you to initiate the transfer from the phone handset. The new contact
phone number will be transferred from the cellular phone via the Bluetooth �commu-
nication link. The transfer procedure varies according to each cellular phone. See the
cellular phone owner’s manual for details.
19
Page 22 of 32

7.Say “Store” when you are finished entering numbers. The system confirms the name,
location, and number.
8. Say “Yes” or “No” when the system asks if you would like to store another location for
the same name. If you do not respond to the system prompt, the system ends the New
Entry session.
MAKING A PHONE CALL
1. Press thebutton.
2. After the tone, do one of the following:
� Say “Call [name] [location].” For example, say “Call Michelle Home.”
� Say “Call [number].” For example, say “Call 123-456-7891.”
� Say “Redial” to redial the previous phone number called by the system.
RECEIVING/ENDING A PHONE CALL
When you receive a phone call, a ring tone sounds through the audio system.
� To accept the call, press the
button. To reject the call, press thebutton.
� To hang up the phone at the end of a call or to disconnect during call placement, press
the
button.
HOW TO SAY NUMBER
NISSAN voice recognition permits numbers to be spoken in a variety of ways.
� Say “zero” or “oh” for “0.” Example: 1-800-662-6200 – Say “one eight zero zero six six
two six two oh oh.”
� Say “pound” for “#”. Say “star” for “*”. Example: 1-555-1212*123 – Say “one five five five
one two one two star one two three.”
NAVIGATION SYSTEM (if so equipped)
GETTING STARTED
The Navigation Systembeginswhen
the ignition switch is in the ACC or ON
position. Tohelp ensure safedriving,
some functions aregrayed out,or
muted, while driving. Park the vehicle in
a safe location andthen operate the
Navigation System.
20
Page 23 of 32
BASIC FUNCTIONS
START-UP SCREEN
� Read theprecautions carefully,highlightthe
“OK” keyusing thejoystick andpress the
ENTER button.
NAVIGATION DISPLAY SCREEN
�Displays navigation features and map.
DISABLED WHILE DRIVING
�Not allfeatures canbemanually operated
while the vehicle is in motion. The text for these
restricted features turns from white to gray and
cannot be selected.
DAY/NIGHT BUTTON
� Press thebuttontoswitch be-
tween theday screen (bright) andthenight
screen (dark) . Within 10 seconds of pressing
the
button, you can adjust the
brightness of the map display screen by mov-
ing the joystick right or left.
MOVING AROUND WITHIN A MAP
� To maneuver aroundthenavigation display
screen, tiltthe joystick corresponding tothe
direction thatyouwant tomove across the
map. Keep tilting thejoystick tocontinuously
move across themap inthat direction. Once
you start moving on the map, the cross pointer
appears..
21
Page 24 of 32
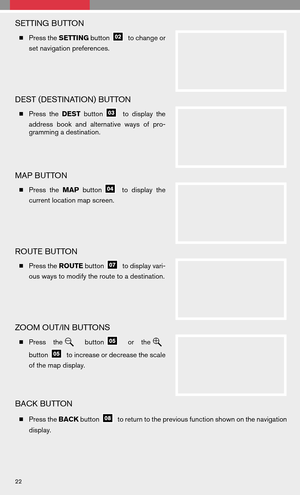
SETTING BUTTON
�Press the SETTING buttonto change or
set navigation preferences.
DEST (DESTINATION) BUTTON
� Press theDEST buttontodisplay the
address bookandalternative waysofpro-
gramming a destination.
MAP BUTTON
� Press theMAP buttontodisplay the
current location map screen.
ROUTE BUTTON
� Press the ROUTEbuttonto display vari-
ous ways to modify the route to a destination.
ZOOM OUT/IN BUTTONS
� Press thebuttonorthe
buttonto increase or decrease the scale
of the map display.
BACK BUTTON
� Press the BACKbuttonto return to the previous function shown on the navigation
display.
22