2008 NISSAN LATIO heater
[x] Cancel search: heaterPage 381 of 2771

AV-22
< SERVICE INFORMATION >
AUDIO
Power Supply Circuit Inspection
INFOID:0000000001704663
1.CHECK FUSE
Check that the following fuses of the subwoofer (premium system) and audio unit are not blown.
OK or NG
OK >> GO TO 2.
NG >> If fuse is blown, be sure to eliminate cause of blown fuse before installing new fuse. Refer to PG-
3 .
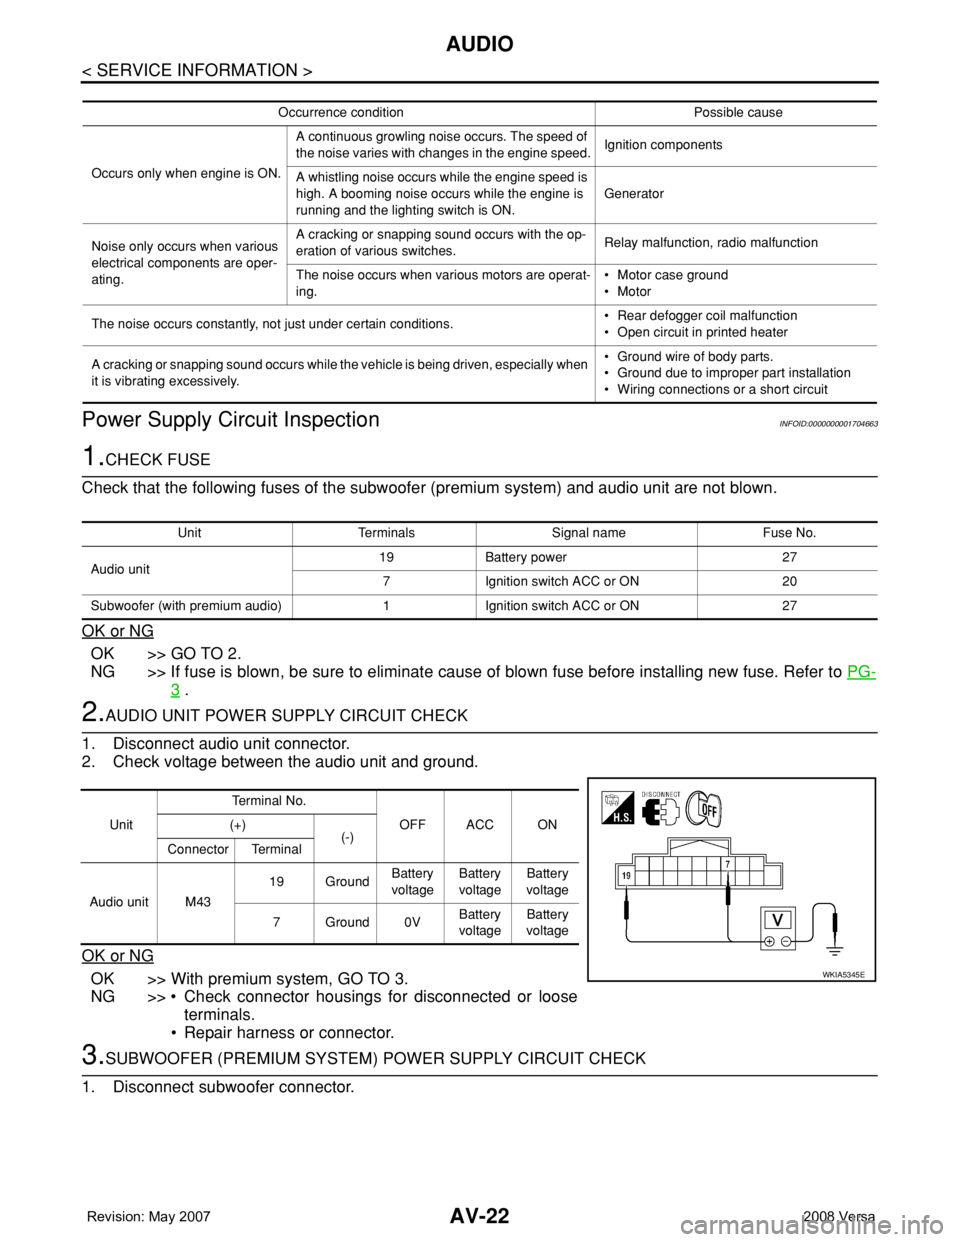
2.AUDIO UNIT POWER SUPPLY CIRCUIT CHECK
1. Disconnect audio unit connector.
2. Check voltage between the audio unit and ground.
OK or NG
OK >> With premium system, GO TO 3.
NG >> • Check connector housings for disconnected or loose
terminals.
• Repair harness or connector.
3.SUBWOOFER (PREMIUM SYSTEM) POWER SUPPLY CIRCUIT CHECK
1. Disconnect subwoofer connector.
Occurrence condition Possible cause
Occurs only when engine is ON.A continuous growling noise occurs. The speed of
the noise varies with changes in the engine speed.Ignition components
A whistling noise occurs while the engine speed is
high. A booming noise occurs while the engine is
running and the lighting switch is ON.Generator
Noise only occurs when various
electrical components are oper-
ating.A cracking or snapping sound occurs with the op-
eration of various switches.Relay malfunction, radio malfunction
The noise occurs when various motors are operat-
ing.• Motor case ground
• Motor
The noise occurs constantly, not just under certain conditions.• Rear defogger coil malfunction
• Open circuit in printed heater
A cracking or snapping sound occurs while the vehicle is being driven, especially when
it is vibrating excessively.• Ground wire of body parts.
• Ground due to improper part installation
• Wiring connections or a short circuit
Unit Terminals Signal name Fuse No.
Audio unit19 Battery power 27
7 Ignition switch ACC or ON 20
Subwoofer (with premium audio) 1 Ignition switch ACC or ON 27
UnitTe r m i n a l N o .
OFF ACC ON (+)
(-)
Connector Terminal
Audio unit M4319 GroundBattery
voltageBattery
voltageBattery
voltage
7Ground0VBattery
voltageBattery
voltage
WKIA5345E
Page 826 of 2771

ENGINE COOLANT
CO-9
< SERVICE INFORMATION >
C
D
E
F
G
H
I
J
K
L
MA
CO
N
P O
1. Install reservoir tank if removed. Refer to CO-11.
2. Install radiator drain plug.
•If water drain plug on cylinder block is removed, close and tighten it. Refer to EM-76
.
CAUTION:
Be sure to clean radiator drain plug and install with new O-ring. Refer to CO-11, "
Component".
3. Make sure that each hose clamp has been firmly tightened.
4. Remove air duct assembly. Refer to EM-16
.
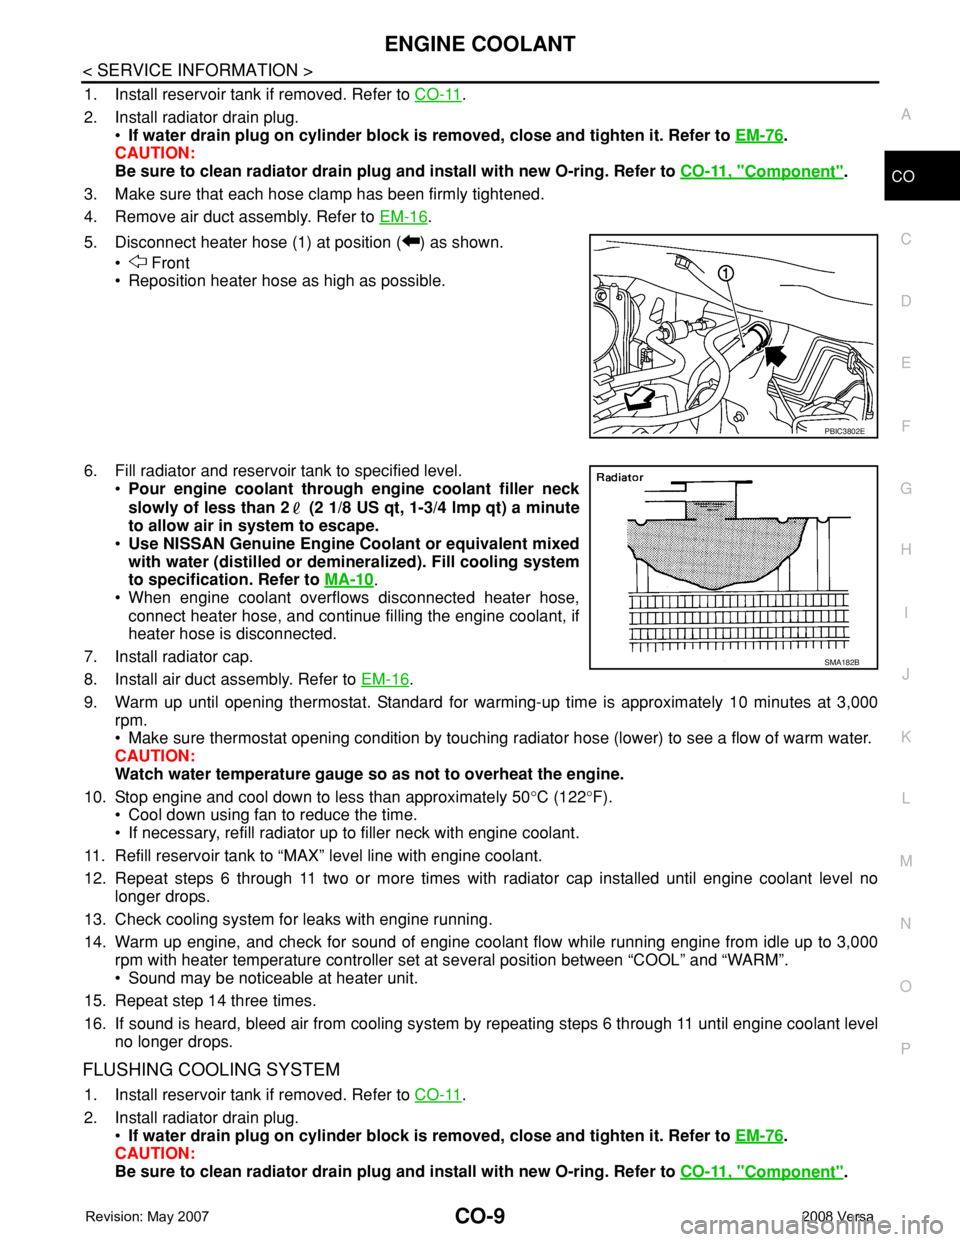
5. Disconnect heater hose (1) at position ( ) as shown.
• Front
• Reposition heater hose as high as possible.
6. Fill radiator and reservoir tank to specified level.
•Pour engine coolant through engine coolant filler neck
slowly of less than 2 (2 1/8 US qt, 1-3/4 lmp qt) a minute
to allow air in system to escape.
•Use NISSAN Genuine Engine Coolant or equivalent mixed
with water (distilled or demineralized). Fill cooling system
to specification. Refer to MA-10
.
• When engine coolant overflows disconnected heater hose,
connect heater hose, and continue filling the engine coolant, if
heater hose is disconnected.
7. Install radiator cap.
8. Install air duct assembly. Refer to EM-16
.
9. Warm up until opening thermostat. Standard for warming-up time is approximately 10 minutes at 3,000
rpm.
• Make sure thermostat opening condition by touching radiator hose (lower) to see a flow of warm water.
CAUTION:
Watch water temperature gauge so as not to overheat the engine.
10. Stop engine and cool down to less than approximately 50°C (122°F).
• Cool down using fan to reduce the time.
• If necessary, refill radiator up to filler neck with engine coolant.
11. Refill reservoir tank to “MAX” level line with engine coolant.
12. Repeat steps 6 through 11 two or more times with radiator cap installed until engine coolant level no
longer drops.
13. Check cooling system for leaks with engine running.
14. Warm up engine, and check for sound of engine coolant flow while running engine from idle up to 3,000
rpm with heater temperature controller set at several position between “COOL” and “WARM”.
• Sound may be noticeable at heater unit.
15. Repeat step 14 three times.
16. If sound is heard, bleed air from cooling system by repeating steps 6 through 11 until engine coolant level
no longer drops.
FLUSHING COOLING SYSTEM
1. Install reservoir tank if removed. Refer to CO-11.
2. Install radiator drain plug.
•If water drain plug on cylinder block is removed, close and tighten it. Refer to EM-76
.
CAUTION:
Be sure to clean radiator drain plug and install with new O-ring. Refer to CO-11, "
Component".
PBIC3802E
SMA182B
Page 836 of 2771

WATER OUTLET AND WATER CONTROL VALVE
CO-19
< SERVICE INFORMATION >
C
D
E
F
G
H
I
J
K
L
MA
CO
N
P O
WATER OUTLET AND WATER CONTROL VALVE
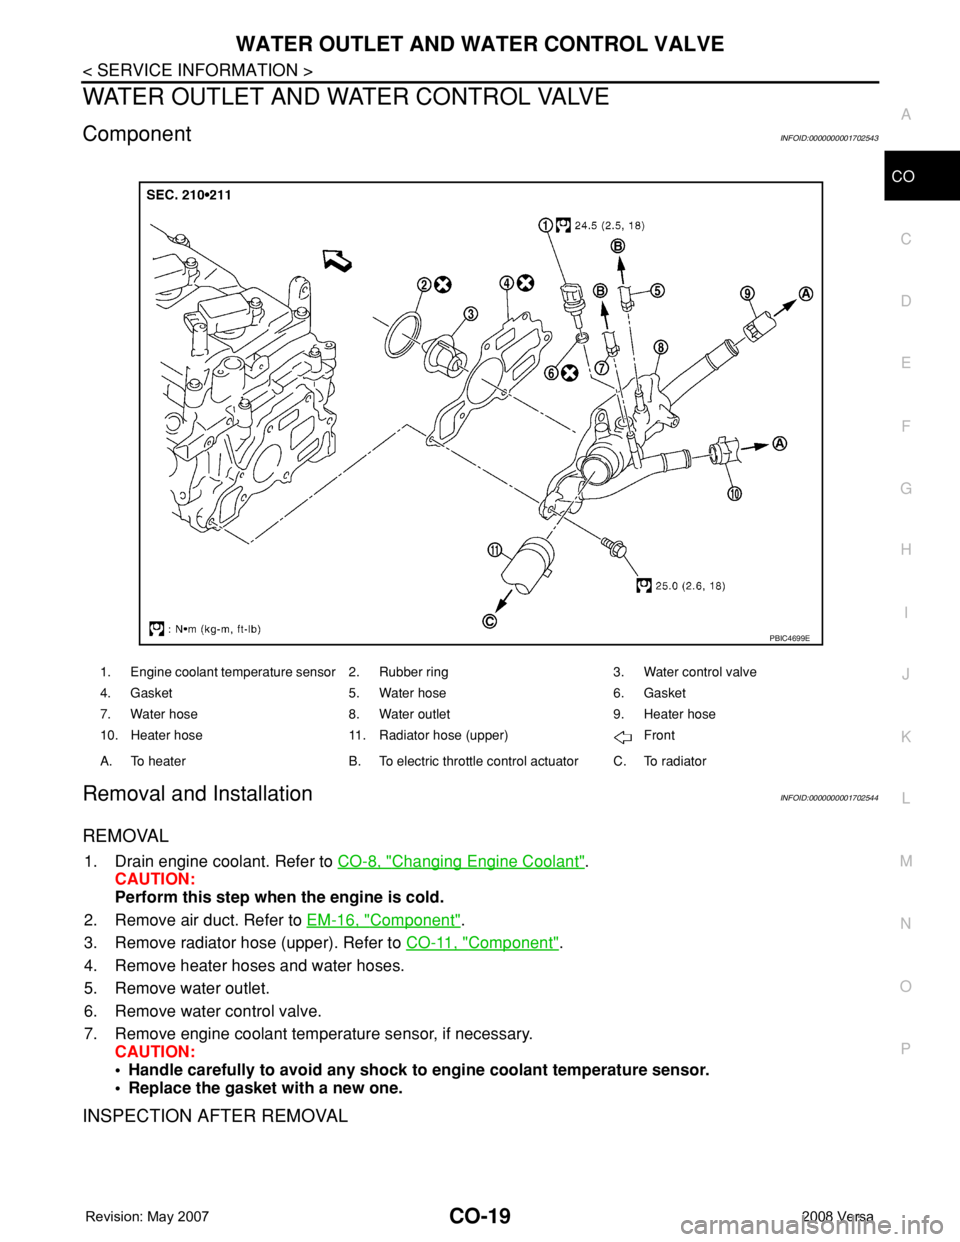
ComponentINFOID:0000000001702543
Removal and InstallationINFOID:0000000001702544
REMOVAL
1. Drain engine coolant. Refer to CO-8, "Changing Engine Coolant".
CAUTION:
Perform this step when the engine is cold.
2. Remove air duct. Refer to EM-16, "
Component".
3. Remove radiator hose (upper). Refer to CO-11, "
Component".
4. Remove heater hoses and water hoses.
5. Remove water outlet.
6. Remove water control valve.
7. Remove engine coolant temperature sensor, if necessary.
CAUTION:
• Handle carefully to avoid any shock to engine coolant temperature sensor.
• Replace the gasket with a new one.
INSPECTION AFTER REMOVAL
1. Engine coolant temperature sensor 2. Rubber ring 3. Water control valve
4. Gasket 5. Water hose 6. Gasket
7. Water hose 8. Water outlet 9. Heater hose
10. Heater hose 11. Radiator hose (upper) Front
A. To heater B. To electric throttle control actuator C. To radiator
PBIC4699E
Page 1076 of 2771

EC-2
ECM Terminal and Reference Value .....................102
CONSULT-II Function (ENGINE) ..........................109
Generic Scan Tool (GST) Function .......................119
CONSULT-II Reference Value in Data Monitor
Mode ......................................................................
121
Major Sensor Reference Graph in Data Monitor
Mode ......................................................................
124
TROUBLE DIAGNOSIS - SPECIFICATION
VALUE .............................................................
127
Description .............................................................127
Testing Condition ...................................................127
Inspection Procedure .............................................127
Diagnosis Procedure .............................................127
TROUBLE DIAGNOSIS FOR INTERMITTENT
INCIDENT ........................................................
136
Description .............................................................136
Diagnosis Procedure .............................................136
POWER SUPPLY AND GROUND CIRCUIT ...137
Wiring Diagram ......................................................137
Diagnosis Procedure .............................................138
Ground Inspection .................................................142
DTC U1000, U1001 CAN COMMUNICATION
LINE .................................................................
143
Description .............................................................143
On Board Diagnosis Logic .....................................143
DTC Confirmation Procedure ................................143
Wiring Diagram ......................................................144
Diagnosis Procedure .............................................144
DTC U1010 CAN COMMUNICATION .............145
Description .............................................................145
On Board Diagnosis Logic .....................................145
DTC Confirmation Procedure ................................145
Diagnosis Procedure .............................................145
DTC P0011 IVT CONTROL .............................147
Description .............................................................147
CONSULT-II Reference Value in Data Monitor
Mode ......................................................................
147
On Board Diagnosis Logic .....................................148
DTC Confirmation Procedure ................................148
Diagnosis Procedure .............................................149
Component Inspection ...........................................150
Removal and Installation .......................................150
DTC P0031, P0032 A/F SENSOR 1 HEATER .151
Description .............................................................151
CONSULT-II Reference Value in Data Monitor
Mode ......................................................................
151
On Board Diagnosis Logic .....................................151
DTC Confirmation Procedure ................................151
Wiring Diagram ......................................................152
Diagnosis Procedure .............................................153
Component Inspection ...........................................154
Removal and Installation .......................................155
DTC P0037, P0038 HO2S2 HEATER ..............156
Description ............................................................156
CONSULT-II Reference Value in Data Monitor
Mode .....................................................................
156
On Board Diagnosis Logic ....................................156
DTC Confirmation Procedure ................................156
Wiring Diagram .....................................................158
Diagnosis Procedure .............................................159
Component Inspection ..........................................160
Removal and Installation .......................................161
DTC P0075 IVT CONTROL SOLENOID
VALVE ..............................................................
162
Component Description ........................................162
CONSULT-II Reference Value in Data Monitor
Mode .....................................................................
162
On Board Diagnosis Logic ....................................162
DTC Confirmation Procedure ................................162
Wiring Diagram .....................................................163
Diagnosis Procedure .............................................164
Component Inspection ..........................................165
Removal and Installation .......................................166
DTC P0101 MAF SENSOR ..............................167
Component Description ........................................167
CONSULT-II Reference Value in Data Monitor
Mode .....................................................................
167
On Board Diagnosis Logic ....................................167
DTC Confirmation Procedure ................................167
Overall Function Check .........................................169
Wiring Diagram .....................................................170
Diagnosis Procedure .............................................171
Component Inspection ..........................................173
Removal and Installation .......................................174
DTC P0102, P0103 MAF SENSOR ..................175
Component Description ........................................175
CONSULT-II Reference Value in Data Monitor
Mode .....................................................................
175
On Board Diagnosis Logic ....................................175
DTC Confirmation Procedure ................................175
Wiring Diagram .....................................................177
Diagnosis Procedure .............................................178
Component Inspection ..........................................180
Removal and Installation .......................................181
DTC P0112, P0113 IAT SENSOR ....................182
Component Description ........................................182
On Board Diagnosis Logic ....................................182
DTC Confirmation Procedure ................................182
Wiring Diagram .....................................................184
Diagnosis Procedure .............................................184
Component Inspection ..........................................186
Removal and Installation .......................................186
DTC P0117, P0118 ECT SENSOR ...................187
Component Description ........................................187
On Board Diagnosis Logic ....................................187
DTC Confirmation Procedure ................................188
Wiring Diagram .....................................................189
Page 1082 of 2771

EC-8
Engine Coolant Temperature Sensor ....................548
Air Fuel Ratio (A/F) Sensor 1 Heater .....................549
Heated Oxygen sensor 2 Heater ...........................549
Crankshaft Position Sensor (POS) ........................549
Camshaft Position Sensor (PHASE) .....................549
Throttle Control Motor ...........................................549
Fuel Injector ..........................................................549
Fuel Pump .............................................................549
Page 1132 of 2771

EC-58
< SERVICE INFORMATION >
ON BOARD DIAGNOSTIC (OBD) SYSTEM
TEST VALUE AND TEST LIMIT (GST ONLY — NOT APPLICABLE TO CONSULT-II)
The following is the information specified in Service $06 of SAE J1979.
The test value is a parameter used to determine whether a system/circuit diagnostic test is OK or NG while
being monitored by the ECM during self-diagnosis. The test limit is a reference value which is specified as the
maximum or minimum value and is compared with the test value being monitored.
These data (test value and test limit) are specified by Test ID (TID) and Component ID (CID) and can be dis-
played on the GST screen.
HOW TO ERASE EMISSION-RELATED DIAGNOSTIC INFORMATION
How to Erase DTC
With CONSULT-II
The emission related diagnostic information in the ECM can be erased by selecting “ERASE” in the “SELF-
DIAG RESULTS” mode with CONSULT-II.
If DTCs are displayed for both ECM and TCM (Transmission control module), they need to be erased individu-
ally from the ECM and TCM (Transmission control module).
NOTE:
If the DTC is not for A/T or CVT related items (see EC-9
), skip steps 2 through 4.
Gear km/h (MPH)
1st 50 (30)
2nd 90 (55)
3rd —
4th —
5th —
6th —
Item Self-diagnostic test item DTCTest value (GST display)
Test limit Conversion
TID CID
CATALYST Three way catalyst functionP0420 01H 81H Min. 1/128
P0420 02H 81H Min. 1
EVAP
SYSTEMEVAP control system (Small leak) P0442 05H 03H Max.
1/128 mm
2
EVAP control system purge flow monitoring P0441 06H 83H Min. 20 mV
EVAP control system (Very small leak) P0456 07H 03H Max.
1/128 mm
2
HO2SAir fuel ratio (A/F) sensor 1P0131 41H 8EH Min. 5 mV
P0132 42H 0EH Max. 5 mV
P2A00 43H 0EH Max. 0.002
P2A00 44H 8EH Min. 0.002
P0130 46H 0EH Max. 5 mV
P0130 47H 8EH Min. 5 mV
P0133 45H 8EH Min. 0.004
P0133 48H 8EH Min. 0.004
Heated oxygen sensor 2P0139 19H 86H Min. 10mV/500 ms
P0137 1AH 86H Min. 10 mV
P0138 1BH 06H Max. 10 mV
P0138 1CH 06H Max. 10 mV
HO2S HTRAir fuel ratio (A/F) sensor 1 heaterP0032 57H 10H Max. 5 mV
P0031 58H 90H Min. 5 mV
Heated oxygen sensor 2 heaterP0038 2DH 0AH Max. 20 mV
P0037 2EH 8AH Min. 20 mV
Page 1161 of 2771

TROUBLE DIAGNOSIS
EC-87
< SERVICE INFORMATION >
C
D
E
F
G
H
I
J
K
L
MA
EC
N
P O
Fail-Safe ChartINFOID:0000000001702588
When the DTC listed below is detected, the ECM enters fail-safe mode and the MIL lights up.
Priority Detected items (DTC)
1 • U1000 U1001 CAN communication line
• U1010 CAN communication
• P0101 P0102 P0103 Mass air flow sensor
• P0112 P0113 P0127 Intake air temperature sensor
• P0117 P0118 P0125 Engine coolant temperature sensor
• P0122 P0123 P0222 P0223 P1225 P1226 P2135 Throttle position sensor
• P0128 Thermostat function
• P0181 P0182 P0183 Fuel tank temperature sensor
• P0327 P0328 Knock sensor
• P0335 Crankshaft position sensor (POS)
• P0340 Camshaft position sensor (PHASE)
• P0460 P0461 P0462 P0463 Fuel level sensor
• P0500 Vehicle speed sensor
• P0605 ECM
• P0643 Sensor power supply
• P0705 P0850 Park/neutral position (PNP) switch
• P1610 - P1615 NATS
• P2122 P2123 P2127 P2128 P2138 Accelerator pedal position sensor
2 • P0031 P0032 Air fuel ratio (A/F) sensor 1 heater
• P0037 P0038 Heated oxygen sensor 2 heater
• P0075 Intake valve timing control solenoid valve
• P0130 P0131 P0132 P0133 P2A00 Air fuel ratio (A/F) sensor 1
• P0137 P0138 P0139 Heated oxygen sensor 2
• P0441 EVAP control system purge flow monitoring
• P0443 P0444 P0445 EVAP canister purge volume control solenoid valve
• P0447 P0448 EVAP canister vent control valve
• P0451 P0452 P0453 EVAP control system pressure sensor
• P1217 Engine over temperature (OVERHEAT)
• P1805 Brake switch
• P2100 P2103 Throttle control motor relay
• P2101 Electric throttle control function
• P2118 Throttle control motor
3 • P0011 Intake valve timing control
• P0171 P0172 Fuel injection system function
• P0300 - P0304 Misfire
• P0420 Three way catalyst function
• P0442 P0456 EVAP control system (SMALL LEAK, VERY SMALL LEAK)
• P0455 EVAP control system (GROSS LEAK)
• P0506 P0507 Idle speed control system
• P0710 P0715 P0720 P0725 P0731 P0732 P0733 P0734 P0740 P0744 P0745 P0746 P0750 P0755 P0776 P0778
P0840 P0845 P1705 P1740 P1760 P1777 P1778 A/T or CVT related sensors, solenoid valves and switches
• P1148 Closed loop control
• P1421 Cold start control
• P1564 ASCD steering switch
• P1572 ASCD brake switch
• P1574 ASCD vehicle speed sensor
• P1715 Turbine revolution sensor (A/T), Primary speed sensor (CVT)
• P2119 Electric throttle control actuator
DTC No. Detected items Engine operating condition in fail-safe mode
P0102
P0103Mass air flow sensor circuit Engine speed will not rise more than 2,400 rpm due to the fuel cut.
Page 1176 of 2771

EC-102
< SERVICE INFORMATION >
TROUBLE DIAGNOSIS
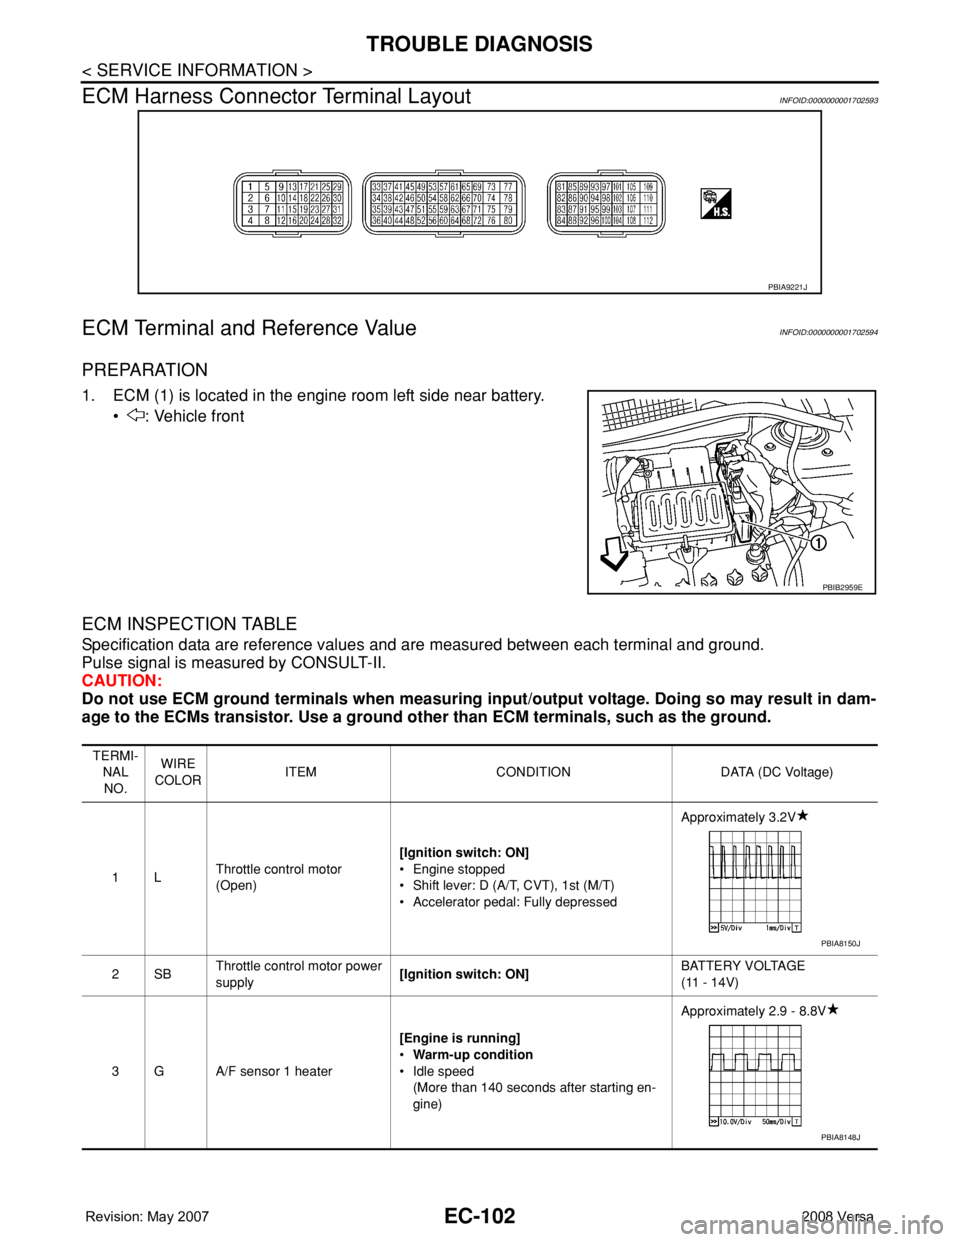
ECM Harness Connector Terminal Layout
INFOID:0000000001702593
ECM Terminal and Reference ValueINFOID:0000000001702594
PREPARATION
1. ECM (1) is located in the engine room left side near battery.
• : Vehicle front
ECM INSPECTION TABLE
Specification data are reference values and are measured between each terminal and ground.
Pulse signal is measured by CONSULT-II.
CAUTION:
Do not use ECM ground terminals when measuring input/output voltage. Doing so may result in dam-
age to the ECMs transistor. Use a ground other than ECM terminals, such as the ground.
PBIA9221J
PBIB2959E
TERMI-
NAL
NO.WIRE
COLORITEM CONDITION DATA (DC Voltage)
1LThrottle control motor
(Open)[Ignition switch: ON]
• Engine stopped
• Shift lever: D (A/T, CVT), 1st (M/T)
• Accelerator pedal: Fully depressedApproximately 3.2V
2SBThrottle control motor power
supply[Ignition switch: ON]BATTERY VOLTAGE
(11 - 14V)
3 G A/F sensor 1 heater[Engine is running]
•Warm-up condition
• Idle speed
(More than 140 seconds after starting en-
gine)Approximately 2.9 - 8.8V
PBIA8150J
PBIA8148J