2008 NISSAN LATIO battery
[x] Cancel search: batteryPage 2177 of 2771

LT-40
< SERVICE INFORMATION >
FRONT FOG LAMP
• through IPDM E/R terminal 50
• to front fog lamp LH terminal 1, and
• through IPDM E/R terminal 51
• to front fog lamp RH terminal 1.
Ground is supplied
• to front fog lamp terminal 2,
• through grounds E15 and E24.
With power and grounds supplied, front fog lamps illuminate.
COMBINATION SWITCH READING FUNCTION
Refer to BCS-3, "System Description" .
EXTERIOR LAMP BATTERY SAVER CONTROL
Refer to LT-72, "System Description" .
CAN Communication System DescriptionINFOID:0000000001704399
Refer to LAN-6, "System Description" .
Page 2181 of 2771
LT-44
< SERVICE INFORMATION >
FRONT FOG LAMP
1. Start auto active test. Refer to PG-19, "Auto Active Test" .
2. Make sure front fog lamp operates.
OK or NG
OK >> GO TO 4.
NG >> GO TO 5.
4.CHECK IPDM E/R
1. Select “IPDM E/R” on CONSULT-III. Select “DATA MONITOR” on “SELECT DIAG MODE” screen.
2. Make sure “FR FOG REQ” turns ON when front fog lamp switch is in ON position.
OK or NG
OK >> Replace IPDM E/R. Refer to PG-26, "Removal and Installation of IPDM E/R" .
NG >> Replace BCM. Refer toBCS-18, "
Removal and Installation of BCM" .
5.CHECK FOG LAMP INPUT SIGNAL
With CONSULT-III
1. Turn ignition switch OFF.
2. Disconnect front fog lamp connector.
3. Select “IPDM E/R” on CONSULT-III, and select “ACTIVE TEST” on “SELECT DIAG MODE” screen.
4. Select “EXTERNAL LAMPS” on “SELECT TEST ITEM” screen.
5. Touch “FOG” screen.
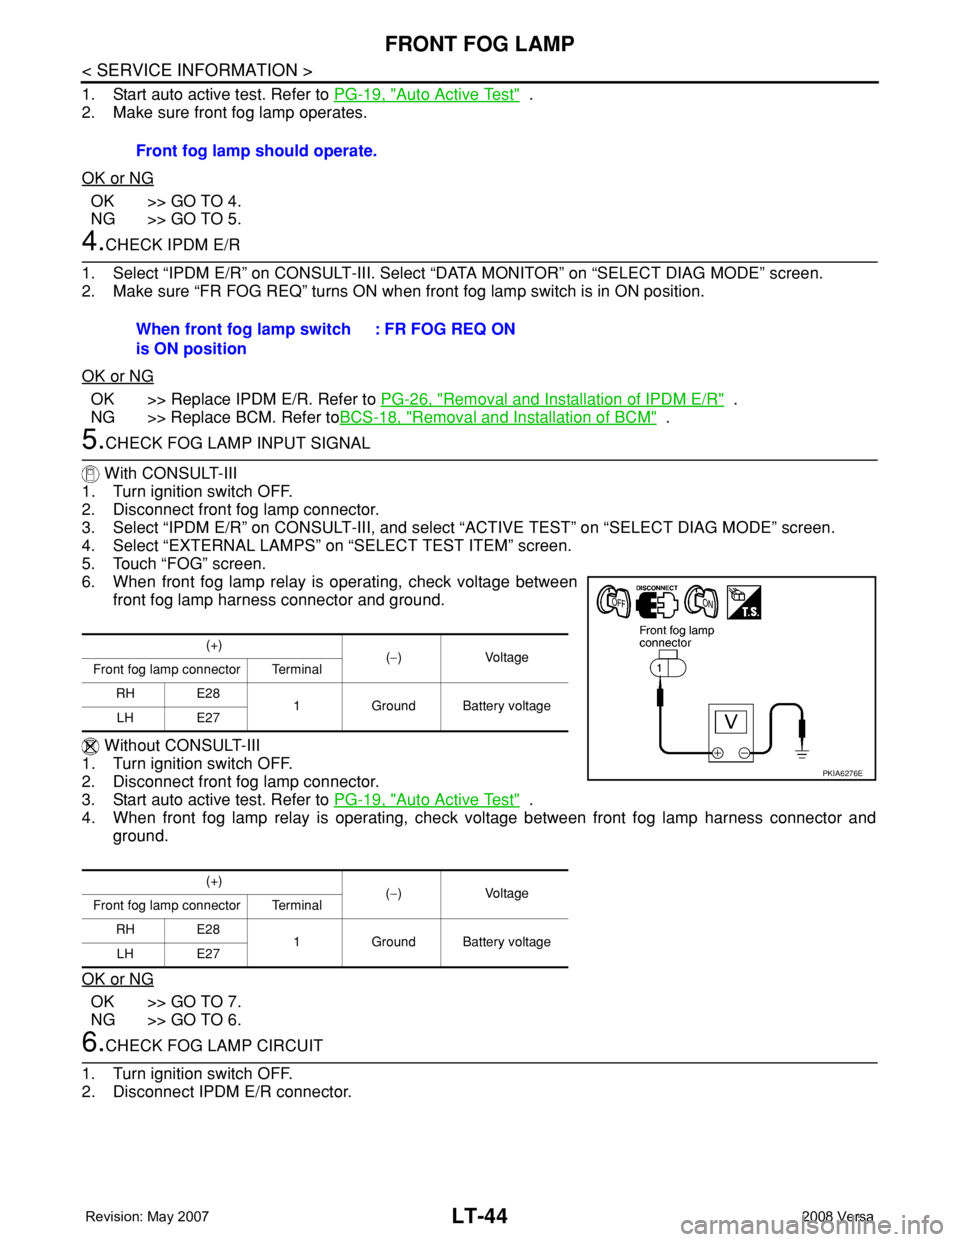
6. When front fog lamp relay is operating, check voltage between
front fog lamp harness connector and ground.
Without CONSULT-III
1. Turn ignition switch OFF.
2. Disconnect front fog lamp connector.
3. Start auto active test. Refer to PG-19, "
Auto Active Test" .
4. When front fog lamp relay is operating, check voltage between front fog lamp harness connector and
ground.
OK or NG
OK >> GO TO 7.
NG >> GO TO 6.
6.CHECK FOG LAMP CIRCUIT
1. Turn ignition switch OFF.
2. Disconnect IPDM E/R connector.Front fog lamp should operate.
When front fog lamp switch
is ON position: FR FOG REQ ON
(+)
(−) Voltage
Front fog lamp connector Terminal
RH E28
1 Ground Battery voltage
LH E27
(+)
(−) Voltage
Front fog lamp connector Terminal
RH E28
1 Ground Battery voltage
LH E27
PKIA6276E
Page 2195 of 2771
LT-58
< SERVICE INFORMATION >
TURN SIGNAL AND HAZARD WARNING LAMPS
Hazard Warning Lamp Does Not Operate But Turn Signal Lamp Operates
INFOID:0000000001704424
1.CHECK HAZARD SWITCH INPUT SIGNAL
With CONSULT-III
1. Select “BCM” on CONSULT-III. Select “FLASHER” on “SELECT TEST ITEM” screen.
2. Select “DATA MONITOR” on “SELECT DIAG MODE” screen. Make sure that “HAZARD SW” turns ON-
OFF linked with operation of hazard switch.
Without CONSULT-III
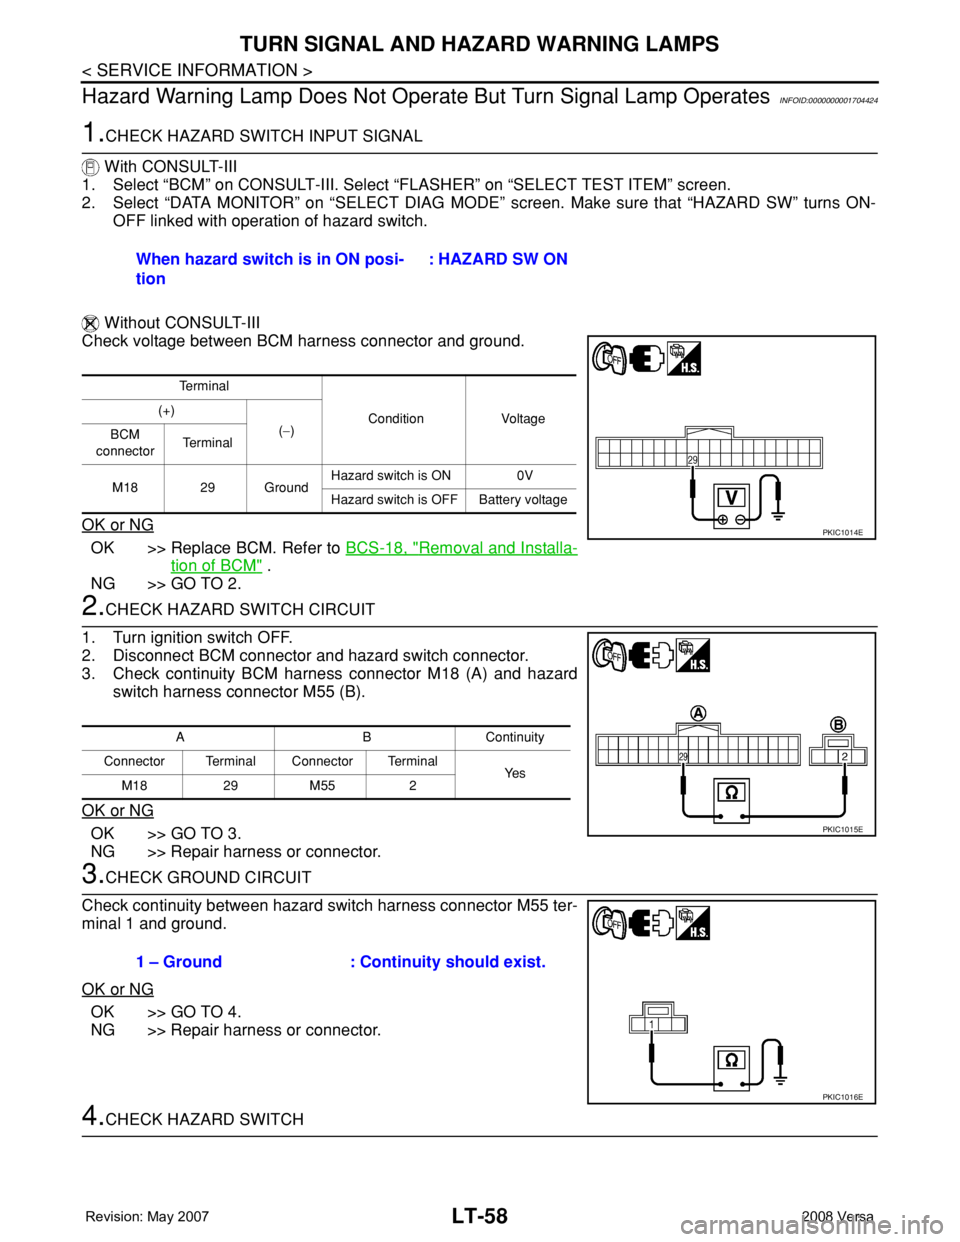
Check voltage between BCM harness connector and ground.
OK or NG
OK >> Replace BCM. Refer to BCS-18, "Removal and Installa-
tion of BCM" .
NG >> GO TO 2.
2.CHECK HAZARD SWITCH CIRCUIT
1. Turn ignition switch OFF.
2. Disconnect BCM connector and hazard switch connector.
3. Check continuity BCM harness connector M18 (A) and hazard
switch harness connector M55 (B).
OK or NG
OK >> GO TO 3.
NG >> Repair harness or connector.
3.CHECK GROUND CIRCUIT
Check continuity between hazard switch harness connector M55 ter-
minal 1 and ground.
OK or NG
OK >> GO TO 4.
NG >> Repair harness or connector.
4.CHECK HAZARD SWITCHWhen hazard switch is in ON posi-
tion : HAZARD SW ON
Te r m i n a l
Condition Voltage (+)
(−)
BCM
connectorTe r m i n a l
M18 29 GroundHazard switch is ON 0V
Hazard switch is OFF Battery voltage
PKIC1014E
ABContinuity
Connector Terminal Connector Terminal
Ye s
M18 29 M55 2
PKIC1015E
1 – Ground : Continuity should exist.
PKIC1016E
Page 2210 of 2771

PARKING, LICENSE PLATE AND TAIL LAMPS
LT-73
< SERVICE INFORMATION >
C
D
E
F
G
H
I
J
L
MA
B
LT
N
O
P
• to front combination lamp RH terminal 6,
• through IPDM E/R terminal 28
• to rear combination lamp LH terminal 4 and
• to license plate lamp LH and RH terminal 1,
• through IPDM E/R terminal 29
• to rear combination lamp RH terminal 4.
Ground is supplied
• to front combination lamp LH and RH terminal 7
• through grounds E15 and E24,
• to rear combination lamp LH terminal 1 and
• to license plate lamp LH and RH terminal 2
• through grounds B7 and B19, and
• to rear combination lamp RH terminal 1
• through grounds B117, B132 (all models) and D402 (with hatchback).
With power and ground supplied, parking, license plate and tail lamps illuminate.
COMBINATION SWITCH READING FUNCTION
Refer to BCS-3, "System Description" .
EXTERIOR LAMP BATTERY SAVER CONTROL
When the combination switch (lighting switch) is in the 1ST (or 2ND) position and the ignition switch is turned
from ON or ACC to OFF, the battery saver control feature is activated.
Under this condition, the parking, license and tail lamps remain illuminated for 5 minutes, then the parking,
license plate and tail lamps are turned off.
Exterior lamp battery saver control mode can be changed by the function setting of CONSULT-III.
CAN Communication System DescriptionINFOID:0000000001704449
Refer to LAN-6, "System Description" .
Page 2217 of 2771
LT-80
< SERVICE INFORMATION >
PARKING, LICENSE PLATE AND TAIL LAMPS
1. Start auto active test. Refer to PG-19, "Auto Active Test" .
2. Make sure parking, license plate and tail lamps operate.
OK or NG
OK >> GO TO 4.
NG >> GO TO 5.
4.CHECK IPDM E/R
1. Select “IPDM E/R” on CONSULT-III, and select “DATA MONITOR” on “SELECT DIAG MODE” screen.
2. Make sure “TAIL&CLR REQ” turns ON when lighting switch is in 1ST position.
OK or NG
OK >> Replace IPDM E/R. Refer to PG-26, "Removal and Installation of IPDM E/R" .
NG >> Replace BCM. Refer to BCS-18, "
Removal and Installation of BCM" .
5.CHECK INPUT SIGNAL
With CONSULT-III
1. Turn ignition switch OFF.
2. Disconnect front combination lamp, license plate lamp and rear combination lamp connectors.
3. Select “IPDM E/R” on CONSULT-III, and select “ACTIVE TEST” on “SELECT DIAG MODE” screen.
4. Select “EXTERNAL LAMPS” on “SELECT TEST ITEM” screen.
5. Touch “TAIL” on "ACTIVE TEST" screen.
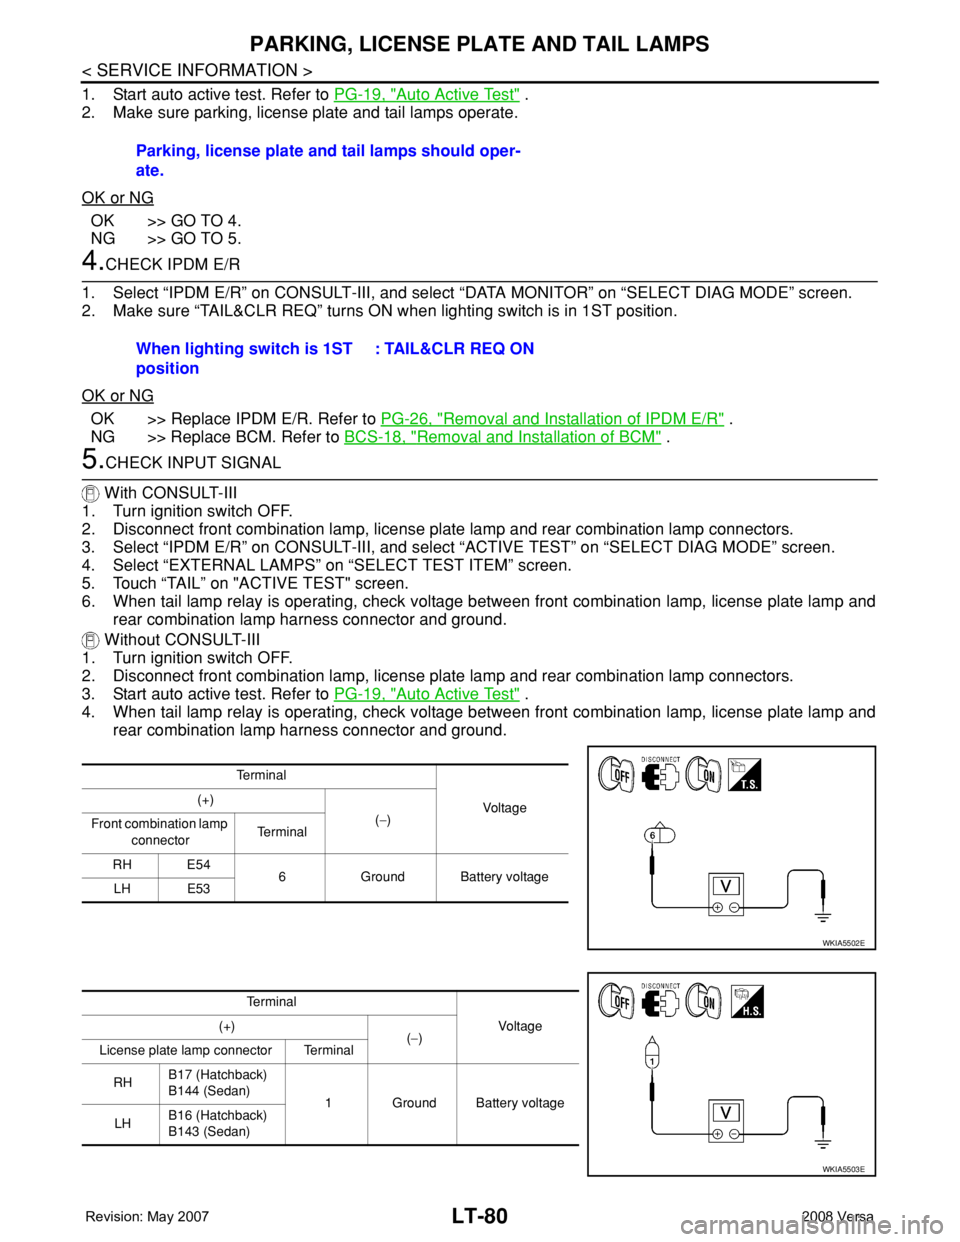
6. When tail lamp relay is operating, check voltage between front combination lamp, license plate lamp and
rear combination lamp harness connector and ground.
Without CONSULT-III
1. Turn ignition switch OFF.
2. Disconnect front combination lamp, license plate lamp and rear combination lamp connectors.
3. Start auto active test. Refer to PG-19, "
Auto Active Test" .
4. When tail lamp relay is operating, check voltage between front combination lamp, license plate lamp and
rear combination lamp harness connector and ground.Parking, license plate and tail lamps should oper-
ate.
When lighting switch is 1ST
position: TAIL&CLR REQ ON
Te r m i n a l
Voltag e (+)
(−)
Front combination lamp
connectorTe r m i n a l
RH E54
6 Ground Battery voltage
LH E53
WKIA5502E
Te r m i n a l
Vo l ta g e (+)
(−)
License plate lamp connector Terminal
RHB17 (Hatchback)
B144 (Sedan)
1 Ground Battery voltage
LHB16 (Hatchback)
B143 (Sedan)
WKIA5503E
Page 2218 of 2771
PARKING, LICENSE PLATE AND TAIL LAMPS
LT-81
< SERVICE INFORMATION >
C
D
E
F
G
H
I
J
L
MA
B
LT
N
O
P
OK or NG
OK >> GO TO 7.
NG >> GO TO 6.
6.CHECK PARKING, LICENSE PLATE AND TAIL LAMP CIRCUIT
1. Turn ignition switch OFF.
2. Disconnect IPDM E/R connector.
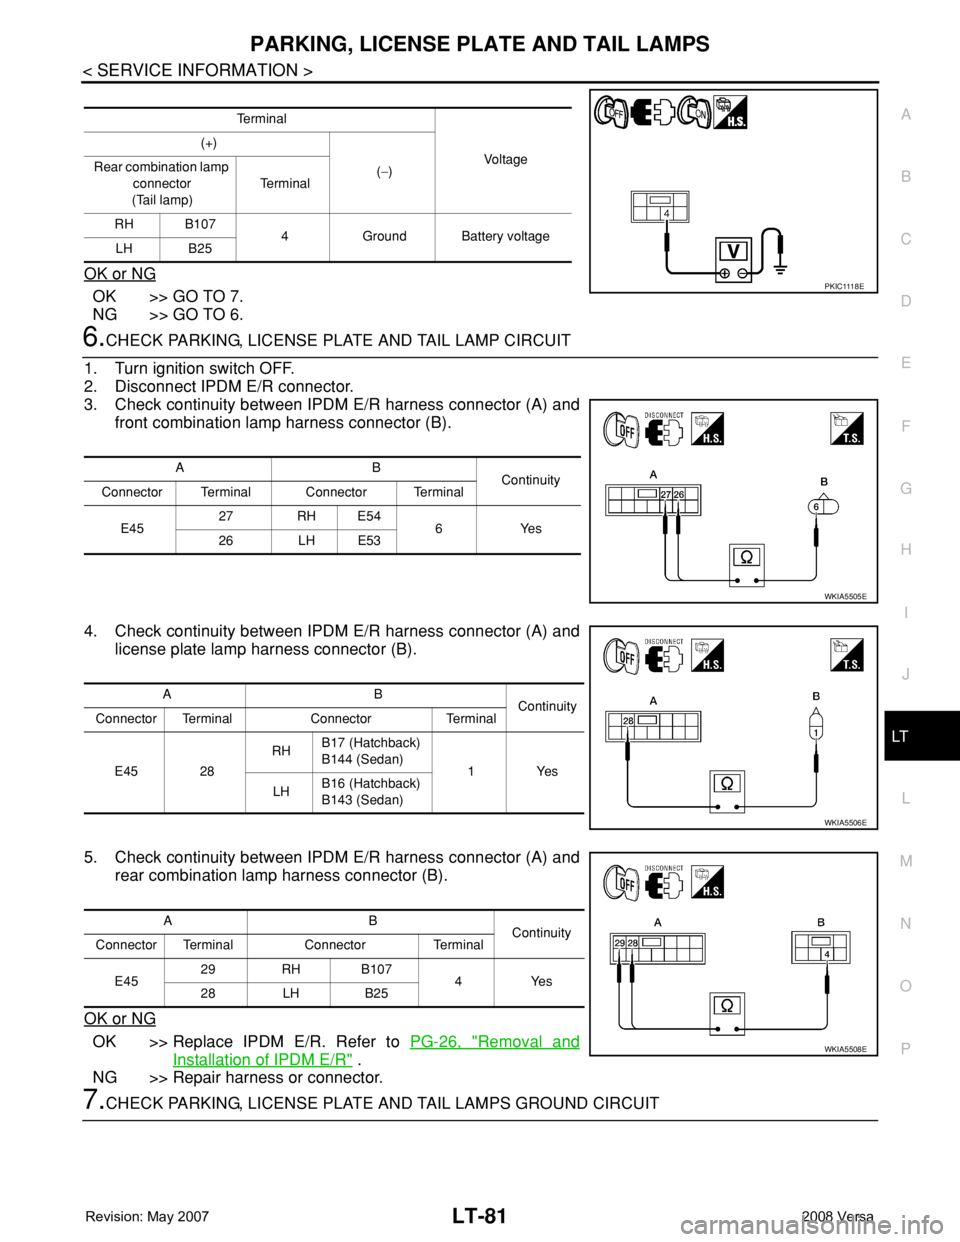
3. Check continuity between IPDM E/R harness connector (A) and
front combination lamp harness connector (B).
4. Check continuity between IPDM E/R harness connector (A) and
license plate lamp harness connector (B).
5. Check continuity between IPDM E/R harness connector (A) and
rear combination lamp harness connector (B).
OK or NG
OK >> Replace IPDM E/R. Refer to PG-26, "Removal and
Installation of IPDM E/R" .
NG >> Repair harness or connector.
7.CHECK PARKING, LICENSE PLATE AND TAIL LAMPS GROUND CIRCUIT
Te r m i n a l
Vo l ta g e (+)
(−) Rear combination lamp
connector
(Tail lamp)Te r m i n a l
RH B107
4 Ground Battery voltage
LH B25
P K I C 111 8 E
AB
Continuity
Connector Terminal Connector Terminal
E4527 RH E54
6Yes
26 LH E53
WKIA5505E
AB
Continuity
Connector Terminal Connector Terminal
E45 28RHB17 (Hatchback)
B144 (Sedan)
1Yes
LHB16 (Hatchback)
B143 (Sedan)
WKIA5506E
AB
Continuity
Connector Terminal Connector Terminal
E4529 RH B107
4Yes
28 LH B25
WKIA5508E
Page 2229 of 2771

LT-92
< SERVICE INFORMATION >
INTERIOR ROOM LAMP
• through front door key cylinder switch LH terminal 2
• through grounds M57 and M61.
At the time the front door LH is opened, the BCM detects the front door LH is unlocked. It determines that the
interior room lamp timer operation conditions are met, and interior room lamp ON for 30 seconds.
When the key is in ignition key cylinder (key switch ON), or ignition knob switch is pushed, power is supplied
• through key switch and ignition knob switch terminal 1
• to BCM terminal 37, or
• through key switch and ignition knob switch terminal 3
• to Intelligent Key unit terminal 27.
When the key is removed from key switch (key switch OFF), power supply to BCM terminal 37 is terminated.
When the ignition knob switch is released, power supply to intelligent key unit is terminated. The BCM detects
that the key has been removed, determines that interior room lamp timer conditions are met, and turns room
lamp ON for 30 seconds.
When the front door LH opens → closes, and key is not inserted in key switch (or ignition knob switch is
released), BCM terminal 47 changes between 0V (door open) → 12V (door closed). BCM determines that
conditions for room lamp operation are met, and turns room lamp ON for 30 seconds.
Interior room lamp timer control is canceled under the following conditions:
• Front door LH is locked (with keyfob or front door key cylinder switch LH).
• Front door LH is opened (front door switch LH).
• Ignition switch ON.
INTERIOR LAMP BATTERY SAVER CONTROL
If an interior room lamp is left ON, it will not be turned OFF even when door is closed.
BCM turns off interior lamp automatically to save battery 30 minutes after ignition switch is turned off.
After lamps are turned OFF by the battery saver system, the lamps illuminate again when
• front door key cylinder switch LH is locked or unlocked
• door is opened or closed
• key is removed from ignition key cylinder or inserted in ignition key cylinder, or the ignition knob switch is
pushed or released.
Interior lamp battery saver control time period can be changed by the function setting of CONSULT-III.
Page 2237 of 2771
LT-100
< SERVICE INFORMATION >
INTERIOR ROOM LAMP
NOTE:
Vehicles without intelligent key system display this item, but cannot be monitored.
ACTIVE TEST
Display Item List
WORK SUPPORT
Display Item List
Interior Room Lamp Control Does Not Operate (With Map Lamp)INFOID:0000000001704476
1.CHECK EACH SWITCH
Select "BCM" on CONSULT-III. With "INT LAMP" data monitor, make sure switches listed in display item list
turn ON-OFF linked with switch operation. Refer to LT-99, "
CONSULT-III Function (BCM)" for switches and
their functions.
OK or NG
OK >> GO TO 2.
NG >> Inspect malfunctioning switch system.
2.ACTIVE TEST
1. Select “BCM” on CONSULT-III. Select “INT LAMP" active test.
2. When room lamp switch is in DOOR position, make sure room lamp operates.
OK or NG
OK >> Replace BCM. Refer to BCS-18, "Removal and Installation of BCM" .
NG >> GO TO 3.
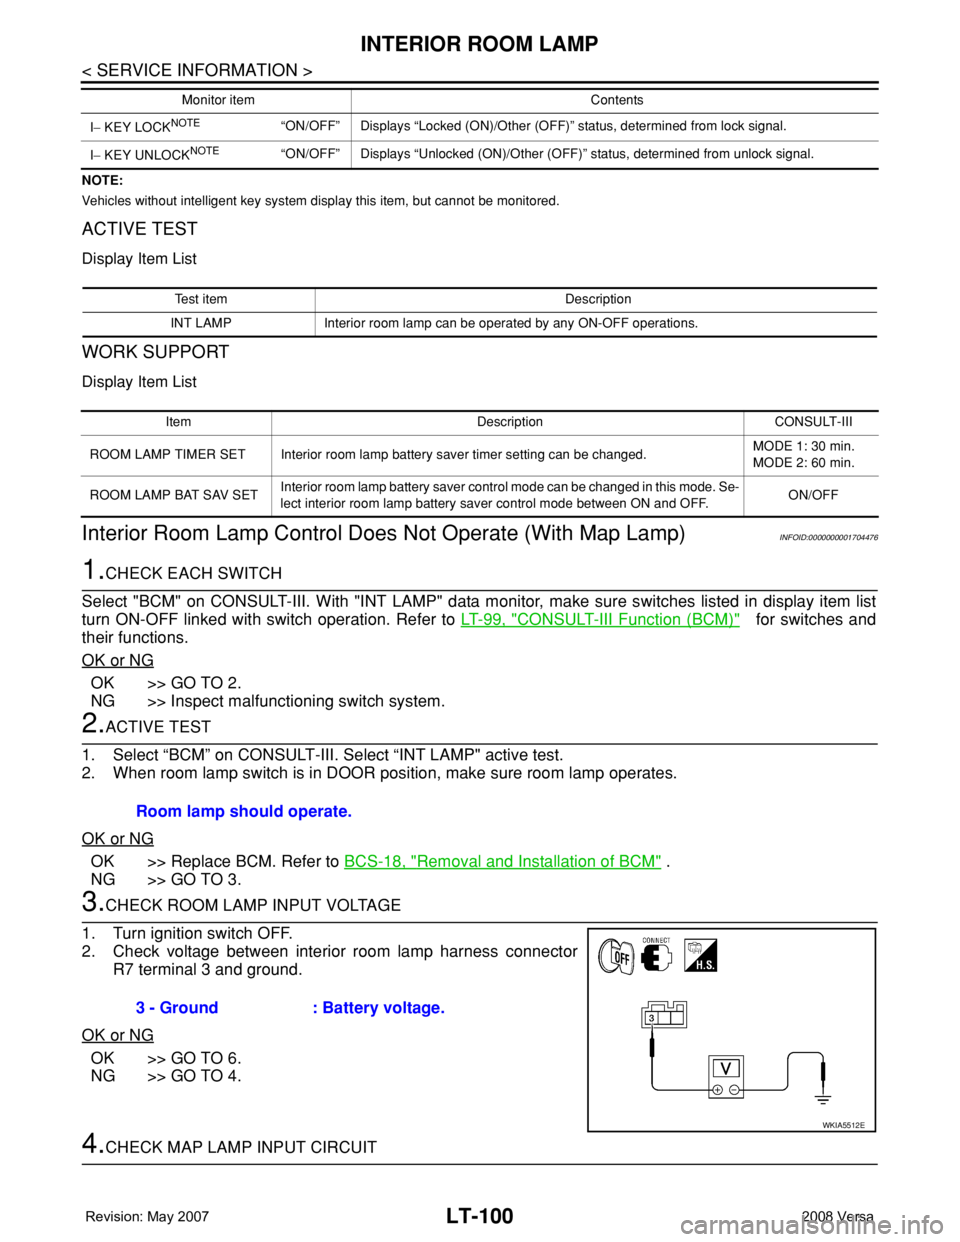
3.CHECK ROOM LAMP INPUT VOLTAGE
1. Turn ignition switch OFF.
2. Check voltage between interior room lamp harness connector
R7 terminal 3 and ground.
OK or NG
OK >> GO TO 6.
NG >> GO TO 4.
4.CHECK MAP LAMP INPUT CIRCUIT
I− KEY LOCKNOTE“ON/OFF” Displays “Locked (ON)/Other (OFF)” status, determined from lock signal.
I− KEY UNLOCK
NOTE“ON/OFF” Displays “Unlocked (ON)/Other (OFF)” status, determined from unlock signal. Monitor item Contents
Test item Description
INT LAMP Interior room lamp can be operated by any ON-OFF operations.
Item Description CONSULT-III
ROOM LAMP TIMER SET Interior room lamp battery saver timer setting can be changed.MODE 1: 30 min.
MODE 2: 60 min.
ROOM LAMP BAT SAV SETInterior room lamp battery saver control mode can be changed in this mode. Se-
lect interior room lamp battery saver control mode between ON and OFF.ON/OFF
Room lamp should operate.
3 - Ground : Battery voltage.
WKIA5512E