Page 557 of 2771
INTELLIGENT KEY SYSTEM
BL-123
< SERVICE INFORMATION >
C
D
E
F
G
H
J
K
L
MA
B
BL
N
O
P
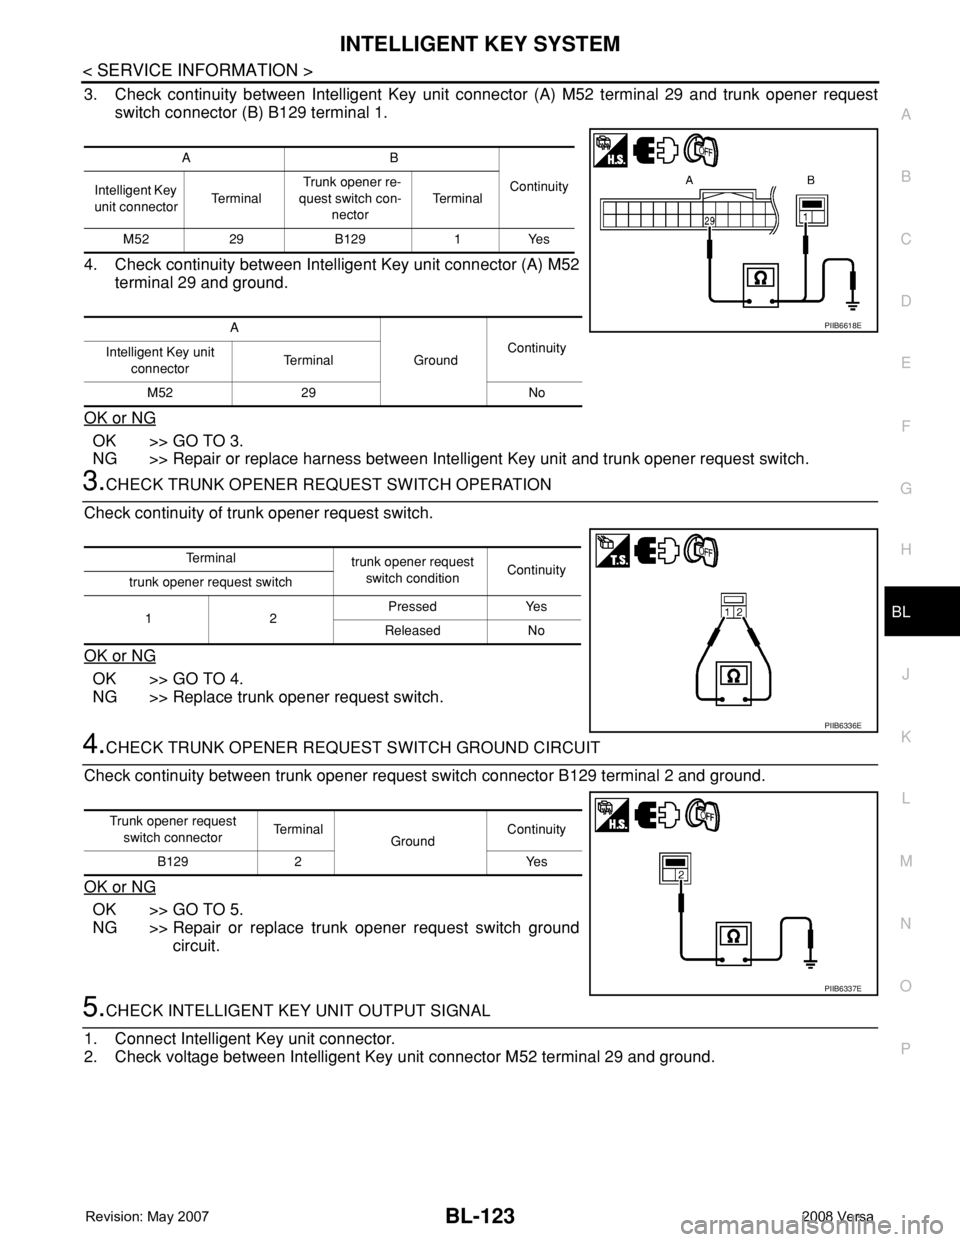
3. Check continuity between Intelligent Key unit connector (A) M52 terminal 29 and trunk opener request
switch connector (B) B129 terminal 1.
4. Check continuity between Intelligent Key unit connector (A) M52
terminal 29 and ground.
OK or NG
OK >> GO TO 3.
NG >> Repair or replace harness between Intelligent Key unit and trunk opener request switch.
3.CHECK TRUNK OPENER REQUEST SWITCH OPERATION
Check continuity of trunk opener request switch.
OK or NG
OK >> GO TO 4.
NG >> Replace trunk opener request switch.
4.CHECK TRUNK OPENER REQUEST SWITCH GROUND CIRCUIT
Check continuity between trunk opener request switch connector B129 terminal 2 and ground.
OK or NG
OK >> GO TO 5.
NG >> Repair or replace trunk opener request switch ground
circuit.
5.CHECK INTELLIGENT KEY UNIT OUTPUT SIGNAL
1. Connect Intelligent Key unit connector.
2. Check voltage between Intelligent Key unit connector M52 terminal 29 and ground.
AB
Continuity
Intelligent Key
unit connectorTe r m i n a l Trunk opener re-
quest switch con-
nectorTe r m i n a l
M52 29 B129 1 Yes
A
GroundContinuity
Intelligent Key unit
connectorTe r m i n a l
M52 29 No
PIIB6618E
Te r m i n a l
trunk opener request
switch conditionContinuity
trunk opener request switch
12Pressed Yes
Released No
PIIB6336E
Trunk opener request
switch connectorTe r m i n a l
GroundContinuity
B129 2 Yes
PIIB6337E
Page 559 of 2771
INTELLIGENT KEY SYSTEM
BL-125
< SERVICE INFORMATION >
C
D
E
F
G
H
J
K
L
MA
B
BL
N
O
P
OK or NG
OK >> GO TO 4.
NG >> Replace unlock sensor.
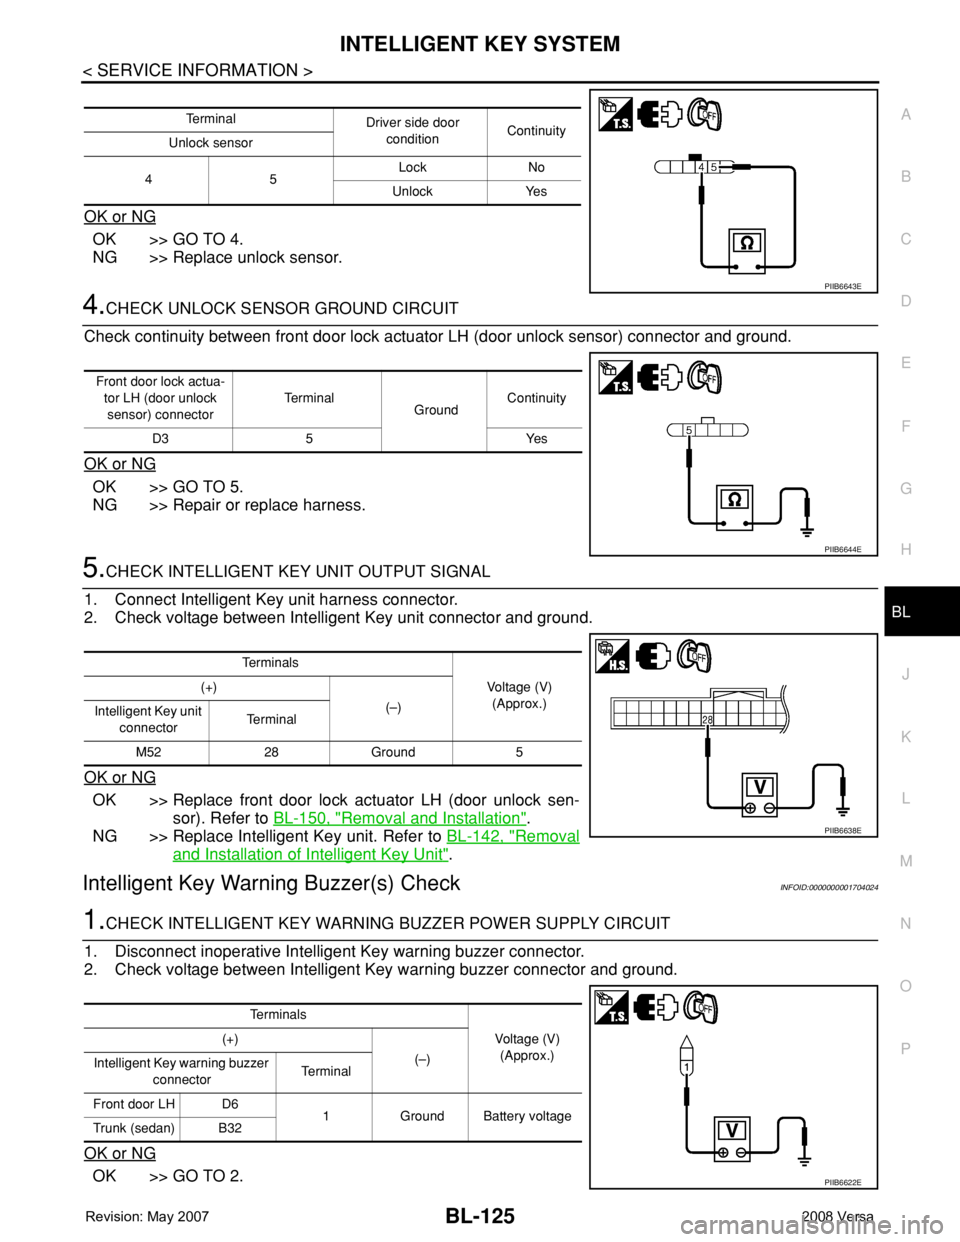
4.CHECK UNLOCK SENSOR GROUND CIRCUIT
Check continuity between front door lock actuator LH (door unlock sensor) connector and ground.
OK or NG
OK >> GO TO 5.
NG >> Repair or replace harness.
5.CHECK INTELLIGENT KEY UNIT OUTPUT SIGNAL
1. Connect Intelligent Key unit harness connector.
2. Check voltage between Intelligent Key unit connector and ground.
OK or NG
OK >> Replace front door lock actuator LH (door unlock sen-
sor). Refer to BL-150, "
Removal and Installation".
NG >> Replace Intelligent Key unit. Refer to BL-142, "
Removal
and Installation of Intelligent Key Unit".
Intelligent Key Warning Buzzer(s) CheckINFOID:0000000001704024
1.CHECK INTELLIGENT KEY WARNING BUZZER POWER SUPPLY CIRCUIT
1. Disconnect inoperative Intelligent Key warning buzzer connector.
2. Check voltage between Intelligent Key warning buzzer connector and ground.
OK or NG
OK >> GO TO 2.
Te r m i n a l
Driver side door
conditionContinuity
Unlock sensor
45Lock No
Unlock Yes
PIIB6643E
Front door lock actua-
tor LH (door unlock
sensor) connectorTe r m i n a l
GroundContinuity
D3 5 Yes
PIIB6644E
Te r m i n a l s
Voltage (V)
(Approx.) (+)
(–)
Intelligent Key unit
connectorTe r m i n a l
M52 28 Ground 5
PIIB6638E
Te r m i n a l s
Voltage (V)
(Approx.) (+)
(–)
Intelligent Key warning buzzer
connectorTerminal
Front door LH D6
1 Ground Battery voltage
Trunk (sedan) B32
PIIB6622E
Page 560 of 2771
BL-126
< SERVICE INFORMATION >
INTELLIGENT KEY SYSTEM
NG >> Repair or replace Intelligent Key warning buzzer power supply circuit.
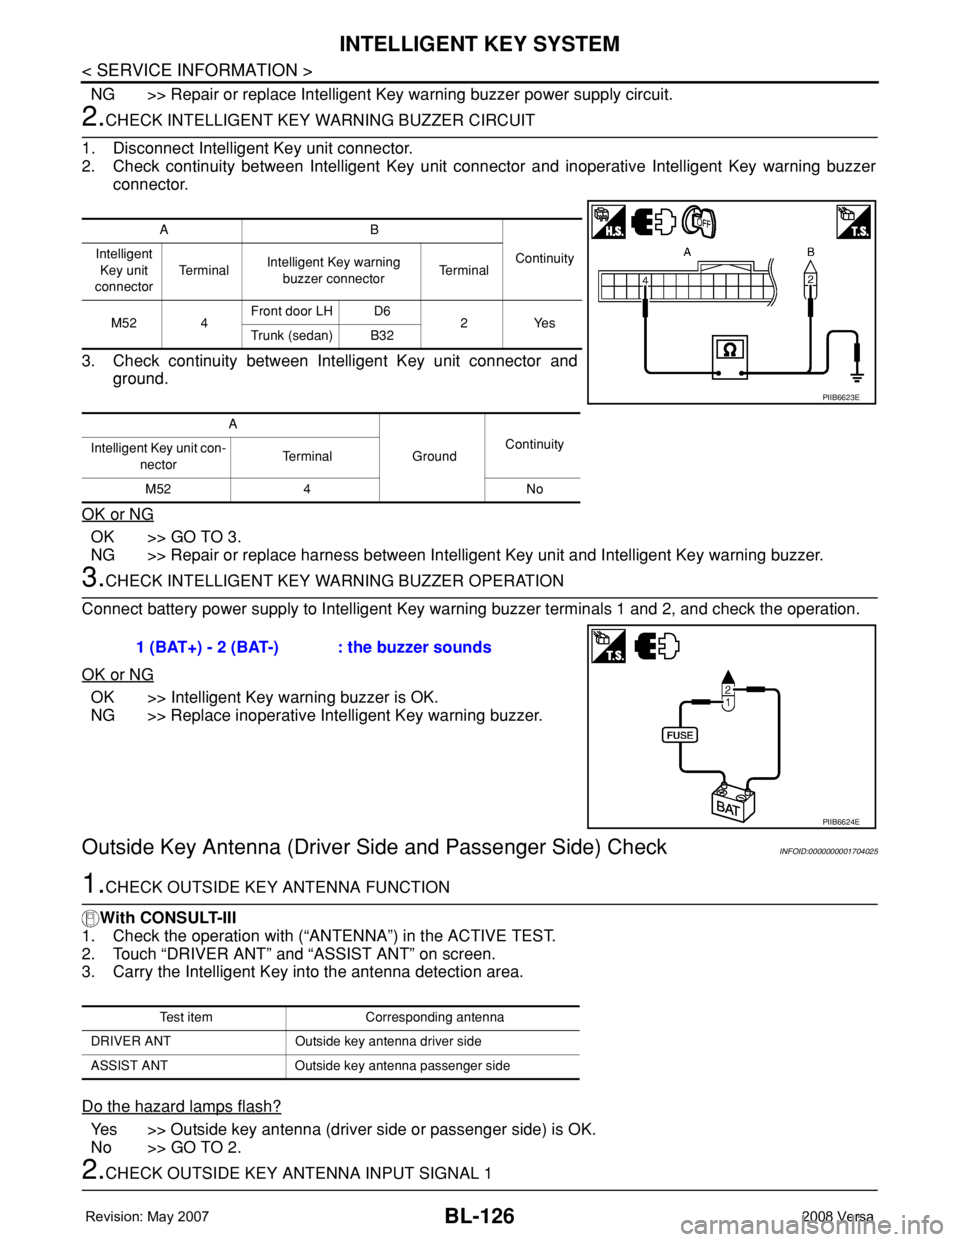
2.CHECK INTELLIGENT KEY WARNING BUZZER CIRCUIT
1. Disconnect Intelligent Key unit connector.
2. Check continuity between Intelligent Key unit connector and inoperative Intelligent Key warning buzzer
connector.
3. Check continuity between Intelligent Key unit connector and
ground.
OK or NG
OK >> GO TO 3.
NG >> Repair or replace harness between Intelligent Key unit and Intelligent Key warning buzzer.
3.CHECK INTELLIGENT KEY WARNING BUZZER OPERATION
Connect battery power supply to Intelligent Key warning buzzer terminals 1 and 2, and check the operation.
OK or NG
OK >> Intelligent Key warning buzzer is OK.
NG >> Replace inoperative Intelligent Key warning buzzer.
Outside Key Antenna (Driver Side and Passenger Side) CheckINFOID:0000000001704025
1.CHECK OUTSIDE KEY ANTENNA FUNCTION
With CONSULT-III
1. Check the operation with (“ANTENNA”) in the ACTIVE TEST.
2. Touch “DRIVER ANT” and “ASSIST ANT” on screen.
3. Carry the Intelligent Key into the antenna detection area.
Do the hazard lamps flash?
Yes >> Outside key antenna (driver side or passenger side) is OK.
No >> GO TO 2.
2.CHECK OUTSIDE KEY ANTENNA INPUT SIGNAL 1
AB
Continuity Intelligent
Key unit
connectorTe r m i n a lIntelligent Key warning
buzzer connectorTe r m i n a l
M52 4Front door LH D6
2Yes
Trunk (sedan) B32
A
GroundContinuity
Intelligent Key unit con-
nectorTerminal
M52 4 No
PIIB6623E
1 (BAT+) - 2 (BAT-) : the buzzer sounds
PIIB6624E
Test item Corresponding antenna
DRIVER ANT Outside key antenna driver side
ASSIST ANT Outside key antenna passenger side
Page 593 of 2771
BACK DOOR LOCK
BL-159
< SERVICE INFORMATION >
C
D
E
F
G
H
J
K
L
MA
B
BL
N
O
P
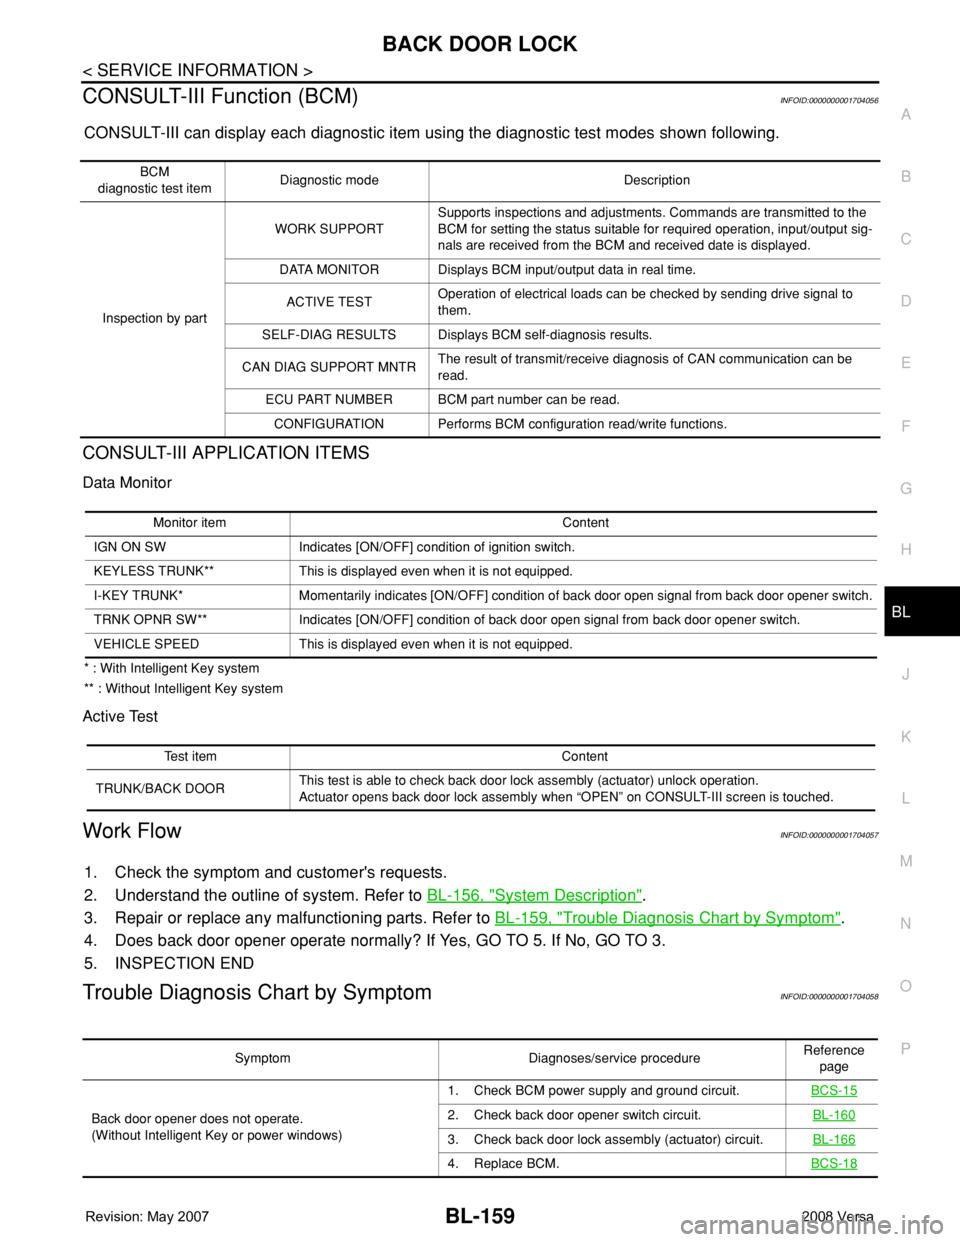
CONSULT-III Function (BCM)INFOID:0000000001704056
CONSULT-III can display each diagnostic item using the diagnostic test modes shown following.
CONSULT-III APPLICATION ITEMS
Data Monitor
* : With Intelligent Key system
** : Without Intelligent Key system
Active Test
Work FlowINFOID:0000000001704057
1. Check the symptom and customer's requests.
2. Understand the outline of system. Refer to BL-156, "
System Description".
3. Repair or replace any malfunctioning parts. Refer to BL-159, "
Trouble Diagnosis Chart by Symptom".
4. Does back door opener operate normally? If Yes, GO TO 5. If No, GO TO 3.
5. INSPECTION END
Trouble Diagnosis Chart by SymptomINFOID:0000000001704058
BCM
diagnostic test itemDiagnostic mode Description
Inspection by partWORK SUPPORTSupports inspections and adjustments. Commands are transmitted to the
BCM for setting the status suitable for required operation, input/output sig-
nals are received from the BCM and received date is displayed.
DATA MONITOR Displays BCM input/output data in real time.
ACTIVE TESTOperation of electrical loads can be checked by sending drive signal to
them.
SELF-DIAG RESULTS Displays BCM self-diagnosis results.
CAN DIAG SUPPORT MNTRThe result of transmit/receive diagnosis of CAN communication can be
read.
ECU PART NUMBER BCM part number can be read.
CONFIGURATION Performs BCM configuration read/write functions.
Monitor item Content
IGN ON SW Indicates [ON/OFF] condition of ignition switch.
KEYLESS TRUNK** This is displayed even when it is not equipped.
I-KEY TRUNK* Momentarily indicates [ON/OFF] condition of back door open signal from back door opener switch.
TRNK OPNR SW** Indicates [ON/OFF] condition of back door open signal from back door opener switch.
VEHICLE SPEED This is displayed even when it is not equipped.
Test item Content
TRUNK/BACK DOORThis test is able to check back door lock assembly (actuator) unlock operation.
Actuator opens back door lock assembly when “OPEN” on CONSULT-III screen is touched.
Symptom Diagnoses/service procedureReference
page
Back door opener does not operate.
(Without Intelligent Key or power windows)1. Check BCM power supply and ground circuit.BCS-15
2. Check back door opener switch circuit.BL-160
3. Check back door lock assembly (actuator) circuit.BL-166
4. Replace BCM.BCS-18
Page 600 of 2771
BL-166
< SERVICE INFORMATION >
BACK DOOR LOCK
OK or NG
OK >> GO TO 3.
NG >> Repair or replace harness.
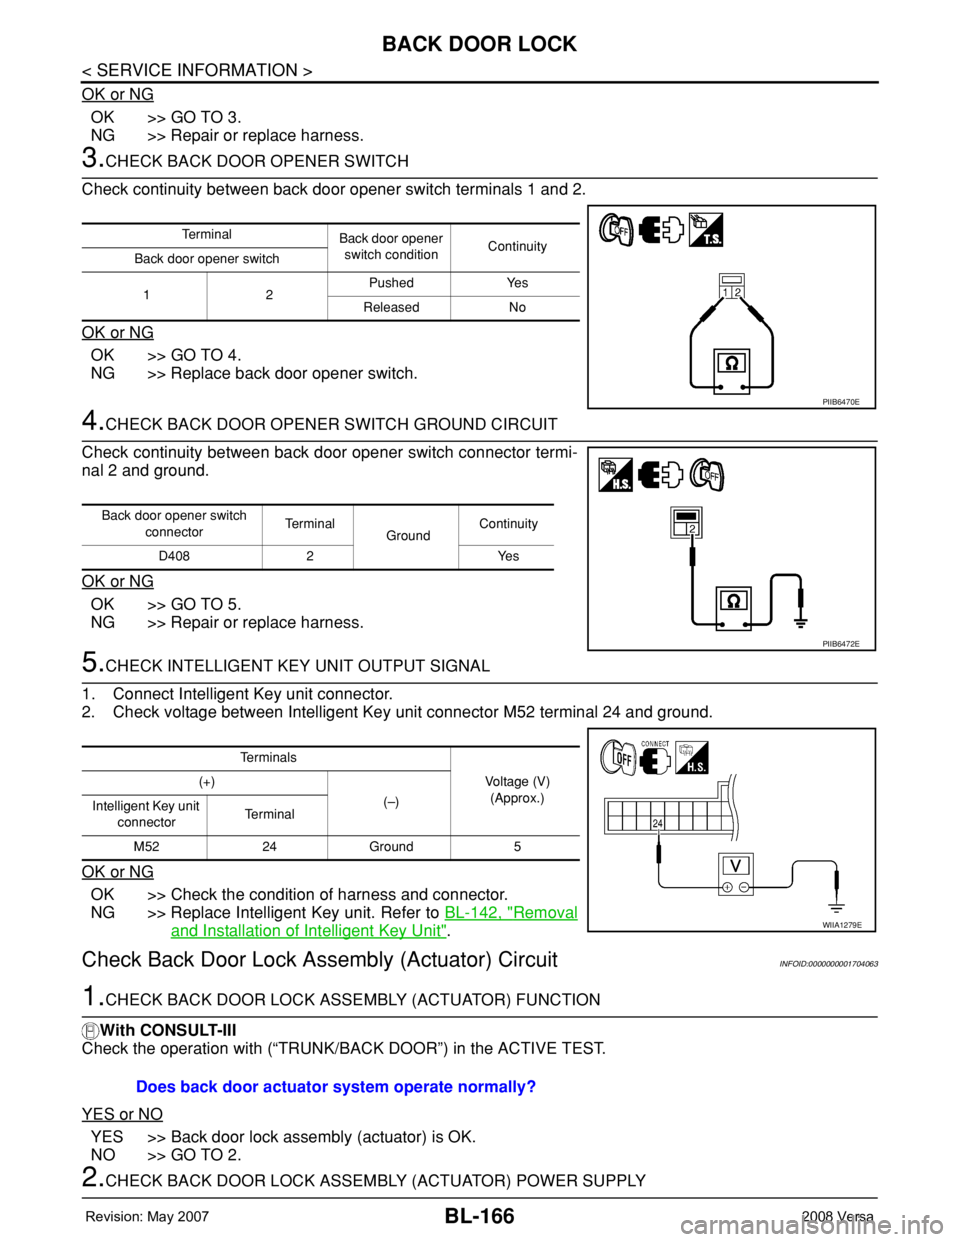
3.CHECK BACK DOOR OPENER SWITCH
Check continuity between back door opener switch terminals 1 and 2.
OK or NG
OK >> GO TO 4.
NG >> Replace back door opener switch.
4.CHECK BACK DOOR OPENER SWITCH GROUND CIRCUIT
Check continuity between back door opener switch connector termi-
nal 2 and ground.
OK or NG
OK >> GO TO 5.
NG >> Repair or replace harness.
5.CHECK INTELLIGENT KEY UNIT OUTPUT SIGNAL
1. Connect Intelligent Key unit connector.
2. Check voltage between Intelligent Key unit connector M52 terminal 24 and ground.
OK or NG
OK >> Check the condition of harness and connector.
NG >> Replace Intelligent Key unit. Refer to BL-142, "
Removal
and Installation of Intelligent Key Unit".
Check Back Door Lock Assembly (Actuator) CircuitINFOID:0000000001704063
1.CHECK BACK DOOR LOCK ASSEMBLY (ACTUATOR) FUNCTION
With CONSULT-III
Check the operation with (“TRUNK/BACK DOOR”) in the ACTIVE TEST.
YES or NO
YES >> Back door lock assembly (actuator) is OK.
NO >> GO TO 2.
2.CHECK BACK DOOR LOCK ASSEMBLY (ACTUATOR) POWER SUPPLY
Te r m i n a l
Back door opener
switch conditionContinuity
Back door opener switch
12Pushed Yes
Released No
PIIB6470E
Back door opener switch
connectorTe r m i n a l
GroundContinuity
D408 2 Yes
PIIB6472E
Te r m i n a l s
Voltage (V)
(Approx.) (+)
(–)
Intelligent Key unit
connectorTe r m i n a l
M52 24 Ground 5
WIIA1279E
Does back door actuator system operate normally?
Page 604 of 2771
BL-170
< SERVICE INFORMATION >
TRUNK LID
TRUNK LID
Fitting AdjustmentINFOID:0000000001704065
Longitudinal and lateral clearance adjustment
1. With the striker released, loosen the trunk lid hinge nuts and close the trunk lid.
2. Make the lateral clearance and the clearance to the rear window glass equal. Then open the trunk lid to
tighten the nuts.
Surface height adjustment
1. Loosen the striker bolts. Raise the striker to the top position, and temporarily tighten the upper bolt.
2. Close the trunk lid lightly and adjust the surface height. Then open the trunk lid and tighten the striker
bolts.
Trunk Lid AssemblyINFOID:0000000001704066
REMOVAL
1. Remove the trunk lid finisher. Refer to EI-53 .
2. Remove the trunk lid wire harness.
1. Rear fender 2. Trunk lid 3. Rear combination lamp
4. Rear bumper fascia a. 4.0 ± 1.0 mm (0.16 ± 0.04 in) b. 3.5 ± 1.0 mm (0.14 ± 0.04 in)
c. 4.5 ± 1.7 mm (0.03 ± 0.06 in) d. 7.0 ± 2.2 mm (0.28 ± 0.09 in)
LIIA2932E
Page 605 of 2771
TRUNK LID
BL-171
< SERVICE INFORMATION >
C
D
E
F
G
H
J
K
L
MA
B
BL
N
O
P
3. Remove the nuts (a) and the trunk lid assembly (1).
INSTALLATION
Installation is in the reverse order of removal.
CAUTION:
After installing, apply touch-up paint (body color) to the head of the hinge nuts.
Trunk Lid LockINFOID:0000000001704067
REMOVAL
1. Remove the trunk lid finisher. Refer to EI-53.
2. If equipped, disconnect the trunk lid lock cylinder rod.
3. Remove the release cable.
4. Disconnect the electrical connector (a), remove the bolts (b) and
the trunk lid lock (1).
INSTALLATION
Installation is in the reverse order of removal.
Trunk Lid StrikerINFOID:0000000001704068
REMOVAL
1. Remove the trunk rear plate and trunk rear finisher. Refer to EI-53.
2. Remove the bolts, disconnect the electrical connector and remove the trunk lock actuator.
3. Remove the bolt and disconnect the trunk lid release cable.
LIIA2933E
LIIA2935E
Page 606 of 2771
BL-172
< SERVICE INFORMATION >
TRUNK LID
4. Remove the bolts (a) and the trunk lid striker (1).
INSTALLATION
Installation is in the reverse order of removal.
LIIA2934E