Page 2519 of 2771
POWER STEERING GEAR
PS-13
< SERVICE INFORMATION >
C
D
E
F
H
I
J
K
L
MA
B
PS
N
O
P
• Check wheel alignment under unladen conditions with tires on level ground. Refer to FSU-6, "Wheel Align-
ment Inspection".
INSPECTION AFTER INSTALLATION
Rotate steering wheel to check for decentered condition, binding, noise or excessive steering effort.
Disassembly and AssemblyINFOID:0000000001703863
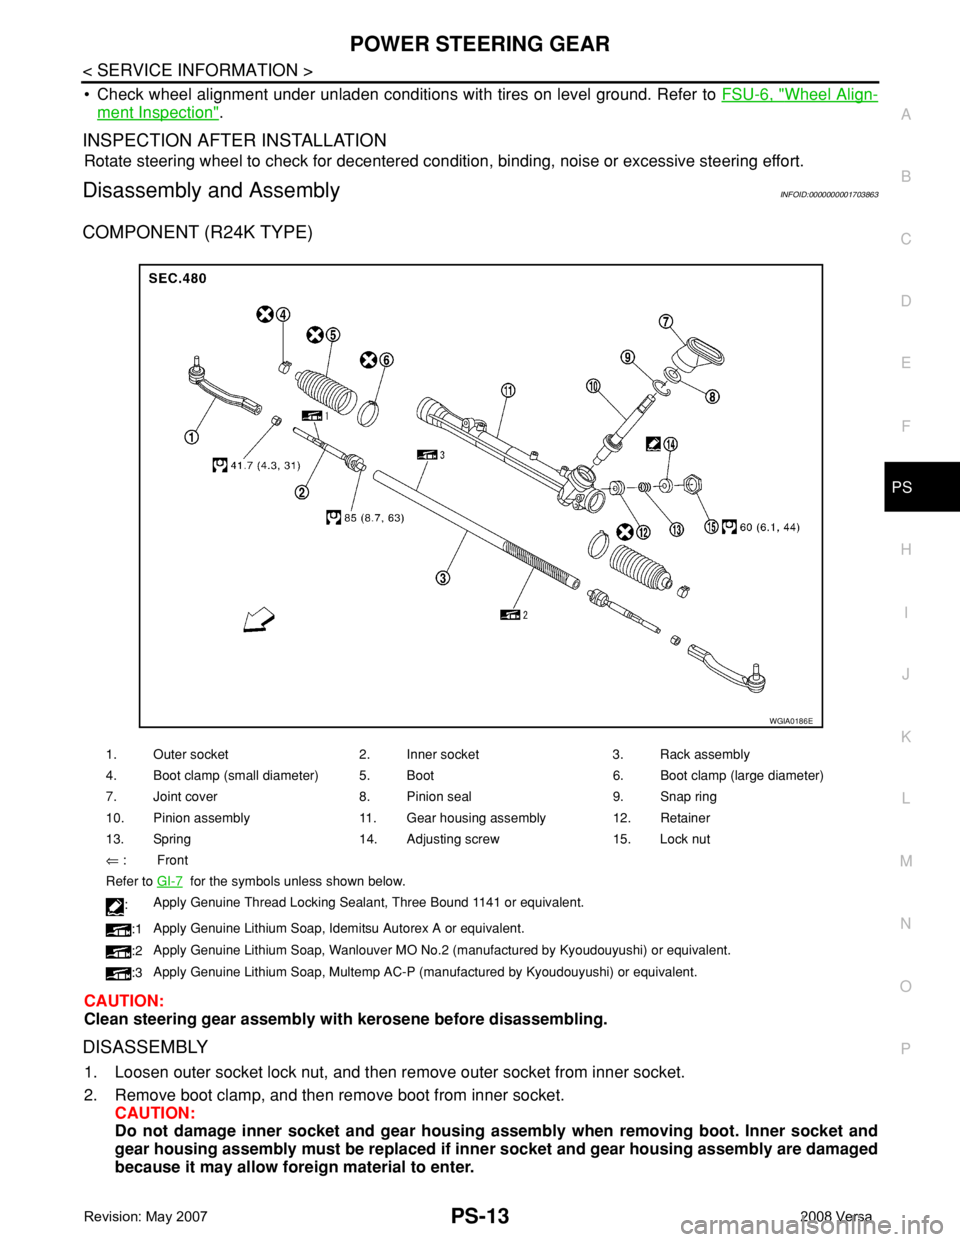
COMPONENT (R24K TYPE)
CAUTION:
Clean steering gear assembly with kerosene before disassembling.
DISASSEMBLY
1. Loosen outer socket lock nut, and then remove outer socket from inner socket.
2. Remove boot clamp, and then remove boot from inner socket.
CAUTION:
Do not damage inner socket and gear housing assembly when removing boot. Inner socket and
gear housing assembly must be replaced if inner socket and gear housing assembly are damaged
because it may allow foreign material to enter.
1. Outer socket 2. Inner socket 3. Rack assembly
4. Boot clamp (small diameter) 5. Boot 6. Boot clamp (large diameter)
7. Joint cover 8. Pinion seal 9. Snap ring
10. Pinion assembly 11. Gear housing assembly 12. Retainer
13. Spring 14. Adjusting screw 15. Lock nut
⇐ : Front
Refer to GI-7
for the symbols unless shown below.
:Apply Genuine Thread Locking Sealant, Three Bound 1141 or equivalent.
:1Apply Genuine Lithium Soap, Idemitsu Autorex A or equivalent.
:2Apply Genuine Lithium Soap, Wanlouver MO No.2 (manufactured by Kyoudouyushi) or equivalent.
:3Apply Genuine Lithium Soap, Multemp AC-P (manufactured by Kyoudouyushi) or equivalent.
WGIA0186E
Page 2520 of 2771
PS-14
< SERVICE INFORMATION >
POWER STEERING GEAR
3. Remove inner socket from rack assembly while holding the flat portion of the rack next to the inner socket
using a suitable tool.
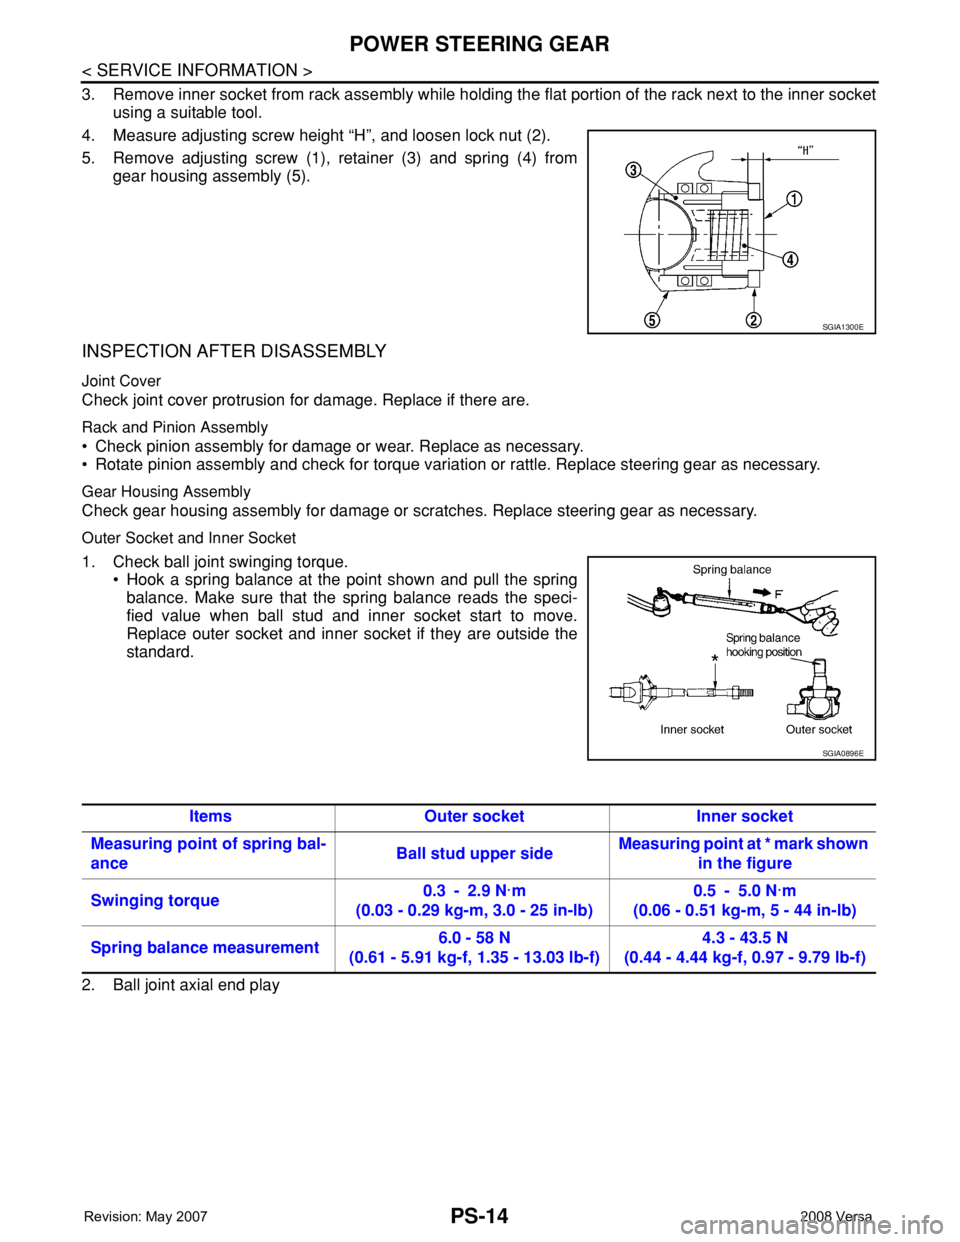
4. Measure adjusting screw height “H”, and loosen lock nut (2).
5. Remove adjusting screw (1), retainer (3) and spring (4) from
gear housing assembly (5).
INSPECTION AFTER DISASSEMBLY
Joint Cover
Check joint cover protrusion for damage. Replace if there are.
Rack and Pinion Assembly
• Check pinion assembly for damage or wear. Replace as necessary.
• Rotate pinion assembly and check for torque variation or rattle. Replace steering gear as necessary.
Gear Housing Assembly
Check gear housing assembly for damage or scratches. Replace steering gear as necessary.
Outer Socket and Inner Socket
1. Check ball joint swinging torque.
• Hook a spring balance at the point shown and pull the spring
balance. Make sure that the spring balance reads the speci-
fied value when ball stud and inner socket start to move.
Replace outer socket and inner socket if they are outside the
standard.
2. Ball joint axial end play
SGIA1300E
SGIA0896E
Items Outer socket Inner socket
Measuring point of spring bal-
anceBall stud upper sideMeasuring point at * mark shown
in the figure
Swinging torque0.3 - 2.9 N·m
(0.03 - 0.29 kg-m, 3.0 - 25 in-lb)0.5 - 5.0 N·m
(0.06 - 0.51 kg-m, 5 - 44 in-lb)
Spring balance measurement6.0 - 58 N
(0.61 - 5.91 kg-f, 1.35 - 13.03 lb-f)4.3 - 43.5 N
(0.44 - 4.44 kg-f, 0.97 - 9.79 lb-f)
Page 2521 of 2771
POWER STEERING GEAR
PS-15
< SERVICE INFORMATION >
C
D
E
F
H
I
J
K
L
MA
B
PS
N
O
P
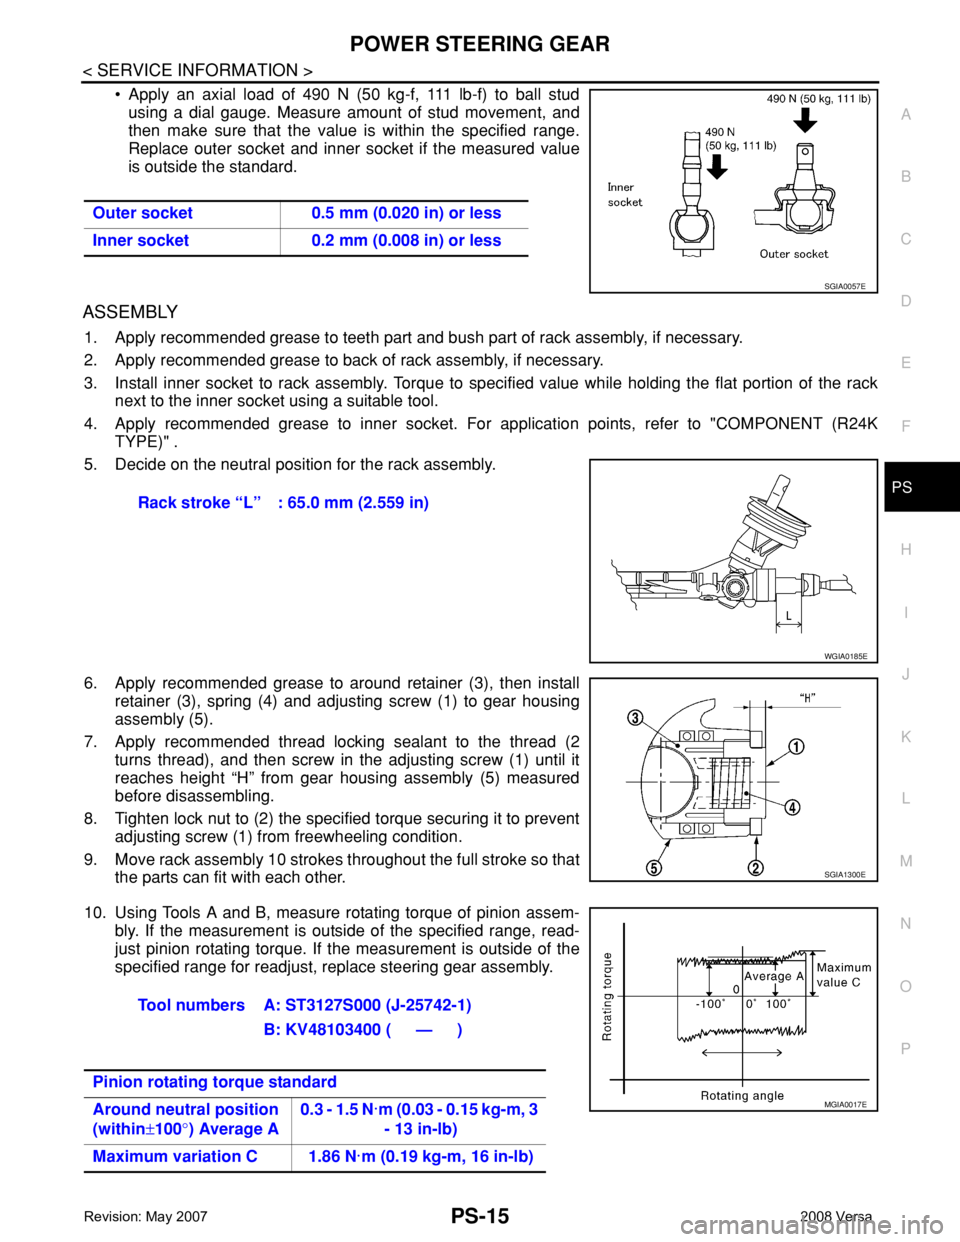
• Apply an axial load of 490 N (50 kg-f, 111 lb-f) to ball stud
using a dial gauge. Measure amount of stud movement, and
then make sure that the value is within the specified range.
Replace outer socket and inner socket if the measured value
is outside the standard.
ASSEMBLY
1. Apply recommended grease to teeth part and bush part of rack assembly, if necessary.
2. Apply recommended grease to back of rack assembly, if necessary.
3. Install inner socket to rack assembly. Torque to specified value while holding the flat portion of the rack
next to the inner socket using a suitable tool.
4. Apply recommended grease to inner socket. For application points, refer to "COMPONENT (R24K
TYPE)" .
5. Decide on the neutral position for the rack assembly.
6. Apply recommended grease to around retainer (3), then install
retainer (3), spring (4) and adjusting screw (1) to gear housing
assembly (5).
7. Apply recommended thread locking sealant to the thread (2
turns thread), and then screw in the adjusting screw (1) until it
reaches height “H” from gear housing assembly (5) measured
before disassembling.
8. Tighten lock nut to (2) the specified torque securing it to prevent
adjusting screw (1) from freewheeling condition.
9. Move rack assembly 10 strokes throughout the full stroke so that
the parts can fit with each other.
10. Using Tools A and B, measure rotating torque of pinion assem-
bly. If the measurement is outside of the specified range, read-
just pinion rotating torque. If the measurement is outside of the
specified range for readjust, replace steering gear assembly. Outer socket 0.5 mm (0.020 in) or less
Inner socket 0.2 mm (0.008 in) or less
SGIA0057E
Rack stroke “L” : 65.0 mm (2.559 in)
WGIA0185E
SGIA1300E
Tool numbers A: ST3127S000 (J-25742-1)
B: KV48103400 ( — )
Pinion rotating torque standard
Around neutral position
(within±100°) Average A0.3 - 1.5 N·m (0.03 - 0.15 kg-m, 3
- 13 in-lb)
Maximum variation C 1.86 N·m (0.19 kg-m, 16 in-lb)
MGIA0017E
Page 2522 of 2771
PS-16
< SERVICE INFORMATION >
POWER STEERING GEAR
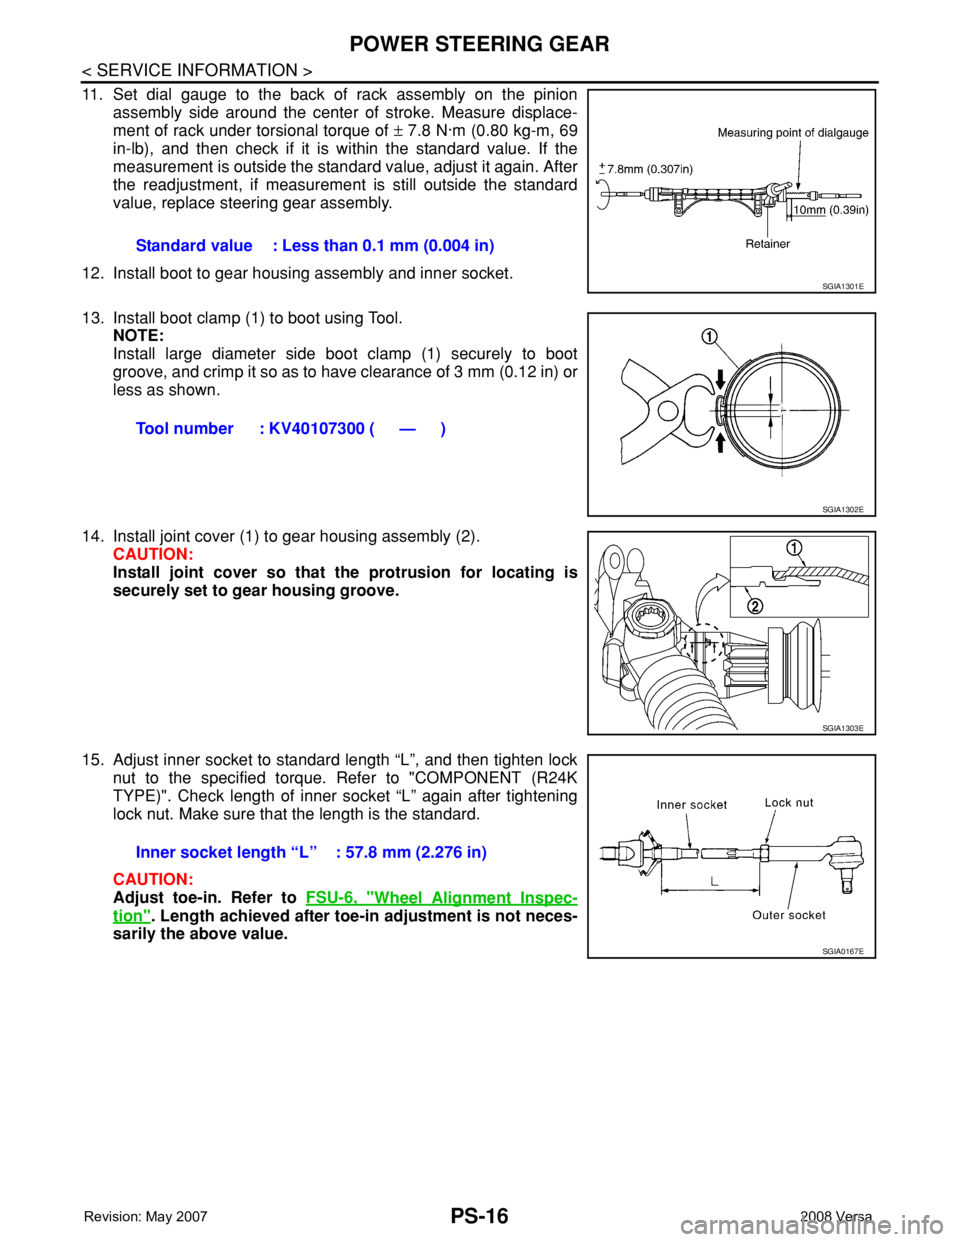
11. Set dial gauge to the back of rack assembly on the pinion
assembly side around the center of stroke. Measure displace-
ment of rack under torsional torque of ± 7.8 N·m (0.80 kg-m, 69
in-lb), and then check if it is within the standard value. If the
measurement is outside the standard value, adjust it again. After
the readjustment, if measurement is still outside the standard
value, replace steering gear assembly.
12. Install boot to gear housing assembly and inner socket.
13. Install boot clamp (1) to boot using Tool.
NOTE:
Install large diameter side boot clamp (1) securely to boot
groove, and crimp it so as to have clearance of 3 mm (0.12 in) or
less as shown.
14. Install joint cover (1) to gear housing assembly (2).
CAUTION:
Install joint cover so that the protrusion for locating is
securely set to gear housing groove.
15. Adjust inner socket to standard length “L”, and then tighten lock
nut to the specified torque. Refer to "COMPONENT (R24K
TYPE)". Check length of inner socket “L” again after tightening
lock nut. Make sure that the length is the standard.
CAUTION:
Adjust toe-in. Refer to FSU-6, "
Wheel Alignment Inspec-
tion". Length achieved after toe-in adjustment is not neces-
sarily the above value.Standard value : Less than 0.1 mm (0.004 in)
SGIA1301E
Tool number : KV40107300 ( — )
SGIA1302E
SGIA1303E
Inner socket length “L” : 57.8 mm (2.276 in)
SGIA0167E
Page 2523 of 2771
SERVICE DATA AND SPECIFICATIONS (SDS)
PS-17
< SERVICE INFORMATION >
C
D
E
F
H
I
J
K
L
MA
B
PS
N
O
P
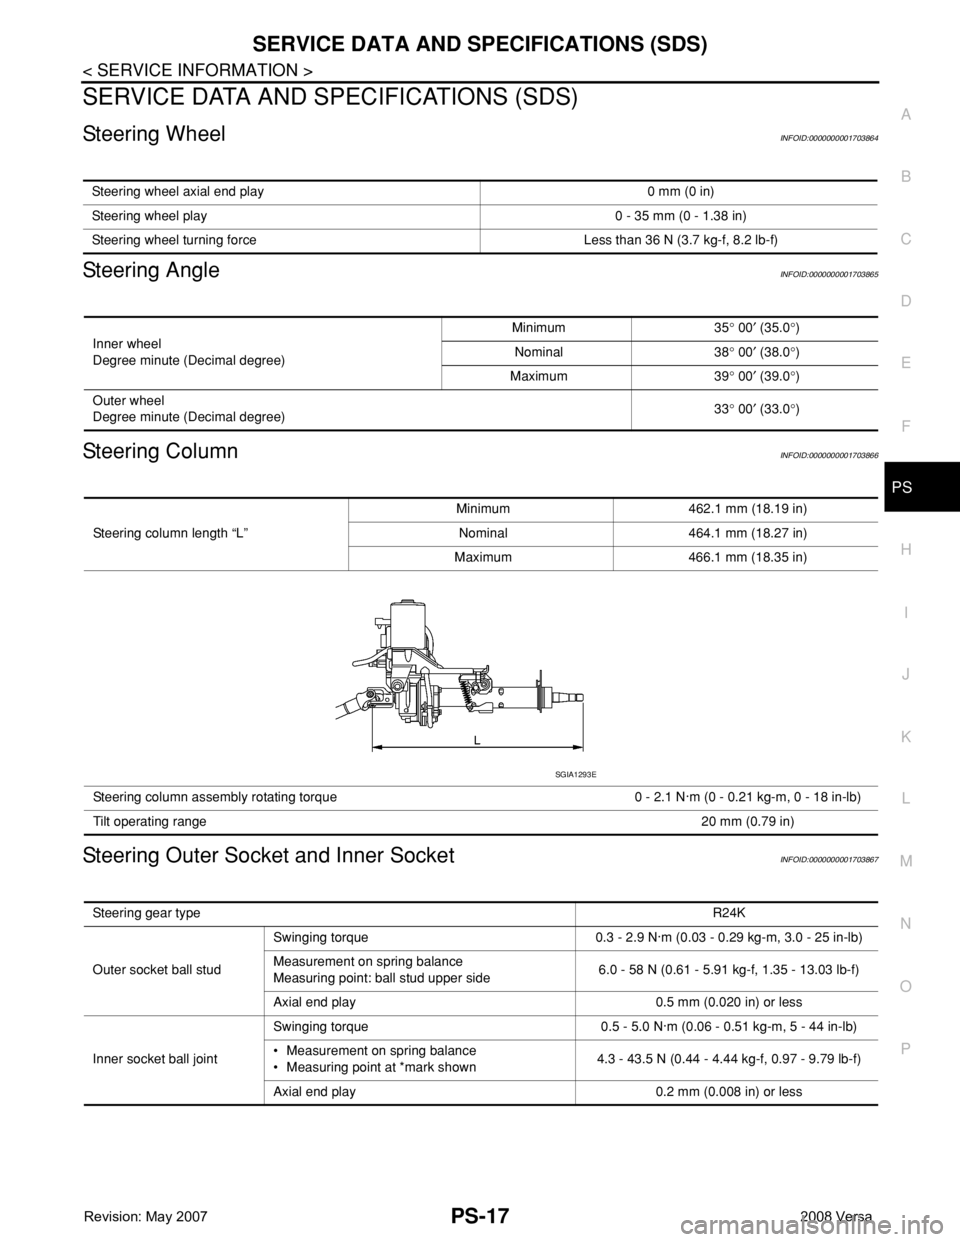
SERVICE DATA AND SPECIFICATIONS (SDS)
Steering WheelINFOID:0000000001703864
Steering AngleINFOID:0000000001703865
Steering ColumnINFOID:0000000001703866
Steering Outer Socket and Inner SocketINFOID:0000000001703867
Steering wheel axial end play 0 mm (0 in)
Steering wheel play 0 - 35 mm (0 - 1.38 in)
Steering wheel turning force Less than 36 N (3.7 kg-f, 8.2 lb-f)
Inner wheel
Degree minute (Decimal degree)Minimum 35° 00′ (35.0°)
Nominal 38° 00′ (38.0°)
Maximum 39° 00′ (39.0°)
Outer wheel
Degree minute (Decimal degree)33° 00′ (33.0°)
Steering column length “L”Minimum 462.1 mm (18.19 in)
Nominal 464.1 mm (18.27 in)
Maximum 466.1 mm (18.35 in)
Steering column assembly rotating torque 0 - 2.1 N·m (0 - 0.21 kg-m, 0 - 18 in-lb)
Tilt operating range20 mm (0.79 in)
SGIA1293E
Steering gear typeR24K
Outer socket ball studSwinging torque 0.3 - 2.9 N·m (0.03 - 0.29 kg-m, 3.0 - 25 in-lb)
Measurement on spring balance
Measuring point: ball stud upper side6.0 - 58 N (0.61 - 5.91 kg-f, 1.35 - 13.03 lb-f)
Axial end play 0.5 mm (0.020 in) or less
Inner socket ball jointSwinging torque 0.5 - 5.0 N·m (0.06 - 0.51 kg-m, 5 - 44 in-lb)
• Measurement on spring balance
• Measuring point at *mark shown4.3 - 43.5 N (0.44 - 4.44 kg-f, 0.97 - 9.79 lb-f)
Axial end play 0.2 mm (0.008 in) or less
Page 2524 of 2771
PS-18
< SERVICE INFORMATION >
SERVICE DATA AND SPECIFICATIONS (SDS)
Steering Gear
INFOID:0000000001703868
Inner socket length “L”57.8 mm (2.276 in) Steering gear typeR24K
SGIA0950E
Steering gear modelR24K
Rack neutral position, dimension “L” (rack stroke) 65.0 mm (2.559 in)
Pinion rotating torque
standardAround neutral position
(within ± 100°) Average A0.3 - 1.5 N·m (0.03 - 0.15 kg-m, 3 - 13 in-lb)
Maximum variation C 1.86 N·m (0.19 kg-m, 16 in-lb)
WGIA0185E
MGIA0017E
Page 2525 of 2771
RAX-1
DRIVELINE/AXLE
C
E
F
G
H
I
J
K
L
M
SECTION RAX
A
B
RAX
N
O
P
CONTENTS
REAR AXLE
SERVICE INFORMATION ............................2
PREPARATION ...................................................2
Commercial Service Tool ..........................................2
NOISE, VIBRATION AND HARSHNESS
(NVH) TROUBLESHOOTING .............................
3
NVH Troubleshooting Chart ......................................3
WHEEL HUB ......................................................4
On-Vehicle Inspection and Service ..........................4
Removal and Installation ..........................................4
SERVICE DATA AND SPECIFICATIONS
(SDS) ..................................................................
6
Wheel Bearing ..........................................................6
Page 2526 of 2771
RAX-2
< SERVICE INFORMATION >
PREPARATION
SERVICE INFORMATION
PREPARATION
Commercial Service ToolINFOID:0000000001703710
Tool name Description
Power tool Removing wheel nuts
PBIC0190E