2008 NISSAN LATIO lift seat
[x] Cancel search: lift seatPage 1852 of 2771
GI-1
GENERAL INFORMATION
C
D
E
F
G
H
I
J
K
L
MB
GI
SECTION GI
N
O
P
CONTENTS
GENERAL INFORMATION
SERVICE INFORMATION ............................2
PRECAUTIONS ...................................................2
Description ................................................................2
Precaution for Supplemental Restraint System
(SRS) "AIR BAG" and "SEAT BELT PRE-TEN-
SIONER" ...................................................................
2
Precaution Necessary for Steering Wheel Rota-
tion After Battery Disconnect .....................................
2
General Precaution ...................................................3
Precaution for Three Way Catalyst ...........................4
Precaution for Fuel (Unleaded Regular Gasoline
Recommended) .........................................................
4
Precaution for Multiport Fuel Injection System or
Engine Control System .............................................
5
Precaution for Hoses .................................................5
Precaution for Engine Oils ........................................6
Precaution for Air Conditioning .................................6
HOW TO USE THIS MANUAL ............................7
Description ................................................................7
Terms ........................................................................7
Units ..........................................................................7
Contents ....................................................................7
Relation between Illustrations and Descriptions .......8
Component ................................................................8
How to Follow Trouble Diagnosis ..............................9
How to Read Wiring Diagram ..................................13
Abbreviations ..........................................................20
SERVICE INFORMATION FOR ELECTRICAL
INCIDENT ...........................................................
22
How to Check Terminal ...........................................22
How to Perform Efficient Diagnosis for an Electri-
cal Incident ..............................................................
25
Control Units and Electrical Parts ............................32
CONSULT-III CHECKING SYSTEM .................35
Description ...............................................................35
Function and System Application ............................35
CONSULT-III Data Link Connector (DLC) Circuit ....36
LIFTING POINT .................................................38
Special Service Tool ................................................38
Garage Jack and Safety Stand and 2-Pole Lift .......38
Board-On Lift ...........................................................39
TOW TRUCK TOWING .....................................40
Tow Truck Towing ...................................................40
Vehicle Recovery (Freeing a Stuck Vehicle) ...........40
TIGHTENING TORQUE OF STANDARD
BOLTS ...............................................................
41
Tightening Torque Table .........................................41
RECOMMENDED CHEMICAL PRODUCTS
AND SEALANTS ...............................................
42
Recommended Chemical Product and Sealant .......42
IDENTIFICATION INFORMATION ....................43
Model Variation ........................................................43
Dimensions ..............................................................46
Wheels & Tires ........................................................46
TERMINOLOGY ................................................47
SAE J1930 Terminology List ...................................47
Page 2578 of 2771
SEAT BELTS
SB-7
< ON-VEHICLE REPAIR >
C
D
E
F
G
I
J
K
L
MA
B
SB
N
O
P
5. Remove the outer retractor anchor bolt, then remove outer seat belt retractor.
INSTALLATION OF OUTER SEAT BELT RETRACTOR - HATCHBACK
Installation is in the reverse order of removal.
REMOVAL OF OUTER SEAT BELT RETRACTOR - SEDAN
1. Remove rear seat cushion, refer to SE-14.
2. Remove outer seat belt anchor bolt.
3. Release the seat belt escutcheon, then remove from belt.
4. Remove rear parcel shelf finisher, refer to XXX.
5. Remove outer seat belt retractor bolt, then remove outer seat belt retractor.
INSTALLATION OF OUTER SEAT BELT RETRACTOR - SEDAN
Installation is in the reverse order of removal.
REMOVAL OF CENTER SEAT BELT RETRACTOR - HATCHBACK
1. Remove and disassemble the rear seat cushion, refer to SE-14.
2. Remove the center seat belt retractor.
INSTALLATION OF CENTER SEAT BELT RETRACTOR - HATCHBACK
Installation is in the reverse order of removal.
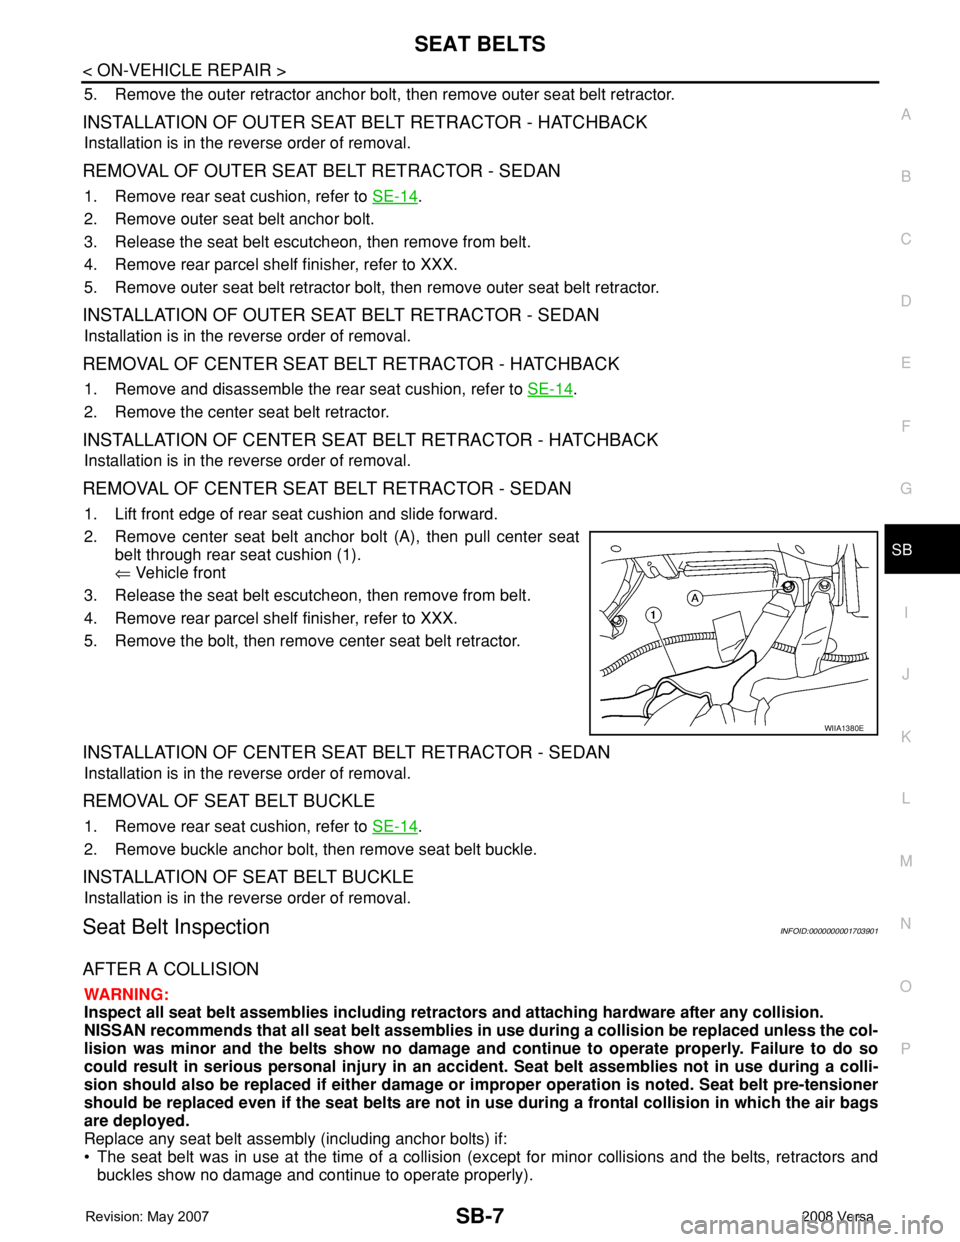
REMOVAL OF CENTER SEAT BELT RETRACTOR - SEDAN
1. Lift front edge of rear seat cushion and slide forward.
2. Remove center seat belt anchor bolt (A), then pull center seat
belt through rear seat cushion (1).
⇐ Vehicle front
3. Release the seat belt escutcheon, then remove from belt.
4. Remove rear parcel shelf finisher, refer to XXX.
5. Remove the bolt, then remove center seat belt retractor.
INSTALLATION OF CENTER SEAT BELT RETRACTOR - SEDAN
Installation is in the reverse order of removal.
REMOVAL OF SEAT BELT BUCKLE
1. Remove rear seat cushion, refer to SE-14.
2. Remove buckle anchor bolt, then remove seat belt buckle.
INSTALLATION OF SEAT BELT BUCKLE
Installation is in the reverse order of removal.
Seat Belt InspectionINFOID:0000000001703901
AFTER A COLLISION
WARNING:
Inspect all seat belt assemblies including retractors and attaching hardware after any collision.
NISSAN recommends that all seat belt assemblies in use during a collision be replaced unless the col-
lision was minor and the belts show no damage and continue to operate properly. Failure to do so
could result in serious personal injury in an accident. Seat belt assemblies not in use during a colli-
sion should also be replaced if either damage or improper operation is noted. Seat belt pre-tensioner
should be replaced even if the seat belts are not in use during a frontal collision in which the air bags
are deployed.
Replace any seat belt assembly (including anchor bolts) if:
• The seat belt was in use at the time of a collision (except for minor collisions and the belts, retractors and
buckles show no damage and continue to operate properly).
WIIA1380E
Page 2618 of 2771
SE-10
< SERVICE INFORMATION >
FRONT SEAT
FRONT SEAT
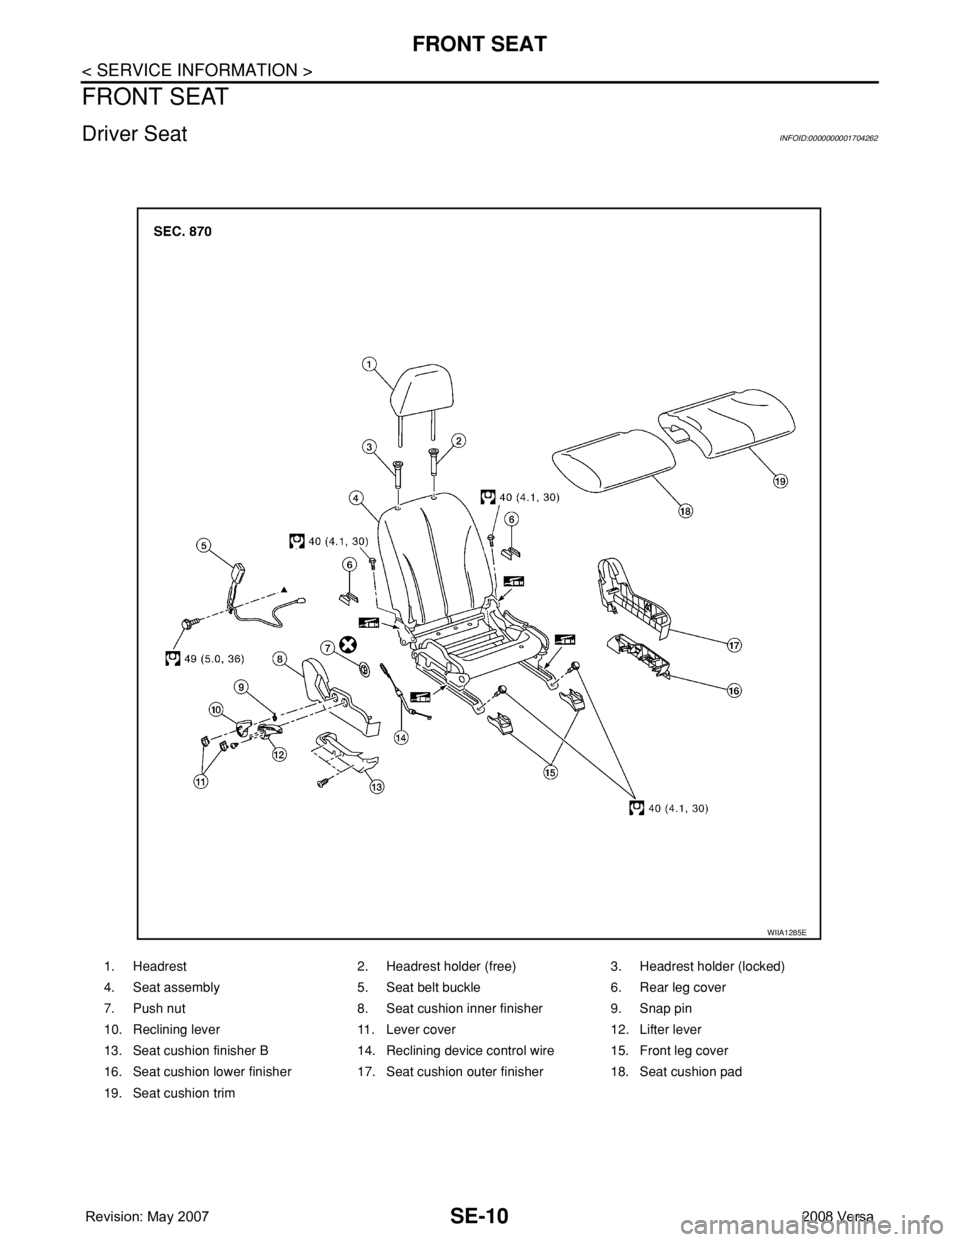
Driver SeatINFOID:0000000001704262
1. Headrest 2. Headrest holder (free) 3. Headrest holder (locked)
4. Seat assembly 5. Seat belt buckle 6. Rear leg cover
7. Push nut 8. Seat cushion inner finisher 9. Snap pin
10. Reclining lever 11. Lever cover 12. Lifter lever
13. Seat cushion finisher B 14. Reclining device control wire 15. Front leg cover
16. Seat cushion lower finisher 17. Seat cushion outer finisher 18. Seat cushion pad
19. Seat cushion trim
WIIA1285E
Page 2625 of 2771
REAR SEAT
SE-17
< SERVICE INFORMATION >
C
D
E
F
G
H
J
K
L
MA
B
SE
N
O
P
1. Install the rear seatback side bracket in the vehicle.
2. Temporarily tighten the seatback assembly and rear seatback side bracket.
3. Lift to fold up seatback assembly. Be sure to lock seatback assembly to rear seat striker.
4. Tighten the bolt.
NOTE:
Confirm that side hinge bracket location pin is set to the hole on the seatback backside.
Disassembly and AssemblyINFOID:0000000001704268
60:40 SPLIT FOLD DOWN SEAT - HATCHBACK
Disassembly of Armrest
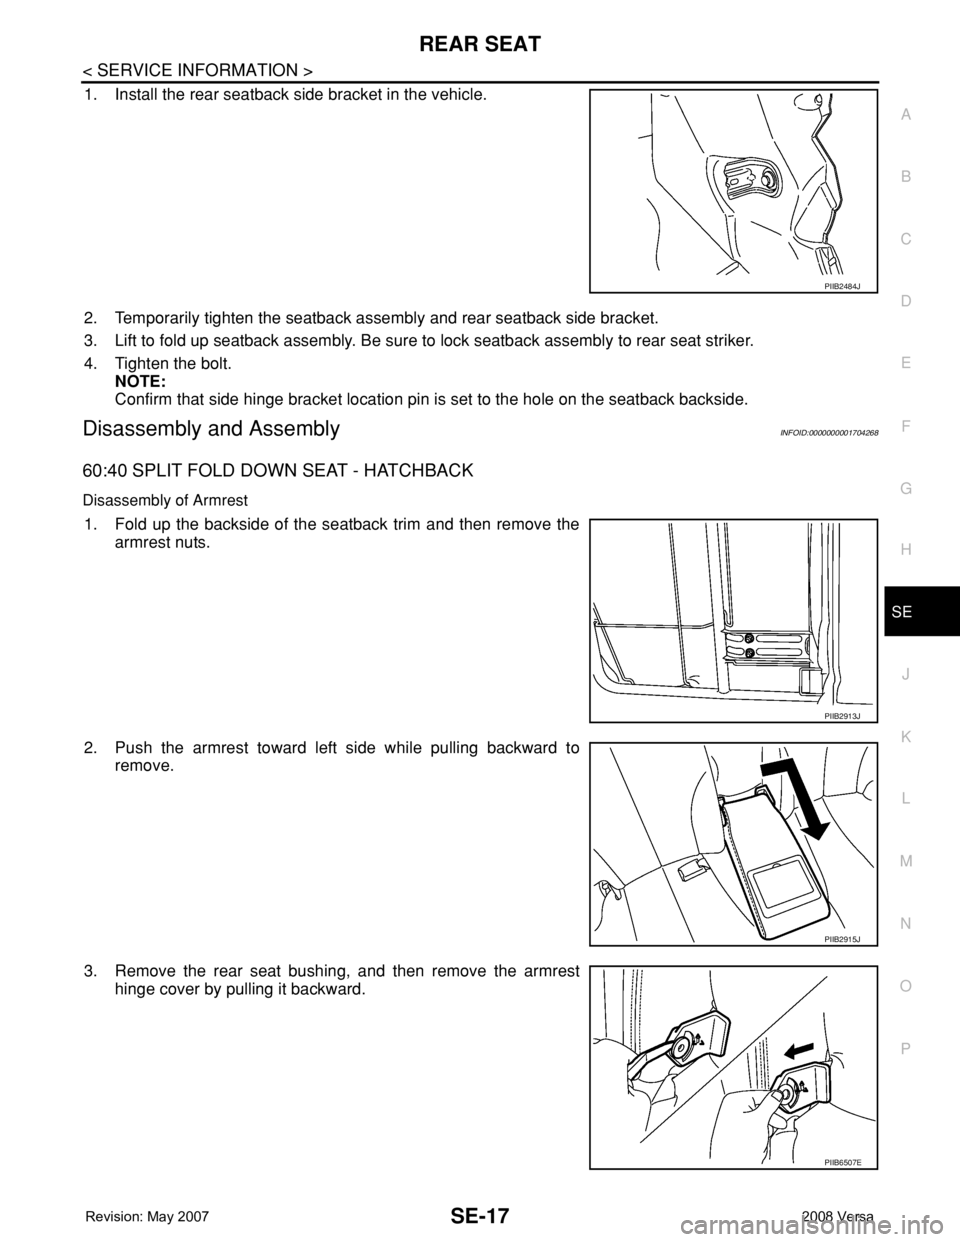
1. Fold up the backside of the seatback trim and then remove the
armrest nuts.
2. Push the armrest toward left side while pulling backward to
remove.
3. Remove the rear seat bushing, and then remove the armrest
hinge cover by pulling it backward.
PIIB2484J
PIIB2913J
PIIB2915J
PIIB6507E
Page 2630 of 2771
SE-22
< SERVICE INFORMATION >
REAR SEAT
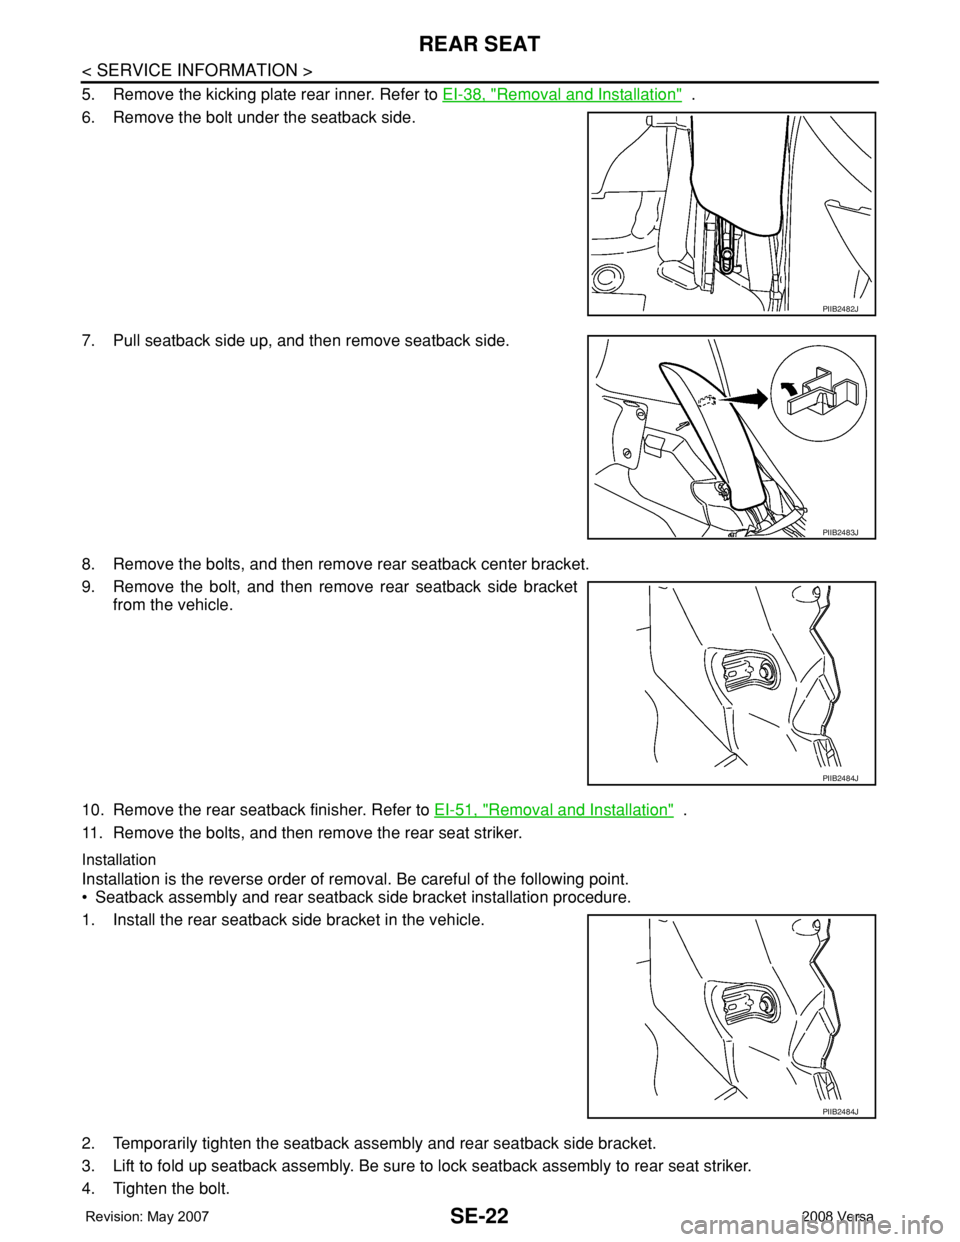
5. Remove the kicking plate rear inner. Refer to EI-38, "Removal and Installation" .
6. Remove the bolt under the seatback side.
7. Pull seatback side up, and then remove seatback side.
8. Remove the bolts, and then remove rear seatback center bracket.
9. Remove the bolt, and then remove rear seatback side bracket
from the vehicle.
10. Remove the rear seatback finisher. Refer to EI-51, "
Removal and Installation" .
11. Remove the bolts, and then remove the rear seat striker.
Installation
Installation is the reverse order of removal. Be careful of the following point.
• Seatback assembly and rear seatback side bracket installation procedure.
1. Install the rear seatback side bracket in the vehicle.
2. Temporarily tighten the seatback assembly and rear seatback side bracket.
3. Lift to fold up seatback assembly. Be sure to lock seatback assembly to rear seat striker.
4. Tighten the bolt.
PIIB2482J
PIIB2483J
PIIB2484J
PIIB2484J
Page 2633 of 2771
REAR SEAT
SE-25
< SERVICE INFORMATION >
C
D
E
F
G
H
J
K
L
MA
B
SE
N
O
P Disassembly of Seat Cushion Trim and Pad
Remove the rings to separate the trim and pad.
Assembly of Seat Cushion Trim and Pad
Assembly is the reverse order of disassembly.
Removal and InstallationINFOID:0000000001704272
CAUTION:
When removing and installing, use shop cloths to protect parts from damage.
FIXED BACK SEAT
Removal
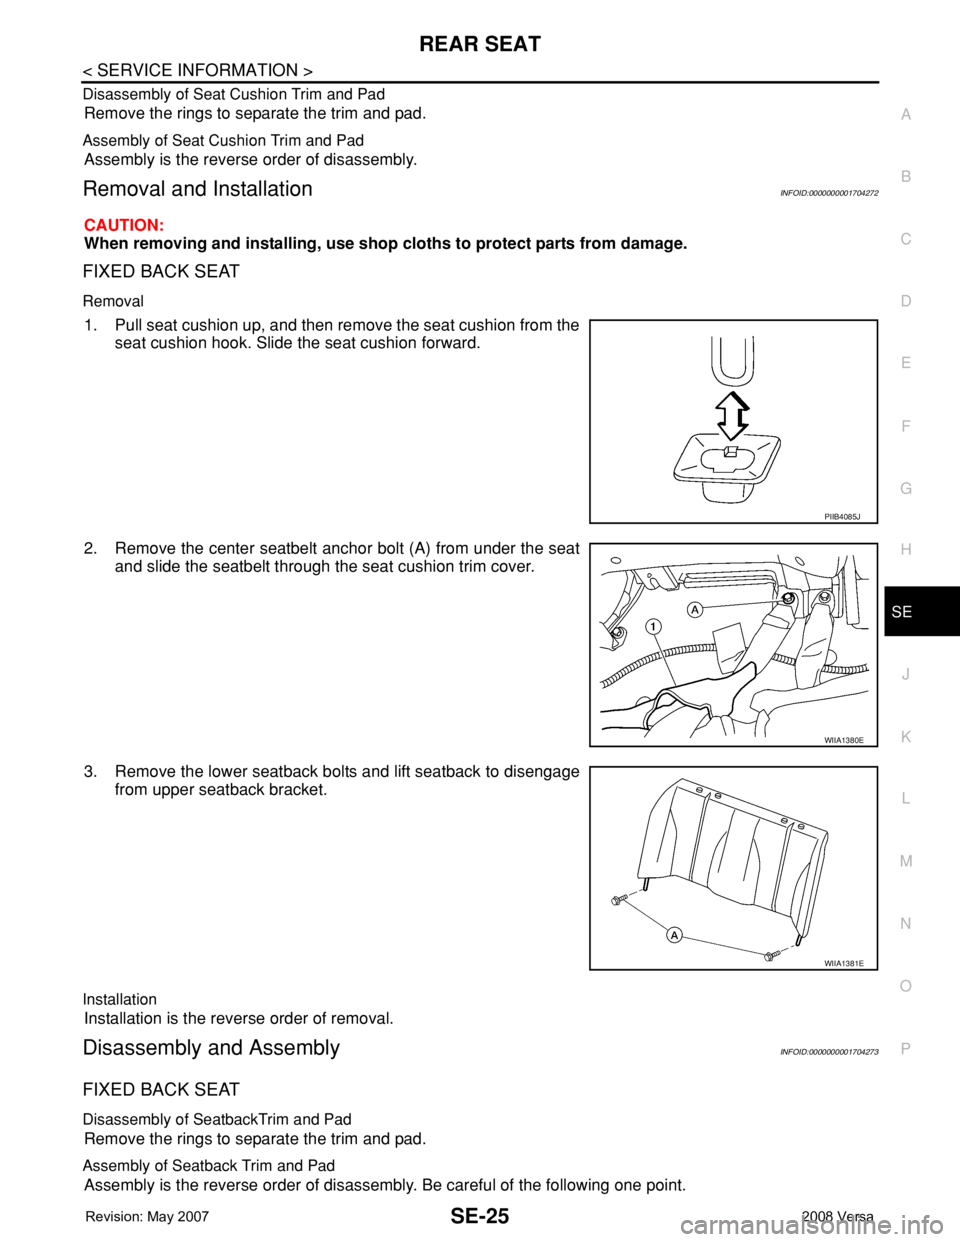
1. Pull seat cushion up, and then remove the seat cushion from the
seat cushion hook. Slide the seat cushion forward.
2. Remove the center seatbelt anchor bolt (A) from under the seat
and slide the seatbelt through the seat cushion trim cover.
3. Remove the lower seatback bolts and lift seatback to disengage
from upper seatback bracket.
Installation
Installation is the reverse order of removal.
Disassembly and AssemblyINFOID:0000000001704273
FIXED BACK SEAT
Disassembly of SeatbackTrim and Pad
Remove the rings to separate the trim and pad.
Assembly of Seatback Trim and Pad
Assembly is the reverse order of disassembly. Be careful of the following one point.
PIIB4085J
WIIA1380E
WIIA1381E