2008 NISSAN LATIO ignition
[x] Cancel search: ignitionPage 2701 of 2771
![NISSAN LATIO 2008 Service Repair Manual STC-18
< SERVICE INFORMATION >[EPS]
TROUBLE DIAGNOSIS FOR SYSTEM
1.PERFORM SELF-DIAGNOSIS
With CONSULT-III
1. Turn ignition switch “ON”. (Do not start engine.)
2. Select “SELF-DIAG RESULTS” mo NISSAN LATIO 2008 Service Repair Manual STC-18
< SERVICE INFORMATION >[EPS]
TROUBLE DIAGNOSIS FOR SYSTEM
1.PERFORM SELF-DIAGNOSIS
With CONSULT-III
1. Turn ignition switch “ON”. (Do not start engine.)
2. Select “SELF-DIAG RESULTS” mo](/manual-img/5/57360/w960_57360-2700.png)
STC-18
< SERVICE INFORMATION >[EPS]
TROUBLE DIAGNOSIS FOR SYSTEM
1.PERFORM SELF-DIAGNOSIS
With CONSULT-III
1. Turn ignition switch “ON”. (Do not start engine.)
2. Select “SELF-DIAG RESULTS” mode for “EPS” with CONSULT-III.
3. Touch “ERASE”.
4. Turn ignition switch “OFF”, and wait at least 10 seconds.
5. Start engine.
6. Perform the self-diagnosis again.
Is the
“CONTROL UNIT [C1608]” displayed?
YES >> Replace EPS control unit. Refer to PS-9, "Removal and Installation".
NO >>INSPECTION END
DTC C1609 CAN VHCL SPEEDINFOID:0000000001703888
CONSULT-III REFERENCE VALUE IN DATA MONITOR MODE
Data are reference value.
* : It is not a malfunction, though it might not be corresponding just after ignition switch is turned ON.
DIAGNOSTIC PROCEDURE
1.CHECK DTC WITH COMBINATION METER
Perform self-diagnosis with combination meter. Refer to DI-13, "
CONSULT-III Function (METER/M&A)" .
Is any malfunction detected by self-diagnosis?
YES >> Check the malfunctioning system.
NO-1 >> With ABS: GO TO 2.
NO-2 >> Without ABS: GO TO 3.
2.CHECK DTC WITH ABS ACTUATOR AND ELECTRIC UNIT (CONTROL UNIT)
Perform self-diagnosis with ABS actuator and electric unit (control unit). Refer to BRC-18, "
CONSULT-III
Function (ABS)" .
Is any malfunction detected by self-diagnosis?
YES >> Check the malfunctioning system.
NO >> GO TO 4.
3.CHECK DTC WITH TRANSMISSON CONTROL MODULE (TCM)
Perform self-diagnosis with TCM. Refer to AT-73, "
CONSULT-III Function (A/T)" .
Is any malfunction detected by self-diagnosis?
YES >> Check the malfunctioning system.
NO >> GO TO 4.
4.CHECK EPS CONTROL UNIT
Check EPS control unit input/output signal. Refer to STC-9, "
EPS Control Unit Input/Output Signal Reference
Va l u e" .
OK or NG
OK >> GO TO 5.
NG >> Check EPS control unit pin terminals for damage or loose connection with harness connector. If
any items are damaged, repair or replace damaged parts.
5.CHECK DTC
Perform the self-diagnosis, after driving the vehicle for a while.
OK or NG
Monitor item (Unit) Content Condition Display value
VEHICLE SPEED (km/h) or (mph) Vehicle speedVehicle stopped 0 km/h (0 mph)
While drivingApproximately equal to the indication on speed-
ometer (Inside of ±10%)
Page 2702 of 2771
![NISSAN LATIO 2008 Service Repair Manual TROUBLE DIAGNOSIS FOR SYSTEM
STC-19
< SERVICE INFORMATION >[EPS]
C
D
E
F
H
I
J
K
L
MA
B
STC
N
O
P
OK >>INSPECTION END
NG >> Perform self-diagnosis with ABS actuator and electric unit (control unit) an NISSAN LATIO 2008 Service Repair Manual TROUBLE DIAGNOSIS FOR SYSTEM
STC-19
< SERVICE INFORMATION >[EPS]
C
D
E
F
H
I
J
K
L
MA
B
STC
N
O
P
OK >>INSPECTION END
NG >> Perform self-diagnosis with ABS actuator and electric unit (control unit) an](/manual-img/5/57360/w960_57360-2701.png)
TROUBLE DIAGNOSIS FOR SYSTEM
STC-19
< SERVICE INFORMATION >[EPS]
C
D
E
F
H
I
J
K
L
MA
B
STC
N
O
P
OK >>INSPECTION END
NG >> Perform self-diagnosis with ABS actuator and electric unit (control unit) and combination meter.
Refer to BRC-18, "
CONSULT-III Function (ABS)" , DI-13, "CONSULT-III Function (METER/M&A)"
.
DTC C1610 CAN ENG RPMINFOID:0000000001703889
CONSULT-III REFERENCE VALUE IN DATA MONITOR MODE
Data are reference value.
DIAGNOSTIC PROCEDURE
1.CHECK DTC WITH ECM
Perform self-diagnosis with ECM. Refer to EC-109, "
CONSULT-II Function (ENGINE)" .
Is any malfunction detected by self-diagnosis?
YES >> Check the malfunctioning system.
NO >> GO TO 2.
2.CHECK EPS CONTROL UNIT
Check EPS control unit input/output signal. Refer to STC-9, "
EPS Control Unit Input/Output Signal Reference
Va l u e" .
OK or NG
OK >> GO TO 3.
NG >> Check EPS control unit pin terminals for damage or loose connection with harness connector. If
any items are damaged, repair or replace damaged parts.
3.CHECK DTC
Perform the self-diagnosis, after driving a vehicle for a while.
OK or NG
OK >>INSPECTION END
NG >> Perform self-diagnosis with ECM again. Refer EC-109, "
CONSULT-II Function (ENGINE)" .
DTC U1000 CAN COMM CIRCUITINFOID:0000000001703890
DIAGNOSTIC PROCEDURE
1.CHECK CAN COMMUNICATION CIRCUIT
With CONSULT-III
1. Turn ignition switch “ON” and start engine.
2. Select “SELF-DIAG RESULTS” mode for “EPS” with CONSULT-III.
3. Perform the self-diagnosis.
Is the
“CAN COMM CIRCUIT [U1000]” displayed?
YES >> Print out CONSULT-III screen and go to LAN-15, "Trouble Diagnosis Flow Chart".
NO >>INSPECTION END
Component InspectionINFOID:0000000001703891
EPS MOTOR
1. Turn ignition switch “OFF”.
2. Disconnect EPS control unit harness connector.
Monitor item (Unit) Content Condition Display value
ENGINE STATUS (RUN/STOP) Engine statusEngine stopped (Engine speed: Less than 400 rpm) STOP
Engine running (Engine speed: 400 rpm or more) RUN
Page 2704 of 2771
![NISSAN LATIO 2008 Service Repair Manual TROUBLE DIAGNOSIS FOR SYMPTOMS
STC-21
< SERVICE INFORMATION >[EPS]
C
D
E
F
H
I
J
K
L
MA
B
STC
N
O
P
TROUBLE DIAGNOSIS FOR SYMPTOMS
EPS Warning Lamp Does Not Turn ONINFOID:0000000001703892
SYMPTOM:
EPS NISSAN LATIO 2008 Service Repair Manual TROUBLE DIAGNOSIS FOR SYMPTOMS
STC-21
< SERVICE INFORMATION >[EPS]
C
D
E
F
H
I
J
K
L
MA
B
STC
N
O
P
TROUBLE DIAGNOSIS FOR SYMPTOMS
EPS Warning Lamp Does Not Turn ONINFOID:0000000001703892
SYMPTOM:
EPS](/manual-img/5/57360/w960_57360-2703.png)
TROUBLE DIAGNOSIS FOR SYMPTOMS
STC-21
< SERVICE INFORMATION >[EPS]
C
D
E
F
H
I
J
K
L
MA
B
STC
N
O
P
TROUBLE DIAGNOSIS FOR SYMPTOMS
EPS Warning Lamp Does Not Turn ONINFOID:0000000001703892
SYMPTOM:
EPS warning lamp does not turn ON when ignition switch to “ON”.
DIAGNOSTIC PROCEDURE
1.CHECK SYSTEM FOR CAN COMMUNICATION LINE
Perform self-diagnosis. Refer to STC-11, "
CONSULT-III Function (EPS)" .
Is the
“CAN COMM CIRCUIT [U1000]” displayed?
YES >> Perform trouble diagnosis for CAN communication line. Refer to STC-19, "DTC U1000 CAN
COMM CIRCUIT" .
NO >> GO TO 2.
2.CHECK EPS CONTROL UNIT
Check EPS control unit input/output signal. Refer to STC-9, "
EPS Control Unit Input/Output Signal Reference
Va l u e" .
OK or NG
OK >> GO TO 3.
NG >> Check EPS control unit pin terminals for damage or loose connection with harness connector. If
any items are damaged, repair or replace damaged parts.
3.SYMPTOM CHECK
Check again.
OK or NG
OK >>INSPECTION END
NG >> Replace combination meter. Refer to DI-20, "
Removal and Installation" .
EPS Warning Lamp Does Not Turn OFFINFOID:0000000001703893
SYMPTOM:
EPS warning lamp does not turn OFF for several seconds after starting the engine.
DIAGNOSTIC PROCEDURE
1.CHECK SELF-DIAGNOSTIC RESULTS
Perform self-diagnosis. Refer to STC-11, "
CONSULT-III Function (EPS)" .
Is any malfunction detected by self-diagnosis?
YES >> Check the malfunctioning system.
NO >> GO TO 2.
2.CHECK EPS CONTROL UNIT POWER SUPPLY CIRCUIT
1. Turn ignition switch “OFF”.
2. Disconnect EPS control unit harness connector.
3. Turn ignition switch “ON”. (Do not start engine.)
4. Check voltage between EPS control unit harness connector (A)
terminals and ground.
Connector Terminal Voltage
M53 10 – Ground Battery voltage
M54 17 – Ground Battery voltage
SGIA1626E
Page 2705 of 2771
![NISSAN LATIO 2008 Service Repair Manual STC-22
< SERVICE INFORMATION >[EPS]
TROUBLE DIAGNOSIS FOR SYMPTOMS
5. Turn ignition switch “OFF”.
6. Check voltage between EPS control unit harness connector (A)
terminals and ground.
7. Connect E NISSAN LATIO 2008 Service Repair Manual STC-22
< SERVICE INFORMATION >[EPS]
TROUBLE DIAGNOSIS FOR SYMPTOMS
5. Turn ignition switch “OFF”.
6. Check voltage between EPS control unit harness connector (A)
terminals and ground.
7. Connect E](/manual-img/5/57360/w960_57360-2704.png)
STC-22
< SERVICE INFORMATION >[EPS]
TROUBLE DIAGNOSIS FOR SYMPTOMS
5. Turn ignition switch “OFF”.
6. Check voltage between EPS control unit harness connector (A)
terminals and ground.
7. Connect EPS control unit harness connector.
OK or NG
OK >> GO TO 3.
NG >> Check the following. If any items are damaged, repair or replace damaged parts.
• 60 A fusible link (No. m, located in the fuse and fusible link block). Refer to PG-3
.
• 10 A fuse [No. 2, located in the fuse block (J/B)]. Refer to PG-3
.
• Harness for short or open between battery and EPS control unit harness connector M54 termi-
nal 17.
• Harness for short or open between ignition switch and EPS control unit harness connector M53
terminal 10.
3.CHECK EPS CONTROL UNIT GROUND CIRCUIT
1. Turn ignition switch “OFF”.
2. Disconnect EPS control unit harness connector.
3. Check continuity between EPS control unit harness connector
(A) terminal and ground.
Also check harness for short to power.
4. Connect EPS control unit harness connector.
OK or NG
OK >> GO TO 4.
NG >> Repair open circuit or short to ground or short to power
in harness or connectors.
4.CHECK EPS CONTROL UNIT
Check EPS control unit input/output signal. Refer to STC-9, "
EPS Control Unit Input/Output Signal Reference
Va l u e" .
OK or NG
OK >> GO TO 5.
NG >> Check EPS control unit pin terminals for damage or loose connection with harness connector. If
any items are damaged, repair or replace damaged parts.
5.SYMPTOM CHECK
Check again.
OK or NG
OK >>INSPECTION END
NG >> Replace combination meter. Refer to DI-20, "
Removal and Installation" .
Steering Wheel Turning Force Is Heavy or LightINFOID:0000000001703894
SYMPTOM:
Steering wheel turning force is heavy or light, while driving.
DIAGNOSTIC PROCEDURE
1.CHECK SYSTEM FOR CAN COMMUNICATION LINE
Perform self-diagnosis. Refer to STC-11, "
CONSULT-III Function (EPS)" .
Connector Terminal Voltage
M53 10 – Ground Approx. 0 V
M54 17 – Ground Battery voltage
SGIA1627E
Connector Terminal Continuity
M54 18 YES
SGIA1628E
Page 2709 of 2771

WT-1
SUSPENSION
C
D
F
G
H
I
J
K
L
M
SECTION WT
A
B
WT
N
O
PCONTENTS
ROAD WHEELS & TIRES
SERVICE INFORMATION ............................2
PRECAUTIONS ...................................................2
Precaution for Supplemental Restraint System
(SRS) "AIR BAG" and "SEAT BELT PRE-TEN-
SIONER" ...................................................................
2
PREPARATION ...................................................3
Special Service Tool .................................................3
Commercial Service Tool ..........................................3
NOISE, VIBRATION AND HARSHNESS
(NVH) TROUBLESHOOTING .............................
4
NVH Troubleshooting Chart ......................................4
ROAD WHEEL ....................................................5
Inspection ..................................................................5
ROAD WHEEL TIRE ASSEMBLY ......................6
Balancing Wheels .....................................................6
Rotation .....................................................................6
TIRE PRESSURE MONITORING SYSTEM ........7
System Component ...................................................7
System Description ...................................................7
CAN COMMUNICATION .....................................9
System Description ...................................................9
TROUBLE DIAGNOSES ....................................10
Wiring Diagram- T/WARN - .....................................10
Terminal and Reference Value for BCM .................10
ID Registration Procedure .......................................11
Transmitter Wake Up Operation .............................12
CONSULT-III Function (BCM) .................................12
How to Perform Trouble Diagnosis for Quick and
Accurate Repair .......................................................
13
Preliminary Check ...................................................14
Self-Diagnosis .........................................................15
Flash Code/Symptom Chart ....................................16
TROUBLE DIAGNOSIS FOR SELF-DIAG-
NOSTIC ITEMS .................................................
18
Data from Transmitter Not Being Received .............18
Transmitter Malfunction ...........................................18
Transmitter Pressure Malfunction ............................19
Vehicle Speed Signal ..............................................19
TROUBLE DIAGNOSIS FOR SYMPTOMS ......20
Low Tire Pressure Warning Lamp Does Not Come
On When Ignition Switch Is Turned On ...................
20
Low Tire Pressure Warning Lamp Stays On When
Ignition Switch Is Turned On ...................................
20
Low Tire Pressure Warning Lamp Flashes When
Ignition Switch Is Turned On ...................................
21
Hazard Warning Lamps Flash When Ignition
Switch Is Turned On ................................................
22
ID Registration Cannot Be Completed ....................22
REMOVAL AND INSTALLATION .....................23
Transmitter (Pressure Sensor) ................................23
SERVICE DATA AND SPECIFICATIONS
(SDS) .................................................................
25
Road Wheel .............................................................25
Tire ..........................................................................25
Page 2715 of 2771

TIRE PRESSURE MONITORING SYSTEM
WT-7
< SERVICE INFORMATION >
C
D
F
G
H
I
J
K
L
MA
B
WT
N
O
P
TIRE PRESSURE MONITORING SYSTEM
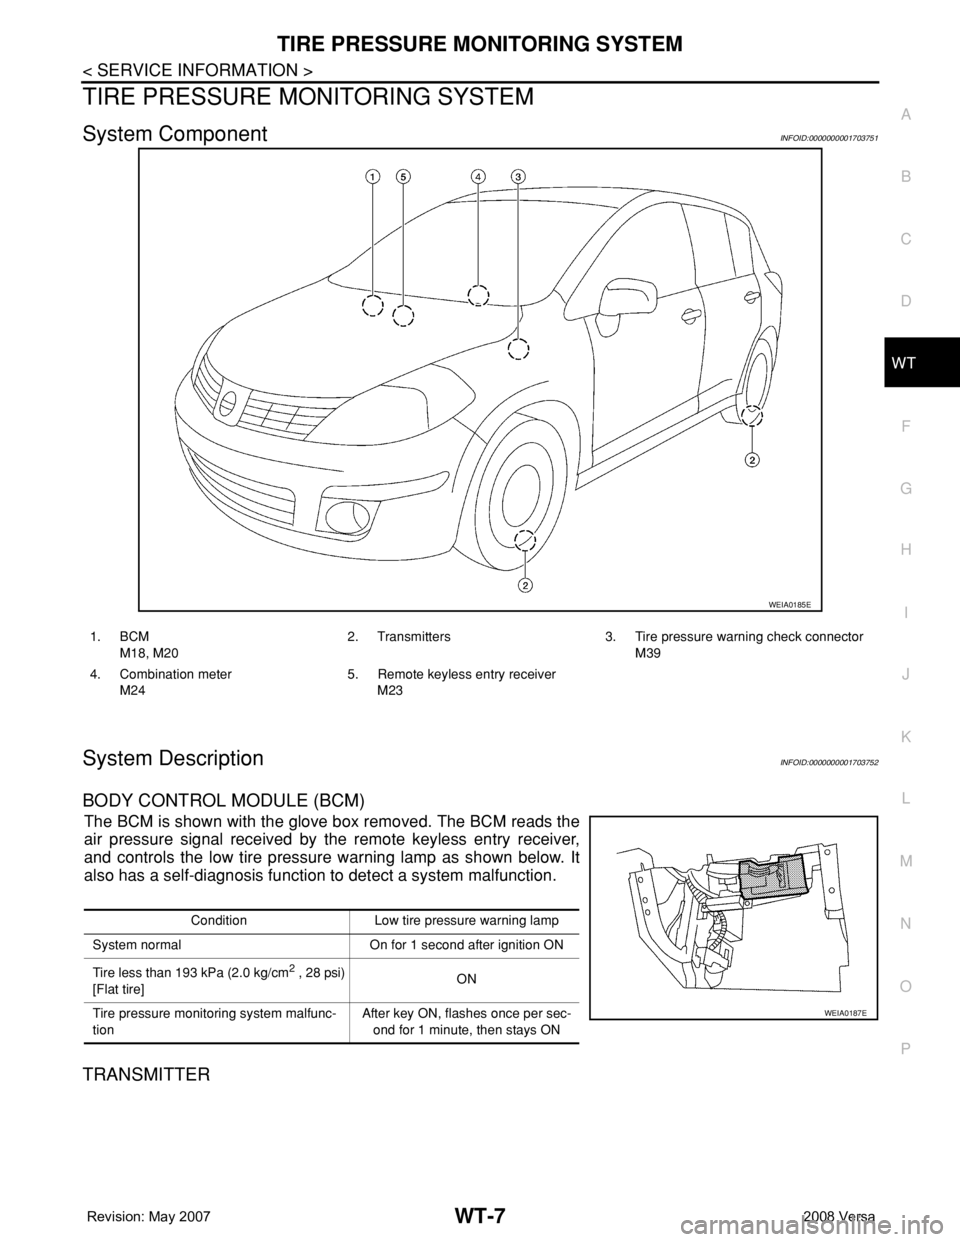
System ComponentINFOID:0000000001703751
System DescriptionINFOID:0000000001703752
BODY CONTROL MODULE (BCM)
The BCM is shown with the glove box removed. The BCM reads the
air pressure signal received by the remote keyless entry receiver,
and controls the low tire pressure warning lamp as shown below. It
also has a self-diagnosis function to detect a system malfunction.
TRANSMITTER
WEIA0185E
1. BCM
M18, M202. Transmitters 3. Tire pressure warning check connector
M39
4. Combination meter
M245. Remote keyless entry receiver
M23
Condition Low tire pressure warning lamp
System normal On for 1 second after ignition ON
Tire less than 193 kPa (2.0 kg/cm
2 , 28 psi)
[Flat tire]ON
Tire pressure monitoring system malfunc-
tionAfter key ON, flashes once per sec-
ond for 1 minute, then stays ON
WEIA0187E
Page 2720 of 2771

WT-12
< SERVICE INFORMATION >
TROUBLE DIAGNOSES
6. Inflate all tires to proper pressure. Refer to WT-25, "Tire" .
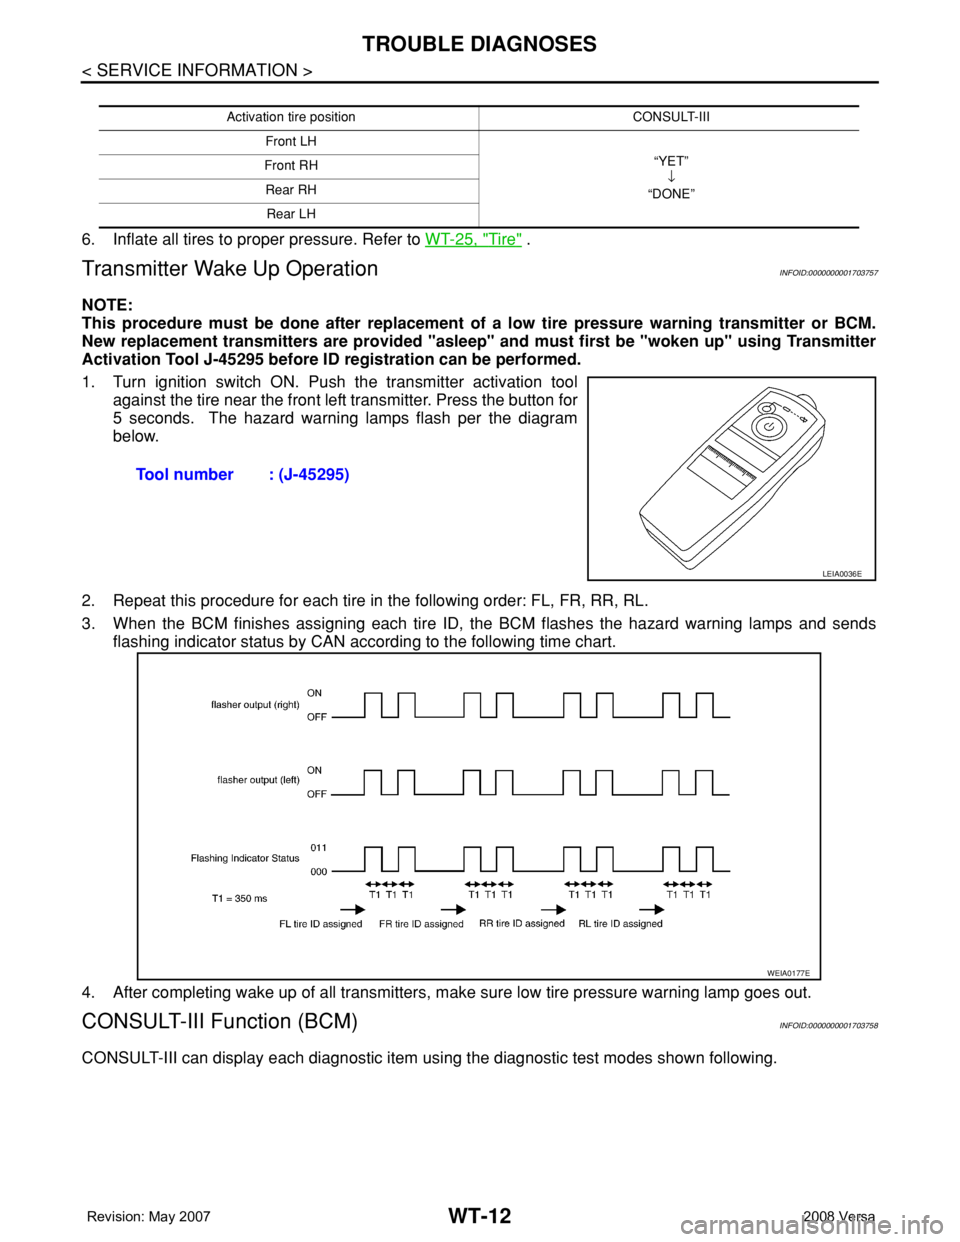
Transmitter Wake Up OperationINFOID:0000000001703757
NOTE:
This procedure must be done after replacement of a low tire pressure warning transmitter or BCM.
New replacement transmitters are provided "asleep" and must first be "woken up" using Transmitter
Activation Tool J-45295 before ID registration can be performed.
1. Turn ignition switch ON. Push the transmitter activation tool
against the tire near the front left transmitter. Press the button for
5 seconds. The hazard warning lamps flash per the diagram
below.
2. Repeat this procedure for each tire in the following order: FL, FR, RR, RL.
3. When the BCM finishes assigning each tire ID, the BCM flashes the hazard warning lamps and sends
flashing indicator status by CAN according to the following time chart.
4. After completing wake up of all transmitters, make sure low tire pressure warning lamp goes out.
CONSULT-III Function (BCM)INFOID:0000000001703758
CONSULT-III can display each diagnostic item using the diagnostic test modes shown following.
Activation tire position CONSULT-III
Front LH
“YET”
↓
“DONE” Front RH
Rear RH
Rear LH
Tool number : (J-45295)
LEIA0036E
WEIA0177E
Page 2722 of 2771

WT-14
< SERVICE INFORMATION >
TROUBLE DIAGNOSES
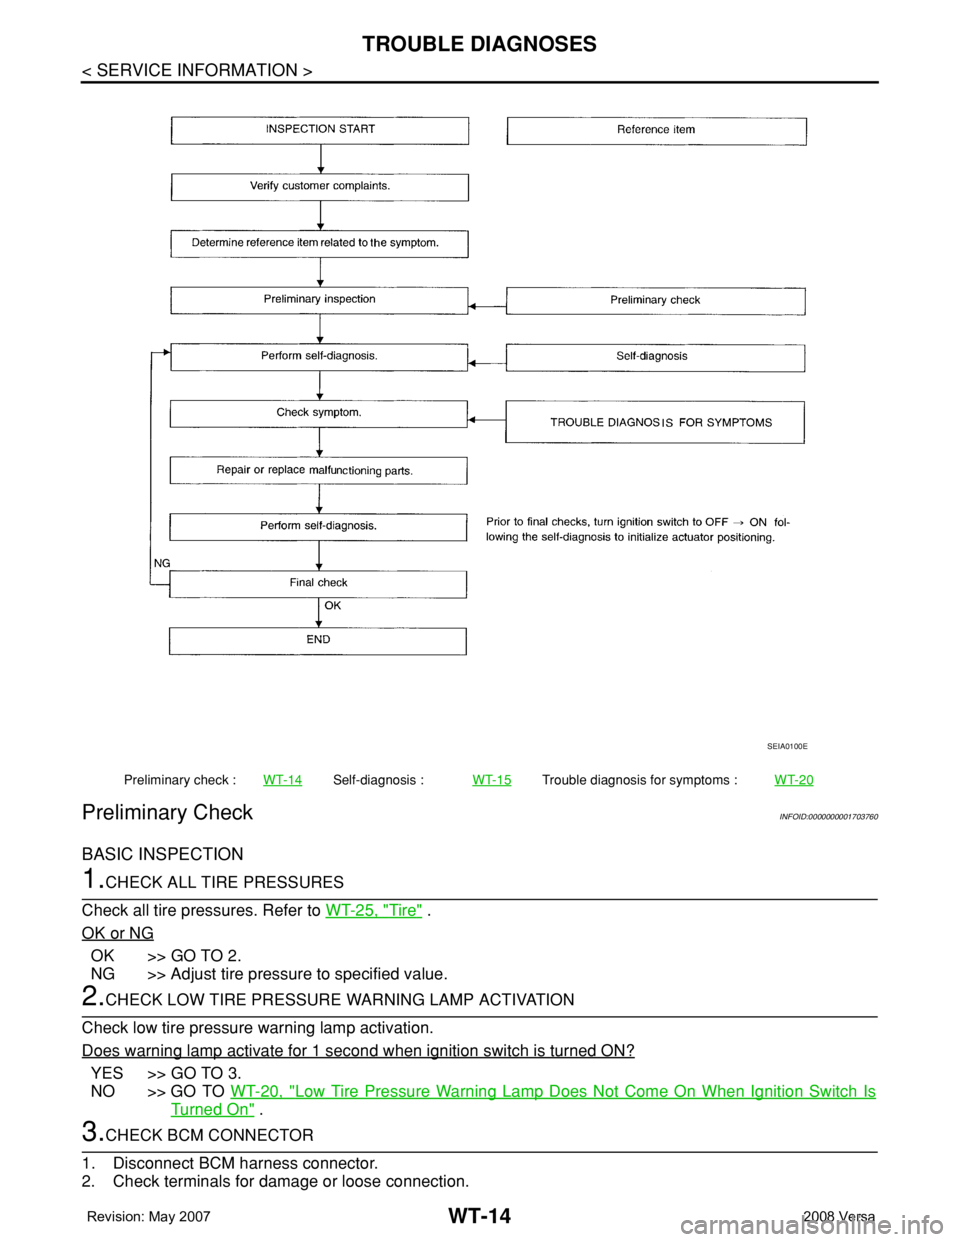
Preliminary Check
INFOID:0000000001703760
BASIC INSPECTION
1.CHECK ALL TIRE PRESSURES
Check all tire pressures. Refer to WT-25, "
Tire" .
OK or NG
OK >> GO TO 2.
NG >> Adjust tire pressure to specified value.
2.CHECK LOW TIRE PRESSURE WARNING LAMP ACTIVATION
Check low tire pressure warning lamp activation.
Does warning lamp activate for 1 second when ignition switch is turned ON?
YES >> GO TO 3.
NO >> GO TO WT-20, "
Low Tire Pressure Warning Lamp Does Not Come On When Ignition Switch Is
Turned On" .
3.CHECK BCM CONNECTOR
1. Disconnect BCM harness connector.
2. Check terminals for damage or loose connection.
Preliminary check :WT-14Self-diagnosis :WT-15Trouble diagnosis for symptoms :WT-20
SEIA0100E