Page 46 of 176
44
SEAT ADJUSTMENT HEAD RESTRAINTS Lumbar support*You can adjust the contour of the backrest
for additional support in the curvature of
your spine's lumbar region. The upper hips
and spinal column receive supplementary
support to help you maintain a relaxed,
upright posture.
Turn the wheel. The curvature is increased or decreased.
Backrest tilt 1. Pull up the lever at the inside of the seat
2. Apply weight to or remove weight from
the backrest as required
3. Release the lever so that the backrest
locks into place.
AdjustingUpward: pull the head restraint
Downward: press the button, see arrow 1,
and push the head restraint downward.
A correctly adjusted head restraint reduces
the risk of injury to the cervical spine in the
event of an accident.
Page 47 of 176

45
OVERVIEW REPAIRS OPERATIONCONTROLS DATA INDEX
HEAD RESTRAINTS ENTRY TO THE REAR
Adjust the head restraint in such a
way that it is centered roughly at ear
level. Otherwise, there is an increased risk
of injury in the event of an accident.
To avoid possible violation of traffic laws,
never retract the head restraints unless the
rear seats are empty. Always ensure that
the head restraints are raised before trans-
porting passengers in the rear seat.<
Removal1. Pull up the head restraint as far as it will
go
2. Press the button, see arrow 1, while pull-
ing the head restraint all the way out.Installation1. Insert the head restraint into the guides
2. Adjust the head restraint.
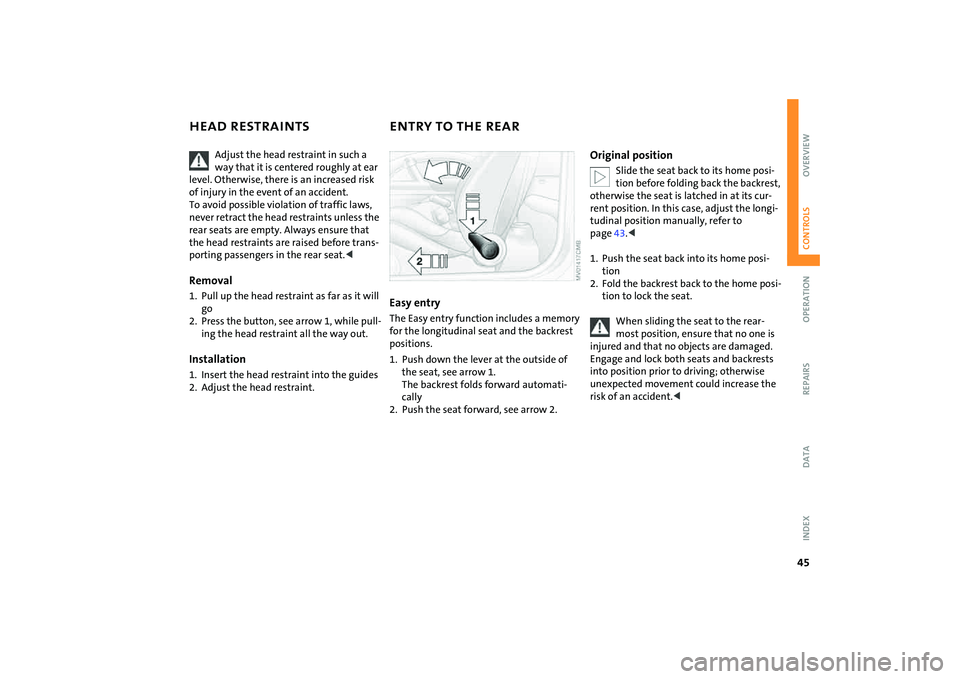
Easy entryThe Easy entry function includes a memory
for the longitudinal seat and the backrest
positions.
1. Push down the lever at the outside of
the seat, see arrow 1.
The backrest folds forward automati-
cally
2. Push the seat forward, see arrow 2.
Original position
Slide the seat back to its home posi-
tion before folding back the backrest,
otherwise the seat is latched in at its cur-
rent position. In this case, adjust the longi-
tudinal position manually, refer to
page43.<
1. Push the seat back into its home posi-
tion
2. Fold the backrest back to the home posi-
tion to lock the seat.
When sliding the seat to the rear-
most position, ensure that no one is
injured and that no objects are damaged.
Engage and lock both seats and backrests
into position prior to driving; otherwise
unexpected movement could increase the
risk of an accident.<
Page 48 of 176

46
SAFETY BELTS
Comply with the instructions on
page42, or the occupants' personal
safety will be diminished.<
Make sure every occupant fastens his or
her safety belt. Airbags are an additional
safety device and work in conjunction with
the safety belts, but do not replace them.
To closeMake sure you hear the lock engage in the
belt buckle.
Safety belt reminder for the front seats
The indicator lamp flashes or lights
up. A signal also sounds. Check if
the safety belts have been properly
fastened.
The safety belt reminder is operational
above a speed of approx. 5 mph / 8 km/h.
The reminder can also occur if objects are
on the front passenger seat.
To release1. Press the red button in the belt buckle
2. Hold the belt
3. Guide the belt back into its reel.
Safety belt height adjustment in the
MINIPress the button and at the same time push
the entire unit upwards or downwards.
Also observe the instructions on adjusting
the seats on page42.Safety belt height in the MINI
ConvertibleThe seat belt height is adapted to your
body size if you are sitting correctly.
Page 49 of 176
47
OVERVIEW REPAIRS OPERATIONCONTROLS DATA INDEX
SAFETY BELTS SEAT HEATING
* STEERING WHEEL
Damaged safety belts
If the safety belts are stressed or
damaged due to an accident: have
the belt system, including the seat-belt
tensioners, replaced and the belt anchor-
ages inspected. Have the necessary work
carried out only by a MINI Dealer or a work-
shop that has specially trained personnel
working in accordance with the specifica-
tions of the MINI manufacturer, otherwise
correct operation of these safety systems is
not ensured.<
Press once for each temperature level.
The highest preselected temperature is set
when two LEDs are lit.
To switch off:
Press the button for a longer period.
Do not adjust the steering wheel
while the vehicle is moving; other-
wise unexpected movement could increase
the accident risk.<
Settings1. Push the locking lever downward
2. Adjust the desired steering wheel posi-
tion
3. Pull the lever back in.
Page 51 of 176

49
OVERVIEW REPAIRS OPERATIONCONTROLS DATA INDEX
VEHICLE MEMORYHow the system functionsNo doubt you have often reflected on how
great it would be if you could configure
your vehicle's various adjustment settings
to meet your own personal requirements.
In developing this vehicle, the manufac-
turer of the MINI has incorporated a num-
ber of options which can be programmed
specifically for your vehicle.What the system can doYour MINI Dealer can provide you with
details on the capabilities of the Vehicle
Memory system.
Examples for Vehicle Memory:
>Automatic locking if none of the vehicle
doors are opened, refer to page26
>Automatic locking after starting to drive,
refer to page28
>Selective central locking system, refer to
pages26, 27
>Convenience operation, refer to
pages26, 27
>Pathway lighting, refer to page60
>Daytime running lamps, refer to page61
>Speed-dependent windshield wipers,
refer to page63
>Setting units for outside temperature
and fuel consumption display, refer to
page70>Setting units for display of temperatures
specified for automatic climate control
system, refer to page87
>Volume control PDC, refer to page81
>Acoustic alarm for starting PDC activa-
tion, refer to page81.
This symbol alerts you to Vehicle
Memory functions in the Owner's
Manual.<
After memory functions have been
reconfigured, your vehicle may oper-
ate slightly differently from the descrip-
tions used in this Owner's Manual. If you
decide to sell your vehicle one day, please
remember to have the memory functions
reset to their default configuration.<
Page 53 of 176

51
OVERVIEW REPAIRS OPERATIONCONTROLS DATA INDEX
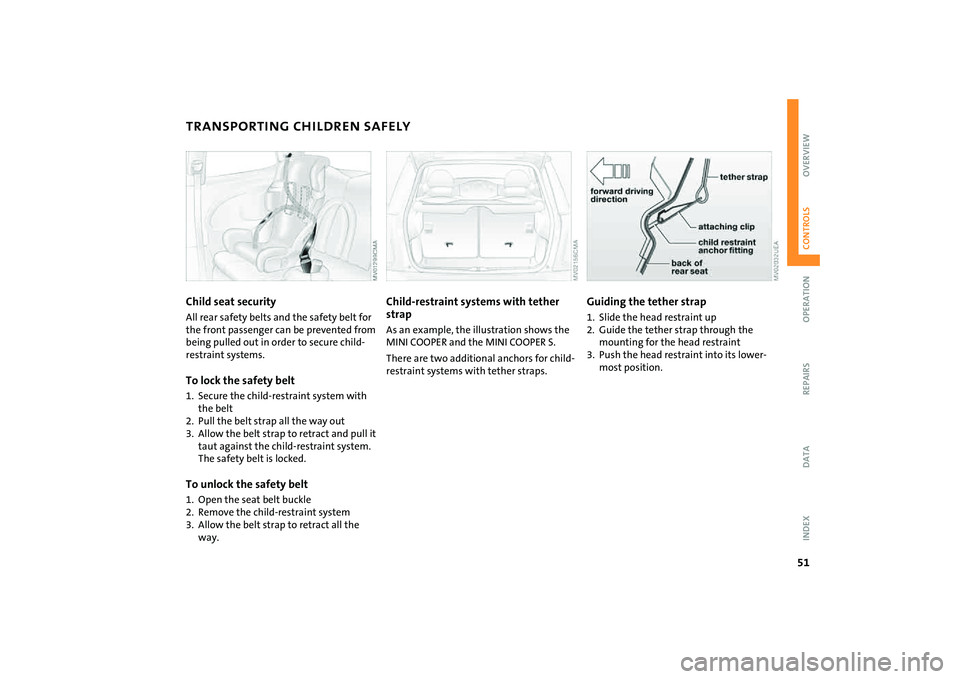
TRANSPORTING CHILDREN SAFELYChild seat securityAll rear safety belts and the safety belt for
the front passenger can be prevented from
being pulled out in order to secure child-
restraint systems.To lock the safety belt1. Secure the child-restraint system with
the belt
2. Pull the belt strap all the way out
3. Allow the belt strap to retract and pull it
taut against the child-restraint system.
The safety belt is locked.To unlock the safety belt1. Open the seat belt buckle
2. Remove the child-restraint system
3. Allow the belt strap to retract all the
way.
Child-restraint systems with tether
strapAs an example, the illustration shows the
MINI COOPER and the MINI COOPER S.
There are two additional anchors for child-
restraint systems with tether straps.
Guiding the tether strap1. Slide the head restraint up
2. Guide the tether strap through the
mounting for the head restraint
3. Push the head restraint into its lower-
most position.
Page 55 of 176

53
OVERVIEW REPAIRS OPERATIONCONTROLS DATA INDEX
IGNITION LOCK STARTING THE ENGINE0 Steering locked
1 Steering unlocked
2 Ignition switched on
3 Starting the engineSteering lockedThe key can be inserted or removed in this
position only.
To lock the steering:
1. Remove the key
2. Turn the steering wheel slightly to the
left or right until the lock engages.
An alarm goes off if the key remains in the
ignition after opening the driver's door.
Interlock for automatic transmission with
Steptronic:
To turn the key back to the 0 position or to
remove it, first move the selector lever to
position P.Steering unlockedIndividual electrical accessories are ready
for operation.
You will find that it is often easier to turn
the ignition key from position 0 to
position 1 when you move the steering
wheel slightly to help disengage the lock.Ignition switched onAll electrical accessories are ready for oper-
ation.Starting the engine
Vehicles with manual transmission:
step on the clutch when starting the
vehicle. A lockout prevents the engine from
starting if the clutch is not depressed.<
Do not allow the engine to run in
enclosed spaces. Breathing the nox-
ious exhaust gases can lead to uncon-
sciousness and death. The exhaust gases
contain carbon monoxide, an odorless and
colorless, but highly toxic gas.
Do not leave the vehicle unattended with
the engine running. This is a safety hazard.
Before getting out of the vehicle with the
engine running, put the transmission in
idle or position P, and apply the parking
brake. If you fail to do this, the vehicle
could move.<
Do not let the engine warm up with the
vehicle at a standstill. Move off immedi-
ately at a moderate engine speed.
Do not stop the starting procedure
too early, and do not continue it for
more than approx. 20 seconds. Release the
ignition key immediately when the engine
starts.
Extended starting attempts, characterized
by excessively frequent or long periods
with the starter engaged, can lead to dam-
age in the catalytic converter.<
Page 56 of 176

54
STARTING THE ENGINE SWITCHING OFF THE ENGINE PARKING BRAKEManual transmission1. Engage the parking brake
2. Gearshift lever in idle position
3. Depress the clutch
4. Start the engine.Automatic transmission with
Steptronic1. Press the footbrake
2. Put the selector lever in position P or N
3. Start the engine.Special starting conditionsIn the following situations, depress the
accelerator pedal halfway and continue
starting the engine for up to approx.
10 seconds:
>If the engine does not start on the first
attempt, for instance if the engine is very
hot or cold.
>The engine is started at very low temper-
atures, below approx. +57/–156, at
high altitudes above 3,300 ft/1000 m.You should never remove the ignition
key when the vehicle is in motion, as
the steering lock could engage.
When you leave the vehicle, always remove
the ignition key and engage the steering
lock.
When parking on inclines, engage the park-
ing brake, or the vehicle could roll.<
Manual transmissionTurn the ignition key to position 1 or 0.Automatic transmission with
SteptronicEngage selector lever position P, turn the
ignition key to position 1 or 0.
The parking brake is designed primarily to
prevent the vehicle from rolling when it is
parked. It operates against the rear wheels.To engageLever automatically locks in position.
The indicator lamp in the instrument clus-
ter lights up from ignition key position 2,
refer to page17.To release1. Pull up slightly
2. Press the button
3. Push the lever downwards.
If, in exceptional circumstances, it
should be necessary to engage the
parking brake while the vehicle is in
motion, do not pull the lever with excessive