Page 108 of 176

106
REFUELINGThis gasoline is highly recommended.
However, you may also use gasoline with
less AKI. The minimum AKI rating is 87.
If you use gasoline with this minimum AKI
rating, the engine may produce knocking
sounds when starting at high outside tem-
peratures. This has no effect on the engine
life.Use high-quality brandsField experience has indicated significant
differences in fuel quality: volatility, com-
position, additives, etc., among gasolines
offered for sale in the United States and
Canada. Fuels containing up to and includ-
ing 10 % ethanol or other oxygenates with
up to 2.8 % oxygen by weight, that is, 15 %
MTBE or 3 % methanol plus an equivalent
amount of co-solvent, will not void the
applicable warranties with respect to
defects in materials or workmanship.
The use of poor-quality fuels may
result in driveability, starting and
stalling problems especially under certain
environmental conditions such as high
ambient temperature and high altitude.
Should you encounter driveability prob-
lems which you suspect could be related to
the fuel you are using, we recommend that
you respond by switching to a recognized
high-quality brand such as gasoline that is
advertised as Top Tier Detergent Gasoline.
Failure to comply with these recommenda-
tions may result in unscheduled mainte-
nance.<
Manual release with the MINIIn the event of an electrical malfunction,
the fuel filler door can be unlocked manu-
ally.
1. Remove the side trim panel on the left-
hand side of the luggage compartment
2. Pull the white lever toward the rear.
The fuel filler door is released
3. Open the fuel filler door.
Page 109 of 176
107
OVERVIEW REPAIRSOPERATIONCONTROLS DATA INDEX
REFUELINGManual release with the MINI
ConvertibleIn the event of an electrical malfunction,
the fuel filler door can be unlocked manu-
ally.
1. Remove the cover of the side trim panel
on the left-hand side, see arrow 1
2. Pull the green strap toward the rear, see
arrow 2.
The fuel filler door is released
3. Open the fuel filler door.
Page 120 of 176
118
BONNET
Do not attempt to service your vehi-
cle if you do not have the required
technical background. If you are not famil-
iar with the regulations to be observed,
have the necessary work on your vehicle
carried out only by a MINI Dealer or a work-
shop that has specially trained personnel
working in accordance with the specifica-
tions of the MINI manufacturer.
Work that is improperly carried out could
result in consequential damage and pose
safety hazards.<
To unlockPull the lever in the right door area beneath
the instrument panel.
To open1. Reach under the bonnet
2. Pull the release lever
3. Open the bonnet.To closeAllow the bonnet to fall from a height of
approx. 1 ft/30 cm.
Make sure that the closing range of
the bonnet is unobstructed, other-
wise personal injury could result.
If it is determined that the bonnet is not
completely closed while driving, stop
immediately and close it securely, also refer
to page17.<
Page 125 of 176

123
OVERVIEW REPAIRSOPERATIONCONTROLS DATA INDEX
COOLANTAs an example, the illustration shows the
coolant tank of the MINI COOPER and the
MINI COOPER Convertible.Checking coolant level 1. The engine must be at ambient temper-
ature
2. MINI COOPER and MINI COOPER Con-
vertible:
Slowly pull the cap of the expansion
tank by the tab until the excess pressure
can escape. Then remove the cap com-
pletely.
MINI COOPER S and MINI COOPER S Con-
vertible:
Slightly unscrew the cap of the expan-
sion tank counterclockwise until the
excess pressure can escape. Then
remove the cap completely
3. The coolant level is correct if it is
between the MIN and MAX markings on
the transparent expansion tank
4. If necessary, slowly add coolant until the
correct level is reached; do not overfill
5. MINI COOPER and MINI COOPER Con-
vertible:
Reattach the cap and press it down
firmly
MINI COOPER S and MINI COOPER S Con-
vertible:
Screw the cap back on and tighten it
firmly
6. Have the cause of the coolant loss
removed as soon as possible.
Page 139 of 176

137
OVERVIEW REPAIRSOPERATION CONTROLS DATA INDEX
REPAIRING A FLAT TIRE SPACE-SAVER SPARE TIRE
*
Safety measures in the event of a
flat:
Park the vehicle as far away from flowing
traffic as possible, and switch on the haz-
ard warning flashers.
Turn the steering wheel to the straight-
ahead wheel position and engage the
steering lock. Engage the parking brake and
shift into 1st or reverse gear – selector lever
in P.
All passengers should be outside the vehi-
cle and well away from your immediate
working area – behind a guardrail, for
instance.
If a portable hazard warning lamp is avail-
able, set it up on the roadside at an appro-
priate distance from the rear of the vehicle.
Comply with all safety guidelines and regu-
lations.<
In the event of a flat tire, different proce-
dures should be followed depending on the
equipment included in your vehicle:
>Vehicles with Run-Flat Tires, refer to
page115
>Vehicles with a space-saver spare tire,
refer to the following section
>Vehicles with MINI Mobility System,
refer to page141.
To change a space-saver spare tire, proceed
as follows:
>Remove space-saver spare tire, refer to
the section after the next one
>Prepare for tire change, refer to page139
>Jack up the vehicle, refer to page140
>Mount the space-saver spare tire, refer
to page140
>Tighten the lug bolts, refer to page140
>Drive with space-saver spare tire, refer to
page139.
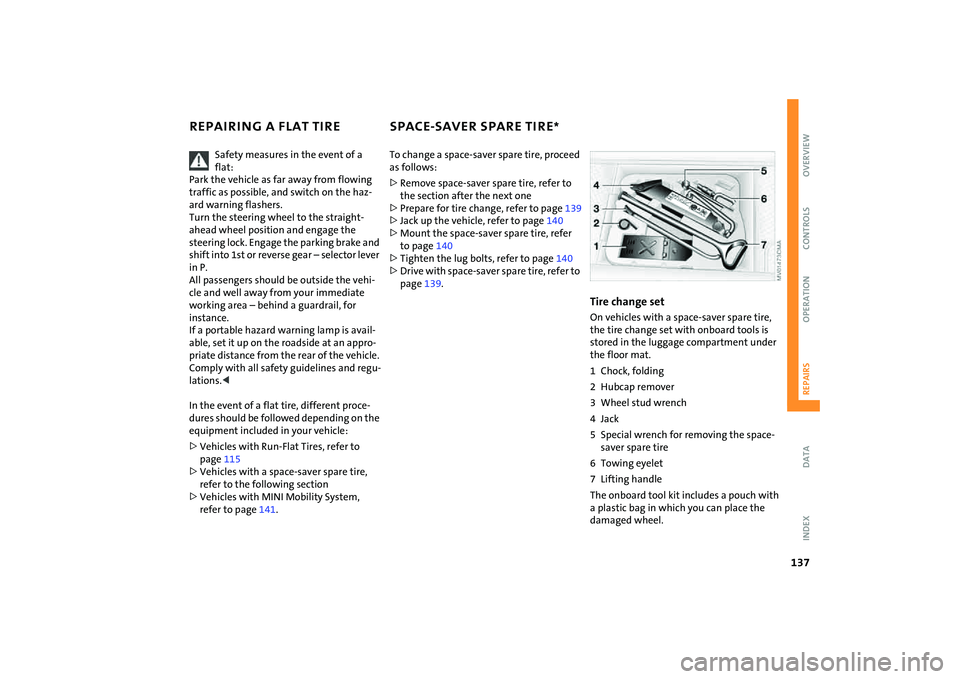
Tire change setOn vehicles with a space-saver spare tire,
the tire change set with onboard tools is
stored in the luggage compartment under
the floor mat.
1 Chock, folding
2 Hubcap remover
3 Wheel stud wrench
4Jack
5 Special wrench for removing the space-
saver spare tire
6 Towing eyelet
7 Lifting handle
The onboard tool kit includes a pouch with
a plastic bag in which you can place the
damaged wheel.
Page 141 of 176

139
OVERVIEW REPAIRSOPERATION CONTROLS DATA INDEX
SPACE-SAVER SPARE TIRE
*
CHANGING TIRES
9. Pull out the space-saver spare tire
towards the rear underneath the vehi-
cle
10. Position the space-saver spare tire with
the valve facing upwards
11. Unscrew the valve extension from the
valve of the space-saver spare tire
12. Unscrew the dust cap from the exten-
sion and place it on the valve of the
space-saver spare tire.
Due to its different dimensions, the
damaged wheel cannot be placed in
the recess for the space-saver spare tire.<
Driving with the space-saver spare tireDrive cautiously. Do not exceed a speed of
50 mph / 80 km/h.
You must expect changes in vehicle han-
dling such as lower track stability during
braking, longer braking distances and
changes in self-steering properties when
close to the handling limit. These effects
are more pronounced when driving with
winter tires.
Only one space-saver spare tire may
be mounted at one time. Reinstall a
wheel and tire of the original size as soon
as possible.<
Check the tire inflation pressure at
the earliest opportunity and correct it
if necessary. Replace the defective tire as
soon as possible and have the new wheel/
tire assembly balanced.<
Additional safety measures in the
event of a tire change:
Change tires only on a flat, solid and non-
slippery surface.
The vehicle or the jack could slip sideways
on soft or slippery support surfaces, such as
snow, ice, flagstones, etc..
Do not use a wooden block or similar object
as a support base for the jack, as this would
prevent it from extending to its full support
height and reduce its load-carrying capac-
ity.
Do not lie under the vehicle or start the
engine when the vehicle is supported by
the jack – risk of fatal injury.<
Preparing for a tire change
Observe the safety precautions
regarding flat tires on page137.<
1. For vehicles with a space-saver spare
tire:
Place the folding chock behind the front
wheel on the other side of the vehicle;
on downward inclines, place it in front of
this wheel. If the wheel is changed on a
surface with a more severe slope, take
additional precautions to secure the
vehicle from rolling
2. Loosen the lug bolts by a half turn.
Page 143 of 176

141
OVERVIEW REPAIRSOPERATION CONTROLS DATA INDEX
MINI MOBILITY SYSTEM
*
MINI Mobility System
The MINI Mobility System is provided to
help you repair a flat tire. With the help of
this system you can apply a liquid sealant
on the inside of the tire, which seals the
damaged area and enables you to continue
to drive.Preparing for tire repair
Before using the MINI Mobility Sys-
tem read the warning and danger
precautions on the equipment.<
If possible, leave objects in which have
been forced into the tire.
Take off the tag regarding speed limits and
stick it onto the steering wheel.
Using the MINI Mobility SystemIn order to repair a flat tire with the MINI
Mobility System, proceed as follows:
>Pump in liquid sealant, refer to page142
>Reinflate the tire, refer to page142
>Distribute liquid sealant, refer to
page143
>Check tire inflation pressure, refer to
page143
>Drive on, refer to page143.
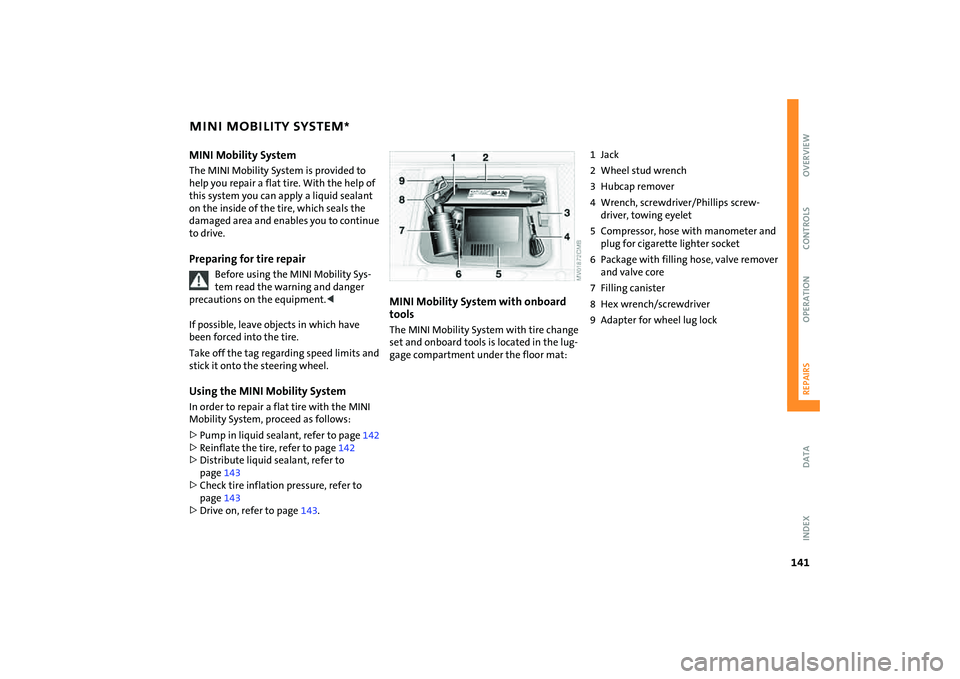
MINI Mobility System with onboard
tools The MINI Mobility System with tire change
set and onboard tools is located in the lug-
gage compartment under the floor mat:
1Jack
2 Wheel stud wrench
3 Hubcap remover
4 Wrench, screwdriver/Phillips screw-
driver, towing eyelet
5 Compressor, hose with manometer and
plug for cigarette lighter socket
6 Package with filling hose, valve remover
and valve core
7 Filling canister
8 Hex wrench/screwdriver
9 Adapter for wheel lug lock
Page 146 of 176

144
VEHICLE BATTERYStorage locationMINI COOPER and MINI COOPER Convert-
ible:
The battery is located in the engine com-
partment, refer to page119.
MINI COOPER S and MINI COOPER S Con-
vertible:
The battery is located in the luggage com-
partment under the floor mat.Battery careThe battery is absolutely maintenance-free,
that is, the original electrolyte will normally
last for the service life of the battery under
moderate climatic conditions. Your MINI
Dealer will be glad to advise you if you have
any questions regarding the battery.Charging the batteryOnly charge the battery in the vehicle via
the terminals in the engine compartment
with the engine switched off, refer to
'Jump-starting', page146.
Disposal
After replacing old batteries, return
the used batteries to your MINI
Dealer or to a recycling point. Maintain the
battery in an upright position for transport
and storage. Secure the battery to prevent
it from tilting during transport.<
Power failureAfter a temporary power failure, e.g. due to
a discharged battery, some of your vehicle's
equipment will function only to a limited
extent and must be reinitialized or read-
justed. Individual settings are also lost and
must be reprogrammed:
>The clock must be reset, refer to page67
>The power windows must be reinitial-
ized, refer to page32
>Radio
*:
The stations must be reset, refer to the
Owner's Manual for Radio
>Navigation system
*:
It may take some time for its operability
to be restored, refer to the Owner's Man-
ual for Navigation System.