2008 MINI COOPER CONVERTIBLE lock
[x] Cancel search: lockPage 37 of 176

35
OVERVIEW REPAIRS OPERATIONCONTROLS DATA INDEX
CONVERTIBLE TOP WITH INTEGRATED SLIDING SUNROOFOpening and closing the sliding
sunroofTo open:
Press button 2 until the desired sunroof
position is reached.
To close:
Press button 1.
The sliding sunroof can be operated up to a
road speed of 75 mph / 120 km/h.
Power convertible top So that you can get the most enjoyment
out of your MINI Convertible, please
observe the following tips:
>It is recommended that you close the
convertible top whenever the vehicle is
parked.
The closed convertible top not only pro-
tects the vehicle interior from damage
due to unforeseen bad weather, but also
provides a certain degree of protection
against theft
>Even when the convertible top is closed,
keep valuable items in the locked lug-
gage compartment or in the lockable
glove compartment
>Do not mount any roof rack systems on
the convertible top
>To avoid damage, do not operate the
convertible top at temperatures below
147/–106.
Do not leave the convertible top
folded for more than one day if it is
wet, to prevent permanent damage from
moisture. Do not place any objects on the
convertible top, as they could otherwise fall
off while the convertible top is being oper-
ated and result in damage or personal
injury.<
Driving off before an opening or clos-
ing procedure is completely finished
can lead to damage or personal injury.
Make sure that the convertible top's travel
path is clear and do not reach into the con-
vertible top mechanism during opening or
closing procedures, otherwise injuries may
result. Keep children away from the swivel-
ing area of the convertible top while it is in
operation.<
Before closing the convertible top, remove
any foreign objects from the windshield
frame. They could prevent the convertible
top from closing.
To conserve battery power, if possible
operate the convertible top only
while the engine is running.
Only operate the convertible top when the
vehicle is at a standstill. Otherwise, the pro-
cedure cannot be carried out or it will be
interrupted.
In order to operate the convertible top, the
loading aid must be locked and the luggage
compartment cover must be in its lower
position, refer to page94.<
Page 38 of 176
36
CONVERTIBLE TOP WITH INTEGRATED SLIDING SUNROOFOpening and closing the convertible
topObserve the instructions and safety precau-
tions described above.
To open:
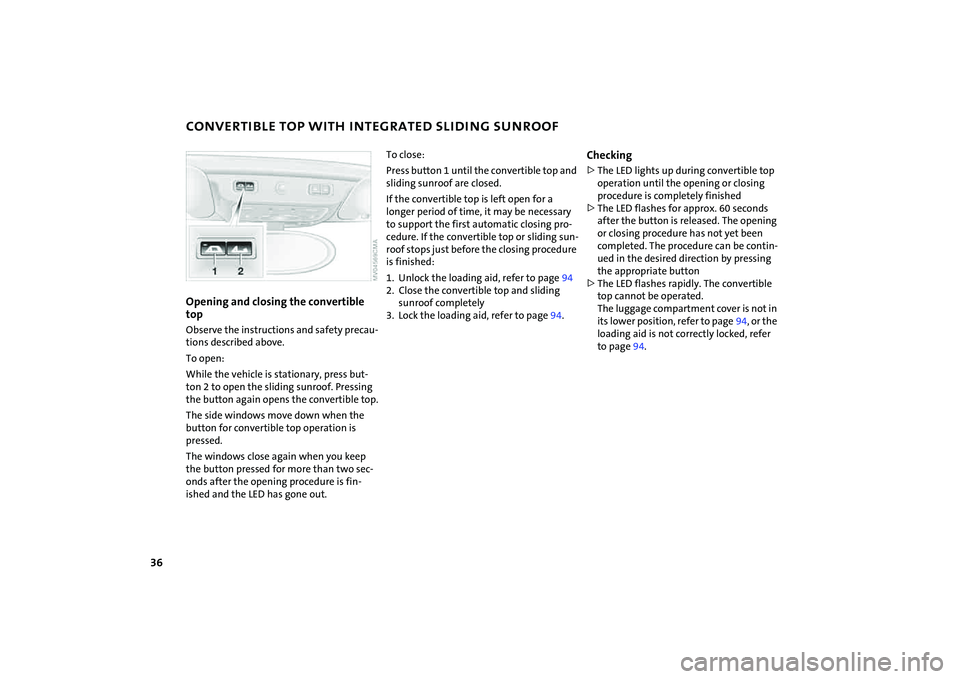
While the vehicle is stationary, press but-
ton 2 to open the sliding sunroof. Pressing
the button again opens the convertible top.
The side windows move down when the
button for convertible top operation is
pressed.
The windows close again when you keep
the button pressed for more than two sec-
onds after the opening procedure is fin-
ished and the LED has gone out.
To close:
Press button 1 until the convertible top and
sliding sunroof are closed.
If the convertible top is left open for a
longer period of time, it may be necessary
to support the first automatic closing pro-
cedure. If the convertible top or sliding sun-
roof stops just before the closing procedure
is finished:
1. Unlock the loading aid, refer to page94
2. Close the convertible top and sliding
sunroof completely
3. Lock the loading aid, refer to page94.
Checking>The LED lights up during convertible top
operation until the opening or closing
procedure is completely finished
>The LED flashes for approx. 60 seconds
after the button is released. The opening
or closing procedure has not yet been
completed. The procedure can be contin-
ued in the desired direction by pressing
the appropriate button
>The LED flashes rapidly. The convertible
top cannot be operated.
The luggage compartment cover is not in
its lower position, refer to page94, or the
loading aid is not correctly locked, refer
to page94.
Page 39 of 176

37
OVERVIEW REPAIRS OPERATIONCONTROLS DATA INDEX
CONVERTIBLE TOP WITH INTEGRATED SLIDING SUNROOFInterruptionThe automatic movement is immediately
interrupted when the buttons for convert-
ible top operation are released. The proce-
dure can be continued in the desired direc-
tion by pressing the appropriate buttons.
If the opening or closing procedure is inter-
rupted by releasing the respective button,
the convertible top stays in its current posi-
tion for several seconds before it slowly
moves into a more stable position. The pro-
cedure can be continued by pressing the
appropriate button.
Movement is also interrupted when there
is a mechanical blockage. In this case, in
order to operate the convertible top again:
1. Turn off the ignition and then switch it
on again
2. Press the button to continue the proce-
dure in the desired direction.Opening and closing procedure
Do not interrupt and restart the clos-
ing procedure several times one after
another, or the convertible top mechanism
could be damaged.<
If the convertible top can be moved in
only one direction after several con-
secutive attempts to operate it, the con-
vertible top system has overheated. Allow
the system to cool down for approx.
20 minutes.<
If the battery is disconnected, e.g. for
changing batteries or vehicle storage,
reinitialize the power windows, refer to
page32. Otherwise the windows will not
be lowered when the convertible top is
opened.
tion via the door lock refer to page27.
Manual closing in the event of an
electrical malfunction
Only close the convertible top manu-
ally if it is absolutely necessary. Never
open it manually. Improper handling of the
convertible top can result in damage. The
closing procedure must be completely fin-
ished. Otherwise, damage or injury could
result.<
Page 40 of 176
38
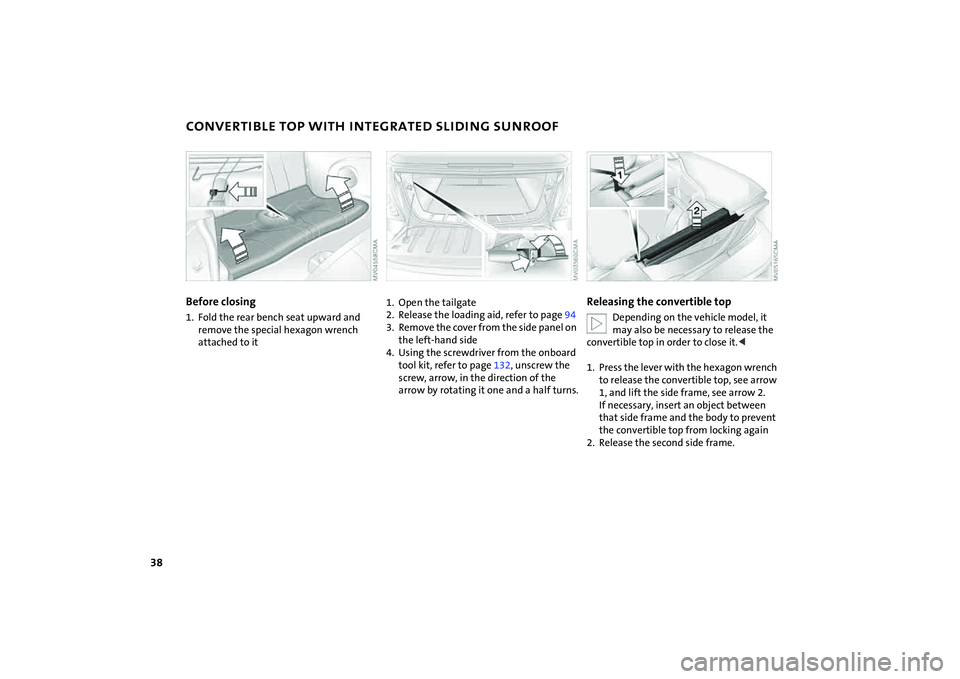
CONVERTIBLE TOP WITH INTEGRATED SLIDING SUNROOFBefore closing1. Fold the rear bench seat upward and
remove the special hexagon wrench
attached to it
1. Open the tailgate
2. Release the loading aid, refer to page94
3. Remove the cover from the side panel on
the left-hand side
4. Using the screwdriver from the onboard
tool kit, refer to page132, unscrew the
screw, arrow, in the direction of the
arrow by rotating it one and a half turns.
Releasing the convertible top
Depending on the vehicle model, it
may also be necessary to release the
convertible top in order to close it.<
1. Press the lever with the hexagon wrench
to release the convertible top, see arrow
1, and lift the side frame, see arrow 2.
If necessary, insert an object between
that side frame and the body to prevent
the convertible top from locking again
2. Release the second side frame.
Page 41 of 176
39
OVERVIEW REPAIRS OPERATIONCONTROLS DATA INDEX
CONVERTIBLE TOP WITH INTEGRATED SLIDING SUNROOF WIND DEFLECTOR
*
Closing the convertible top
If possible, close the convertible top
with the help of a second person.<
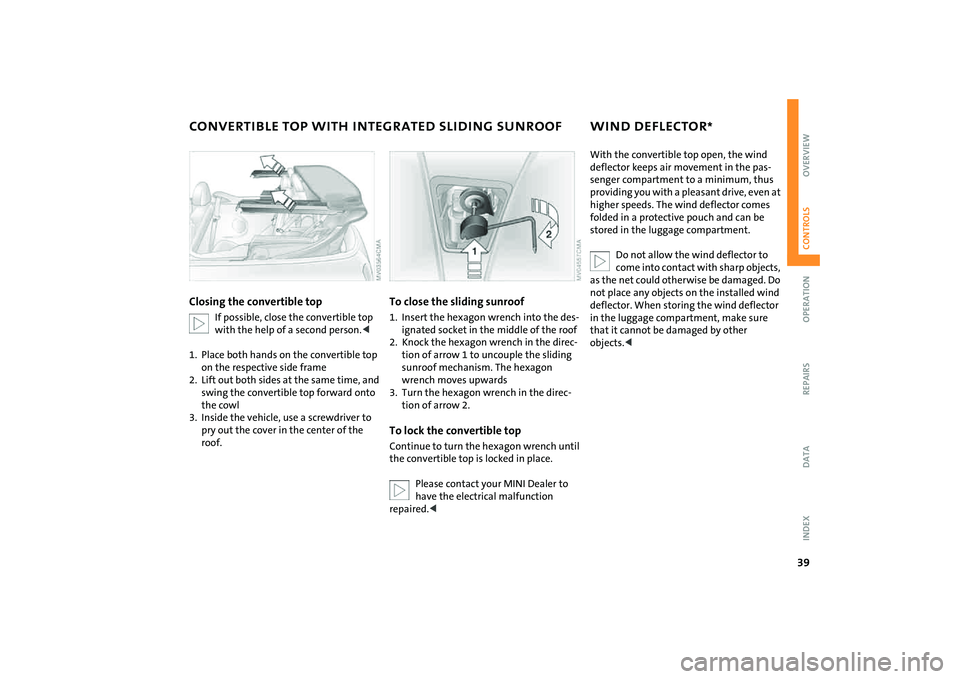
1. Place both hands on the convertible top
on the respective side frame
2. Lift out both sides at the same time, and
swing the convertible top forward onto
the cowl
3. Inside the vehicle, use a screwdriver to
pry out the cover in the center of the
roof.
To close the sliding sunroof1. Insert the hexagon wrench into the des-
ignated socket in the middle of the roof
2. Knock the hexagon wrench in the direc-
tion of arrow 1 to uncouple the sliding
sunroof mechanism. The hexagon
wrench moves upwards
3. Turn the hexagon wrench in the direc-
tion of arrow 2.To lock the convertible topContinue to turn the hexagon wrench until
the convertible top is locked in place.
Please contact your MINI Dealer to
have the electrical malfunction
repaired.<
With the convertible top open, the wind
deflector keeps air movement in the pas-
senger compartment to a minimum, thus
providing you with a pleasant drive, even at
higher speeds. The wind deflector comes
folded in a protective pouch and can be
stored in the luggage compartment.
Do not allow the wind deflector to
come into contact with sharp objects,
as the net could otherwise be damaged. Do
not place any objects on the installed wind
deflector. When storing the wind deflector
in the luggage compartment, make sure
that it cannot be damaged by other
objects.<
Page 42 of 176
40
WIND DEFLECTOR
*
Before installing
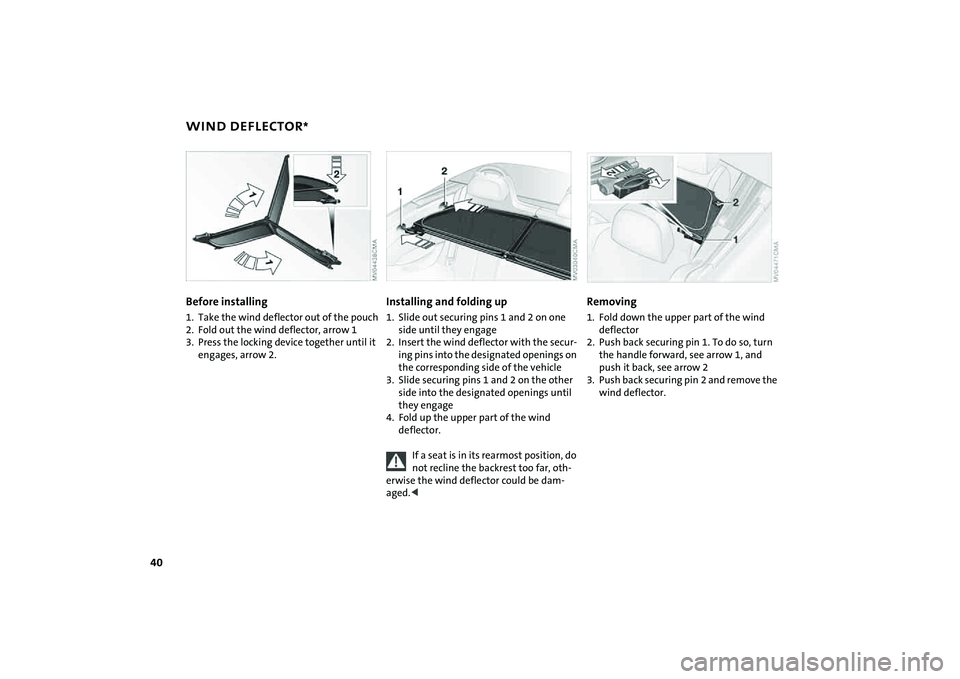
1. Take the wind deflector out of the pouch
2. Fold out the wind deflector, arrow 1
3. Press the locking device together until it
engages, arrow 2.
Installing and folding up1. Slide out securing pins 1 and 2 on one
side until they engage
2. Insert the wind deflector with the secur-
ing pins into the designated openings on
the corresponding side of the vehicle
3. Slide securing pins 1 and 2 on the other
side into the designated openings until
they engage
4. Fold up the upper part of the wind
deflector.
If a seat is in its rearmost position, do
not recline the backrest too far, oth-
erwise the wind deflector could be dam-
aged.<
Removing1. Fold down the upper part of the wind
deflector
2. Push back securing pin 1. To do so, turn
the handle forward, see arrow 1, and
push it back, see arrow 2
3. Push back securing pin 2 and remove the
wind deflector.
Page 43 of 176
41
OVERVIEW REPAIRS OPERATIONCONTROLS DATA INDEX
WIND DEFLECTOR
*
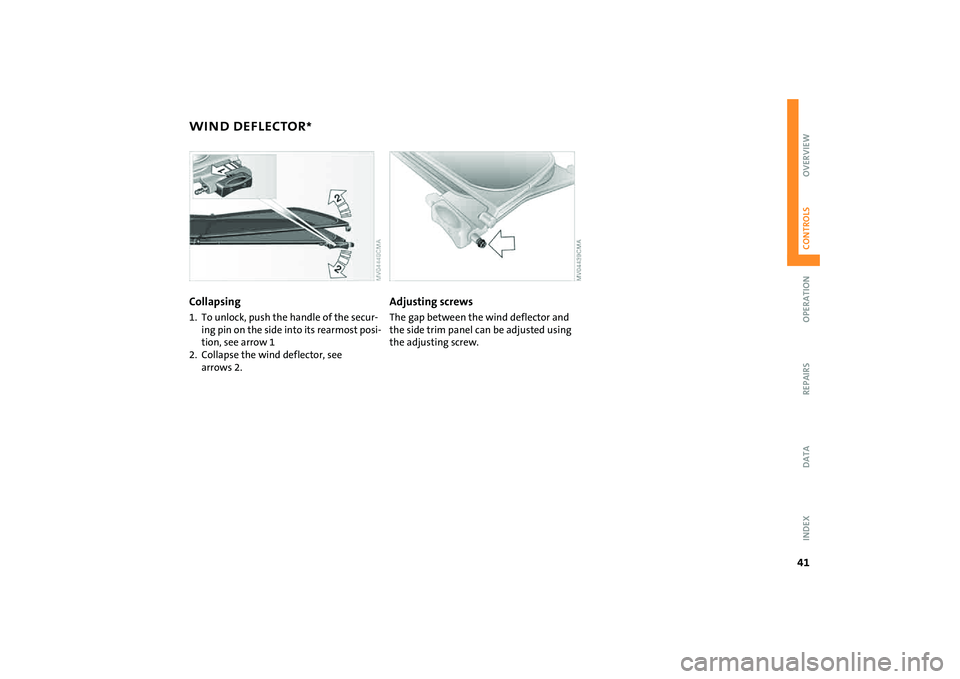
Collapsing
1. To unlock, push the handle of the secur-
ing pin on the side into its rearmost posi-
tion, see arrow 1
2. Collapse the wind deflector, see
arrows 2.
Adjusting screwsThe gap between the wind deflector and
the side trim panel can be adjusted using
the adjusting screw.
Page 44 of 176
42
SAFE SEATING POSITIONThe ideal seating position can make a vital
contribution to relaxed, relatively fatigue-
free driving. Together with the safety belts
and airbags, the seating position also plays
an important role in providing occupants
with maximum levels of passive safety in
an accident. To ensure that the safety sys-
tems operate with optimal efficiency, we
strongly urge you to observe the instruc-
tions contained in the following section.
For additional information about trans-
porting children safely, refer to page50.Airbags
Always maintain an adequate dis-
tance between yourself and all of the
airbags. Always hold the steering wheel by
the rim with the hands at the 9 and
3 o'clock positions to keep any chance of
injury to hands or arms to an absolute min-
imum, should the airbag be deployed.
No one and nothing is to come between
the airbags and the seat occupant. Do not
use the front passenger airbag cover as a
storage surface for objects of any kind.
Ensure that the front passenger is correctly
seated, e.g. that no feet or legs are propped
against the dashboard. Otherwise, leg
injury could result if the front passenger
airbag suddenly deployed.
Make sure that passengers do not lean
their heads against the side or head airbag,
as injuries could result if the side airbags
were triggered.<
Even if all these instructions are followed, it
cannot entirely be ruled out that in some
circumstances injury may result from con-
tact with the airbags. In sensitive individu-
als, the ignition and inflation noise may
induce a mild hearing loss that is usually
temporary.
For airbag locations and additional infor-
mation on airbags, refer to page79.Head restraintA correctly adjusted head restraint reduces
the risk of injury to the cervical spine in the
event of an accident.
Adjust the head restraint in such a
way that it is centered roughly at ear
level. Otherwise, there is an increased risk
of injury in the event of an accident.
work in conjunction with the safety belts,
but do not replace them. Your vehicle is
equipped with four seats, each of which is
provided with a safety belt.
Never allow more than one person to
wear a single safety belt. Never allow
infants or small children to ride in a passen-
ger's lap. Make sure that the belt in the lap
area sits low across the hips and does not
press against the abdomen. The safety belt
must not rest against the throat, run across
sharp edges, pass over hard or fragile
objects or be pinched. Fasten the safety
belt so that it is not twisted and sits as
snugly as possible against the lap and
shoulder. Otherwise the belt could slide
over the hips and injure the abdomen in
the event of a frontal collision. Avoid wear-
ing bulky clothing and pull the belt in the
upper-body area upward periodically to
retension it. Otherwise, the restraining
effect of the safety belt could be dimin-
ished.<
For information on using the safety belts,
refer to page46.