Page 36 of 164

DISPLAY
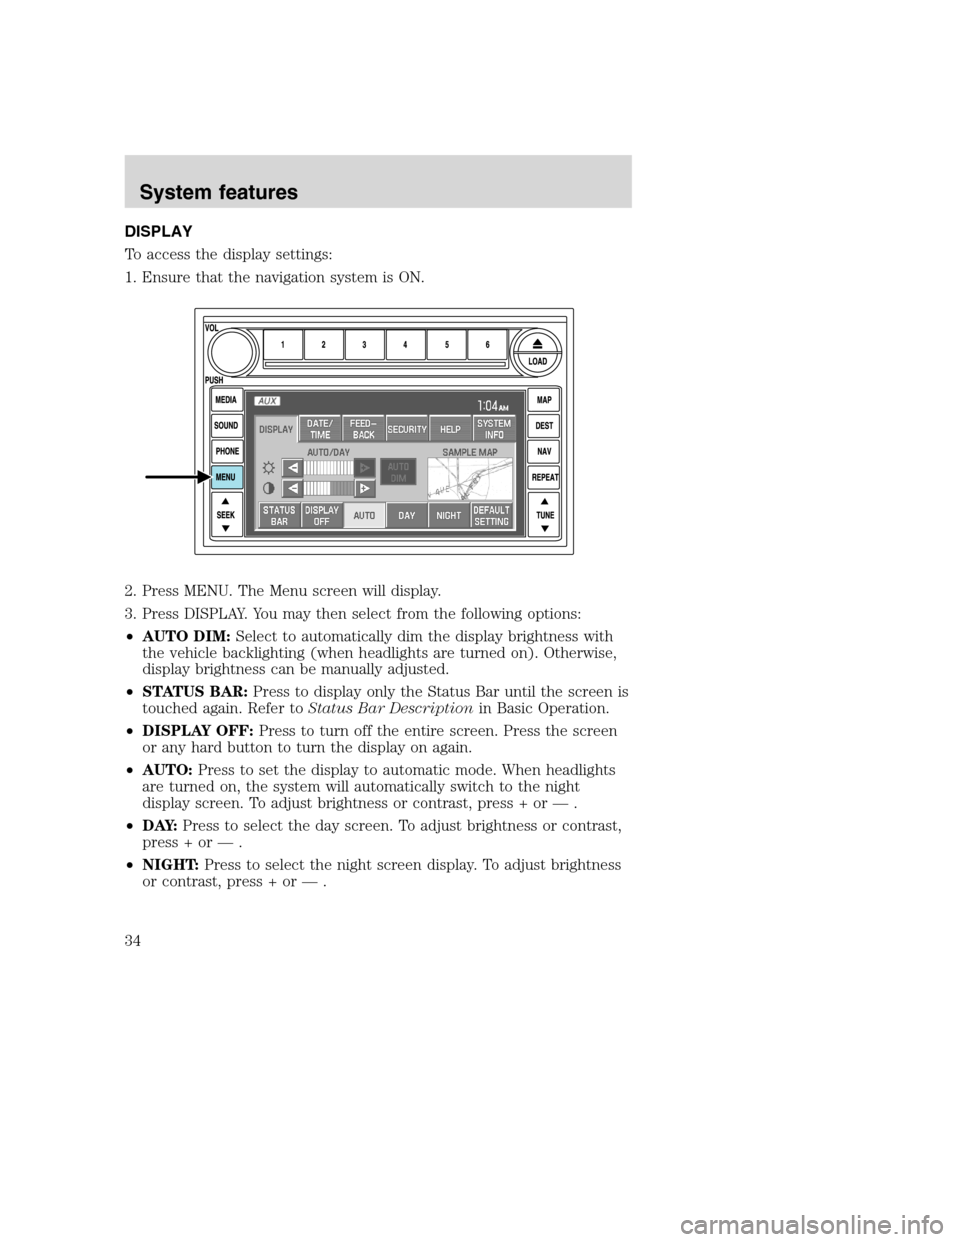
To access the display settings:
1. Ensure that the navigation system is ON.
2. Press MENU. The Menu screen will display.
3. Press DISPLAY. You may then select from the following options:
•AUTO DIM:Select to automatically dim the display brightness with
the vehicle backlighting (when headlights are turned on). Otherwise,
display brightness can be manually adjusted.
•STATUS BAR:Press to display only the Status Bar until the screen is
touched again. Refer toStatus Bar Descriptionin Basic Operation.
•DISPLAY OFF:Press to turn off the entire screen. Press the screen
or any hard button to turn the display on again.
•AUTO:Press to set the display to automatic mode. When headlights
are turned on, the system will automatically switch to the night
display screen. To adjust brightness or contrast, press + or — .
•D AY:Press to select the day screen. To adjust brightness or contrast,
press + or — .
•NIGHT:Press to select the night screen display. To adjust brightness
or contrast, press + or — .
2008(nv1)
Supplement
USA(fus)
System features
34
Page 37 of 164
•DEFAULT SETTING:Press to clear any current settings and return
to the system default.
•SAMPLE MAP:Shows you how the map will appear with the current
settings
DATE/TIME
To access the date/time settings:
1. Ensure that the navigation system is ON.
2. Press MENU. The Menu screen will display.
3. Press DATE / TIME. You may then select from the following options:
SHOW CLOCK / SHOW CALENDAR:Press to toggle between CLOCK
and CALENDAR screens. Under the CLOCK screen, the following
buttons will be available:
•CLOCK ON/OFF :Press ON to enable the clock display in the status
bar. Press OFF to disable the clock display in the status bar.
•TIME SET BUTTONS:Press + or – to adjust the hours and minutes.
•24 HOUR FORMAT:If enabled, the system will display military time.
If disabled, the user must select AM or PM.
•DEFAULT SETTING:Press to clear current settings and return to
system default settings.
2008(nv1)
Supplement
USA(fus)
System features
35
Page 38 of 164
•SHOW CALENDAR:Press to display the calendar screen.
The calendar screen will display the
current month. Press PREV to view
the previous month or NEXT to
view the next month. Under the
CALENDAR screen, the following
buttons are available:
•GO TO TODAY:Press to highlight the current date.
•SHOW CLOCK:Press to return to the clock screen.
FEEDBACK
To access the feedback screen:
1. Ensure that the navigation system is ON.
2. Press MENU. The Menu screen will display.
2008(nv1)
Supplement
USA(fus)
System features
36
Page 39 of 164

3. Press FEEDBACK. The feedback screen will appear. In this screen you
have the following options:
FEEDBACK:One must be selected at all times:
•ALL BUTTONS:Press to hear an audible beep every time any button
on the system is pressed.
•TOUCH SCREEN:Press to hear an audible beep when any touch
screen button is pressed.
•NONE:Press to turn off all audible beeps. You may press any button
and no beeps will be heard.
LANGUAGE:One must be selected at all times:
•ENGLISH:Press to set the system language to English.
•ESPANOL:Press to set the system language to North American
Spanish.
•FRANCAIS:Press to set the system language to North American
French.
Note:The system will automatically restart after a new language is
chosen.
VOICE VOLUME:Press +/- to select voice prompt volume level (1–34).
You may also turn the volume control during a voice prompt to adjust
the volume level.
TEST:Press to hear an audio sample of voice prompt at the currently
selected volume.
NAVIGATION GUIDANCE:Press ON to hear navigation guidance voice
prompts. Press OFF to turn the voice prompts off.
DEFAULT SETTING:Press to clear any current settings and return to
the system default settings.
2008(nv1)
Supplement
USA(fus)
System features
37
Page 40 of 164
SECURITY
Your navigation system has a special security feature which allows you to
enable the valet mode. In valet mode, if your vehicle is being parked by a
valet, they will be unable to access any of the navigational information
(addresses, destinations, etc.), change any settings or eject any CDs or
the navigation DVD. To access and enable valet mode:
1. Ensure that the navigation system is on.
2. Press MENU.
3. Press SECURITY.
4. Press ENABLE VALET MODE to lock the system using any 4-digit PIN
(Personal Identification Number). When valet mode is activated, the
system will be completely locked. The PIN must be entered in order to
disable Valet Mode and unlock the system. You can select a different PIN
every time the system needs to be locked. If the PIN is forgotten, you
can disable Valet Mode by disconnecting the battery or removing the
appropriate fuse for one minute to reset the system.
2008(nv1)
Supplement
USA(fus)
System features
38
Page 41 of 164
HELP
Your system has a special help feature. To access the help feature:
1. Ensure that the system is on.
2. Press MENU.
3. Press HELP. You may then select from:
•BASIC OPERATION:This screen will provide basic help with the
hard buttons on the system, providing a brief description for each
button.
•DRIVING RESTRICTIONS:This screen will inform you that due to
driver distraction and safety concerns, certain features will be
restricted when the vehicle is in motion.
•NAVIGATION DVD INFORMATION:Press to access information on
the navigation map DVD — basic operation , how to access the DVD,
and also replacement and contact information for the Customer
Relationship Center.
2008(nv1)
Supplement
USA(fus)
System features
39
Page 42 of 164
SYSTEM INFORMATION
The system information screen gives you contact information, current
location and access to the Navigation DVD. To access the System
Information screen:
1. Ensure that the system is on.
2. Press MENU.
3. Press SYSTEM INFO to view the following information:
•Customer Relationship Center (shown as�Customer Service Center�)
phone numbers in USA and Canada
•Current GPS Location
•Map DVD Release Version
•ACCESS NAVIGATION DVD: Press to access the Navigation Map DVD
from this screen.
•Satellite Radio Electronic Serial Number (ESN#)
2008(nv1)
Supplement
USA(fus)
System features
40
Page 43 of 164
LOADING AND EJECTING NAVIGATION MAP DVDS
1. Ensure that the system is on.
2. Press MENU.
3. Press SYSTEM INFO.
4. Press ACCESS NAVIGATION
DVD. The following disclaimer will
appear:
“To access the navigation DVD,
select the OPEN button. This will
cause the display to open. If the
navigation DVD is installed, it will
be ejected automatically. The screen
will close automatically when a disc
is inserted, or if no activity is
detected for 5 minutes.”
2008(nv1)
Supplement
USA(fus)
System features
41