Page 7 of 164
•Continuous scrolling of map
•Editing/Adding entries in the Address Book and Avoid Areas List
•DVD ROM Load and Eject
When the vehicle begins to move, and the Select Route Screen is shown,
the highlighted route is automatically selected and guidance begins.
When the vehicle speed is reduced to 5 mph (8 km/h) or less, system
restrictions are lifted and you have full access to the system.
QUICK START
Driving while distracted can result in loss of vehicle control,
accident and injury. Ford strongly recommends that drivers use
extreme caution when using any device that may take their focus off
the road. The drivers primary responsibility is the safe operation of
their vehicle. Only use cell phones and other devices not essential to
the driving task when it is safe to do so.
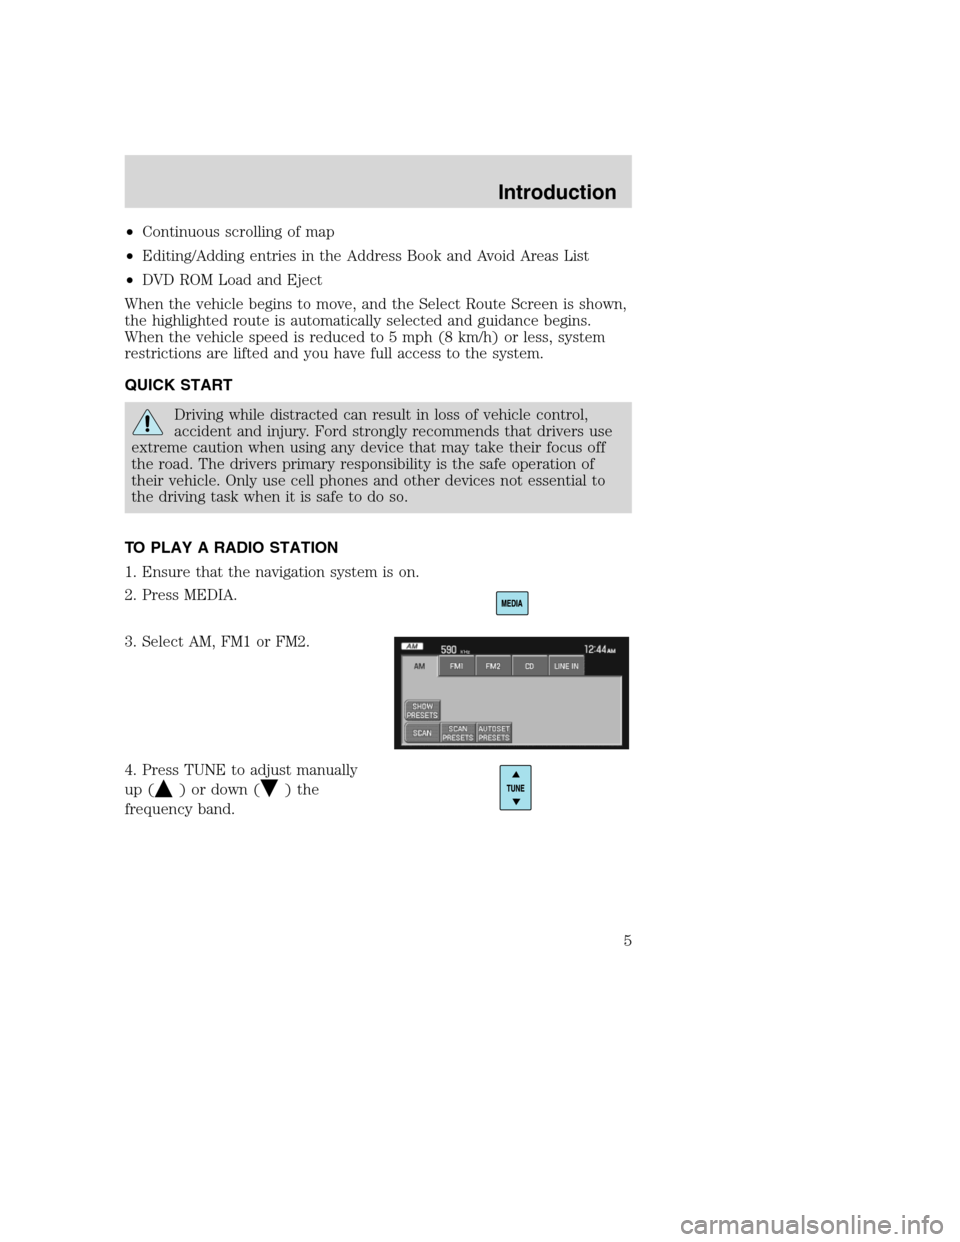
TO PLAY A RADIO STATION
1. Ensure that the navigation system is on.
2. Press MEDIA.
3. Select AM, FM1 or FM2.
4. Press TUNE to adjust manually
up (
) or down () the
frequency band.
2008(nv1)
Supplement
USA(fus)
Introduction
5
Page 8 of 164
5. Press SEEK to find the next
strong station up (
) or down
(
) the frequency band.
TO PLAY SATELLITE RADIO
(SR - IF EQUIPPED)
1. Ensure that the navigation system is on.
2. Press MEDIA.
3. If your vehicle is equipped with
Satellite Radio, the SR tab will be
present on the media screen. Select
the SR tab to enter Satellite Radio
mode (if equipped).
For further information on Satellite
Radio, refer toSatellite Radioin
theAudio Featureschapter.
TO PLAY A PREVIOUSLY LOADED CD:
1. Ensure that the navigation system is on.
2. Press MEDIA.
3. Select the CD tab or press
MEDIA repeatedly until CD is
highlighted. Press the corresponding
memory preset (1–6) to select the
desired CD. The previously loaded
CD will begin to play. The system
will begin playing the discs in order.
Note:If there are no CDs loaded
into the system, NO DISC will display in the status bar and you will not
be able to highlight or select the CD tab.
2008(nv1)
Supplement
USA(fus)
Introduction
6
Page 10 of 164
TO USE THE NAVIGATION SYSTEM:
1. Ensure that the vehicle ignition is on, and the navigation map DVD is
loaded into the navigation map DVD player. If the navigation map DVD is
not loaded, refer toLoading and ejecting navigation map DVDsin the
System Featureschapter for loading instructions.
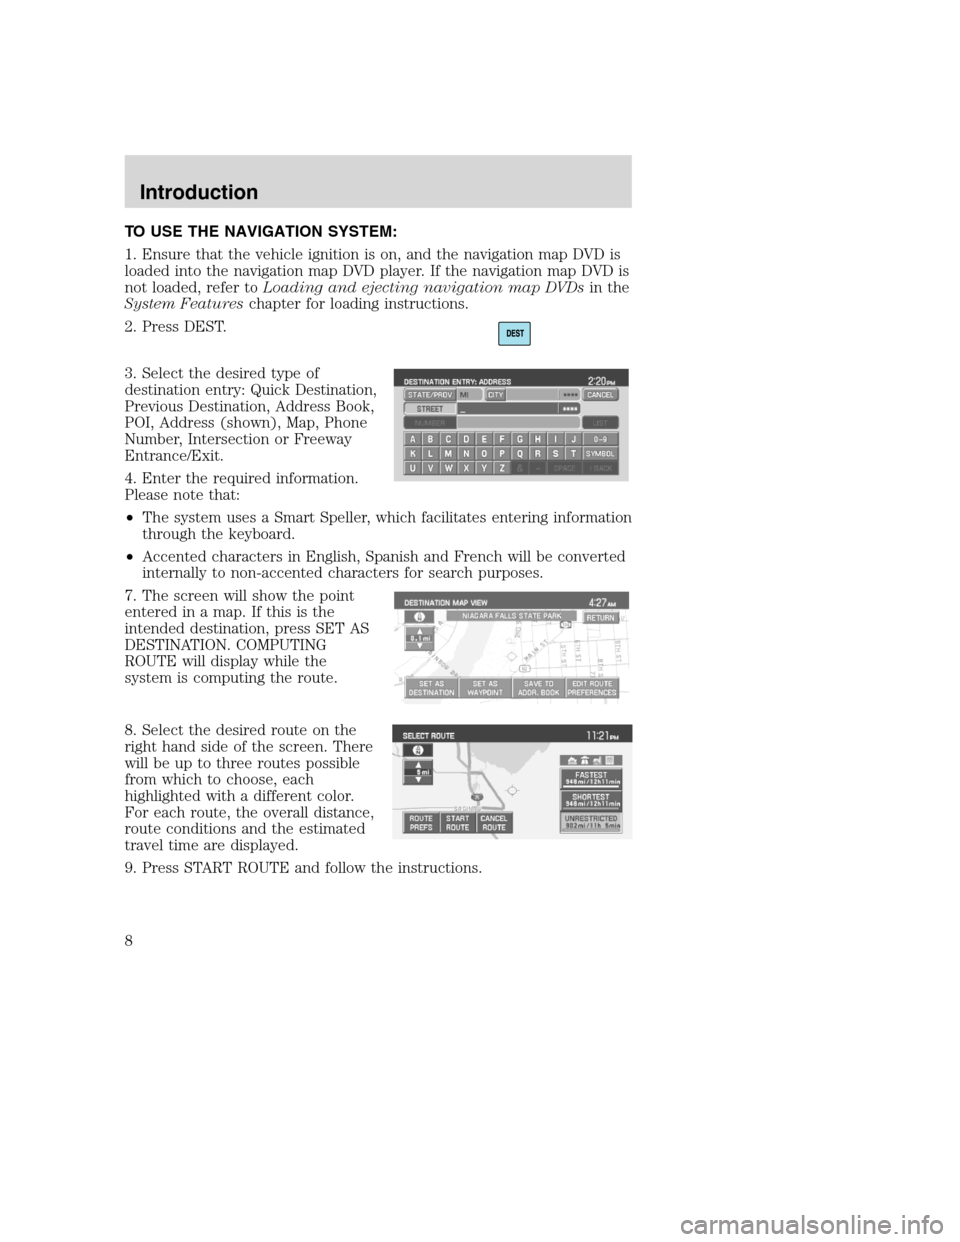
2. Press DEST.
3. Select the desired type of
destination entry: Quick Destination,
Previous Destination, Address Book,
POI, Address (shown), Map, Phone
Number, Intersection or Freeway
Entrance/Exit.
4. Enter the required information.
Please note that:
•The system uses a Smart Speller, which facilitates entering information
through the keyboard.
•Accented characters in English, Spanish and French will be converted
internally to non-accented characters for search purposes.
7. The screen will show the point
entered in a map. If this is the
intended destination, press SET AS
DESTINATION. COMPUTING
ROUTE will display while the
system is computing the route.
8. Select the desired route on the
right hand side of the screen. There
will be up to three routes possible
from which to choose, each
highlighted with a different color.
For each route, the overall distance,
route conditions and the estimated
travel time are displayed.
9. Press START ROUTE and follow the instructions.
2008(nv1)
Supplement
USA(fus)
Introduction
8
Page 27 of 164
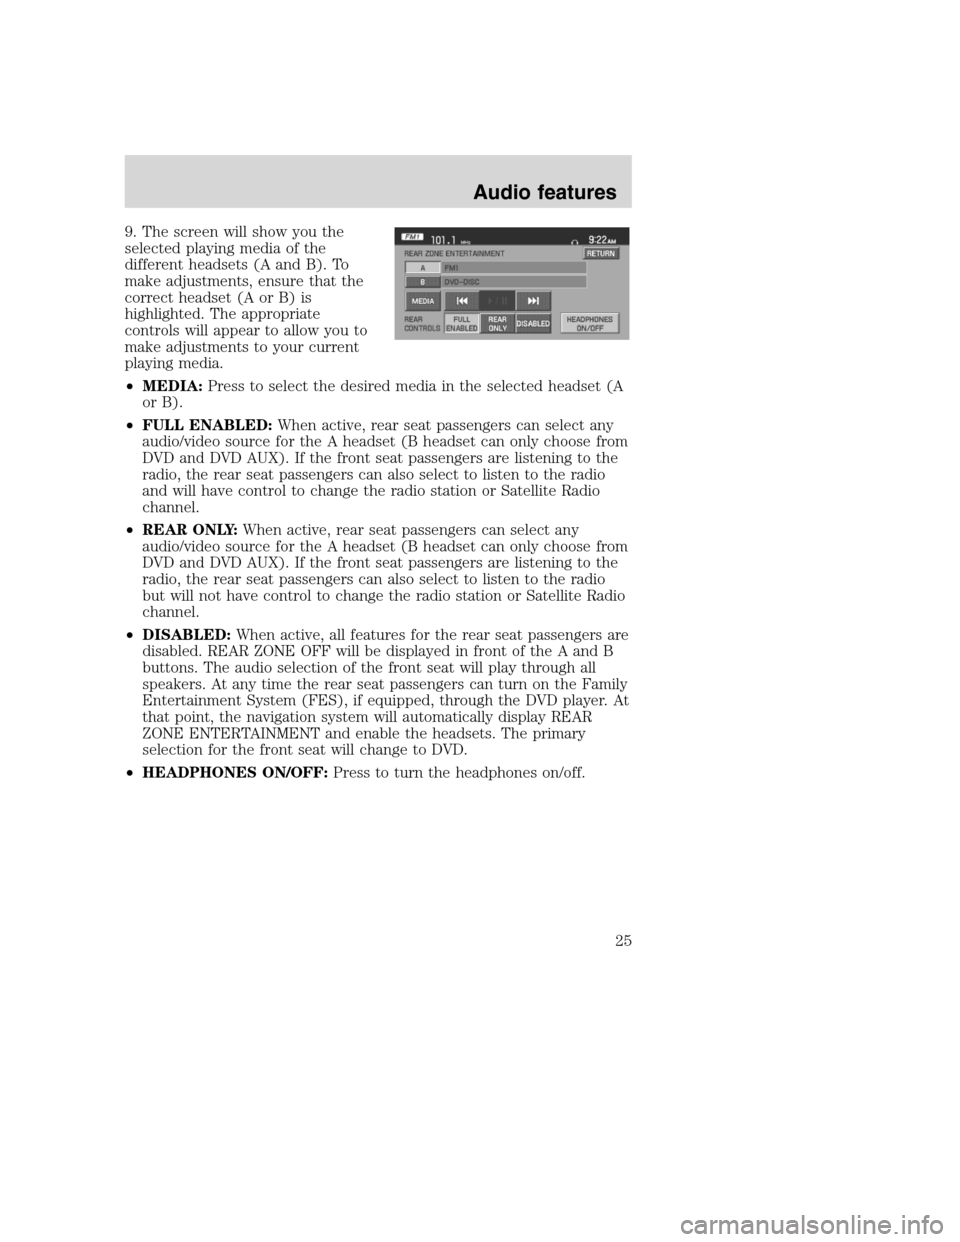
9. The screen will show you the
selected playing media of the
different headsets (A and B). To
make adjustments, ensure that the
correct headset (A or B) is
highlighted. The appropriate
controls will appear to allow you to
make adjustments to your current
playing media.
•MEDIA:Press to select the desired media in the selected headset (A
or B).
•FULL ENABLED:When active, rear seat passengers can select any
audio/video source for the A headset (B headset can only choose from
DVD and DVD AUX). If the front seat passengers are listening to the
radio, the rear seat passengers can also select to listen to the radio
and will have control to change the radio station or Satellite Radio
channel.
•REAR ONLY:When active, rear seat passengers can select any
audio/video source for the A headset (B headset can only choose from
DVD and DVD AUX). If the front seat passengers are listening to the
radio, the rear seat passengers can also select to listen to the radio
but will not have control to change the radio station or Satellite Radio
channel.
•DISABLED:When active, all features for the rear seat passengers are
disabled. REAR ZONE OFF will be displayed in front of the A and B
buttons. The audio selection of the front seat will play through all
speakers. At any time the rear seat passengers can turn on the Family
Entertainment System (FES), if equipped, through the DVD player. At
that point, the navigation system will automatically display REAR
ZONE ENTERTAINMENT and enable the headsets. The primary
selection for the front seat will change to DVD.
•HEADPHONES ON/OFF:Press to turn the headphones on/off.
2008(nv1)
Supplement
USA(fus)
Audio features
25
Page 32 of 164
HYBRID INFORMATION (IF EQUIPPED)
If you have a Hybrid vehicle, your navigation system has special Hybrid
screens which relay Energy Flow and Fuel Economy information. To
access these screens, press MENU and then select the HEV tab.
ENERGY FLOW SCREEN
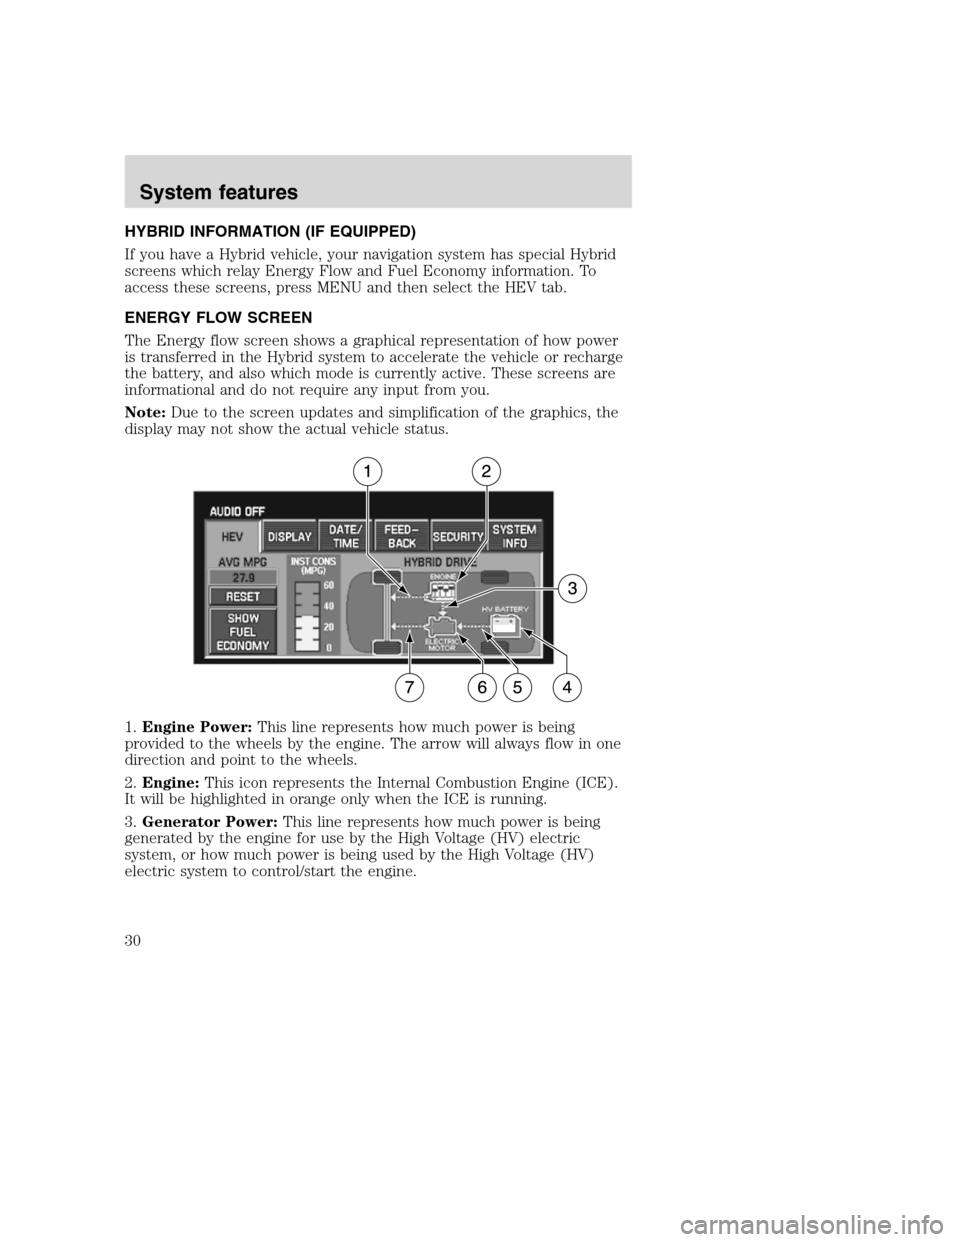
The Energy flow screen shows a graphical representation of how power
is transferred in the Hybrid system to accelerate the vehicle or recharge
the battery, and also which mode is currently active. These screens are
informational and do not require any input from you.
Note:Due to the screen updates and simplification of the graphics, the
display may not show the actual vehicle status.
1.Engine Power:This line represents how much power is being
provided to the wheels by the engine. The arrow will always flow in one
direction and point to the wheels.
2.Engine:This icon represents the Internal Combustion Engine (ICE).
It will be highlighted in orange only when the ICE is running.
3.Generator Power:This line represents how much power is being
generated by the engine for use by the High Voltage (HV) electric
system, or how much power is being used by the High Voltage (HV)
electric system to control/start the engine.
2008(nv1)
Supplement
USA(fus)
System features
30
Page 33 of 164
4.High Voltage (HV) Battery:This icon represents your High Voltage
Battery. The fill level (shown in green), represents the state of charge of
your HV
5.Battery Power:This line represents how much power the HV battery
is providing to accelerate the vehicle (discharging), or how much power
is being delivered back through the motor to the battery charging.
6.Electric motor:This icon represents the Hybrid Electric Motor. This
symbol will be highlighted in orange after the vehicle has been started
and will remain highlighted until key off to indicate that the vehicle is
ready to be driven.
7.Motor power:This line represents the Hybrid Electric Motor. This
symbol will be highlighted in orange after the vehicle has been started
and will remain highlighted until key off to indicate that the vehicle is
ready to be driven.
Note:The power arrows may point in different directions, indicating
which way the power is flowing. The arrows may also vary in width to
indicate the different levels of power being provided to that component.
The energy flow screens contain a title to indicate which mode is active
within the Hybrid system.
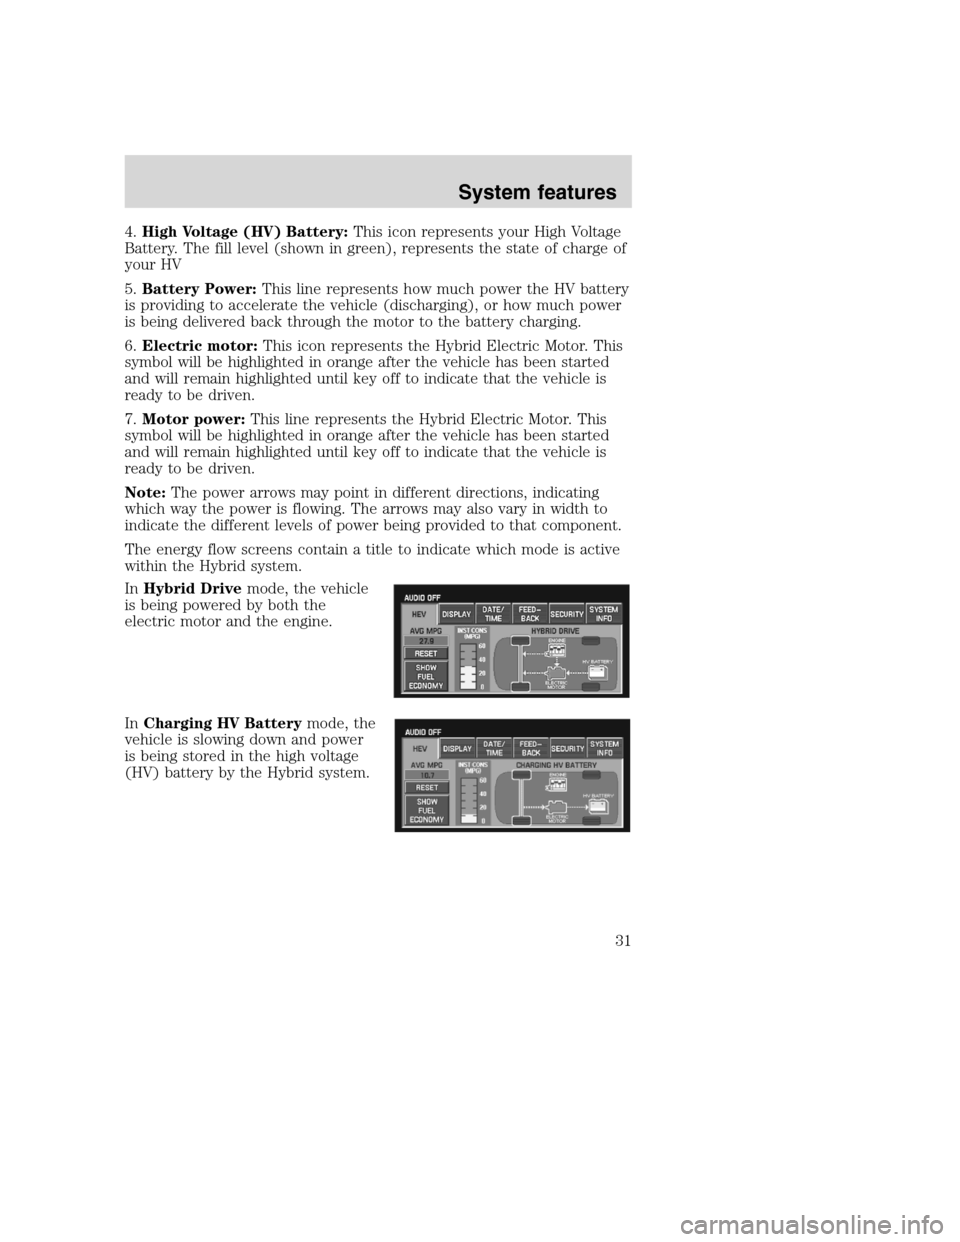
InHybrid Drivemode, the vehicle
is being powered by both the
electric motor and the engine.
InCharging HV Batterymode, the
vehicle is slowing down and power
is being stored in the high voltage
(HV) battery by the Hybrid system.
2008(nv1)
Supplement
USA(fus)
System features
31
Page 36 of 164
DISPLAY
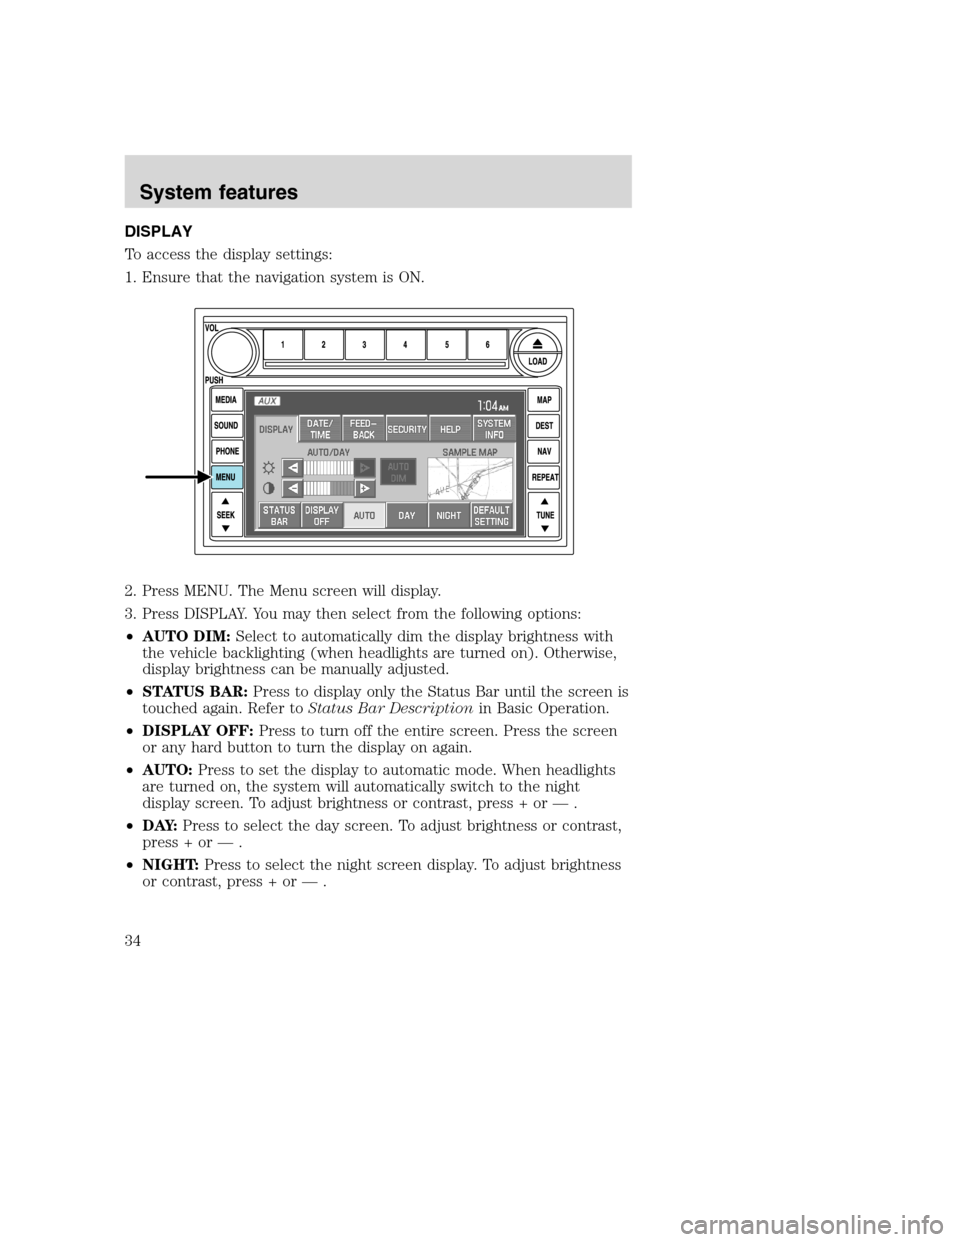
To access the display settings:
1. Ensure that the navigation system is ON.
2. Press MENU. The Menu screen will display.
3. Press DISPLAY. You may then select from the following options:
•AUTO DIM:Select to automatically dim the display brightness with
the vehicle backlighting (when headlights are turned on). Otherwise,
display brightness can be manually adjusted.
•STATUS BAR:Press to display only the Status Bar until the screen is
touched again. Refer toStatus Bar Descriptionin Basic Operation.
•DISPLAY OFF:Press to turn off the entire screen. Press the screen
or any hard button to turn the display on again.
•AUTO:Press to set the display to automatic mode. When headlights
are turned on, the system will automatically switch to the night
display screen. To adjust brightness or contrast, press + or — .
•D AY:Press to select the day screen. To adjust brightness or contrast,
press + or — .
•NIGHT:Press to select the night screen display. To adjust brightness
or contrast, press + or — .
2008(nv1)
Supplement
USA(fus)
System features
34
Page 38 of 164
•SHOW CALENDAR:Press to display the calendar screen.
The calendar screen will display the
current month. Press PREV to view
the previous month or NEXT to
view the next month. Under the
CALENDAR screen, the following
buttons are available:
•GO TO TODAY:Press to highlight the current date.
•SHOW CLOCK:Press to return to the clock screen.
FEEDBACK
To access the feedback screen:
1. Ensure that the navigation system is ON.
2. Press MENU. The Menu screen will display.
2008(nv1)
Supplement
USA(fus)
System features
36