2008 MERCEDES-BENZ SL ROADSTER ignition
[x] Cancel search: ignitionPage 80 of 317
Seats
771
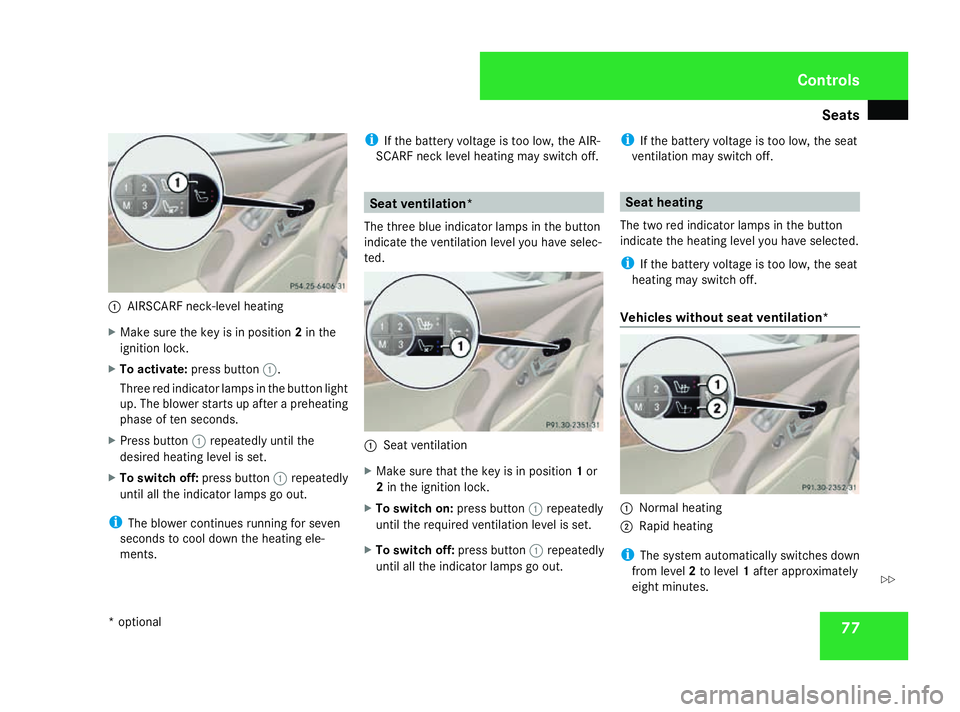
AIRSCARF neck-level heating
X Make sure the key is in position 2in the
ignition lock.
X To activate: press button 1.
Three red indicator lamps in the button light
up. The blower starts up after apreheating
phase of ten seconds.
X Press button 1repeatedly until the
desired heating level is set.
X To switch off: press button1repeatedly
until all the indicator lamps go out.
i The blower continues running for seven
seconds to cool down the heating ele-
ments. i
If the battery voltage is too low, the AIR-
SCARF neck level heating may switch off. Seat ventilation*
The three bluei ndicator lamps in the button
indicate the ventilation level you have selec-
ted. 1
Seat ventilation
X Make sure that the key is in position 1or
2 in the ignition lock.
X To switch on: press button1repeatedly
until the required ventilation level is set.
X To switch off: press button1repeatedly
until all the indicator lamps go out. i
If the battery voltage is too low, the seat
ventilation may switch off. Seat heating
The two red indicator lamps in the button
indicate the heating level you have selected.
i If the battery voltage is too low, the seat
heating may switch off.
Vehicles without seat ventilation* 1
Normal heating
2 Rapid heating
i The system automatically switches down
from level 2to level 1after approximately
eight minutes. Controls
*o ptional
230_AKB; 5; 4, en-GB
bjanott,
Version: 2.9.6 2008-04-08T15:09:54+02:00-Seite 77 ZDateiname: 6515_3089_02_buchblock.pdf; preflight
Page 81 of 317
Steering wheel
78The system automatically switches off
approximately 30 minutes after it is set to
level 1.
X Make sure that the key is in position 2in
the ignition lock.
X To switch on rapid heating: press button
2.
X To switch off rapid heating: press button
2 twice.
X To switch on the seat heating: press but-
ton 1.
X To switch off seat heating: press button
1.
Vehicles with seat ventilation* 1
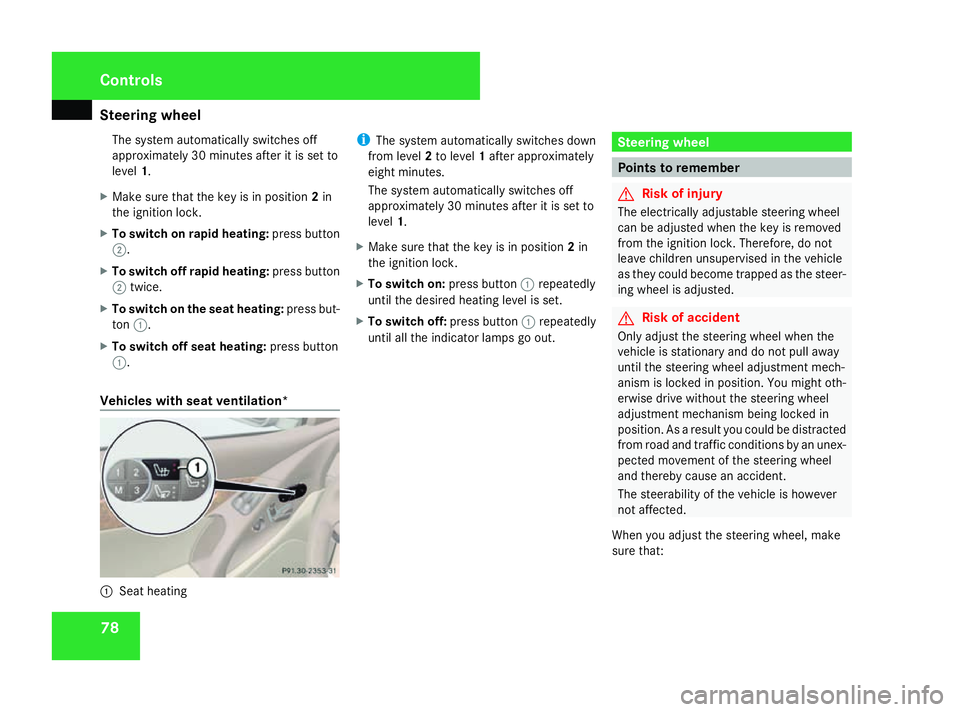
Seat heating i
The system automatically switches down
from level 2to level 1after approximately
eight minutes.
The system automatically switches off
approximately 30 minutes after it is set to
level 1.
X Make sure that the key is in position 2in
the ignition lock.
X To switch on: press button1repeatedly
until the desired heating level is set.
X To switch off: press button1repeatedly
until all the indicator lamps go out. Steering wheel
Points to remember
G
Risk of injury
The electrically adjustable steering wheel
can be adjusted when the key is removed
from the ignition lock. Therefore, do not
leave children unsupervised in the vehicle
as they could become trapped as the steer-
ing wheel is adjusted. G
Risk of accident
Only adjust the steering wheel when the
vehicle is stationary and do not pull away
until the steering wheel adjustment mech-
anism is locked in position. You might oth-
erwise drive without the steering wheel
adjustment mechanism being locked in
position. As aresult you could be distracted
from road and traffic conditions by an unex-
pected movement of the steering wheel
and thereby cause an accident.
The steerability of the vehicle is however
not affected.
When you adjust the steering wheel, make
sure that: Controls
230_AKB; 5; 4, en-GB
bjanott
,V ersion: 2.9.6
2008-04-08T15:09:54+02:00
-Seite 78 Dateiname: 6515_3089_02_buchblock.pdf; preflight
Page 82 of 317
Steering wheel
79
R
the steering wheel can be reached with
your arms slightly bent
R you can move your legs freely
R you can see all the displaysint he instru-
ment cluster clearly Adjusting the steering wheel
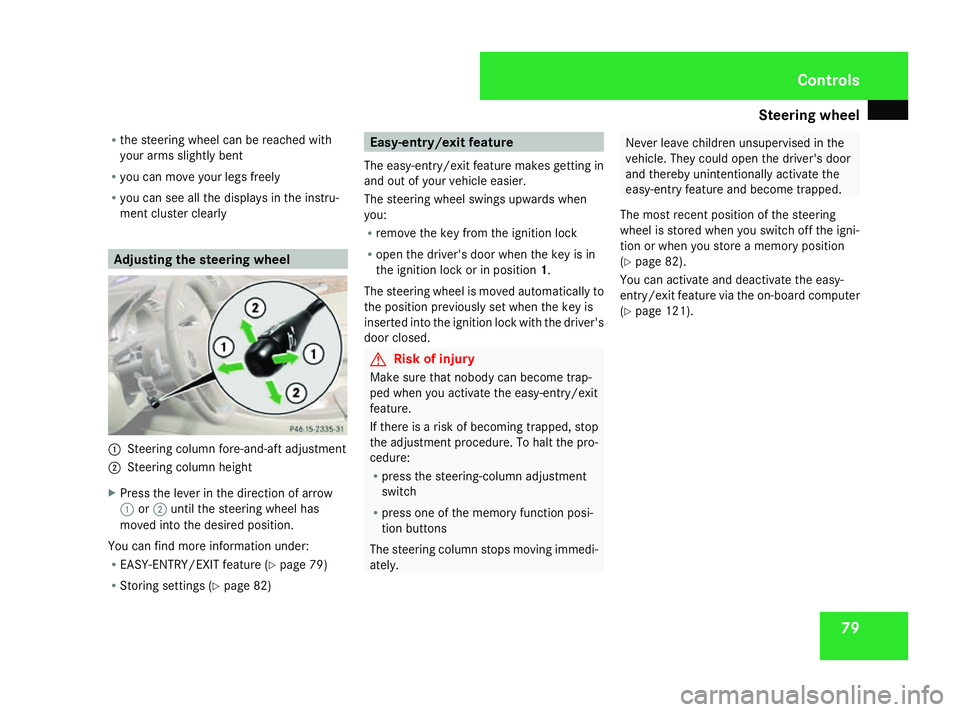
1
Steering column fore-and-aft adjustment
2 Steering column height
X Press the lever in the direction of arrow
1 or2 until the steering wheel has
moved into the desired position.
You can find more information under:
R EASY-ENTRY/EXIT feature (Y page 79)
R Storing settings (Y page 82) Easy-entry/exit feature
The easy-entry/exit feature makes getting in
and out of yourv ehicle easier.
The steering wheel swings upwards when
you:
R remove the key from the ignition lock
R open the driver's door when the key is in
the ignition lock or in position 1.
The steering wheel is moved automatically to
the position previously set when the key is
inserted into the ignition lock with the driver's
door closed. G
Risk of injury
Make sure that nobody can become trap-
ped when you activate the easy-entry/exit
feature.
If there is arisk of becoming trapped, stop
the adjustment procedure .Tohalt the pro-
cedure:
R press the steering-column adjustment
switch
R press one of the memory function posi-
tion buttons
The steering column stops moving immedi-
ately. Never leave children unsupervised in the
vehicle. They could open the driver's door
and thereby unintentionally activate the
easy-entryf
eature and become trapped.
The most recent position of the steering
wheel is stored when you switch off the igni-
tion or when you store amemory position
(Y page 82).
You can activate and deactivate the easy-
entry/exit feature via the on-board computer
(Y page 121). Controls
230_AKB; 5; 4, en-GB
bjanott,
Version: 2.9.6
2008-04-08T15:09:54+02:00
-Seite 79 ZDateiname: 6515_3089_02_buchblock.pdf; preflight
Page 83 of 317
Mirrors
80 Mirrors
Rear-vie
wmirror
X Adjust the rear-view mirror by hand so you
have agood overview of the traffic condi-
tions. Exterior mirrors
G
Risk of accident
The exterior mirrors reduce the size of the
image. Objects are actually close rthan
they appear. You coul dmisjudge the dis-
tance from vehicles driving behind and
cause an accident, e.g. whe nchanging
lane. For this reason, make sure of the
actua ldistance from the vehicle driving
behind by glancing over you rshoulder.
The convex exterior mirrors give alarger field
of vision.
At low outside temperatures, the exterior mir-
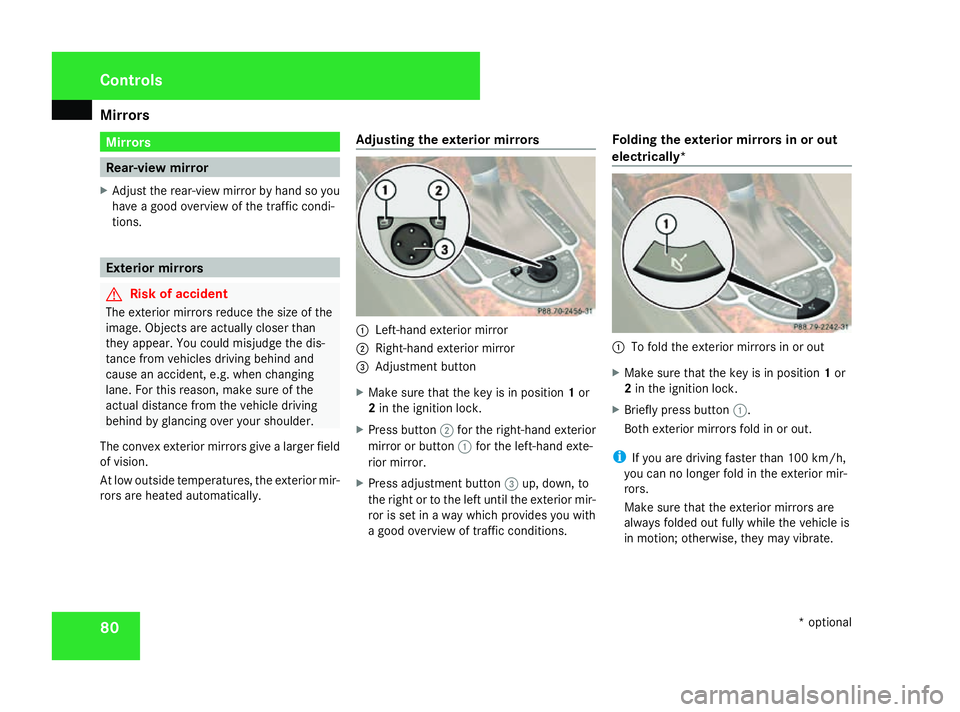
rors are heated automatically. Adjusting the exterior mirrors 1
Left-hand exterior mirror
2 Right-hand exterior mirror
3 Adjustment button
X Make sure that the key is in position 1or
2 in the ignition lock.
X Press button 2for the right-hand exterior
mirror or button 1for the left-hand exte-
rior mirror.
X Press adjustment button 3up, down, to
the right or to the left until the exterior mir-
ror is set in awaywhich provides you with
ag ood overview of traffic conditions. Folding the exterior mirrors in or out
electrically*
1
To fold the exterior mirrors in or out
X Make sure that the key is in position 1or
2 in the ignition lock.
X Briefl ypress button 1.
Both exterior mirrors fold in or out.
i If you are driving faster than 100 km/h,
you can no longe rfold in the exterior mir-
rors.
Make sure that the exterior mirrors are
always folded out fully while the vehicl eis
in motion; otherwise, they may vibrate. Controls
*optional
230_AKB; 5; 4, en-GB
bjanott,
Version: 2.9.6 2008-04-08T15:09:54+02:00-Seite 80 Dateiname: 6515_3089_02_buchblock.pdf; preflight
Page 84 of 317
Mirrors
81
Resetting the exterior mirrors If the battery has been disconnected or has
become discharged, the exterior mirrors
must be reset. Otherwise, they wil lnot fold in
whe nyou select the "Fol dinmirrors when
locking" function in the on-board computer
(Y pag e121).
X Make sure that the key is in position 1in
the ignition lock.
X Briefl ypress button 1.
Folding the exterior mirrors in or out
automatically* If the "Fol
dinmirrors whe nlocking" function
is activated in the on-board computer
(Y pag e121):
R The exterior mirrors fold in automatically as
soon as you lock the vehicle from the out-
side.
R The exterior mirrors fold out again auto-
matically as soon as you unlock the vehicle
and then open the driver's or front-
passenger door.
i If you have activated this function and fold
in the exterior mirrors using button 1,they
wil lnot be folded out automatically .You can then only fold out the exterior mirrors
using button
1. Automatic anti-dazzle mirrors
The rear-view mirror and the exterior mirror
on the driver's side automatically go into anti-
dazzle mode if the ignition is switched on and
incident light from headlamps strikes the sen-
sor in the rear-view mirror.
The mirrors do not go into anti-dazzle mode if
reverse gea risengaged or the interior lighting
is switched on. G
Risk of accident
If incident light from the headlamps of other
vehicles is prevented from striking the sen-
sor in the rear-view mirror, for instance if
the draught stop is fitted, the mirror's auto-
matic anti-dazzle function wil lnot operate.
Incident light coul dthen dazzle you .This
may distract you from the traffic conditions,
and you may thereby cause an accident. In
this case, adjust the rear-view mirror man-
ually. Passengers
ide exterior mirror park-
ing position
To make it easier to park, you can store the
front-passenger side exterior mirror position
in such awaythat you can see the rear wheel
on that side as soon as you engag ereverse
gear.
You can store aparking position for the exte-
rior mirror on the front-passenger side using
the memory button.
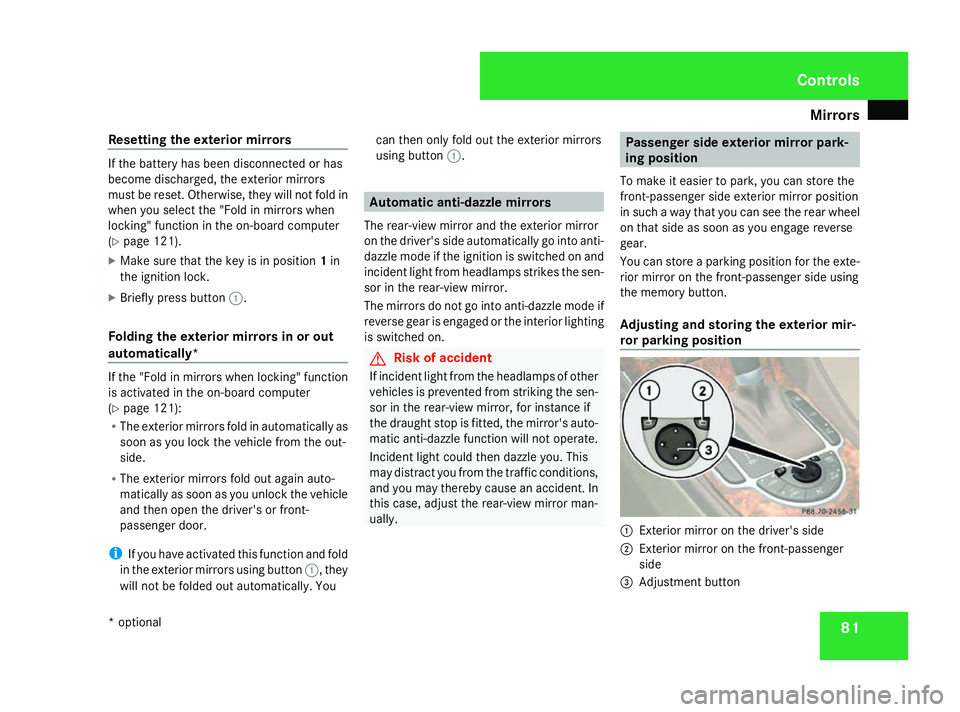
Adjusting and storin gthe exterior mir-
ror parking position 1
Exterior mirror on the driver's side
2 Exterior mirror on the front-passenger
side
3 Adjustment button Controls
*o ptional
230_AKB; 5; 4, en-GB
bjanott,
Version: 2.9.6 2008-04-08T15:09:54+02:00-Seite 81 ZDateiname: 6515_3089_02_buchblock.pdf; preflight
Page 85 of 317
Memory functions
82
X
Make sure that the vehicle is stationary and
that the key is in position 2in the ignition
lock.
X Press button 2for the exterior mirror on
the front-passenger side.
X Use adjustment button 3to adjust the
exterior mirror to aposition which allows
you to see the rear wheel and the kerb.
X Press memory button M(Y pag e82)on
the door control panel.
X Press one of the arrow sonadjustment but-
ton 3withi nthree seconds.
The parking position is stored if the exterior
mirror does not move.
i If the mirror moves out of position, repeat
the steps. You can adjust the exterior mir-
ror again after storing the setting.
Calling up astored parking position set-
ting X
With the key in position 2in the ignition
lock and with exterior mirror on the front-
passenger side 2activated, engage
reverse gear.
Exterior mirror on the front-passenger 2
moves to the stored parking position. The exterior mirror on the front-passenger
side moves back to its original position:
R as soon as you exceed aspee dof
10 km/h
R about ten seconds after you have disen-
gaged reverse gear
R if you press button 1for the exterior mir-
ror on the driver's side Memory functions
Storing settings
You can store up to three different settings
using the memory button.
The following settings are stored as asingle
memory preset:
R position of the seat, backres tand head
restraint
R multi-contour seat*: the backres tside
cushions of the sea tcushion and the back-
rest, contour of the backres tinthe lumbar
and shoulde rregions
R driver's side :steering-whee lposition
R driver's side :position of the exterior mir-
rors on the driver's and front-passenger
sides G
Risk of injury
The memory function can be use dwhent he
key has been removed .For this reason,
children should never be left unsupervised
in the vehicle. They coul dotherwise
become trappe dwhenm oving the sea tor
the steering wheel. Controls
*optional
230_AKB; 5; 4, en-GB
bjanott,
Version: 2.9.6 2008-04-08T15:09:54+02:00-Seite 82 Dateiname: 6515_3089_02_buchblock.pdf; preflight
Page 90 of 317
Lights
87Lights
Light switch
For reason sofsafety, Mercedes-Ben zrecom-
mends that you driv ewith th elight sswitched
on eve ndurin gthe daytime. In som ecoun-
tries, daytime operatio nofheadlamps varies
due to legal requirements and self-imposed
obligations .Inthese countries, th edipped-
beam headlamps are automaticall yswitched
on when th eengineiss tarted.
i If you driv eincountries in whic htraffic
drives on th eopposit eside of th eroad to
th ec ountr ywher ethe vehicle is registered,
oncomin gtraffic may be dazzle dbythe
asymmetrical dipped-beam headlamps.
Hav ethe headlamps changed to symmet-
rical dipped beam when driving in these
countries. You can obtain information
about this from any Mercedes-Ben zService
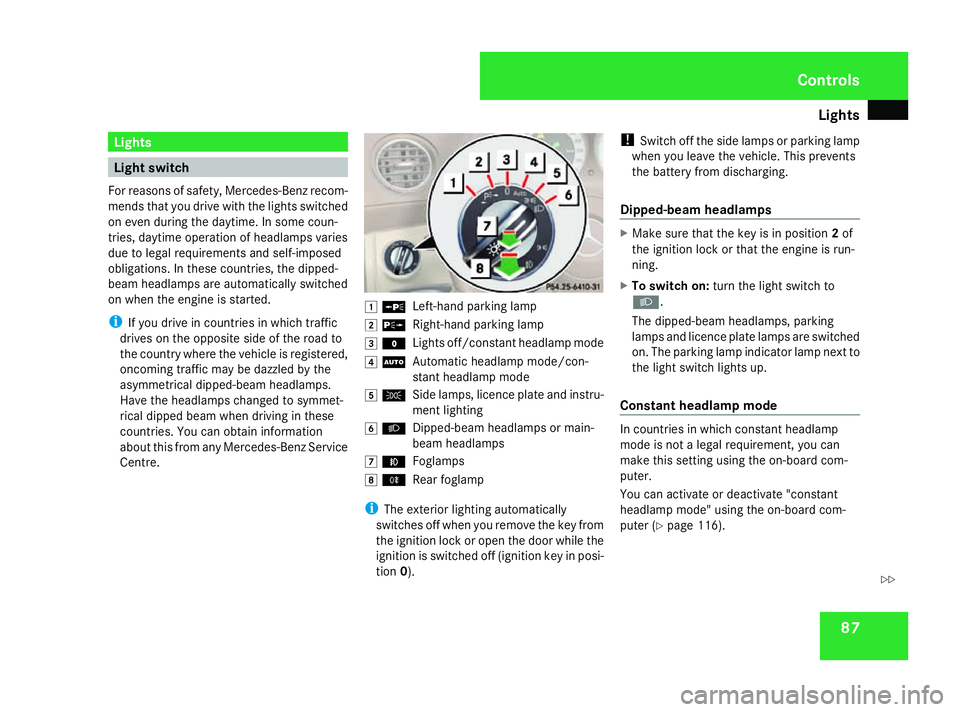
Centre. $
a
Left-han dparking lamp
% g
Right-hand parking lamp
& M
Lightsoff/constan theadlamp mode
( U
Automatic headlamp mode/con-
stant headlamp mode
) C
Side lamps, licence plate and instru-
mentlighting
* B
Dipped-beam headlamps or main-
beam headlamps
, ¥
Foglamps
. †
Rear foglamp
i The exterior lighting automatically
switches off when you remove the key from
the ignition lock or open the door while the
ignition is switched off (ignition key in posi-
tion 0). !
Switch off the side lamps or parking lamp
when you leave the vehicle. This prevents
the battery fro mdischarging.
Dipped-beam headlamps X
Make sure that the key is in position 2of
the ignition lock or that the engin eisrun-
ning.
X To switch on: turnthe light switc hto
B .
The dipped-beam headlamps, parking
lamps and licence plate lamps are switched
on. The parking lamp indicator lamp nex tto
the light switc hlight sup.
Constant headlam pmode In countries in which constant headlamp
mode is not
alegal requirement, you can
make thi ssettin gusing the on-board com-
puter.
You can activat eordeactivat e"constant
headlamp mode" using the on-board com-
puter (Y page 116). Controls
230_AKB; 5; 4, en-GB
bjanott
,V ersion: 2.9.6
2008-04-08T15:09:54+02:00
-Seite 87 ZDateiname: 6515_3089_02_buchblock.pdf; preflight
Page 91 of 317
Lights
88
X
To switch on: turnthe light switch to
M orU.
The dipped-beam headlamps, side lamps
and licenc eplatelamp are switched on
when th eengineisr unning.
i When you tur nthe light switch to any
position other than MorU,t hecor-
respondin glight goes on.
Automatic headlamp mode The side lamps
,dipped-beam headlamps and
licenc eplatelamp are switched on or off
automatically, dependin gonthebrightness of
th ea mbient light. G
Ris
kofa ccident
If th elight switch is set to the Uposi-
tion, th elight will no tcom eona utomati-
cally in foggy conditions. This coul dendan-
ger you and others. Therefore, tur nthe light
switch to Bin thedark or in fog.
The automatic headlam pfeature is only an
aid. The driver is responsible for th evehi-
cle's lighting at all times. G
Ris
kofa ccident
When it is dark or foggy, tur nthe light
switch from UtoB in good time.
Otherwise, th eheadlamps could switch off
temporarily and you could caus eanacci-
dent.
X To switch on: turnthe light switch to
U.
The side lamps are switched on and off
automaticall ywhen th ekeyis in position
1 in th eignition lock.
The dipped-beam headlamps, side lamps
and licenc eplatelamp are switched on
automaticall ywhen th eengineisr unning.
When th eparking lamp or dipped-beam
headlamps are switched on ,the indicator
lamp next to th elight switch light sup.
Fron tfoglamps/Rear foglamp G
Ris
kofa ccident
If you suspect that driving conditions will be
foggy, tur nthe light switch to Bbefore
you start your journey. Otherwise, your
vehicle may no tbevisible and you could
endanger yourself and others. G
Ris
kofa ccident
When it is dark or foggy, tur nthe light
switch from UtoB in good time.
Otherwise, th eheadlamps coul dswitch off
temporarily and you coul dcaus eana cci-
dent.
When th elight switch is set to Uyou can-
no tswitch on th efront or rear foglamp.
X Mak esure that th ekeyis in position 2in
th ei gnition lock.
X To switch on th efront foglamps: turnthe
light switch to the BorC position.
X Pull th elight switch out to th efirst stop.
The ¥ green indicator lamp next to the
light switch light sup.
X To switch on th erearfoglamp: turnthe
light switch to BorC.
X Pull th elight switch out to th esecond
detent.
The † yellow indicator lamp next to the
light switch light sup.
X To switch off th efront foglamps/rear
foglamp: push in thelight switch to the
stop.
The corresponding indicator lamp goes out. Controls
230_AKB
;5;4,en-GB
bjanott ,V ersion: 2.9.6
2008-04-08T15:09:54+02:00
-Seite 88 Dateiname: 6515_3089_02_buchblock.pdf; preflight