2008 MERCEDES-BENZ SL ROADSTER ignition
[x] Cancel search: ignitionPage 62 of 317
Anti-thef
tsyste ms 59G
Ris
kofa ccident
Make sure tha tyou do not endanger
other roa dusers when applying the
brakes.
R Yo us hould applythe brakes firml yfrom
tim etot imeatah ighv ehicle speedifthe
vehicle' sbrake syste mhasnot been sub-
jected to high load sfor alon gp erio dof
time. This improve sthe gri pofthe brake
pads/linings.
R Yo us hould brakefirml ya fter driving on a
we tors now-covere droads urface before
stopping the engine .The brak ediscs dr yas
the yarewarme dup,thu spreve nting cor-
rosion.
R For safety reasons ,Mercedes-Benz recom-
mends tha tyou onlyusecomponents ,e.g.
brak epads/li nings,which have been spe-
cially approve dbyMercedes-Benz for your
vehicle. Brake pads/linings whic hhaven ot
been approve dfor Mercedes-Benz could
affect your vehicle' sopera ting safety. Anti-theft systems
Immobiliser
Th eimm obiliser prevents your vehicl efrom
being starte dwithout the correct key.
Activating the immobiliser X
With the key: removethe key fro mthe
ignition lock.
X With KEYLES SGO*: pres sthe KEYLESS
GO button on the selector lever.
Th ee ngine switche soff.
Deactivating th eimmob iliser X
Wit hthe key: turn th ekeyto position 2in
th ei gnition lock.
X Wit hKEYLESS GO*: press theKEYLESS
GO butto nontheselecto rlever twic ewith-
out depressin gthe brake.
i The immobilise risalways deactivated
when you start th eengine. ATA (anti-thef
talarm system)
Av isual and audible alar mistriggere difthe
alar msystem is primed and you open:
R ad oor
R ad ooru sin gthe emergency ke yelement
R theb ootlid
R theb onnet
R theg love compartment
R thes towag espac eunder th earmrest
R as towag ecom partmen tintherear
The alar misnotswitched of fevenify ou close
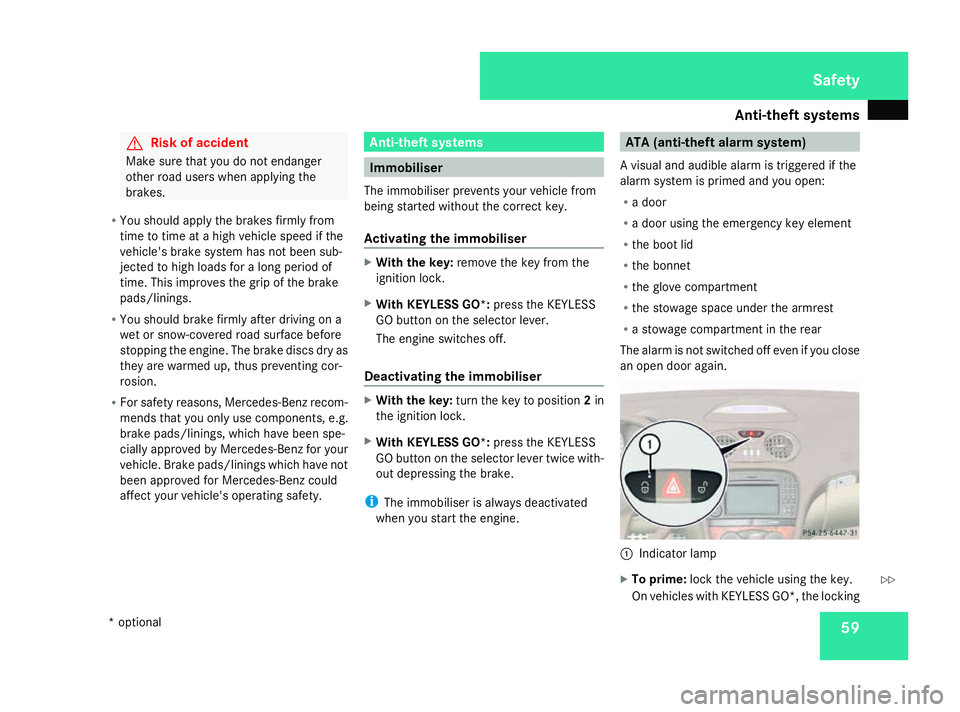
an ope ndoora gain. 1
Indicator lamp
X To prime: lockthe vehicle usin gthe key.
On vehicles wit hKEYLESS GO* ,the locking Safety
*o ptional
230_AKB; 5; 4, en-GB
bjanott
,V ersion: 2.9.6
2008-04-08T15:09:54+02:00
-Seite 59 ZDateiname: 6515_3089_02_buchblock.pdf; preflight
Page 63 of 317
Anti-thef
tsyste ms 60button on the door handle/boo
tlid ca na lso
be used.
Indicato rlamp 1flashes. Th ealarm sys-
tem is primed after approximatel y15sec-
onds.
X To deactivate: unlock the vehicl eusing the
key .Onv ehicle swithK EYLESS GO *, you
can also unlock the vehicle by opening the
door/boot lid.
Switchin goff the alarm X
With the key: insert the key into the igni-
tion lock.
The alarm is switched off.
or
X Press the Œor‹ button on the key.
The alarm is switched off.
X With KEYLES SGO*: grasp the outside
doo rhandle. The key mus tbeo utsid ethe
vehicle.
The alarm is switched off.
or
X Press the KEYLESS GO button on the selec-
tor lever. The key mus tbeinside the vehi-
cle.
The alarm is switched off. Tow-awa
yprotection
An audibl eand visua lalarm is triggered if your
vehicle's angle of inclination is altered while
tow-awa yprotectio nisp rimed .Thish appens
if the vehicle is jacked up on one side, for
example.
Priming tow-awa yprotection X
Lock the vehicle using the key .Onvehicles
with KEYLESS GO*, the locking button on
the doo rhandle/boot li dcan also be used.
Tow-away protectio nisp rimed after
approximately 30 seconds.
To deactivate tow-awa yprotection Whe
nyou unlock your vehicle using the key
or KEYLESS GO *,tow-away protection is
automaticall ydeactivated.
Deactivate tow-away protection manuall yto
prevent afalse alarmify ourv ehicle:
R is being transported
R is being loaded ,e.g.o nto aferry or car
transporter
R is being parked on amovable surface, e.g.
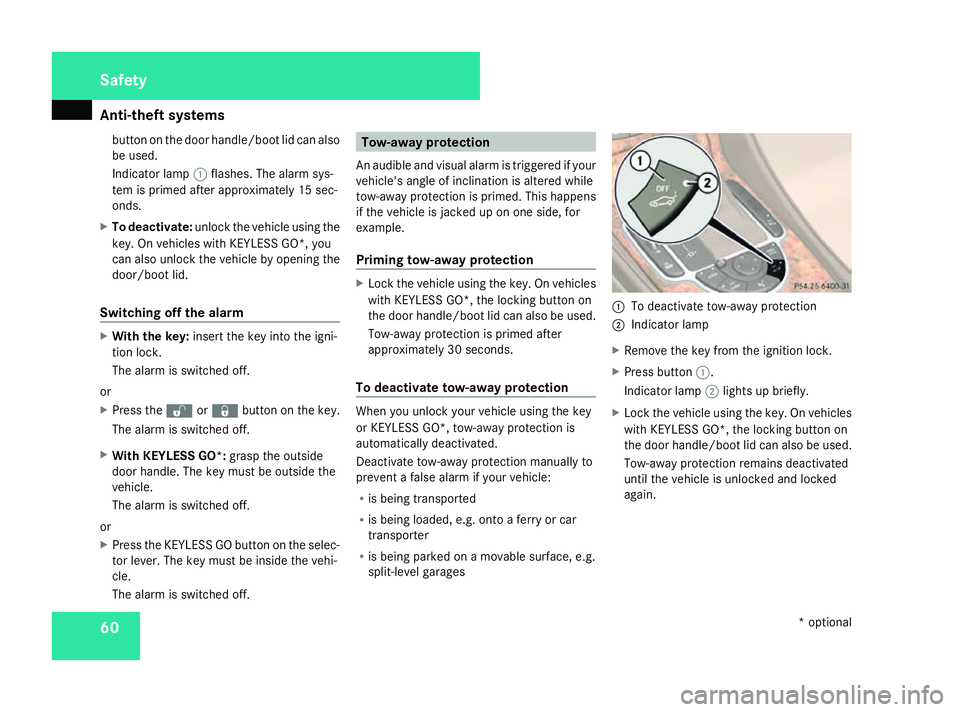
split-level garages 1
To deactivate tow-away protection
2 Indicator lamp
X Remov ethe key fro mthe ignition lock.
X Press button 1.
Indicator lamp 2lights up briefly.
X Loc kthe vehicl eusing the key .Onvehicles
with KEYLESS GO*, the locking button on
the door handle/boo tlid can also be used.
Tow-awa yprotection remains deactivated
unti lthe vehicl eisunlocke dand locked
again. Safety
*optional
230_AKB; 5; 4, en-GB
bjanott,
Version: 2.9.6 2008-04-08T15:09:54+02:00-Seite 60 Dateiname: 6515_3089_02_buchblock.pdf; preflight
Page 65 of 317
Anti-thef
tsyste ms 62
X
Remove the key fro mthe ignition lock.
X Pres sbutton 2.
Indicato rlamp 1flashe sbriefly.
X Lock the vehicl eusing the key .Onvehicles
with KEYLESS GO*, the locking button on
the door handle/boo tlid cana lsobeu sed.
Th einterior motio nsensorremain sdeact i-
vated until the vehicl eisunlock ed and
locked again. Safety
*optional
230_AKB; 5; 4, en-GB
bjanott, Version: 2.9.6 2008-04-08T15:09:54+02:00-Seite 62 Dateiname: 6515_3089_02_buchblock.pdf; preflight
Page 71 of 317
Opening and closing
68possible to close the door. Do not attempt
to forc
ethe door to close. You could oth-
erwise damage the door or the window. Locking/unlocking the vehicle from
the inside
You can centrally lock or unlock the vehicle
from the inside. This feature may be useful if,
for example, you wish to unlock the
passenger door from the inside or lock the
vehicle before you pull away. G
Risk of accident
Do not leave children unsupervised in the
vehicle. They could open adoor from the
inside –even if it is locked –and thereby
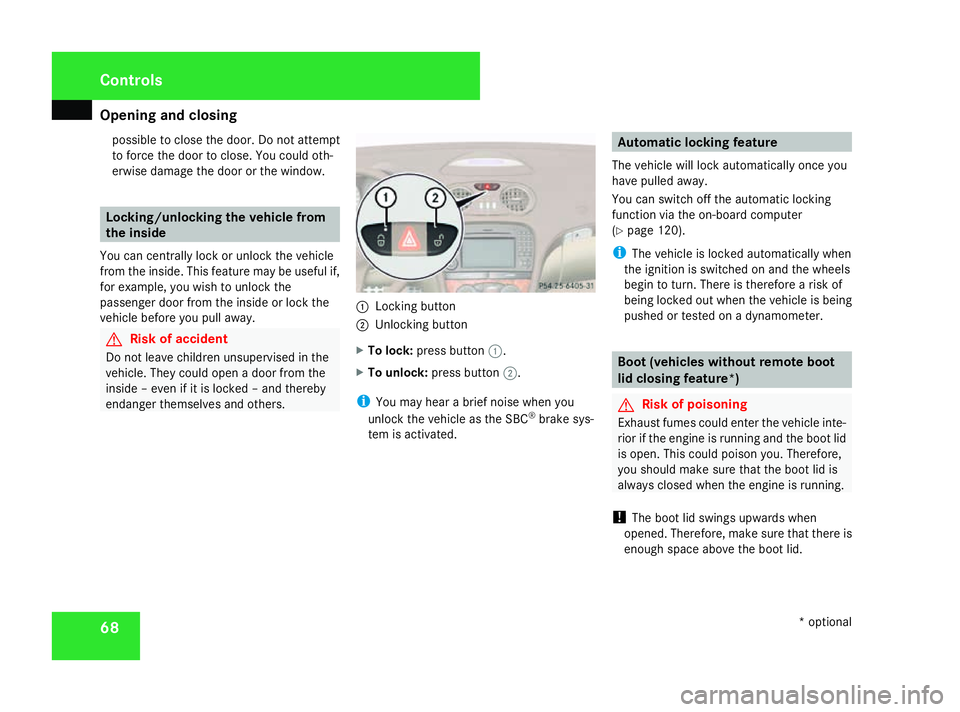
endanger themselves and others. 1
Lockingb utton
2 Unlocking button
X To lock: press button 1.
X To unlock: press button 2.
i You may hear abrief noise when you
unlock the vehicle as the SBC ®
brake sys-
tem is activated. Automatic lockingf
eature
The vehicle will lock automatically once you
have pulleda way.
You can switch off the automatic locking
function via the on-board computer
(Y page 120).
i The vehicle is locked automatically when
the ignition is switched on and the wheels
begin to turn. There is therefore arisk of
being locked out when the vehicle is being
pushed or tested on adynamometer. Boot (vehicles without remote boot
lid closing feature*)
G
Risk of poisoning
Exhaust fumes could enter the vehicle inte-
rior if the engine is running and the boot lid
is open. This could poison you. Therefore,
you should make sure that the boot lid is
always closed when the engine is running.
! The boot lid swings upwards when
opened. Therefore, make sure that there is
enough space above the boot lid. Controls
*optional
230_AKB; 5; 4, en-GB
bjanott
,V ersion: 2.9.6
2008-04-08T15:09:54+02:00
-Seite 68 Dateiname: 6515_3089_02_buchblock.pdf; preflight
Page 76 of 317
Key positions
73Key positions
Key
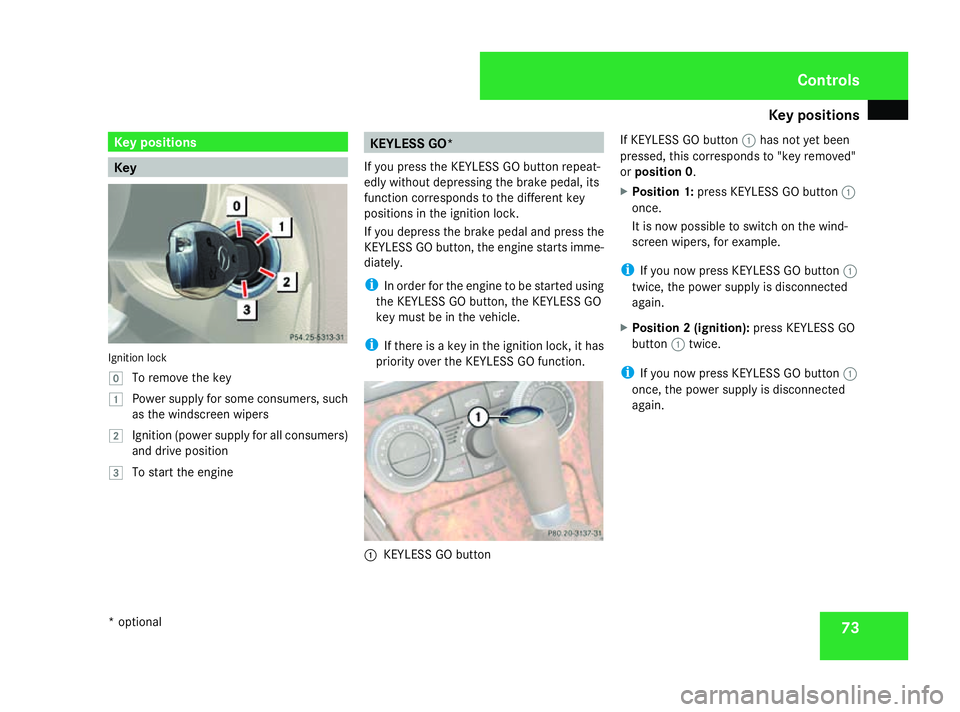
Ignition lock
}
To remove th ekey
$ Power supply for som econsumers, such
as th ewindscreen wipers
% Ignition (power supply for all consumers)
and driv eposition
& To start th eengine KEYLESS GO*
If you pres sthe KEYLESS GO button repeat-
edly without depressing th ebrak epedal, its
function corresponds to th edifferen tkey
position sintheignition lock.
If you depress th ebrak epedal and pres sthe
KEYLESS GO button ,the engine start simme-
diately.
i In orde rfor th eengine to be started using
th eK EYLESS GO button ,the KEYLESS GO
key must be in th evehicle.
i If there is akey in th eignition lock, it has
priorit yover th eKEYLESS GO function. 1
KEYLESS GO button If KEYLESS GO button
1has no tyet been
pressed, this corresponds to "key removed"
or position 0 .
X Position 1: pressKEYLESS GO button 1
once.
It is no wpossible to switch on th ewind-
screen wipers, for example.
i If you no wpressKEYLESS GO button 1
twice, th epower supply is disconnected
again.
X Position 2(ignition): pressKEYLESS GO
button 1twice.
i If you no wpressKEYLESS GO button 1
once, th epower supply is disconnected
again. Controls
*o ptional
230_AKB
;5;4,en-GB
bjanott ,V ersion: 2.9.6
2008-04-08T15:09:54+02:00
-Seite 73 ZDateiname: 6515_3089_02_buchblock.pdf; preflight
Page 77 of 317
Seats
74 Seats
Points to remember
G
Risk of injury
The seats can still be adjusted when there
is no key in the ignition lock. For this rea-
son, children should never be left unsuper-
vised in the vehicle. They could become
trapped when adjusting aseat. G
Risk of accident
Only adjust the driver's seat when the vehi-
cle is stationary. You will otherwise be dis-
tracted from the road and traffic conditions
and you could lose control of the vehicle as
ar esult of the seat moving. This could
cause an accident. G
Risk of injury
Make sure that nobody can become trap-
ped when you adjust the seat.
Observe the notes concerning the airbag
system.
Secure children as recommended; see
"Children in the vehicle" section.
! When you move the seats, make sure that
there are no objectsint he footwell orbehind the seats. Otherwise, you could
damage the seats and the objects.
i The head restraint scannot be removed. Adjusting the seat electrically
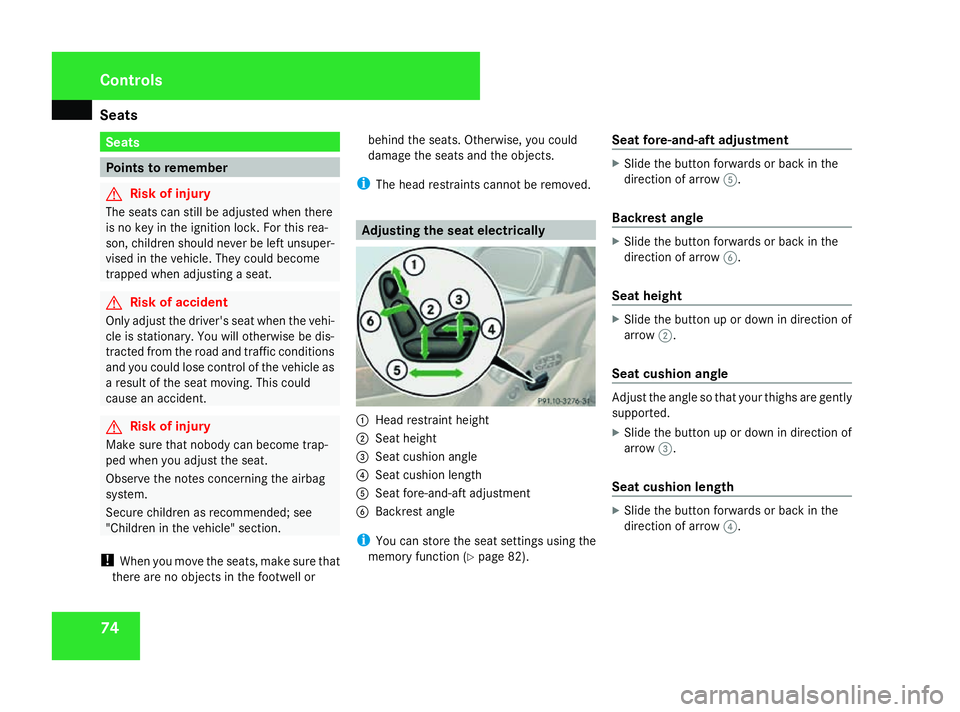
1
Head restraint height
2 Seat height
3 Seat cushion angle
4 Seat cushion length
5 Seat fore-and-aft adjustment
6 Backrest angle
i You can store the seat settings using the
memory function (Y page 82). Seat fore-and-aft adjustment X
Slide the button forwards or back in the
direction of arrow 5.
Backrest angle X
Slide the button forwards or back in the
direction of arrow 6.
Seat height X
Slide the button up or down in direction of
arrow 2.
Seat cushiona ngle Adjust the angle so that yourt
highs are gently
supported.
X Slide the button up or down in direction of
arrow 3.
Seat cushionl ength X
Slide the button forwards or back in the
direction of arrow 4. Controls
230_AKB; 5; 4, en-GB
bjanott,
Version: 2.9.6
2008-04-08T15:09:54+02:00
-Seite 74 Dateiname: 6515_3089_02_buchblock.pdf; preflight
Page 78 of 317
Seats
75
Head restraint height G
Risk of injury
Make sure that the central area of the head
restraint supports the back of your head at
about eye level. You could seriously injure
your neck if your head is not correctly sup-
ported by the head restraint in the event of
an accident. Never travel without acor-
rectly adjusted and engaged head restraint.
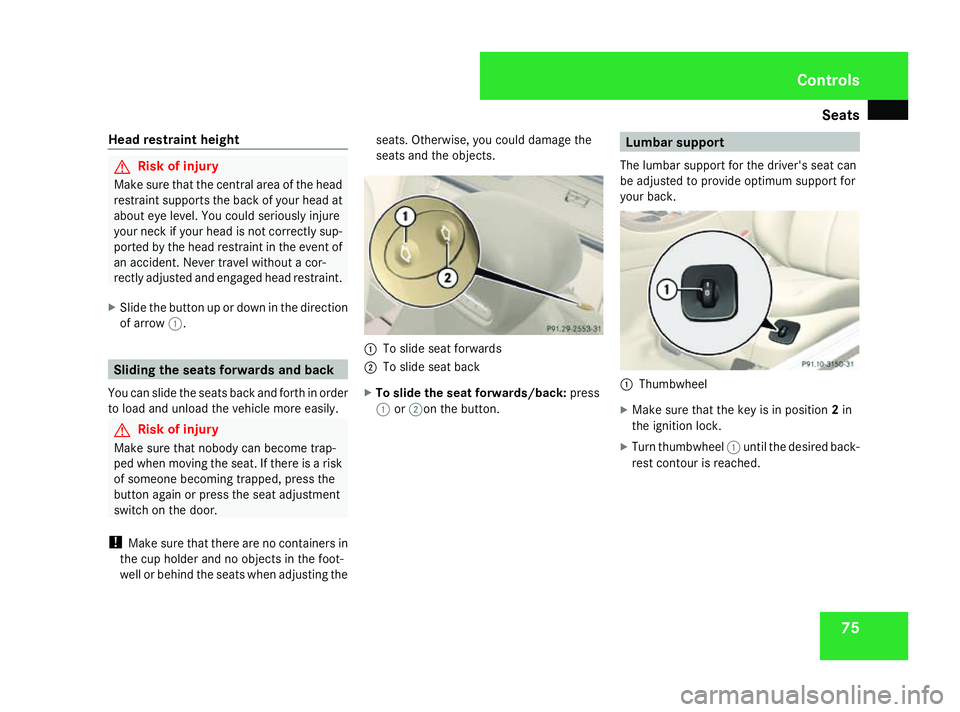
X Slide the button up or down in the direction
of arrow 1. Sliding the seats forwardsa
nd back
You can slide the seats back and forth in order
to load and unload the vehicle more easily. G
Risk of injury
Make sure that nobody can become trap-
ped when moving the seat. If there is arisk
of someone becoming trapped, press the
button again or press the seat adjustment
switch on the door.
! Make sure that there are no containers in
the cup holder and no objectsint he foot-
well or behind the seats when adjusting the seats. Otherwise, you could damage the
seats and the objects.
1
To slide seat forwards
2 To slide seat back
X To slide the seat forwards/back: press
1 or2on the button. Lumbar support
The lumbar support for the driver's seat can
be adjusted to provide optimum support for
your back. 1
Thumbwheel
X Make sure that the key is in position 2in
the ignition lock.
X Turn thumbwheel 1until the desired back-
rest contour is reached. Controls
230_AKB; 5; 4, en-GB
bjanott
,V ersion: 2.9.6
2008-04-08T15:09:54+02:00
-Seite 75 ZDateiname: 6515_3089_02_buchblock.pdf; preflight
Page 79 of 317
Seats
76 Multi-contour seat*
You can set the contour of the seat to provide
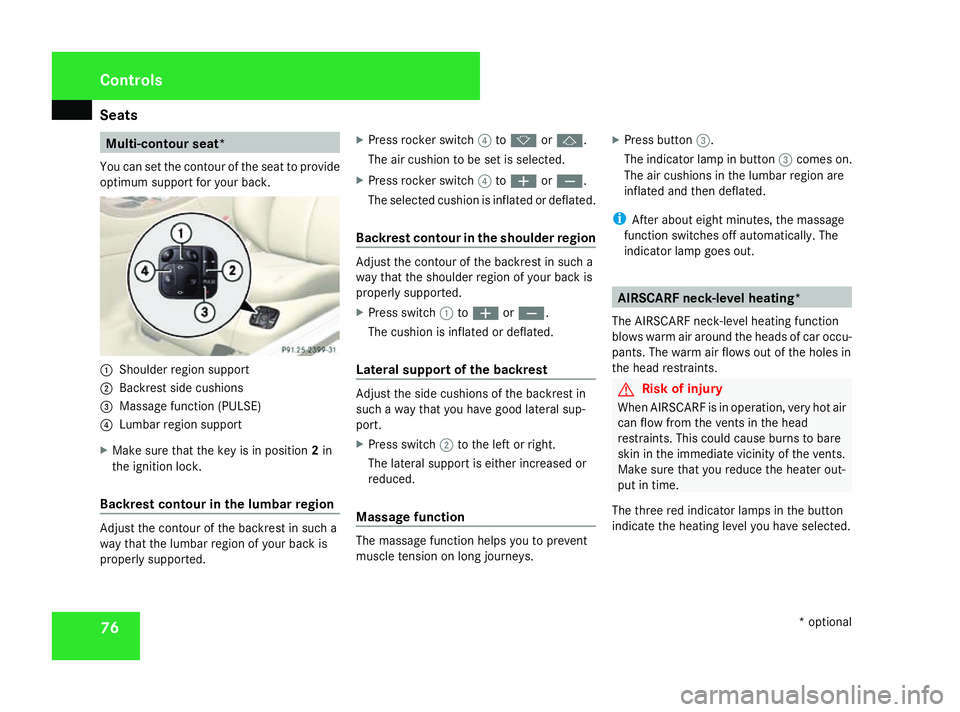
optimum support for your back. 1
Shoulder region support
2 Backrest side cushions
3 Massage function (PULSE)
4 Lumbarr egion support
X Make sure that the key is in position 2in
the ignition lock.
Backrest contour in the lumbar region Adjust the contour of the backrest in such a
way that the lumbar region of yourb
ack is
properly supported. X
Press rocker switch 4tok orj.
The air cushion to be set is selected.
X Press rocker switch 4toæ orç.
The selected cushion is inflated or deflated.
Backrest contour in the shoulder region Adjust the contour of the backrest in such a
way that the shoulder region of yourb
ack is
properly supported.
X Press switch 1toæ orç.
The cushion is inflated or deflated.
Lateral support of the backrest Adjust the side cushions of the backrest in
such
away that you have good lateral sup-
port.
X Press switch 2to the left or right.
The lateral support is either increased or
reduced.
Massage function The massage function helps you to prevent
muscle tension on long journeys.X
Press button 3.
The indicator lamp in button 3comes on.
The air cushions in the lumbar region are
inflated and then deflated.
i After aboute ight minutes, the massage
function switches off automatically.T he
indicator lamp goes out. AIRSCARF neck-level heating*
The AIRSCARF neck-level heating function
blowsw arm air around the headsofc ar occu-
pants. The warm air flows out of the holes in
the head restraints. G
Risk of injury
When AIRSCARF is in operation, very hot air
can flow from the vents in the head
restraints. This could cause burns to bare
skin in the immediate vicinity of the vents.
Make sure that you reduce the heater out-
put in time.
The three red indicator lamps in the button
indicate the heating level you have selected. Controls
*optional
230_AKB; 5; 4, en-GB
bjanott,
Version: 2.9.6 2008-04-08T15:09:54+02:00-Seite 76 Dateiname: 6515_3089_02_buchblock.pdf; preflight