2008 MERCEDES-BENZ SL ROADSTER clock
[x] Cancel search: clockPage 266 of 317
Changing th
ebulbs 263
X
Turn bulb holder 5clockwise until it
engages.
The handle of bulb holder 5must be hor-
izontal.
X Align housing cover 1and tur nitclock-
wise. Changing th
erearb ulbs
Opening and closin gthe sidetrimp an-
els You must open th
ecorre sponding side trim
panel in th eboot to chang ethe bulbs.
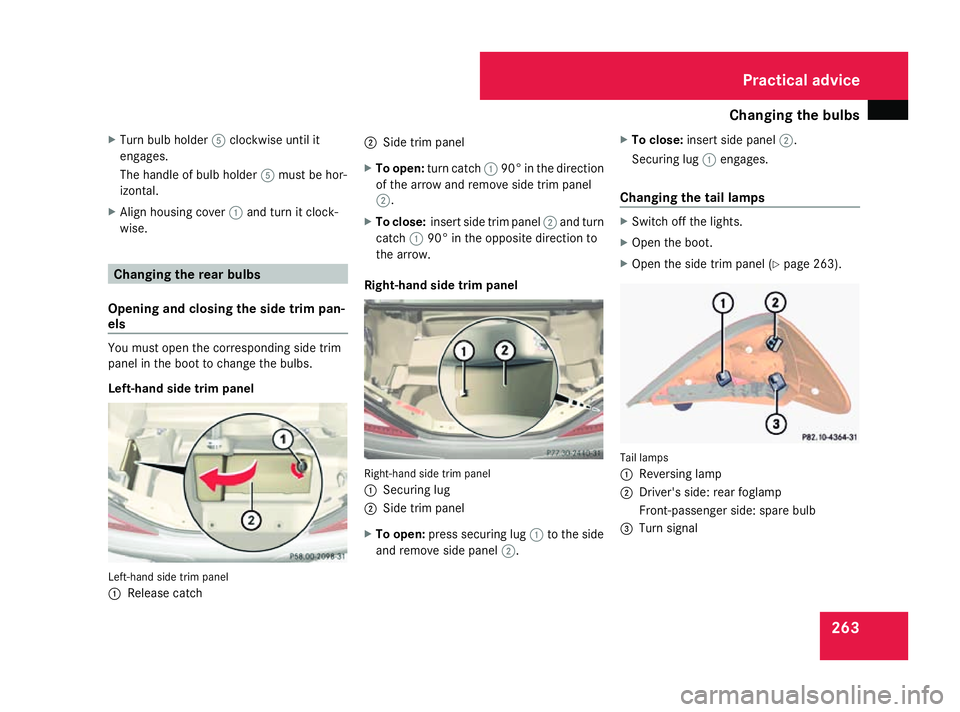
Left-hand sid etrimp anel Left-han
dside trim panel
1 Releas ecatch 2
Sidetrimp anel
X To open: turnc atch 190°int he direction
of the arrow and remove side trim panel
2.
X To close: insert side trim panel 2and turn
catch 190° in the opposite direction to
the arrow.
Right-han dsidet rim panel Right-hand side trim panel
1
Securing lug
2 Sidetrim panel
X To open: press securing lug 1to the side
and remove side panel 2.X
To close: insert side panel 2.
Securing lug 1engages.
Changin gthe tail lamps X
Switch off the lights.
X Ope nthe boot.
X Ope nthe side trim panel (Y page 263). Tail lamps
1
Reversing lamp
2 Driver' sside: rearfoglamp
Front-passenger side :spare bulb
3 Turn signal Practical advice
230_AKB; 5; 4, en-GB
bjanott,
Version: 2.9.6 2008-04-08T15:09:54+02:00-Seite 263 ZDateiname: 6515_3089_02_buchblock.pdf; preflight
Page 267 of 317
Replacing the wiper blades
264
X
Turn the corresponding bulb holde ranti-
clockwise and remove it.
X Pull the corresponding bulb ou tofthe bulb
holder.
X Insert the appropriate new bulb into the
bulb holder.
X Insert the corresponding bulb holde rand
turn it clockwise.
X Close the side trim panel (Y page 263).
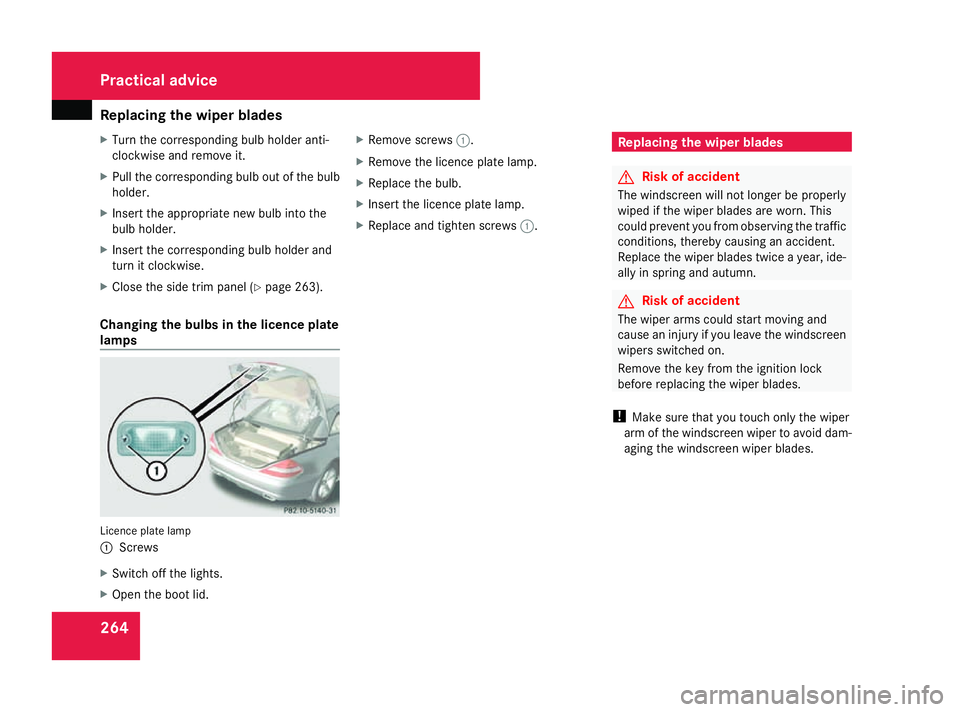
Changin gthe bulbs in the licenc eplate
lamps Licence plate lamp
1
Screws
X Switch off the lights.
X Ope nthe boo tlid. X
Remove screws 1.
X Remove the licence plate lamp.
X Replace the bulb.
X Insert the licence plate lamp.
X Replace and tighten screws 1. Replacing the wiper blades
G
Ris
kofa ccident
The windscree nwilln ot longer be properly
wipe difthe wipe rblade sare worn. This
could prevent yo ufrom observing the traffic
conditions, thereb ycausing an accident.
Replace the wipe rblade stwice ayear, ide-
ally in spring and autumn. G
Ris
kofa ccident
The wipe rarm sc ould start moving and
cause an injury if yo ulea ve the windscreen
wipers switched on.
Remove the key from the ignition lock
before replacing the wipe rblade s.
! Make sure tha tyou touch onl ythe wiper
arm of the windscree nwiper to avoid dam-
aging the windscree nwiper blades. Practical advice
230_AKB; 5; 4, en-GB
bjanott,
Version: 2.9.6 2008-04-08T15:09:54+02:00-Seite 264 Dateiname: 6515_3089_02_buchblock.pdf; preflight
Page 275 of 317
Flat tyre
272
X
Mak esuret hatthe base of th ejackisp osi-
tioned directl yunder jacking point 1.
X Hold th ejac kint hisp osition and tur ncrank
3 clockwise until th efootoft hejack
touches th eground .The jac kmustthen
stand vertically, eve nonaslope.
X Tur ncrank 3 until th etyreisr aised amax-
imum of 3cmfromt heground.
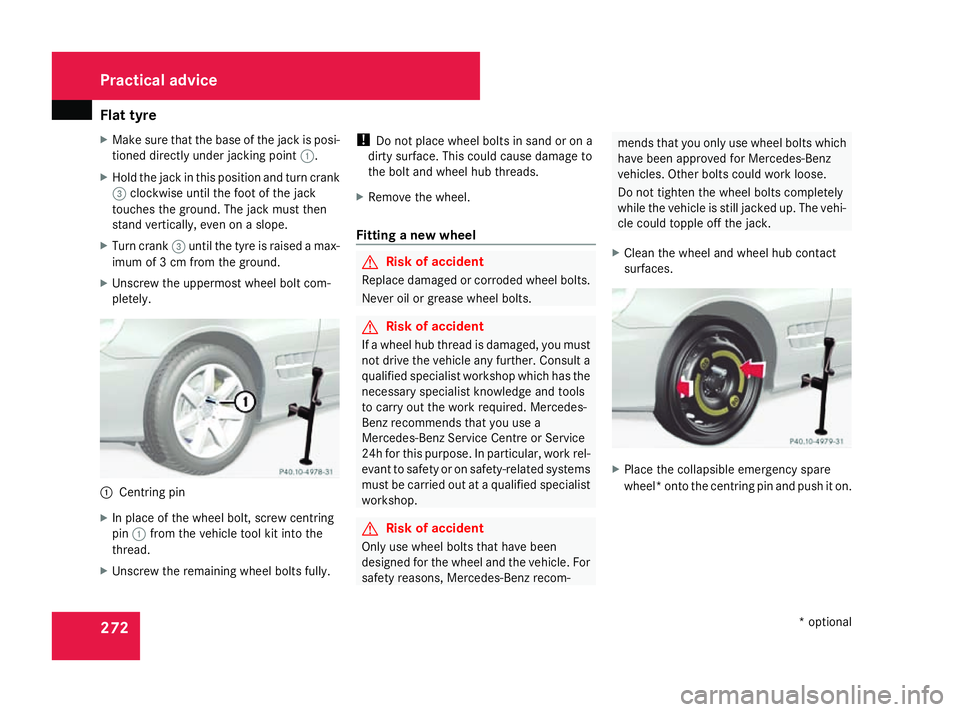
X Unscrew th euppermos twhee lbolt com-
pletely. 1
Centrin gpin
X In place of th ewheel bolt ,screw centring
pin 1from th evehicle tool kit int othe
thread.
X Unscrew th eremainin gwheel bolt sfully. !
Do not place wheel bolt sinsandorona
dirt ysurface. This could cause damage to
th eb olt and wheel hub threads.
X Remov ethe wheel.
Fitting anew wheel G
Risk of accident
Replace damaged or corrode dwheel bolts.
Never oil or greas ewheel bolts. G
Risk of accident
If aw heel hub thread is damaged ,you must
not driv ethe vehicle any further. Consult a
qualifie dspecialist workshop whic hhas the
necessar yspecialist knowledge and tools
to carry out th ework required. Mercedes-
Ben zrecommend sthaty ou use a
Mercedes-Ben zServic eCentre or Service
24 hfor this purpose. In particular ,work rel-
evan ttosafety or on safety-related systems
must be carried out at aqualifie dspecialist
workshop. G
Risk of accident
Only use wheel bolt sthath ave been
designed for th ewheel and th evehicle. For
safety reasons ,Mercedes-Ben zrecom- mends that you onl
yuse wheel bolt swhich
have been approved for Mercedes-Benz
vehicles .Other bolt scould work loose.
Do not tighten th ewheel bolt scompletely
while th evehicle is still jacked up. The vehi-
cle could topple off th ejack.
X Clean th ewheel and wheel hub contact
surfaces. X
Place th ecollapsible emergency spare
wheel* ont othe centring pin and push it on. Practical advice
*optional
230_AKB
;5;4,en-GB
bjanott, Version:2.9.6
2008-04-08T15:09:54+02:00
-Seite 272 Dateiname: 6515_3089_02_buchblock.pdf; preflight
Page 277 of 317
Flat tyre
274The air pump can be operate
dagain once
it has cooled down.
If th etyrep ressur eistoohigh:
X Ope nthe pressur erelease screw on the
pressur egauge until th etyrep ressur eis
correct.
X Disconnect th eelectric air pump and stow
it away.
Lowering th evehicle X
Lower th evehicle. To do this, tur nthe crank
of th ejacka nti-clockwise until th evehicle
is standin gfirmly on th eground again.
X Pull th ejacko ut of th ejacking socket.
X Plac ethe jacktoo neside. X
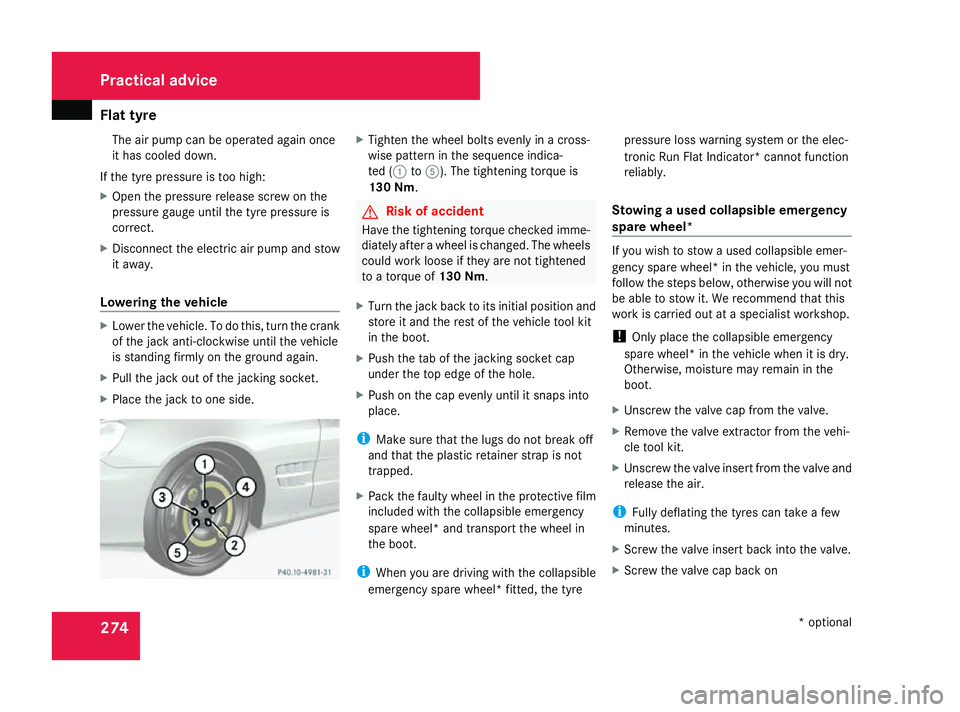
Tighte nthe whee lbolt se venl yinac ross-
wise pattern in th esequence indica-
te d( 1to 5). The tightenin gtorque is
130 Nm . G
Risk of accident
Hav ethe tightenin gtorque checke dimme-
diately after awhee lisc hanged. The wheels
could wor kloos eift heya re no ttightened
to atorque of 130 Nm .
X Tur nthe jackb acktoi tsinitial position and
store it and th erestoft hevehicl etoolkit
in th eboot.
X Push th etab of th ejacking socke tcap
under th etop edge of th ehole.
X Push on th ecap evenl yuntil it snaps into
place.
i Mak esuret hatthe lugs do no tbreak off
and that th eplastic retainer strap is not
trapped.
X Pac kthe fault ywhee lint heprotective film
included wit hthe collapsible emergency
spar ewheel* and transpor tthe whee lin
th eb oot.
i Whe nyou are drivin gwitht he collapsible
emergenc yspar ew heel* fitted, th etyre pressur
elossw arnin gsystem or th eelec-
tronic Run Fla tInd icator* canno tfunction
reliably.
Stowing ausedc ollapsible emergency
spar ewheel* If you wish to stow
aused collapsible emer-
gency spar ewheel* in th evehicle, you must
follow th esteps below, otherwise you will not
be able to stow it .Werecommen dthatthis
wor kisc arriedout at aspecialist workshop.
! Only plac ethe collapsible emergency
spar ewheel* in th evehicl ewhen it is dry.
Otherwise ,moisture may remain in the
boot.
X Unscrew th evalvec ap from th evalve.
X Remove th evalvee xtractor from thevehi-
cle tool kit.
X Unscrew th evalv eins ertfro mt hevalv eand
release th eair.
i Fullydeflatin gthe tyres can tak eafew
minutes.
X Screw th evalveinsertb acki ntot he valve.
X Screw th evalvec ap bac kon Practical advice
*optional
230_AKB; 5; 4, en-GB
bjanott
,V ersion: 2.9.6
2008-04-08T15:09:54+02:00
-Seite 274 Dateiname: 6515_3089_02_buchblock.pdf; preflight
Page 285 of 317
Towin
gand tow-starting 282
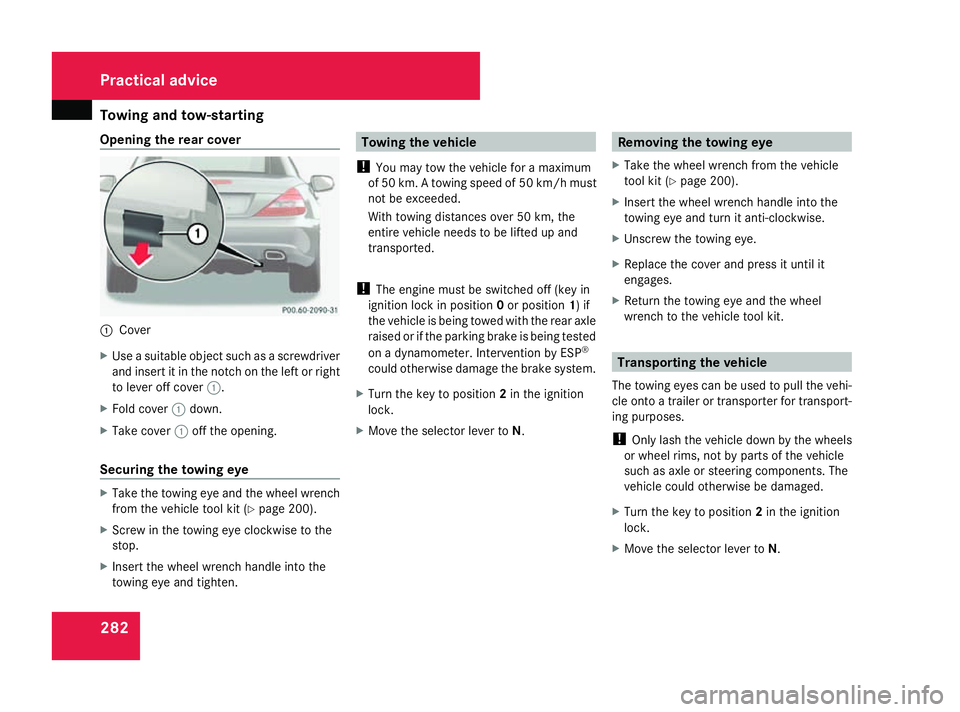
Opening the rea
rcover 1
Cover
X Use asuitabl eobject such as ascrewdriver
and insert it in the notch on the left or right
to lever off cover 1.
X Fol dc over 1down.
X Take cover 1off the opening.
Securin gthe towin geye X
Take the towing ey eand the whee lwrench
fro mt he vehicl etoolkit ( Ypage 200).
X Scre wint he towing ey eclockwise to the
stop.
X Insert the whee lwrench handl einto the
towing ey eand tighten. Towin
gthe vehicle
! Youm aytow the vehicl efor am aximum
of 50 km. Atowing spee dof50k m/h must
not be exceeded.
With towing distances ove r50km, the
entire vehicl eneeds to be lifted up and
transported.
! Thee ngine must be switched off (ke yin
ignition lock in position 0or position 1)if
the vehicl eisbeing towed with the rea raxle
raised or if the parking brake is being tested
on adynamometer. Interventio nbyESP®
could otherwis edamag ethe brake system.
X Turn the key to position 2in the ignition
lock.
X Move the selector lever to N. Removing the towin
geye
X Take the whee lwrench fro mthe vehicle
too lkit ( Ypage 200).
X Insert the whee lwrench handl einto the
towing ey eand tur nitanti-clockwise.
X Unscrew the towing eye.
X Replac ethe cover and press it unti lit
engages.
X Retur nthe towing ey eand the wheel
wrench to the vehicl etoolkit. Transporting the vehicle
Th et owing eyes ca nbeusedtop ullt he vehi-
cle onto atrailer or transporte rfor transport-
ing purposes.
! Onlylas ht he vehicl edownbyt he wheels
or whee lrim s, not by parts of the vehicle
such as axl eorsteering components .The
vehicl ecould otherwis ebedamaged.
X Turn the key to position 2in the ignition
lock.
X Move the selector lever to N.Practical advice
230_AKB; 5; 4, en-GB
bjanott,
Version: 2.9.6 2008-04-08T15:09:54+02:00-Seite 282 Dateiname: 6515_3089_02_buchblock.pdf; preflight