2008 MERCEDES-BENZ SL ROADSTER clock
[x] Cancel search: clockPage 154 of 317
Air conditioning
151Setting th
eairflow
X Mak esuret hatthe keyisi nposition 2in
th ei gnition lock.
X To increase/reduce: turnthumbwheel
a clockwise or anti-clockwise
(Y page 145). Demisting th
ewindscreen
i You should only select th e"demisting"
function until th ewindscree nisclear again.
X Mak esuret hatthe keyisi nposition 2in
th ei gnition lock.
X To activate: press theybutton.
The indicator lamp in the ybutton
comes on.
The system automatically switches to the
following functions:
R coolin gwitha ir dehumidification on
R hig ha irflow 18
R hig htem perature 18
R air distribution to th ewindscree nand
fron tside windows
R air-recirculation mode off X
To deactivate: press theybutton.
The indicator lamp in the ybuttongoes
out .The previously selecte dsetting scome
into effec tagain .The coolin gwitha ir dehu-
midification function remain son.Air-recir-
culation mode remain sdeactivated.
or
X Press the Ubutton.
The indicator lamp in the ybuttongoes
out .Airflo wand air distribution are set to
automatic mode.
or
X Tur nthumbwheel 7orc clockwise or
anti-clockwise (Y page 145).
or
X Tur nthumbwheel aclockwise or anti-
clockwise (Y page 145). Demisting th
ewindows
Windows misted up on th einside X
Activat ethe "coolin gfunction wit hair-
dehumidification "function.
X Activat ethe automatic mode.
X If th ewindows continue to mis tup, activate
th e" demisting" function.
Windows misted up on th eoutside X
Activat ethe windscree nwipers.
X Press on eoftheÑ buttons repeatedly
until the a,ÚorY symbol is dis-
played.
i You should only selec tthiss etting until
th ew indscree nisclear again.
18 Dependin gontheoutsid etem perature. Cont
rols
230_AKB; 5; 4, en-GB
bjanott,
Version: 2.9.6
2008-04-08T15:09:54+02:00
-Seite 151 ZDateiname: 6515_3089_02_buchblock.pdf; preflight
Page 178 of 317
Refuelling
175Refuelling
Refuelling
G
Ris
kofe xplosion
Fue lish ighl yf lammable. Fire ,nake dflames
and smoking are therefore prohibited when
handling fuels.
Switch off the engine before refuelling. G
Ris
kofi njury
Avoi dany contact with fuels.
Yo uc an damag eyourh ealth if your skin
come sinto direct contact with fue lorifyou
inhal ethe vapours.
! Do not us ediese ltor efuel vehicles with a
petrol engine. Even small amounts of diesel
will damag ethe injectio nsystem .Damage
caused by using diese ltorefuel vehicles
with apetrol engine or mixing petrol with
diese lisnot covered by the warranty.
! Do not start the engine if yo uaccidentally
refuel with the wrong fuel. Otherwise, the
fue lcould enter the fue llin es. The fue ltank
and fue llin es woul dthen have to be
drained. In this case, notif yaqualified spe-
cialist worksho pand have the fue ltank and
fue llin es draine dcompletely. Whe
nyou ope norc lose the vehicl ewitht he
key or KEYLESS GO*, the fue lfille rflapis
automaticall yunlocked or locked.
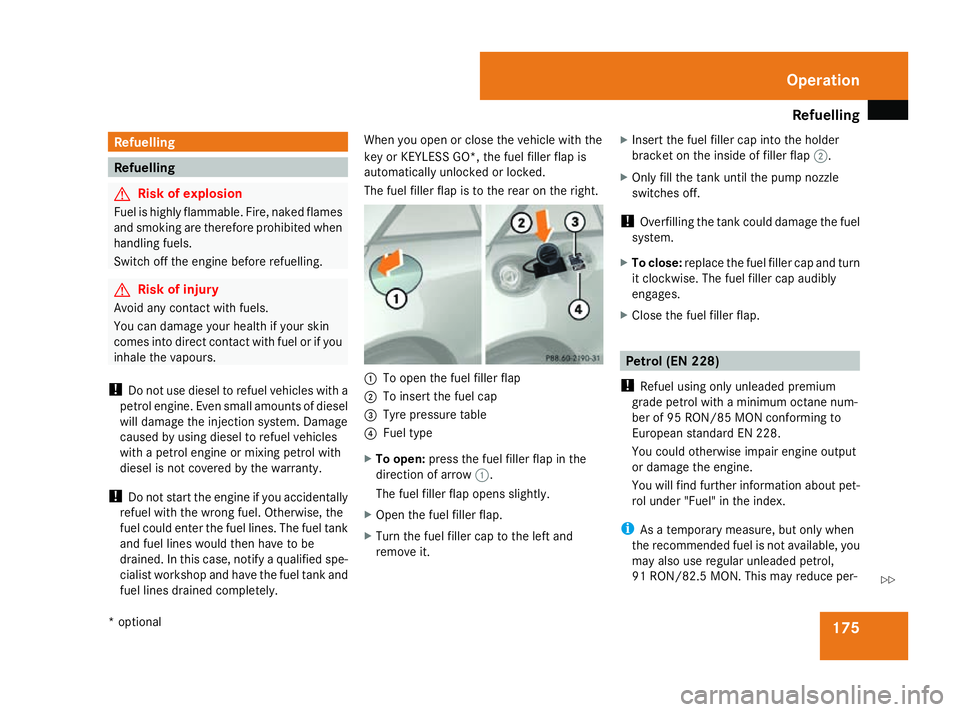
The fue lfille rflapistot he rearonthe right. 1
To open the fuel fille rflap
2 To insert the fuel cap
3 Tyre pressure table
4 Fuel type
X To open: press the fuel fille rflapint he
directio nofarrow 1.
Th ef uelfille rflapo pens slightly.
X Open the fuel fille rflap.
X Turn the fuel fille rcap to the left and
remove it. X
Insert the fuel fille rcap into the holder
bracket on the insid eoffillerflap 2.
X Onl yfillt he tank until the pump nozzle
switches off.
! Overfilling the tank could damage the fuel
system.
X To close: replace the fuel fille rcap and turn
it clockwise. Th efuelfille rcap audibly
engages.
X Clos ethe fuel fille rflap. Petrol (E
N228)
! Refuel using onl yunleade dpremium
grade petrol with aminimum octane num-
be rof95R ON/85M ONconforming to
Europea nstandard EN 228.
Yo uc ould otherwis eimpair engine output
or damage the engine.
Yo uw illf indf urthe rinformation abou tpet-
rol unde r"Fuel" in the index.
i Asatemporary measure, bu tonlyw hen
the recommende dfuelisn ot available, you
ma yalsou seregular unleaded petrol,
91 RON/82.5 MO N. Thismay reduce per- Operation
*o ptional
230_AKB; 5; 4, en-GB
bjanott,
Version: 2.9.6 2008-04-08T15:09:54+02:00-Seite 175 ZDateiname: 6515_3089_02_buchblock.pdf; preflight
Page 183 of 317
Engine compartment
180Example (SL 600)
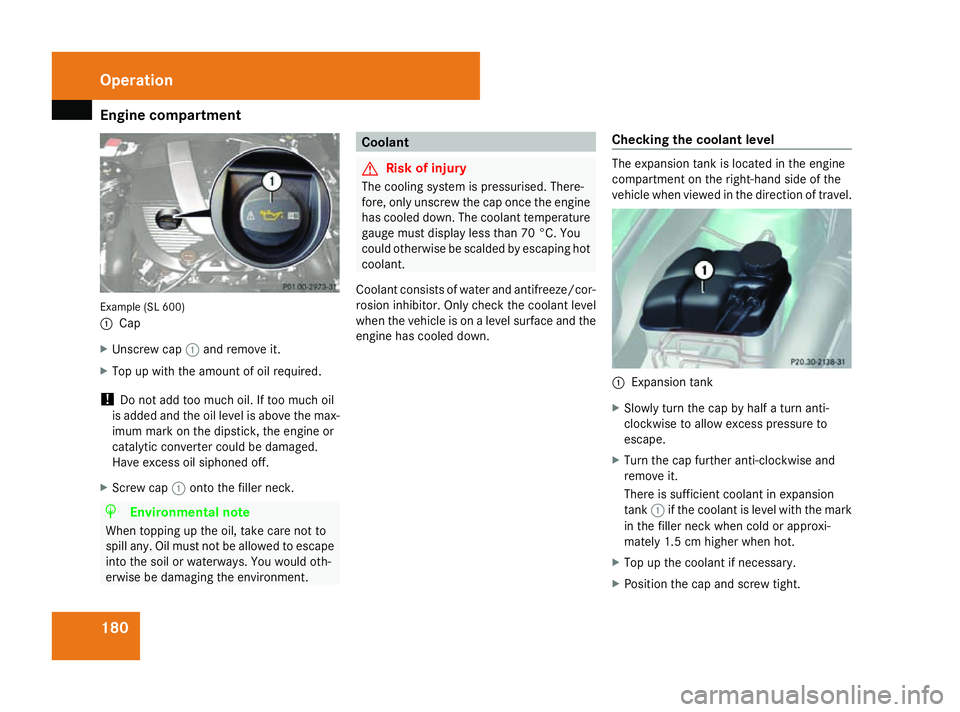
1
Cap
X Unscrew cap 1and remove it.
X Top up with th eamount of oil required.
! Do not add too much oil. If too much oil
is added and th eoil level is above th emax-
imum mark on th edipstick ,the engine or
catalytic converter could be damaged.
Have excess oil siphoned off.
X Screw cap 1ontothe filler neck. H
Environmental note
When topping up th eoil, tak ecare not to
spill any. Oil must not be allowed to escape
int ot he soil or waterways. You would oth-
erwise be damagin gthe environment. Coolant
G
Risk of injury
The cooling system is pressurised. There-
fore, only unscrew th ecap onc ethe engine
has cooled down. The coolant temperature
gauge must display less than 70 °C. You
could otherwise be scalde dbyescaping hot
coolant.
Coolant consist sofwater and antifreeze/cor-
rosion inhibitor. Only chec kthe coolant level
when th evehicle is on alevel surface and the
engine has cooled down. Checking th
ecoolant level The expansion tan
kislocated in th eengine
compartmen tontheright-han dside of the
vehicle when viewed in th edirectio noftravel. 1
Expansion tank
X Slowly tur nthe cap by half aturna nti-
clockwise to allow excess pressure to
escape.
X Turn th ecap further anti-clockwise and
remove it.
Ther eiss ufficien tcoolant in expansion
tank 1if th ecoolant is level with th emark
in th efiller nec kwhen cold or approxi-
mately 1. 5cmhigher when hot.
X Top up th ecoolant if necessary.
X Position th ecap and screw tight. Operation
230_AKB; 5; 4, en-GB
bjanott
,V ersion: 2.9.6
2008-04-08T15:09:54+02:00
-Seite 180 Dateiname: 6515_3089_02_buchblock.pdf; preflight
Page 203 of 317
Where will
Ifind...? 200 Where will
Ifind...? Warning triangle
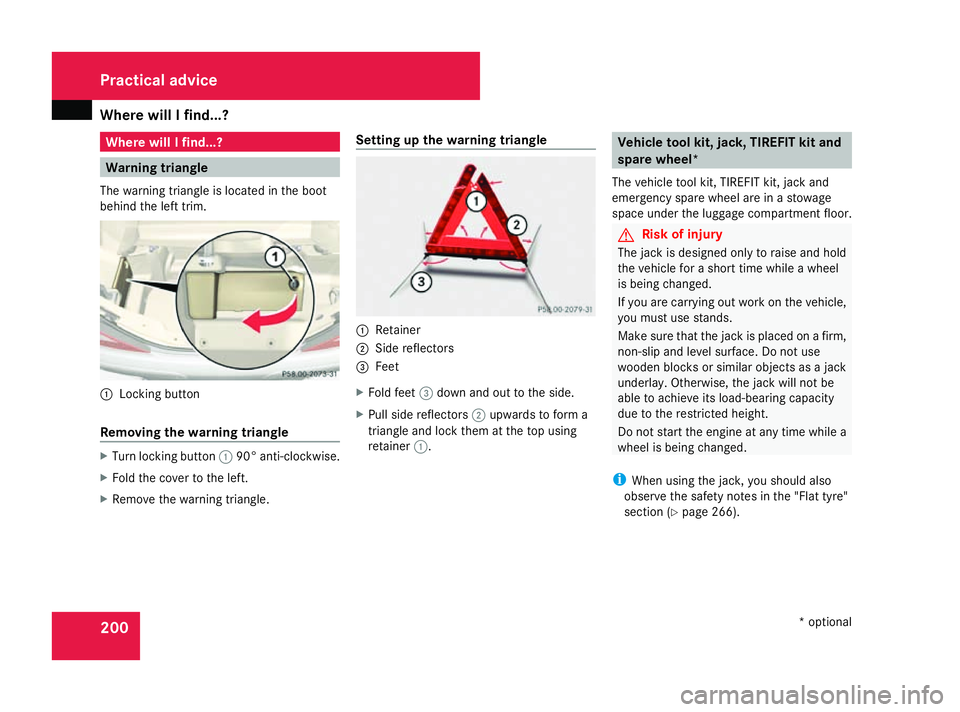
The warning triangl eislocated in the boot
behind the left trim. 1
Locking button
Removin gthe warning triangle X
Turn locking button 190° anti-clockwise.
X Fold the cover to the left.
X Remove the warning triangle. Setting up the warning triangle 1
Retainer
2 Side reflectors
3 Feet
X Fold feet 3dow nand ou ttothe side.
X Pull sid ereflectors 2upwards to form a
triangle and lock them at the top using
retainer 1. Vehicl
etoolkit, jack, TIREFI Tkit and
spare wheel*
The vehicle tool kit, TIREFIT kit, jack and
emergency spare wheel are in astowage
space under the luggage compartment floor. G
Risk of injury
The jack is designe donly to raise and hold
the vehicle for ashort time whileaw heel
is being changed.
If yo uare carrying ou tworkont he vehicle,
yo um ustu se stands.
Make sure that the jack is place donafirm,
non-sli pand level surface .Donot use
woode nblocks or similar objects as ajack
underlay .Otherwise, the jack will not be
able to achiev eits load-bearing capacity
du etot he restricted height.
Do not start the engine at any time whilea
wheel is being changed.
i Whe nusing the jack, yo ushoul dalso
observe the safety notes in the "Flat tyre"
section (Y page 266). Practical advice
*optional
230_AKB; 5; 4, en-GB
bjanott,
Version: 2.9.6 2008-04-08T15:09:54+02:00-Seite 200 Dateiname: 6515_3089_02_buchblock.pdf; preflight
Page 258 of 317
Locking/unlockin
ginanemergency 255Locking/unlocking in an emergency
Emergency key
If th evehicle can no longer be unlocked or
locke dwith th ekeyor th eKEYLESS GO
key*, use th eemergency ke yelement.
If you use th eemergency ke yelemen tto
unlock and open th edriver' sdoor or th eboot
lid, th eanti-thef talarm system* will be trig-
gered (Y page 59).
Ther eare several ways to tur noff th ealarm:
X Press the korj buttonont hekey.
or
X Inser tthe keyintot he ignition lock.
or
X Press th eKEYLESS GO button* on the
selecto rlever. The KEYLESS GO key* must
be in th evehicle.
or
X Loc koru nlock th evehicle usin gKEYLESS
GO*. The KEYLESS GO key* must be out-
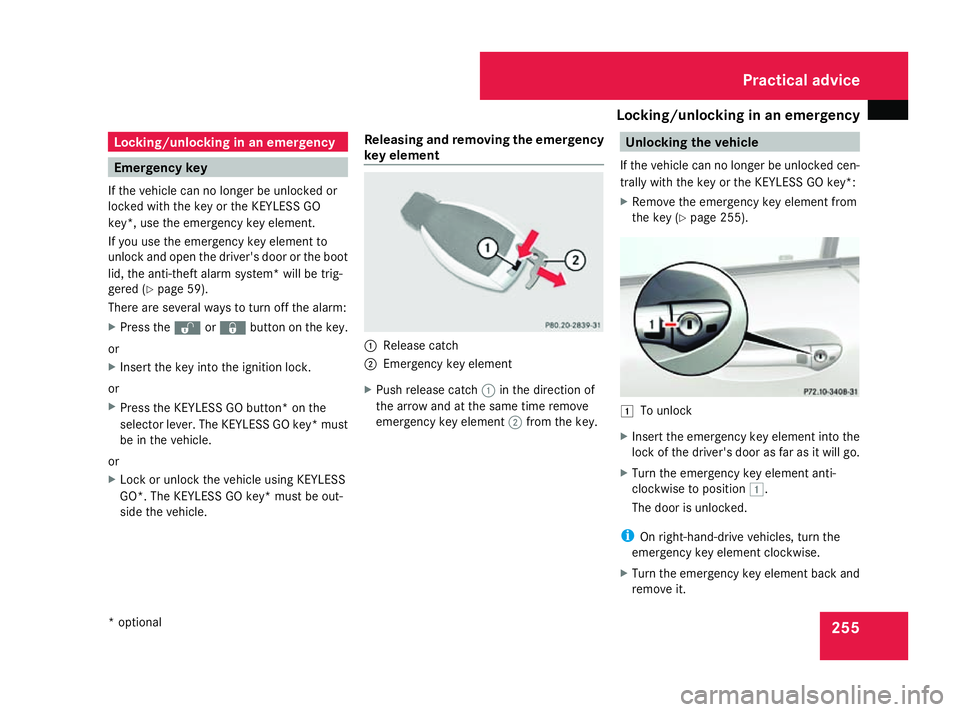
side th evehicle. Releasing and removing th
eemergency
key element 1
Release catch
2 Emergency ke yelement
X Push release catch 1in th edirection of
th ea rrow and at th esame tim eremove
emergency ke yelement 2from th ekey. Unlocking th
evehicle
If th evehicle can no longer be unlocked cen-
trally with th ekeyor th eKEYLESS GO key*:
X Remov ethe emergency ke yelemen tfrom
th ek ey ( Ypage 255). $
To unlock
X Inser tthe emergency ke yelemen tint ot he
loc koft hedriver' sdoor as far as it will go.
X Turn th eemergency ke yelemen tanti-
clockwise to position $.
The door is unlocked.
i On right-hand-driv evehicles, tur nthe
emergency ke yelemen tclockwise.
X Turn th eemergency ke yelemen tback and
remove it. Practical advice
*o ptional
230_AKB
;5;4,en-GB
bjanott ,V ersion: 2.9.6
2008-04-08T15:09:54+02:00
-Seite 255 ZDateiname: 6515_3089_02_buchblock.pdf; preflight
Page 259 of 317
Locking/unlockin
ginanemergency 256 Locking th
evehicle
If th evehicle can no longer be locke dcen-
trally with th ekeyor th eKEYLESS GO key*:
X Open th edriver' sdoor.
X Close th efront-pa ssenger door and the
boot lid.
X Press th elockin gbutto n(Ypage 68).
X Chec kwhether th elockin gknobont he
front-passenger door is still visible. Press
down th elockin gknobm anually if neces-
sary.
X Close th edriver' sdoor.
X Remov ethe emergency ke yelemen tfrom
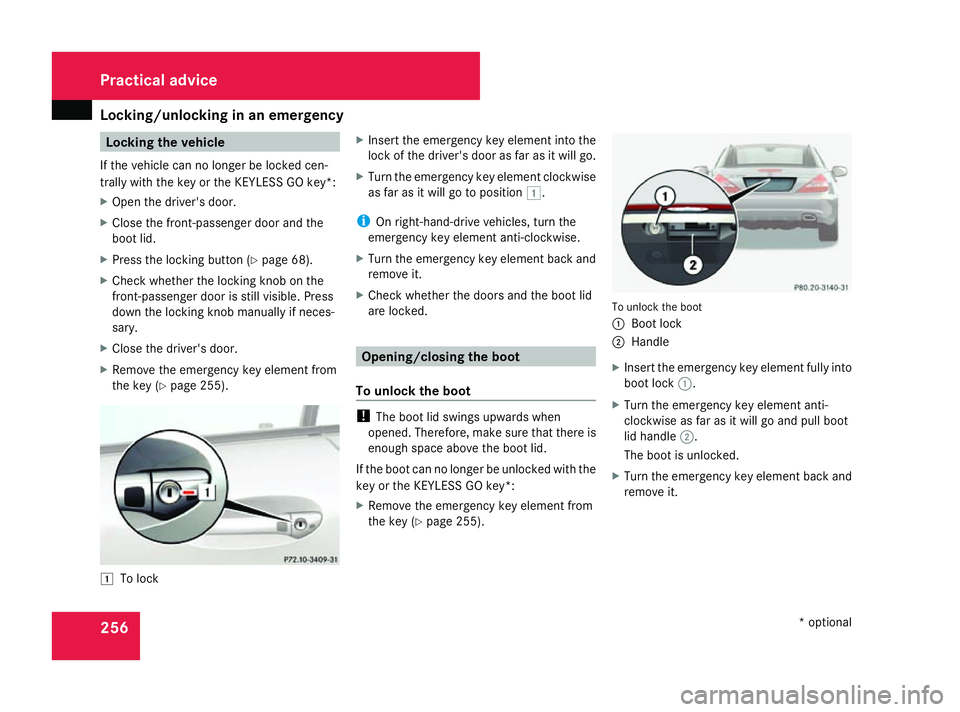
th ek ey ( Ypage 255). $
To lock X
Insert the emergenc ykey elemen tint ot he
lock of the driver's door as far as it will go.
X Turn the emergenc ykey elemen tclockwise
as far as it will go to position $.
i On right-hand-drive vehicles, tur nthe
emergenc ykey elemen tanti-clockwise.
X Turn the emergenc ykey elemen tback and
remove it.
X Check whether the doors and the boot lid
are locked. Opening/closing th
eboot
To unlock th eboot !
The boot lid swing supwards when
opened. Therefore, make sure that there is
enough space above the boot lid.
If the boot can no longer be unlocked with the
key or the KEYLESS GO key*:
X Remove the emergenc ykey elemen tfrom
the key (Y page 255). To unloc
kthe boot
1 Boot lock
2 Handle
X Insert the emergenc ykey elemen tfully into
boot lock 1.
X Turn the emergenc ykey elemen tanti-
clockwise as far as it will go and pull boot
lid handle 2.
The boot is unlocked.
X Turn the emergenc ykey elemen tback and
remove it. Practical advice
*optional
230_AKB; 5; 4, en-GB
bjanott
,V ersion: 2.9.6
2008-04-08T15:09:54+02:00
-Seite 256 Dateiname: 6515_3089_02_buchblock.pdf; preflight
Page 261 of 317
Changing th
ebatteries 258
X
Remove th eemergenc ykey elemen tfrom
th ek ey ( Ypage 255).
X Inser tthe emergenc ykey elemen tint ot he
loc koft heglov ecom partmen tand tur nit
to position $.
You can open th eglovec om partment. Lowering th
eloading aid manually
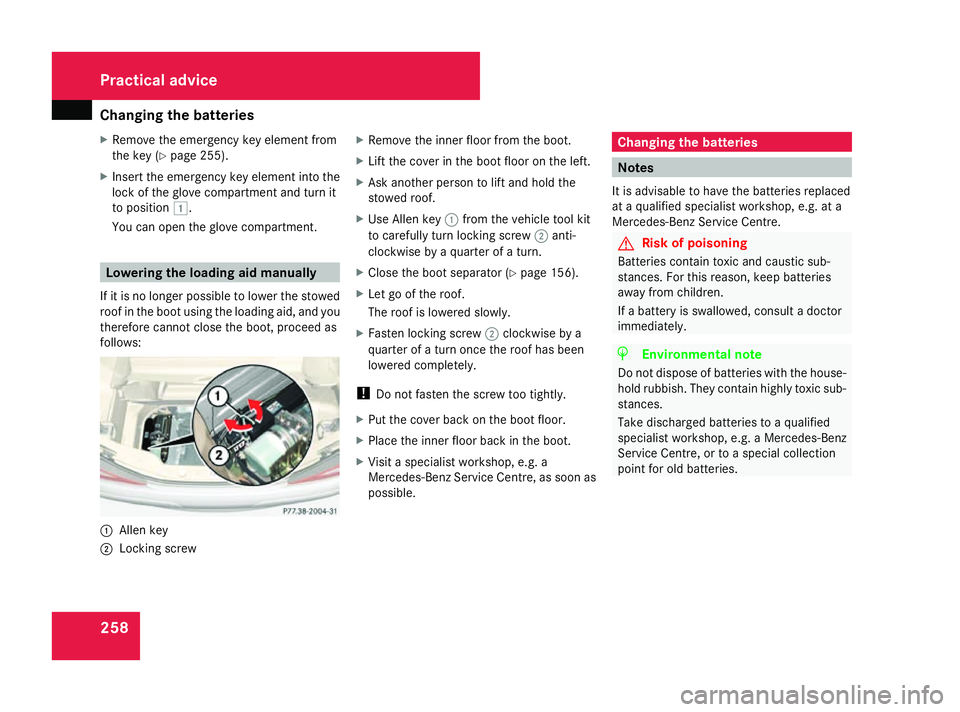
If it is no longer possible to lower th estowed
roo fint heboot usin gthe loadin gaid, and you
therefor ecanno tclose th eboot ,proceed as
follows: 1
Alle nkey
2 Lockin gscrew X
Remov ethe inner floo rfromt heboot.
X Lif tthe cover in th eboot floo rontheleft.
X Ask another person to lift and hold the
stowed roof.
X Use Alle nkey1 from th evehicle tool kit
to carefully tur nlocking screw 2anti-
clockwis ebyaquarter of aturn.
X Close th eboot separator (Y page 156).
X Let go of th eroof.
The roof is lowered slowly.
X Fasten locking screw 2clockwis ebya
quarter of aturno ncet he roof has been
lowered completely.
! Do not fasten th escrew to otightly.
X Put th ecover back on th eboot floor.
X Place th einner floo rback in th eboot.
X Visit aspecialist workshop, e.g .a
Mercedes-Ben zServic eCentre, as soon as
possible. Changing th
ebatteries Notes
It is advisabl etohave th ebatteries replaced
at aq ualified specialist workshop, e.g .ata
Mercedes-Ben zServic eCentre. G
Risk of poisoning
Batteries contain toxic and caustic sub-
stances. For this reason, kee pbatteries
away from children.
If ab attery is swallowed, consult adoctor
immediately. H
Environmental note
Do not dispos eofbatteries with th ehouse-
hold rubbish .They contain highly toxic sub-
stances.
Take discharge dbatteries to aqualified
specialist workshop, e.g .aMercedes-Benz
Servic eCentre, or to aspecial collection
poin tfor old batteries. Practical advice
230_AKB; 5; 4, en-GB
bjanott
,V ersion: 2.9.6
2008-04-08T15:09:54+02:00
-Seite 258 Dateiname: 6515_3089_02_buchblock.pdf; preflight
Page 265 of 317
Changing th
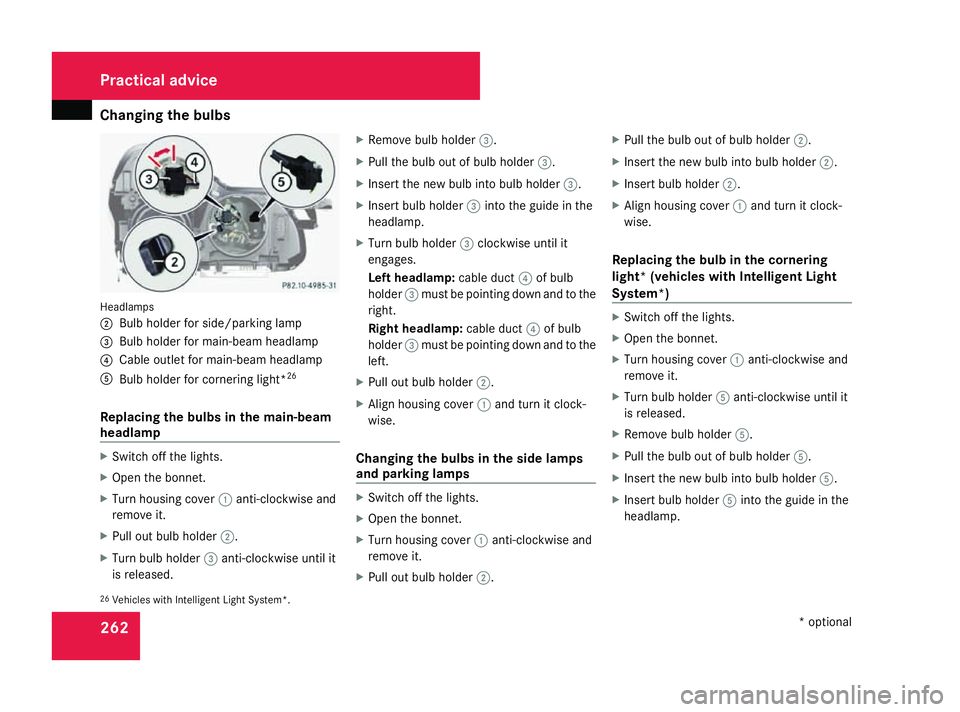
ebulbs 262Headlamps
2
Bulb holder for side/parking lamp
3 Bulb holder for main-beam headlamp
4 Cable outle tfor main-beam headlamp
5 Bulb holder for cornering light* 26
Replacing th ebulbs in th emain-beam
headlamp X
Switch off th elights.
X Open th ebonnet.
X Turn housin gcover 1anti-clockwise and
remove it.
X Pull out bulb holder 2.
X Turn bulb holder 3anti-clockwise until it
is released. X
Remov ebulb holder 3.
X Pull th ebulb out of bulb holder 3.
X Insert th enew bulb int obulb holder 3.
X Insert bulb holder 3intot he guide in the
headlamp.
X Turn bulb holder 3clockwis euntil it
engages.
Left headlamp: cable duct4of bulb
holder 3must be pointin gdown and to the
right.
Righ theadlamp: cable duct 4of bulb
holder 3must be pointin gdown and to the
left.
X Pull out bulb holder 2.
X Alig nhousin gcover 1and tur nitclock-
wise.
Changing th ebulbs in th eside lamps
and parking lamps X
Switch off th elights.
X Open th ebonnet.
X Turn housin gcover 1anti-clockwise and
remove it.
X Pull out bulb holder 2. X
Pull th ebulb out of bulb holder 2.
X Insert th enew bulb int obulb holder 2.
X Insert bulb holder 2.
X Alig nhousin gcover 1and tur nitclock-
wise.
Replacing th ebulb in th ecornering
light *(vehicles with Intelligent Light
System*) X
Switch off th elights.
X Open th ebonnet.
X Turn housin gcover 1anti-clockwise and
remove it.
X Turn bulb holder 5anti-clockwise until it
is released.
X Remov ebulb holder 5.
X Pull th ebulb out of bulb holder 5.
X Insert th enew bulb int obulb holder 5.
X Insert bulb holder 5intot he guide in the
headlamp.
26 Vehicles with Intelligen tLigh tSystem*. Practical advice
*optional
230_AKB; 5; 4, en-GB
bjanott
,V ersion: 2.9.6
2008-04-08T15:09:54+02:00
-Seite 262 Dateiname: 6515_3089_02_buchblock.pdf; preflight