Page 93 of 317
Lights
90 Hazard warning lamps
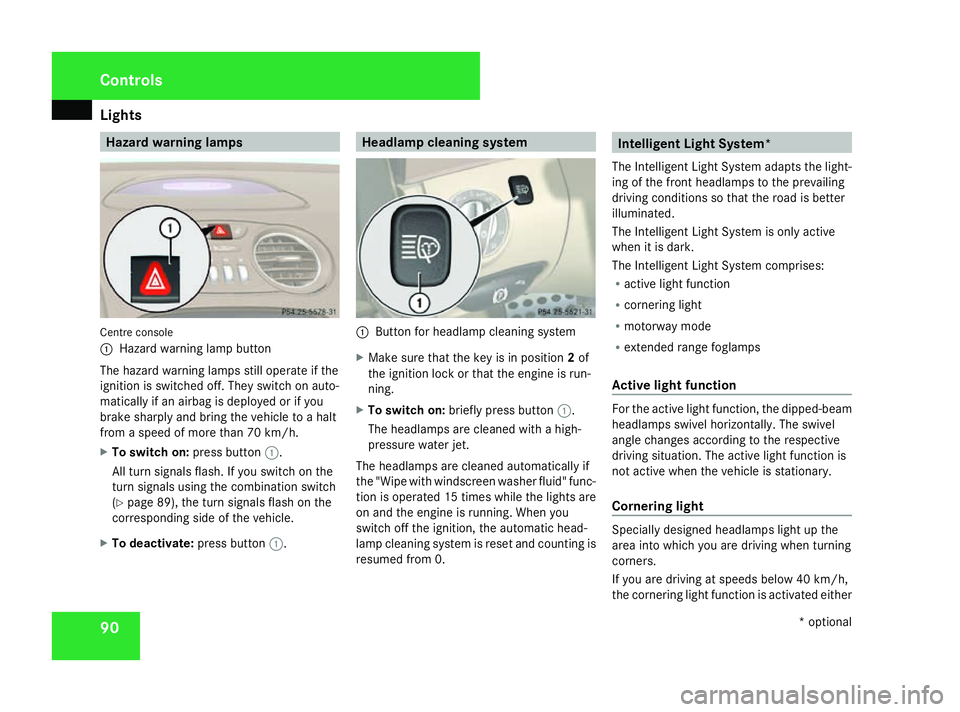
Centre console
1
Hazard warnin glamp button
The hazar dwarnin glamps still operat eifthe
ignition is switched off .They switc honauto-
matically if an airbag is deployed or if you
brak esharply and brin gthe vehicle to ahalt
fro mas peed of more than 70 km/h.
X To switch on: press button1.
All tur nsignals flash. If you switc honthe
tur ns ignals using the combination switch
(Y page 89), the tur nsignals flash on the
correspondin gside of the vehicle.
X To deactivate: press button1. Headlam
pcleaning system 1
Button for headlamp cleaning system
X Make sure that the key is in position 2of
the ignition lock or that the engin eisrun-
ning.
X To switch on: briefly press button 1.
The headlamps are cleaned with ahigh-
pressure water jet.
The headlamps are cleaned automatically if
the "Wipe with windscreen washer fluid" func-
tion is operated 15 times while the light sare
on and the engin eisrunning. When you
switc hoff the ignition, the automatic head-
lamp cleaning system is reset and countin gis
resume dfrom0. Intelligent Light System*
The Intelligent Light System adapts the light-
ing of the front headlamps to the prevailing
driving conditions so that the road is better
illuminated.
The Intelligent Light System is only active
when it is dark.
The Intelligent Light System comprises:
R active light function
R cornering light
R motorway mode
R extended rang efoglamps
Active light function For the active light function
,the dipped-beam
headlamps swivel horizontally. The swivel
angle changes accordin gtothe respective
driving situation .The active light function is
not active when the vehicle is stationary.
Cornering light Specially designed headlamps light up the
area int
owhich you are driving when turning
corners.
If you are driving at speeds below 40 km/h,
the cornering light function is activated either Controls
*optional
230_AKB; 5; 4, en-GB
bjanott
,V ersion: 2.9.6
2008-04-08T15:09:54+02:00
-Seite 90 Dateiname: 6515_3089_02_buchblock.pdf; preflight
Page 224 of 317
Displa
ymessages 221Display messages Possible cause/consequence Possible solution
. Turn signal rear
left Back-u
pbulb
on
or
Turn signal rear
righ tBack-up bulb
on Th
er earleft-han dorr earright -hand turn
signa lisfaulty. X
Replac ethe bulb (Y page 259). . Turn signal left
mirror
or
Turn signal right
mirror Th
et urns igna lint he left-han dorright-
hand exterior mirro risfaulty. This mes-
sage will onl yappea rifallLEDs have
failed. X
Visi taq ualified specialis tworkshop. . Turn signal front
left Back-u
pbulb
on
or
Turn signal front
righ tBack-up bulb
on Th
ef ront left-han dorright-hand turn sig-
na lisf aulty. X
Visi taq ualified specialis tworkshop. Practical advi
ce
230_AKB; 5; 4, en-GB
bjanott,
Version: 2.9.6
2008-04-08T15:09:54+02:0
0-Seite221 ZDateiname: 6515_3089_02_buchblock.pdf; preflight
Page 251 of 317
Troubleshooting
248 Headlamps and turn signals
Problem Possible cause/consequence Suggeste
dsolutions Th
eh eadlam ps or the tur nsignals
in the exterior mirrors ar emisted
up on the inside. Air humidity is ver
yhigh. X
Drive with the headlamps switched on.
Th eh eadlam ps aredemis teda fter as hort distance. Th
eh eadlam phousin gisnot
sealed and moisture ha sbeen
able to enter. X
Have the headlamps checked at aqualified specialis tworkshop. Windscreen wipers
Problem Possible cause/consequence Suggeste
dsolutions Th
ew indscreen wipers ar ejam-
med. Leaves or snow, for example, may
be obstructing the windscreen
wipe
rmovement. Th ewiper
moto rhas been deactivated. X
For safety reasons, yo ushoul dremove the key fro mthe ignition
lock.
X Remov ethe caus eofthe obstruction.
X Switch the windscreen wipers back on. Th
ew indscreen wipers fail com-
pletely. Th
ew indscreen wipe rdrive is
malfunctioning. X
Select anothe rwiper spee dont he combination switch.
X Have the windscreen wipers checked at aqualified specialis twork-
shop. Practical advice
230_AKB; 5; 4, en-GB
bjanott,
Version: 2.9.6 2008-04-08T15:09:54+02:00-Seite 248 Dateiname: 6515_3089_02_buchblock.pdf; preflight
Page 263 of 317
Changing th
ebulbs 260 Do no
tchang ex enon bulbs yourself ,but
have them replace dataqualified specialist
workshop whic hhas th eneces saryspecial-
ist knowledge and tools to carry out the
wor krequired.
Mercedes-Benz recommends that you use
aM ercedes-Benz Service Centr efor this
purpose .Inparticular, wor krelevan tto
safet yoro nsafety-related systems must be
carried out at aqualified specialist work-
shop.
! Do no tchang et he LEDs yourself .You
could otherwise damag ethe LEDs or parts
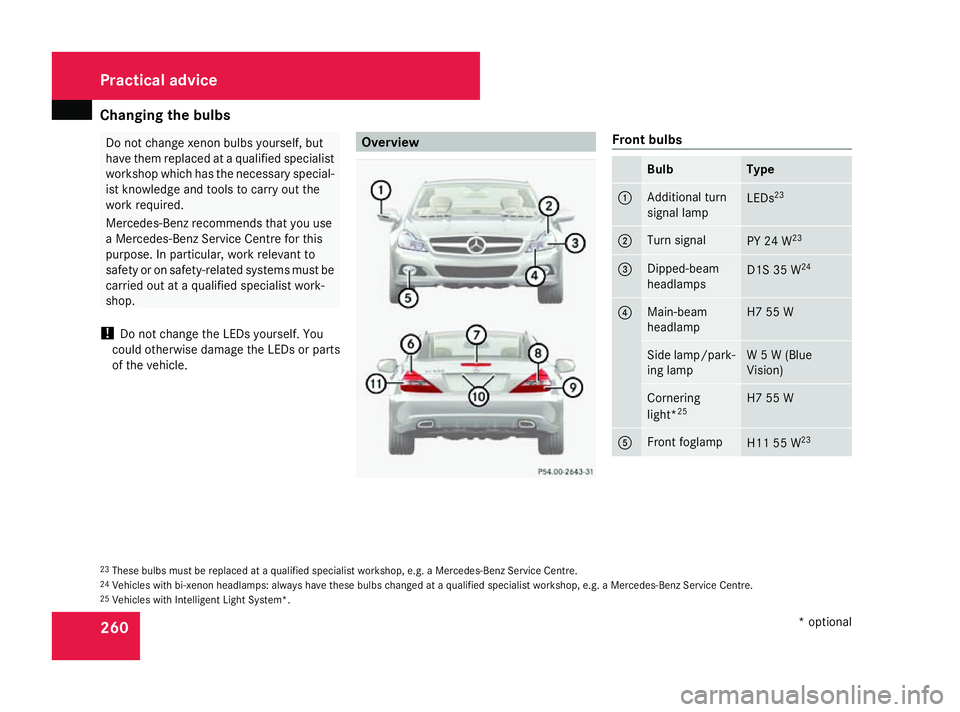
of th evehicle. Overview Front bulbs
Bulb Type
1 Additional turn
signal lamp LEDs
23 2 Turn signal
PY 24 W
23 3 Dipped-beam
headlamps
D1S35W
24 4 Main-beam
headlamp H7 55 W
Side lamp/park-
ing lamp W5W(
Blue
Vision) Cornering
light*
25 H7 55 W
5 Front foglamp
H11 55 W
23 23
These bulbs must be replaced at aqualifie dspecialist workshop, e.g .aMercedes-Ben zServic eCentre.
24 Vehicles with bi-xenon headlamps: always have these bulbs changed at aqualifie dspecialist workshop, e.g .aMercedes-Ben zServic eCentre.
25 Vehicles with Intelligen tLight System*. Practical advice
*optional
230_AKB; 5; 4, en-GB
bjanott ,V ersion: 2.9.6
2008-04-08T15:09:54+02:00
-Seite 260 Dateiname: 6515_3089_02_buchblock.pdf; preflight
Page 264 of 317
Changing th
ebulbs 261
Rea
rbulbs Bulb Type
6 Rear foglamp P21W
7 Thir
dbrak elamp LED
23 8 Reversing lamp P21W
9 Brake/tail lamp
LED
23 a Licence plate
lamp C5W
b Turn signal PY 21 W
Before changing bulbs
You can replace th
efollowin gbulbs:
R Main-beam headlamp
R Sid elamp and parking lamp
R Replacing th ebulb in th ecorner ingl ight*
(vehicles wit hIntel ligent Light System*)
R Reversing lamp
R Rear foglamp R
Turn signal (rear)
R Licence plat elamp
Observ ethe followin gpoints:
R Use only th ebulb types specifie dhere.
R To preven tashort-circuit ,switch off the
lights before changing abulb.
R Only hold bulbs wit haclean, lint-free cloth.
R Do no tworkw ithw et or greasy fingers.
R If th enew bulb still does no tligh tup, con-
sult aqualified specialist workshop, e.g. a
Mercedes-Benz Service Centre.
i Hav ethe headlamp setting checke dreg-
ularly at aqualified specialist workshop,
e.g. aMercedes-Benz Service Centre. Changing th
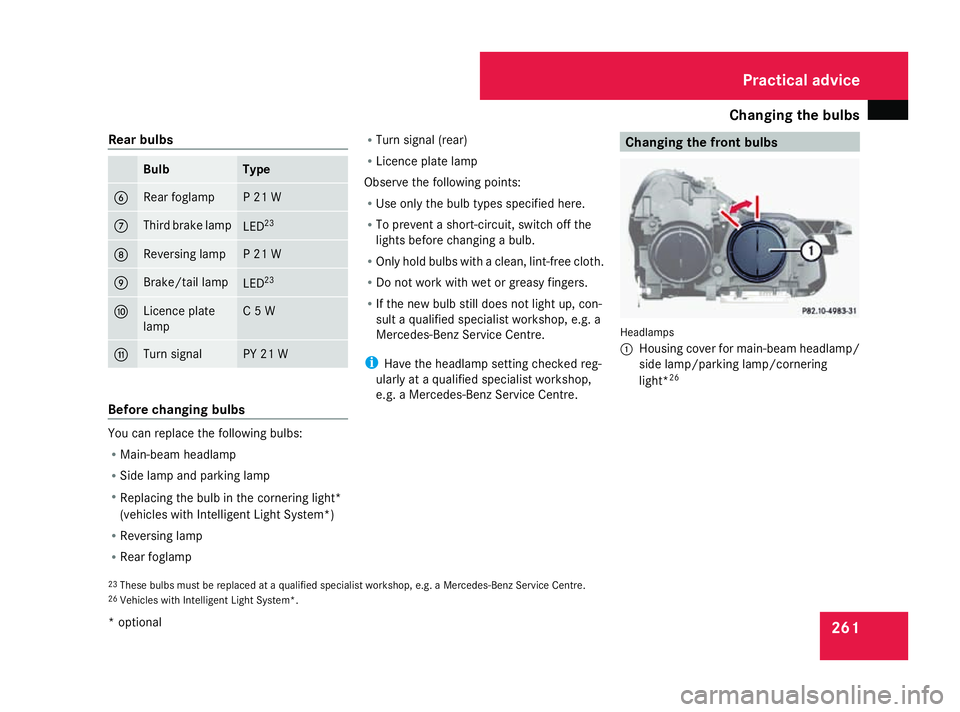
efront bulbs Headlamps
1
Housin gcover for main-beam headlamp/
side lamp/parking lamp/cornering
light* 26
23 These bulbs mus tbereplace dataq ualified specialist workshop ,e.g.aM ercedes-Ben zServic eCentre.
26 Vehicles wit hIntel ligent Light System*. Practical advice
*o ptional
230_AKB; 5; 4, en-GB
bjanott
,V ersion: 2.9.6
2008-04-08T15:09:54+02:00
-Seite 261 ZDateiname: 6515_3089_02_buchblock.pdf; preflight
Page 266 of 317
Changing th
ebulbs 263
X
Turn bulb holder 5clockwise until it
engages.
The handle of bulb holder 5must be hor-
izontal.
X Align housing cover 1and tur nitclock-
wise. Changing th
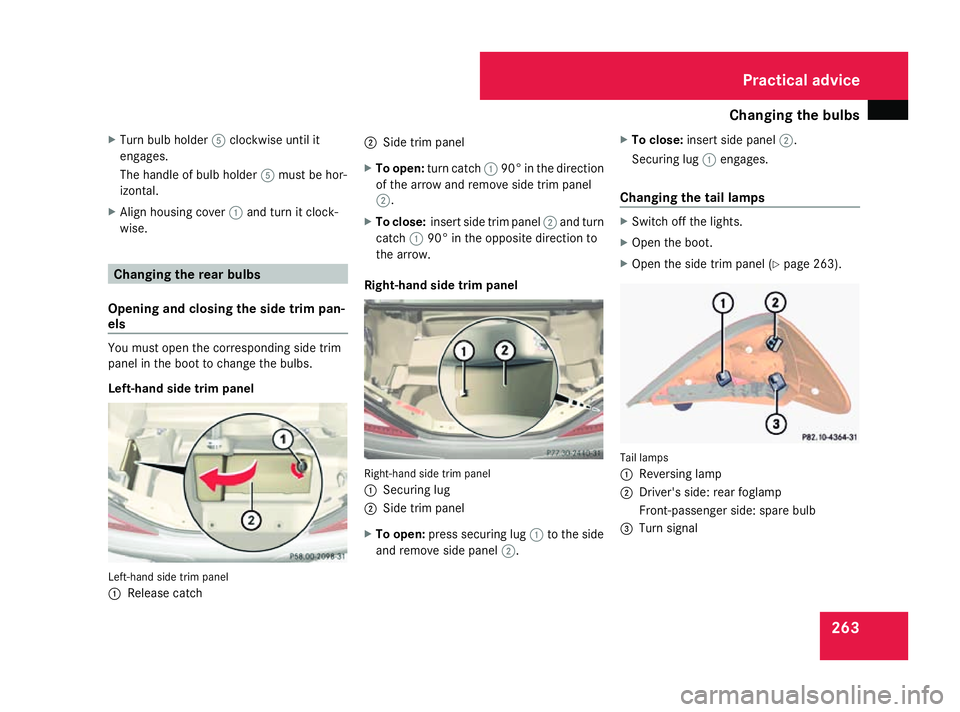
erearb ulbs
Opening and closin gthe sidetrimp an-
els You must open th
ecorre sponding side trim
panel in th eboot to chang ethe bulbs.
Left-hand sid etrimp anel Left-han
dside trim panel
1 Releas ecatch 2
Sidetrimp anel
X To open: turnc atch 190°int he direction
of the arrow and remove side trim panel
2.
X To close: insert side trim panel 2and turn
catch 190° in the opposite direction to
the arrow.
Right-han dsidet rim panel Right-hand side trim panel
1
Securing lug
2 Sidetrim panel
X To open: press securing lug 1to the side
and remove side panel 2.X
To close: insert side panel 2.
Securing lug 1engages.
Changin gthe tail lamps X
Switch off the lights.
X Ope nthe boot.
X Ope nthe side trim panel (Y page 263). Tail lamps
1
Reversing lamp
2 Driver' sside: rearfoglamp
Front-passenger side :spare bulb
3 Turn signal Practical advice
230_AKB; 5; 4, en-GB
bjanott,
Version: 2.9.6 2008-04-08T15:09:54+02:00-Seite 263 ZDateiname: 6515_3089_02_buchblock.pdf; preflight