2008 MERCEDES-BENZ R-CLASS MPV fold seats
[x] Cancel search: fold seatsPage 197 of 373

Loading and stowing
194order. If you attempt to fold down the seat
cushion before the seat backrest has been
folded into the upright position, the seat
cover may be damaged.
X Grip loop 8(Ypage 193) and pull seat
backrest 3(3rd row of seats)
(Y page 193) into an upright position.
X Pull release handle 1(Ypage 192) and put
backrest 3(3rd row of seats)
(Y page 193) into the desired position.
X Bring seat cushion 7(3rd row of seats)
(Y page 193) into the vertical position.
X After putting it into an upright position, fold
seat cushion 7(3rd row of seats)
(Y page 193) further back until it audibly
engages in place. Resetting seats in the 2nd row of seats 1
Backrest
2 Release catch
3 Seat cushion
X Pull release lever 2upwards beyond the
pressure point to the stop and fold backrest
1 upwards by about 45°.
X Insert the head restraint (Y page 83).
X Pull release lever 2to the pressure point
and adjust backrest 1to the desired posi-
tion.
X Check that the seat is correctly engaged.
X Set the seat head restraint to the desired
position (Y page 83). Lock verification indicator for outer seats
in the 2nd row of seats Seat unlocked
1
Lock verification indicator
2 Indicator area
When the seat is unlocked, locking display
1 is folded out and indicator area 2is
clearly visible.
X When the seat is locked, fold the backrest
back until you hear the seat engage. Controls
251_AKB; 5; 7, en-GB
wobuchh,
Version: 2.10.6
2008-05-11T14:51:51+02:00 - Seite 194 Dateiname: 6515_1825_02_buchblock.pdf; preflight
Page 198 of 373

Loading and stowing
195Seat locked
1
Lock verification indicator
2 Indicator area
When the seat is locked, locking display 1is
folded in and indicator area 2is barely visi-
ble. Resetting the middle seat in the 2nd row
of seats Armrest position
1
Release loop
2 Seat
X Pull release loop 1of seat 2in the direc-
tion of the arrow and hold it securely.
The seat is released and folds up.
X Press seat 2further down until the back
of the seat engages in the armrest position.
X Pull release loop 1of the backrest in the
direction of the arrow and hold it securely.
X Fold the backrest back until it is heard to
engage in the driving position. Centre console for the 2nd row of
seats*
The centre console contains a stowage com-
partment (Y page 203) and a cup holder
(Y page 183).
If you are using the fully extended luggage
compartment and want an even loading area
(Y page 190), you must remove the centre
console.
Removing the centre console G
Risk of injury
Before removing the centre console, take
out all containers from the centre console
cup holder. Liquids could otherwise spill
onto the passengers and /or the vehicle
interior. Hot liquids could scald passen-
gers. Liquids spilt on the vehicle interior
could damage it.
! To avoid damage to the centre console or
to its components, make sure that the
stowage compartment is closed before
removing the centre console.
i Remove all objects from the stowage
compartment (Y page 203) to reduce the
weight of the centre console. Controls
* optional
251_AKB; 5; 7, en-GB
wobuchh
, Version: 2.10.6 2008-05-11T14:51:51+02:00 - Seite 195 ZDateiname: 6515_1825_02_buchblock.pdf; preflight
Page 201 of 373

Loading and stowing
198
X
To retract: pull the luggage compartment
cover towards you briefly by handle 1to
unhook it from guides 2on the left and
the right.
X Guide the luggage compartment cover
slowly forwards as far as it will go; it will
automatically retract while you do this.
Fitting/removing the luggage compart-
ment cover Luggage compartment cover fitted behind the 2nd
row of seats
1 Button
2 Luggage compartment cover
X To remove: roll up luggage compartment
cover 2.
X Push the right-hand side section to the left
until it engages. X
Remove luggage compartment cover 2.
X To install: extend luggage compartment
cover 2(Ypage 199 )if you wish to install
luggage compartment cover 2behind the
2nd row of seats.
! You must not fit the extensions if you wish
to fit the luggage compartment cover
behind the 3rd row of seats. The luggage
compartment cover and side panels in the
luggage compartment could otherwise be
damaged.
X If fitted, remove the protective caps from
the side panels on the 3rd row of seats if you wish to install luggage compartment
cover
2behind the 2nd row of seats. Protective cap in the right-hand side panel on the
3rd row of seats
X
Push in the bottom of the protective cap as
indicated by the arrow.
The protective cap folds out at the top.
X Pull the protective cap up from the side
panel in the direction of the arrow.
i Stow the protective caps in a safe place.
i Before fitting the luggage compartment
cover, make sure that the button
(Y page 198) is facing upwards.
X With the handle of the luggage compart-
ment enlargement pointing to the rear and
button 1facing upwards on the left-hand Controls
251_AKB; 5; 7, en-GB
wobuchh
, Version: 2.10.6
2008-05-11T14:51:51+02:00 - Seite 198 Dateiname: 6515_1825_02_buchblock.pdf; preflight
Page 203 of 373

Loading and stowing
200 tion suddenly or are involved in an accident,
and could cause you an injury.
You can use the safety net in two different
positions: 1
Bracket behind the B-pillar
2 Bracket behind the C-pillar
R The brackets behind B-pillar 1are
required for the full luggage compartment
enlargement (Y page 191).
The corresponding lashing eyelets
to tighten the net are located in the footwell
of the 2nd row of seats (Y page 188).
R The brackets behind C-pillar 2are
required for the partial luggage compart-
ment enlargement (Y page 190). The corresponding lashing eyelets to ten-
sion the net are located in the luggage
compartment (Y
page 188).
Preparing the safety net
X Open the two Velcro fasteners on the
safety net holder.
X Unroll and unfold the safety net.
The upper and lower guide rods must
engage audibly.
Attaching the safety net Guide rod inserted behind B-pillar
1
Retainer
2 Guide rod X
Insert guide rod 2into retainer 1in the
direction of the arrow.
X Slide guide rod 2forwards into retainer
1 in the direction of the arrow.
Tightening the safety net Seat belt reel holder behind the front seats
1
Belt hook
2 Lashing eyelet
3 Strap
X Insert belt hook 1into lashing eyelet 2
in the direction of the arrow.
X Pull tensioning strap 3by the loose end in
the direction of the arrow until the safety
net is tight.
X After a short distance, check the tension of
the safety net and retighten it if necessary. Controls
251_AKB; 5; 7, en-GB
wobuchh,
Version: 2.10.6
2008-05-11T14:51:51+02:00 - Seite 200 Dateiname: 6515_1825_02_buchblock.pdf; preflight
Page 204 of 373
Loading and stowing
201
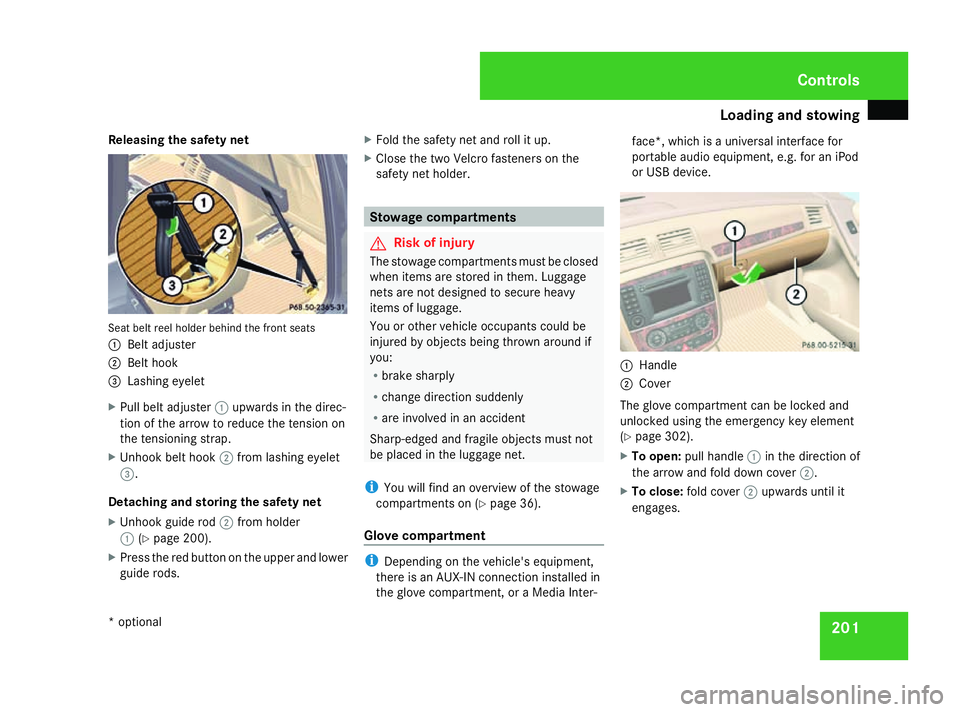
Releasing the safety net
Seat belt reel holder behind the front seats
1
Belt adjuster
2 Belt hook
3 Lashing eyelet
X Pull belt adjuster 1upwards in the direc-
tion of the arrow to reduce the tension on
the tensioning strap.
X Unhook belt hook 2from lashing eyelet
3.
Detaching and storing the safety net
X Unhook guide rod 2from holder
1 (Ypage 200).
X Press the red button on the upper and lower
guide rods. X
Fold the safety net and roll it up.
X Close the two Velcro fasteners on the
safety net holder. Stowage compartments
G
Risk of injury
The stowage compartments must be closed
when items are stored in them. Luggage
nets are not designed to secure heavy
items of luggage.
You or other vehicle occupants could be
injured by objects being thrown around if
you:
R brake sharply
R change direction suddenly
R are involved in an accident
Sharp-edged and fragile objects must not
be placed in the luggage net.
i You will find an overview of the stowage
compartments on (Y page 36).
Glove compartment i
Depending on the vehicle's equipment,
there is an AUX-IN connection installed in
the glove compartment, or a Media Inter- face*, which is a universal interface for
portable audio equipment, e.g. for an iPod
or USB device.
1
Handle
2 Cover
The glove compartment can be locked and
unlocked using the emergency key element
(Y page 302).
X To open: pull handle 1in the direction of
the arrow and fold down cover 2.
X To close: fold cover 2upwards until it
engages. Controls
* optional
251_AKB; 5; 7, en-GB
wobuchh, Version: 2.10.6 2008-05-11T14:51:51+02:00 - Seite 201 ZDateiname: 6515_1825_02_buchblock.pdf; preflight
Page 206 of 373

Loading and stowing
2031
Stowage tray/telephone compartment
2 Coin holder
Stowage compartments above and
below the centre air vents, 2nd row of
seats Depending on the equipment in the vehicle, a
control panel may be installed instead of the
upper stowage compartment, e.g. if the vehi-
cle has rear-compartment air conditioning for
the 2nd and 3rd rows of seats. Upper stowage compartment
In vehicles with the smoker's package*, an
ashtray is installed instead of the lower stow-
age compartment (Y
page 205). Lower stowage compartment
1
Cover
2 Release button X
Press release button 2.
Cover 1swings backwards.
Stowage compartment in the centre
console, 2nd row of seats* X
Press the release button under the armrest
and fold the armrest upwards.
Stowage compartments in the 3rd row
of seats There is a stowage compartment in the side
trim on both sides. In vehicles with rear-com-
partment air conditioning (2nd and 3rd row of
seats), a swivelling side air vent is installed
instead of the stowage compartment. Controls
* optional
251_AKB; 5; 7, en-GB
wobuchh,
Version: 2.10.6 2008-05-11T14:51:51+02:00 - Seite 203 ZDateiname: 6515_1825_02_buchblock.pdf; preflight
Page 208 of 373

Features
205
X
Swing sun visor 1to the side.
X Vehicles with sliding/tilting sunroof*:
fold down additional sun visor* 2to the
windscreen. Roller sunblinds* for the rear side
windows 1
Retainer
2 Tab
X To extend: pull the roller sunblind out by
tab 2and hook it onto retainers 1at the
top of the window.
! Always guide the roller sunblind by hand.
Do not let it snap back suddenly, as this
would damage the automatic roller mech-
anism. !
If you drive with the roller sunblind exten-
ded and the window open, the roller sun-
blind may pop out of the retainer and
suddenly spring back if you drive at high
speeds, e.g. on the motorway. This could
damage the inertia reel. Therefore, either
close the window or retract the roller sun-
blind before driving at high speeds. Ashtray*
Ashtray in the cockpit 1
Cover
2 Insert
X To open: open cover 1(Ypage 202).
X To remove the insert: reach into the
recess on the rear of insert 2.X
Pull insert 2upwards and remove it.
X Inserting the insert: place insert2into
the opening from above and press it down
until it engages.
Ashtray in the 2nd row of seats Vehicles with a centre console in the 2nd row
of seats and short wheelbase do not have an
ashtray below the centre console.
1
Cover
2 Insert
X To open: open cover 1(Ypage 203).
X Fold cover 1down in the direction of the
arrow as far as it will go. Controls
* optional
251_AKB; 5; 7, en-GB
wobuchh,
Version: 2.10.6 2008-05-11T14:51:51+02:00 - Seite 205 ZDateiname: 6515_1825_02_buchblock.pdf; preflight
Page 210 of 373

Features
2071
Cover
2 Socket protective cap
X Open cover 1(Ypage 202).
X Remove protective cap 2from the socket.
i On vehicles with the smoker's package*,
a cigarette lighter is fitted instead of the
socket (Y page 206).
Socket in the 2nd row of seats !
If accessories are connected, make sure
that a maximum current draw of 20 A is not
exceeded. Otherwise, you will overload the
fuse. X
Fold up the socket cover.
i You can also use the socket when the
ignition is switched off. An emergency cut-
out ensures that the on-board voltage does
not drop too low. If the on-board voltage is
too low, the power to the sockets is auto-
matically cut. This ensures that there is
sufficient power to start the engine.
Socket in the luggage compartment !
If accessories are connected, make sure
that a maximum current draw of 20 A is not
exceeded. Otherwise, you will overload the
fuse. The socket is located in the luggage compart-
ment on the right-hand side trim.
X
Fold up the socket cover.
i You can also use the socket when the
ignition is switched off. An emergency cut-
out ensures that the on-board voltage does
not drop too low. If the on-board voltage is
too low, the power to the sockets is auto-
matically cut. This ensures that there is
sufficient power to start the engine. Controls
* optional
251_AKB; 5; 7, en-GB
wobuchh, Version: 2.10.6 2008-05-11T14:51:51+02:00 - Seite 207 ZDateiname: 6515_1825_02_buchblock.pdf; preflight