2008 MERCEDES-BENZ GLK SUV sensor
[x] Cancel search: sensorPage 72 of 261
G
Risk of accident
If incident light from headlamps is prevented
from striking the sensor in the rear-view mir-
ror, for instance, if the safety net is fitted, the
mirror’s automatic anti-dazzle function will
not work.
Incident light could then dazzle you. This may
distract you from the traffic conditions, and
you may, thereby, cause an accident. In this
case, adjust the rear-view mirror manually. Memory functions*
Storing settings
You can store up to three different settings
using the memory button.
The following settings are stored as a single
memory preset:
R position of the seat, backrest and head
restraint
R driver's side: steering wheel position
R driver's side: position of the exterior mir-
rors on the driver's and front-passenger
sides G
Risk of injury
The memory function can still be used when
the key has been removed. For this reason,
children should never be left unsupervised in
the vehicle. Otherwise, they could become
trapped when moving the seat or the steering
wheel. G
Risk of accident
Only use the memory function on the driver’s
side when the vehicle is stationary. Other-
wise, you could be distracted from the traffic
conditions by the steering wheel and seat
moving of their own accord, and as a result
cause an accident. X
Adjust the seat ( Ypage 62).
X On the driver's side, also adjust the steer-
ing wheel (Y page 66) and the mirrors
(Y page 67).
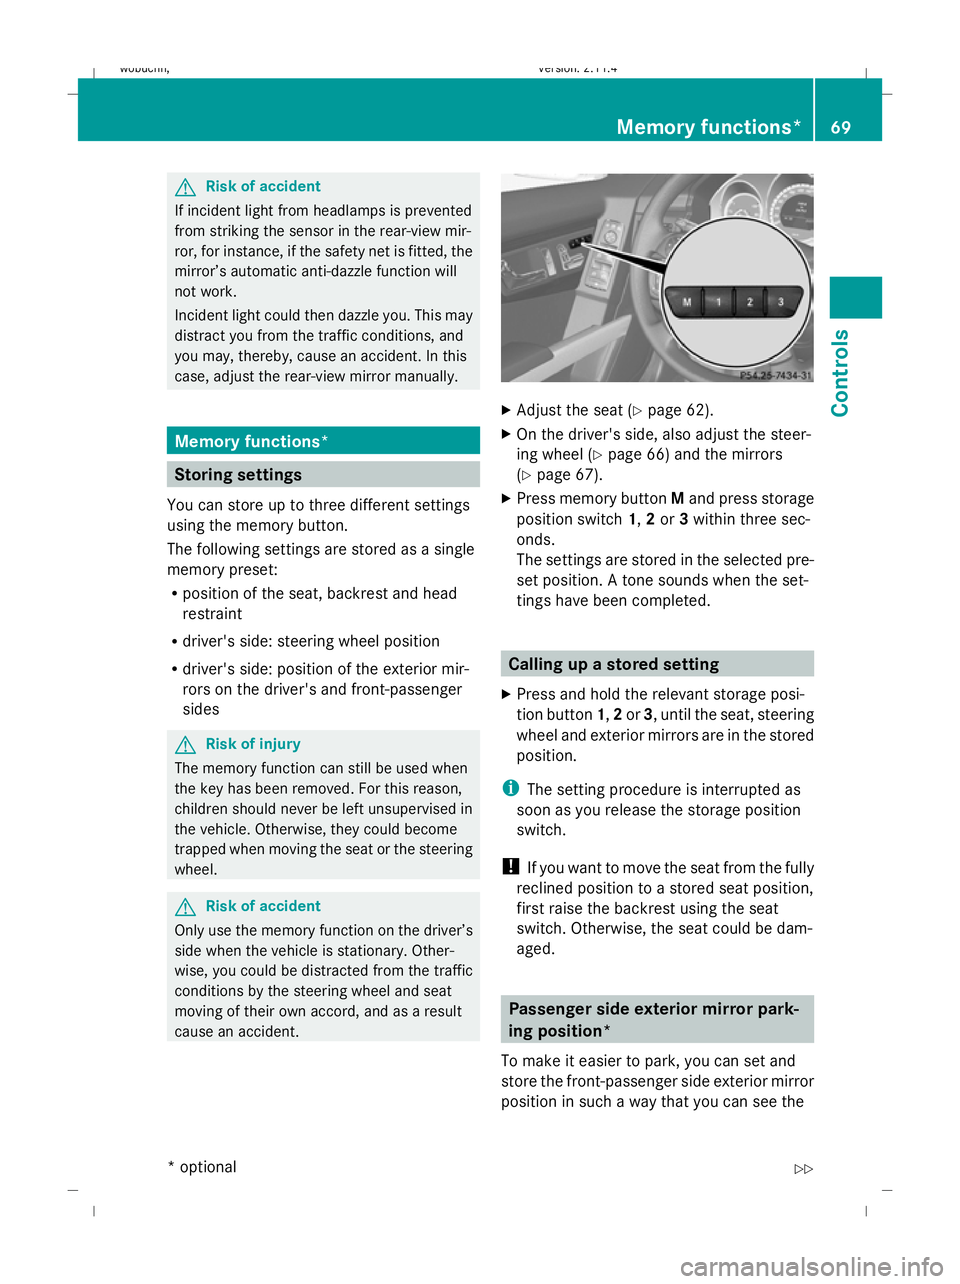
X Press memory button Mand press storage
position switch 1,2or 3within three sec-
onds.
The settings are stored in the selected pre-
set position. A tone sounds when the set-
tings have been completed. Calling up a stored setting
X Press and hold the relevant storage posi-
tion button 1,2or 3, until the seat, steering
wheel and exterior mirrors are in the stored
position.
i The setting procedure is interrupted as
soon as you release the storage position
switch.
! If you want to move the seat from the fully
reclined position to a stored seat position,
first raise the backrest using the seat
switch. Otherwise, the seat could be dam-
aged. Passenger side exterior mirror park-
ing position*
To make it easier to park, you can set and
store the front-passenger side exterior mirror
position in such a way that you can see the Memory functions*
69Controls
* optional
X204_AKB; 1; 5, en-GB
wobuchh,
Version: 2.11.4
2008-10-15T13:20:56+02:00 - Seite 69 ZDateiname: 6515_0671_02_buchblock.pdf; preflight
Page 82 of 261
Not active:
if you are driving at speeds above
100 km/h or you switch off the rear foglamp. Interior lighting
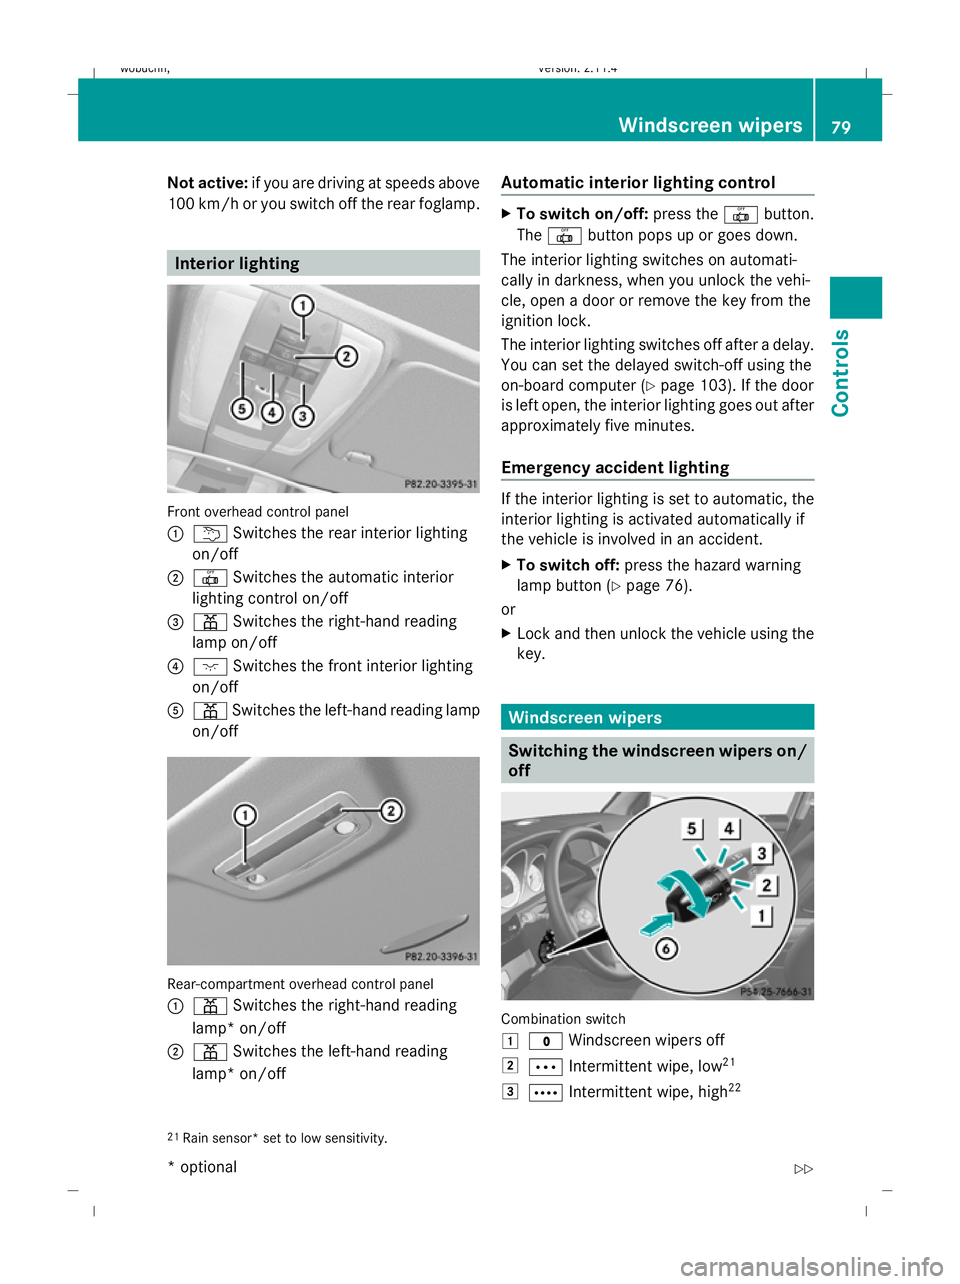
Front overhead control panel
:
u Switches the rear interior lighting
on/off
; | Switches the automatic interior
lighting control on/off
= p Switches the right-hand reading
lamp on/off
? c Switches the front interior lighting
on/off
A p Switches the left-hand reading lamp
on/off Rear-compartment overhead control panel
:
p Switches the right-hand reading
lamp* on/off
; p Switches the left-hand reading
lamp* on/off Automatic interior lighting control X
To switch on/off: press the|button.
The | button pops up or goes down.
The interior lighting switches on automati-
cally in darkness, when you unlock the vehi-
cle, open a door or remove the key from the
ignition lock.
The interior lighting switches off after a delay.
You can set the delayed switch-off using the
on-board computer (Y page 103). If the door
is left open, the interior lighting goes out after
approximately five minutes.
Emergency accident lighting If the interior lighting is set to automatic, the
interior lighting is activated automatically if
the vehicle is involved in an accident.
X
To switch off: press the hazard warning
lamp button (Y page 76).
or
X Lock and then unlock the vehicle using the
key. Windscreen wipers
Switching the windscreen wipers on/
off
Combination switch
1
$ Windscreen wipers off
2 Ä Intermittent wipe, low 21
3 Å Intermittent wipe, high 22
21 Rain sensor* set to low sensitivity. Windscreen
wipers
79Controls
* optional
X204_AKB; 1; 5, en-GB
wobuchh,
Version: 2.11.4 2008-10-15T13:20:56+02:00 - Seite 79 ZDateiname: 6515_0671_02_buchblock.pdf; preflight
Page 83 of 261
4
° Continuous wipe, slow
5 ¯ Continuous wipe, fast
B Single wipe/to wipe the windscreen using
washer fluid
! Vehicles with a rain sensor *:
If th e windscreen becomes dirty in dry
weather conditions, the windscreen wipers
may be activated inadvertently. This could
then damage the windscreen wiper blades
or scratch the windscreen.
For this reason, you should always switch
off the windscreen wipers in dry weather.
X Turn the key to position 1or 2in the ignition
lock.
X Turn the combination switch to the corre-
sponding position.
Vehicles with a rain sensor*: in theÄ
or Å position, the appropriate wiping fre-
quency is automatically set according to the
intensity of the rain. In the Åposition, the
rain sensor is more sensitive than in the Ä position and therefore the windscreen
wiper will wipe more frequently. Rear window wiper
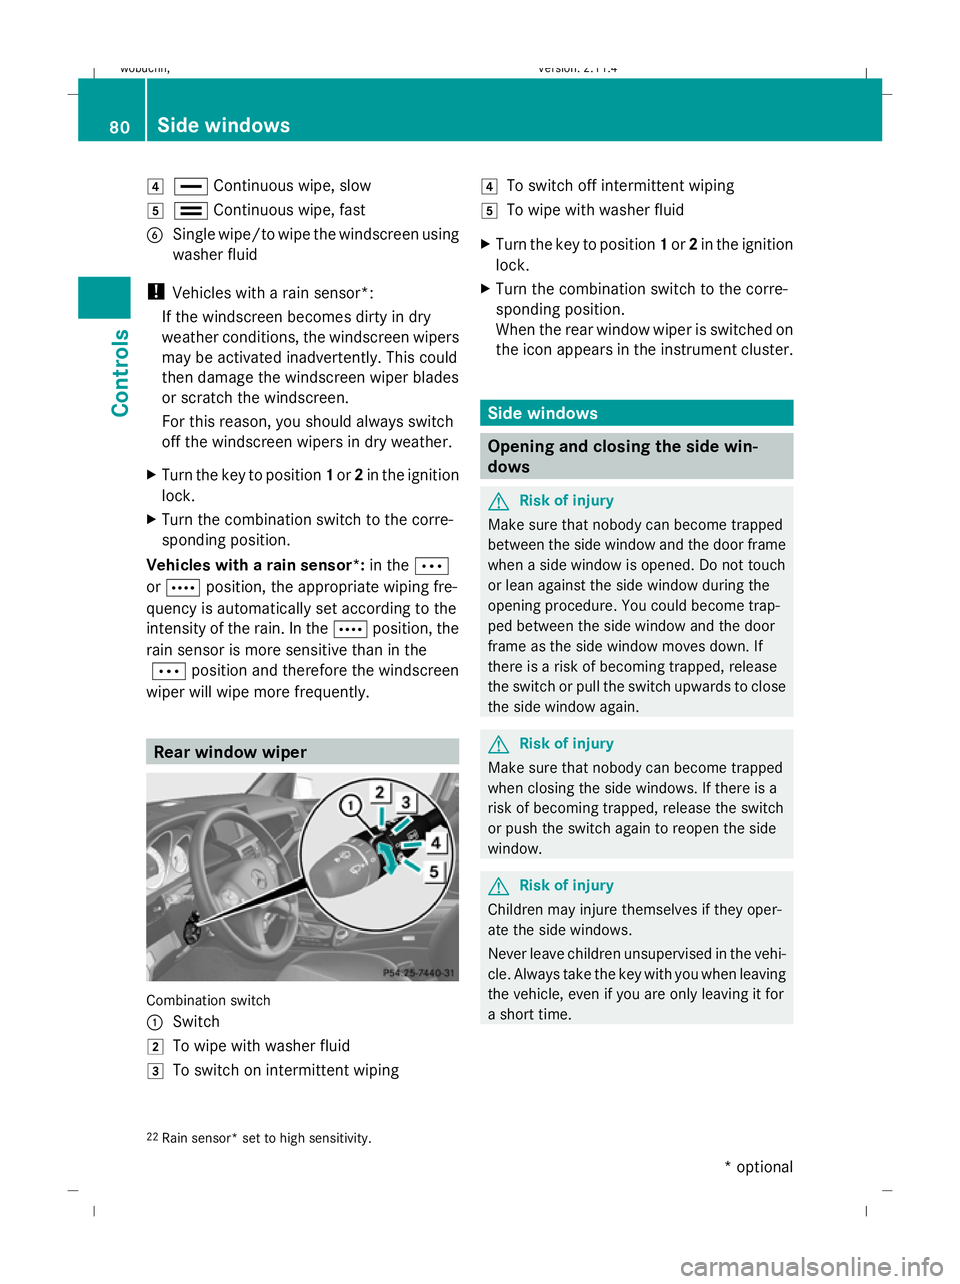
Combination switch
:
Switch
2 To wipe with washer fluid
3 To switch on intermittent wiping 4
To switch off intermittent wiping
5 To wipe with washer fluid
X Turn the key to position 1or 2in the ignition
lock.
X Turn the combination switch to the corre-
sponding position.
When the rear window wiper is switched on
the icon appears in the instrument cluster. Side windows
Opening and closing the side win-
dows
G
Risk of injury
Make sure that nobody can become trapped
between the side window and the door frame
when a side window is opened. Do not touch
or lean against the side window during the
opening procedure. You could become trap-
ped between the side window and the door
frame as the side window moves down. If
there is a risk of becoming trapped, release
the switch or pull the switch upwards to close
the side window again. G
Risk of injury
Make sure that nobody can become trapped
when closing the side windows. If there is a
risk of becoming trapped, release the switch
or push the switch again to reopen the side
window. G
Risk of injury
Children may injure themselves if they oper-
ate the side windows.
Never leave children unsupervised in the vehi-
cle. Always take the key with you when leaving
the vehicle, even if you are only leaving it for
a short time.
22 Rain sensor* set to high sensitivity. 80 Side windowsControls
* optional
X204_AKB; 1; 5, en-GB
wobuchh,
Version: 2.11.4 2008-10-15T13:20:56+02:00 - Seite 80Dateiname: 6515_0671_02_buchblock.pdf; preflight
Page 116 of 261
Setting permanent Speedtronic
X
Press =or; to highlight the Set-
tings menu and select with a.
X Press :or9 to highlight the Vehi-
cle submenu and select with a.
X Press :or9 to select the Limit
speed (winter tyres): function.
You can see the current setting.
X To change this, press a. X
Press :or9 to select the desired
setting.
The following settings can be selected:
R Off
Permanent Speedtronic is deactivated.
R a limit speed between 230 km/hand
160 km/h in increments of 10 km/h
X Press ato save the entry. Parktronic*
G
Risk of accident
Parktronic is only an aid and may not detect
all obstacles. It is not a substitute for attentive
driving.
You are always responsible for safety and
must continue to pay attention to your imme-
diate surroundings when parking and
manoeuvring. You could, otherwise, endanger
yourself and others. G
Risk of injury
Make sure that no persons or animals are in
the manoeuvring range. Otherwise, they
could be injured. Parktronic is an electronic parking aid with
ultrasound. It indicates visually and audibly
the distance between your vehicle and an
object.
Parktronic is automatically activated when
you switch on the ignition and release the
handbrake.
Parktronic is deactivated at speeds above
18 km/h. It is reactivated at lower speeds.
Parktronic monitors the area around your
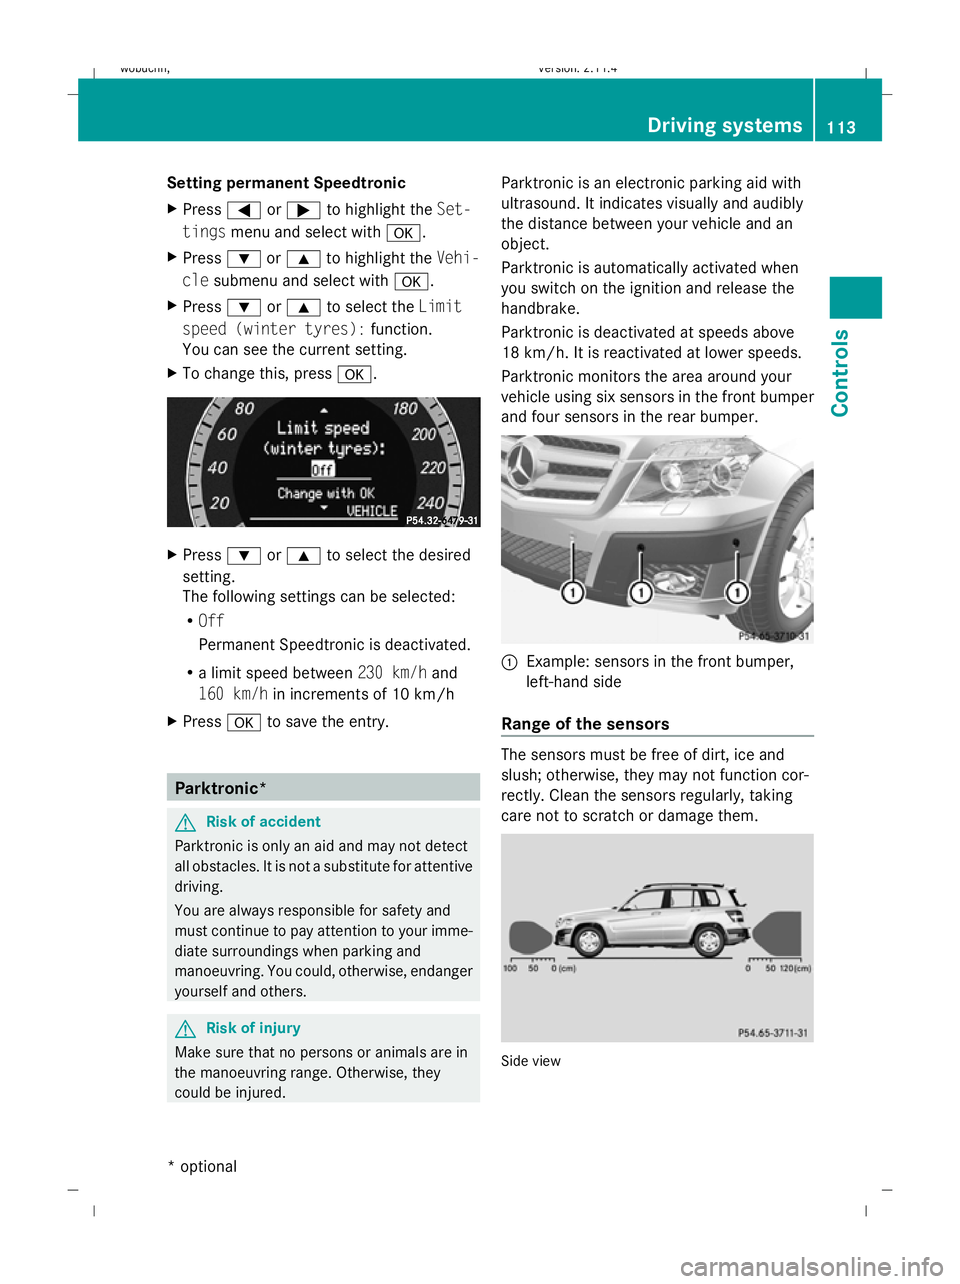
vehicle using six sensors in the front bumper
and four sensors in the rear bumper.
:
Example: sensors in the front bumper,
left-hand side
Range of the sensors The sensors must be free of dirt, ice and
slush; otherwise, they may not function cor-
rectly. Clean the sensors regularly, taking
care not to scratch or damage them.
Side view Driving systems
113Controls
* optional
X204_AKB; 1; 5, en-GB
wobuchh,
Version: 2.11.4
2008-10-15T13:20:56+02:00 - Seite 113 ZDateiname: 6515_0671_02_buchblock.pdf; preflight
Page 117 of 261
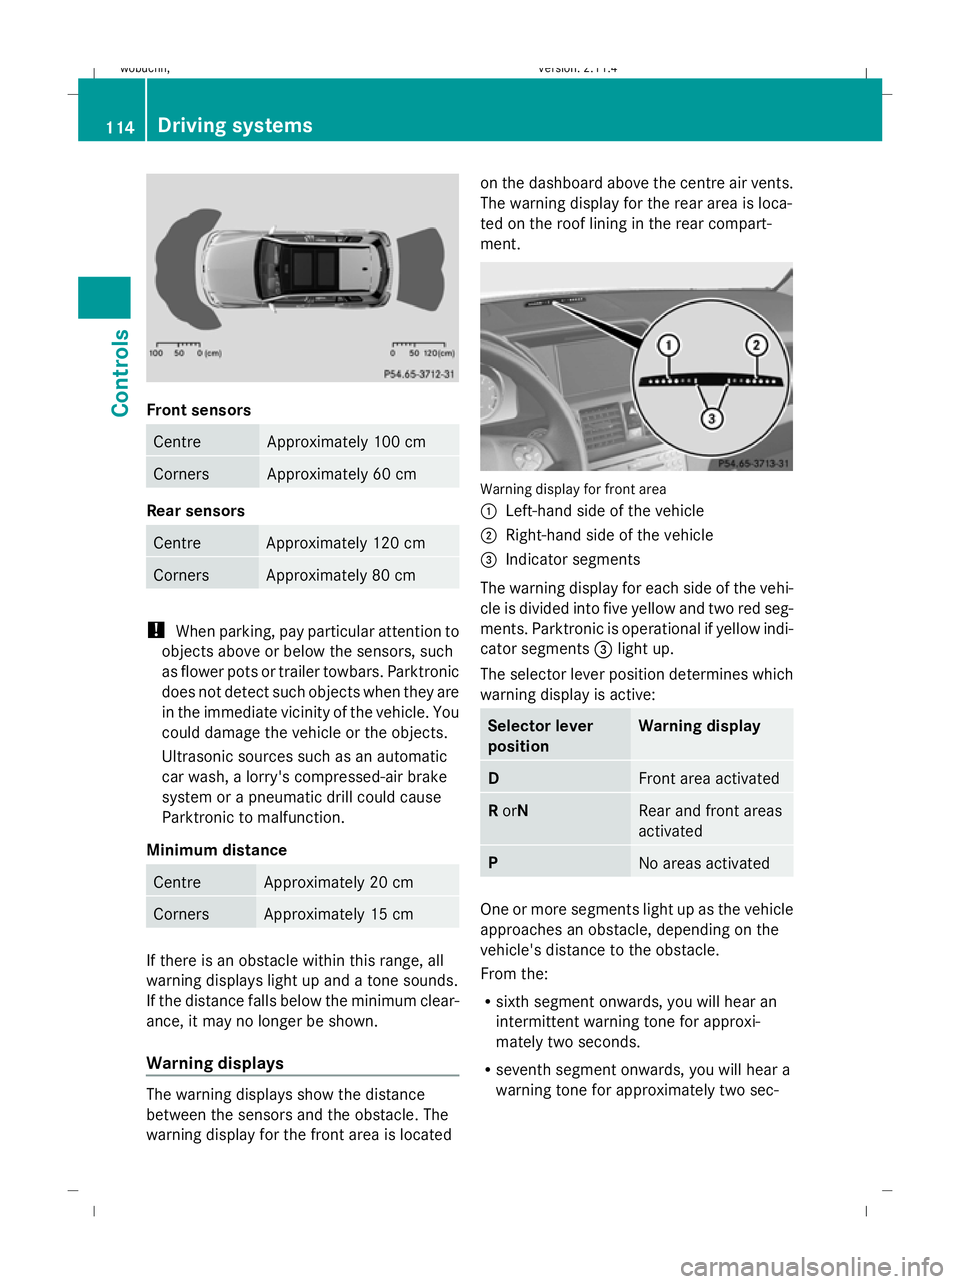
Front sensors
Centre Approximately 100 cm
Corners Approximately 60 cm
Rear sensors
Centre Approximately 120 cm
Corners Approximately 80 cm
!
When parking, pay particular attention to
objects above or below the sensors, such
as flower pots or trailer towbars. Parktronic
does not detect such objects when they are
in the immediate vicinity of the vehicle. You
could damage the vehicle or the objects.
Ultrasonic sources such as an automatic
car wash, a lorry's compressed-air brake
system or a pneumatic drill could cause
Parktronic to malfunction.
Minimum distance Centre Approximately 20 cm
Corners Approximately 15 cm
If there is an obstacle within this range, all
warning displays light up and a tone sounds.
If the distance falls below the minimum clear-
ance, it may no longer be shown.
Warning displays The warning displays show the distance
between the sensors and the obstacle. The
warning display for the front area is located on the dashboard above the centre air vents.
The warning display for the rear area is loca-
ted on the roof lining in the rear compart-
ment.
Warning display for front area
:
Left-hand side of the vehicle
; Right-hand side of the vehicle
= Indicator segments
The warning display for each side of the vehi-
cle is divided into five yellow and two red seg-
ments. Parktronic is operational if yellow indi-
cator segments =light up.
The selector lever position determines which
warning display is active: Selector lever
position Warning display
D
Front area activated
R
orN Rear and front areas
activated
P
No areas activated
One or more segments light up as the vehicle
approaches an obstacle, depending on the
vehicle's distance to the obstacle.
From the:
R
sixth segment onwards, you will hear an
intermittent warning tone for approxi-
mately two seconds.
R seventh segment onwards, you will hear a
warning tone for approximately two sec- 114 Driving systemsControls
X204_AKB; 1; 5, en-GB
wobuchh,
Version: 2.11.4 2008-10-15T13:20:56+02:00 - Seite 114Dateiname: 6515_0671_02_buchblock.pdf; preflight
Page 131 of 261
Closing with increased force and with-
out the anti-entrapment feature G
Risk of injury
You could be severely or even fatally injured
when closing the panorama sliding sunroof
with increased closing force or if the anti-
entrapment feature is deactivated. Make sure
that nobody can become trapped when clos-
ing the panorama sliding sunroof.
If the panorama sliding sunroof blocks during
closing:
X Immediately after the panorama sliding
sunroof blocks, pull the switch again to the
point of resistance in the direction of
arrow ;until the panorama sliding sun-
roof is closed.
The panorama sliding sunroof is closed
with more force.
If the panorama sliding sunroof blocks during
closing again:
X Immediately after the panorama sliding
sunroof blocks, pull the switch again to the
point of resistance in the direction of
arrow ;until the panorama sliding sun-
roof is closed.
The panorama sliding sunroof is closed
without the anti-entrapment feature.
Rain closing feature* When the key is in position
0in the ignition
lock or is removed, the panorama sliding sun-
roof closes automatically:
R if it starts to rain
R at extreme outside temperatures
R after six hours
R if there is a malfunction in the power supply
The panorama sliding sunroof remains raised
at the rear in order to allow ventilation of the
vehicle interior.
i If the panorama sliding sunroof is obstruc-
ted when being closed by the rain closing feature, it opens again slightly. The rain
closing feature is then deactivated.
The panorama sliding sunroof does not close
if:
R it is raised at the rear
R it is blocked
R no rain is falling on the area of the wind-
screen being monitored by the rain sensor
(e.g. because the vehicle is under a bridge
or in a carport) Roller sunblinds for the panorama
sliding sunroof*
The roller sunblinds provide protection from
the sun. The two roller sunblinds can only be
opened and closed together when the pano-
rama sliding sunroof is closed. G
Risk of injury
Make sure that nobody can become trapped
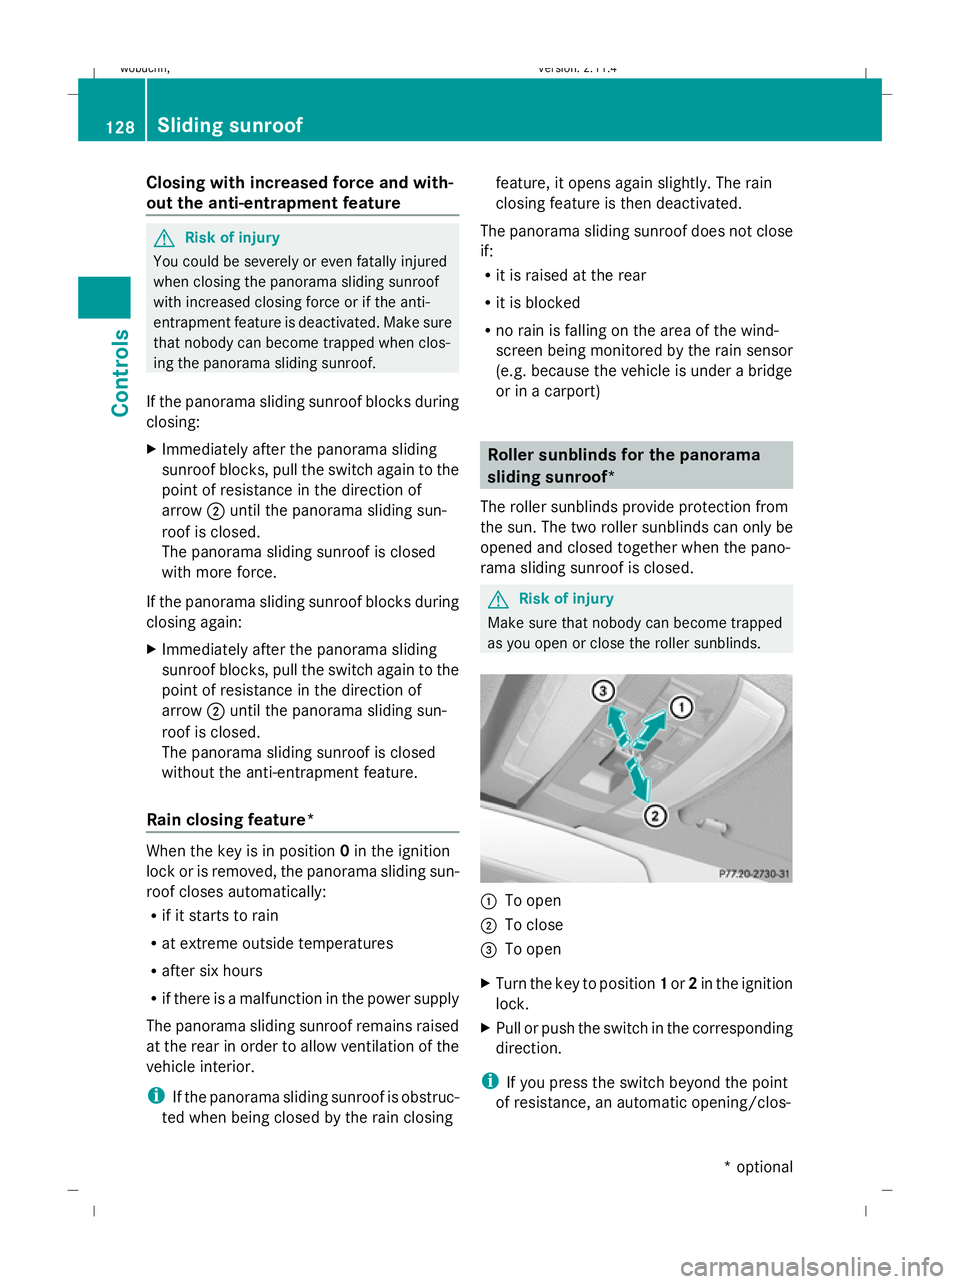
as you open or close the roller sunblinds. :
To open
; To close
= To open
X Turn the key to position 1or 2in the ignition
lock.
X Pull or push the switch in the corresponding
direction.
i If you press the switch beyond the point
of resistance, an automatic opening/clos- 128 Sliding sunroofControls
* optional
X204_AKB; 1; 5, en-GB
wobuchh,
Version: 2.11.4 2008-10-15T13:20:56+02:00 - Seite 128Dateiname: 6515_0671_02_buchblock.pdf; preflight
Page 171 of 261
and rinse off the treated surface afterwards.
Remove:
R tree resin, oils, fuels and greases by rub-
bing gently with a cloth soaked in petro-
leum ether or lighter fluid.
R tar stain with tar remover
R wax with silicone remover
! Do not affix to painted surfaces or plastic
surfaces:
R stickers
R films
R magnetic plates
R scented oil bottles or similar items
Otherwise, you could damage the paint fin-
ish or plastic. H
Environmental note
Dispose of empty packaging, cleaning cloths
and polishing wads in an environmentally
responsible manner. Vehicle care
! Do not park the vehicle for a long period
of time directly after cleaning, especially if
the wheels have just been cleaned with a
wheel cleaner. Wheel cleaners could cause
rapid corrosion of the brake discs and
brake pads/linings. After cleaning, park
the vehicle when it is at normal operating
temperature.
Automatic car wash You can wash the vehicle in an automatic car
wash from the beginning.
! Do not use a touch-free automatic car
wash that uses chemical agents to wash
the vehicle.
Preferably use automatic car washes without
brushes.
If the vehicle is very dirty, pre-wash it before
cleaning it in an automatic car wash. !
Make sure that the automatic car wash is
suitable for the size of the vehicle. Fold in
the exterior mirrors before the vehicle is
washed. There is otherwise a risk of dam-
age to the exterior mirrors.
! Make sure that the automatic transmis-
sion is not in position Pwhen washing your
vehicle in a tow-through car wash.
Do not remove the key from the ignition
lock. Do not open the driver's or front-
passenger door when the engine is
switched off, as this automatically shifts
the automatic transmission to park posi-
tion Pand locks the wheels, unless you
have previously shifted the automatic
transmission to N.
! Make sure that the side windows are com-
pletely closed, that the ventilation/heater
blower is fully turned off and that the wind-
screen wiper switch is set to 0. Otherwise,
the rain sensor may be activated, triggering
unintended wiper movements. This could
cause damage to the vehicle.
After using an automatic car wash, wipe off
wax and drying agents from the windscreen
and the wiper blades. This will prevent smears
and reduce wiping noises caused by residue
on the windscreen.
High-pressure cleaners G
Risk of accident
Do not use high-pressure cleaners with circu-
lar-jet nozzles (dirt grinders) to clean your
vehicle, in particular the tyres. Otherwise, you
could damage the tyres and cause an acci-
dent.
! Observe the instructions issued by the
equipment manufacturer concerning the
distance to be maintained between the
nozzle of the high-pressure cleaner and the
vehicle (at least 30 cm).
Move the high-pressure cleaner nozzle
around when cleaning your vehicle. 168 CareOperation
X204_AKB; 1; 5, en-GB
wobuchh,
Version: 2.11.4 2008-10-15T13:20:56+02:00 - Seite 168Dateiname: 6515_0671_02_buchblock.pdf; preflight
Page 174 of 261
does not become soaked. For leather
care, use leather care foam A 001 986
59 71 10. You can purchase this from any
Mercedes-Benz Service Centre.
R artificial leather covers with a cloth mois-
tened with a solution containing 1%
detergent (e. g. washing-up liquid).
R fabric covers with a microfibre cloth
moistened with a solution containing 1%
detergent (e. g. washing-up liquid). When
cleaning, take care not to rub too vigo-
rously and always wipe entire seat sec-
tions to avoid leaving visible lines. Leave
the seat to dry afterwards. Cleaning
results depend on the type of dirt and
how long it has been there.
i Note that leather covers are a natural
product and, as such, are subject to a nat-
ural ageing process and may react differ-
ently (e.g. increased wrinkling) to certain
environmental influences (such as high
humidity, intense heat).
Note that regular care is essential to ensure
that the quality (both appearance and com-
fort) of the covers is retained over time.
Cleaning the wooden trim*and trim
strips X
Moisten a clean lint-free cloth with water.
X Clean the wooden trim.
X If particularly dirty, use a mild detergent.
! Do not use cleaning agents containing
solvents because these can damage the
wooden trim.
Cleaning the exhaust tail pipes Impurities combined with the effects of road
grit and corrosive environmental factors may
cause flash rust to form on the surface.
Regular care of the exhaust tail pipes will
ensure that their original shine is restored. !
Do not clean the exhaust tail pipes with
alkaline-based cleaning agents such as
wheel cleaner.
Use the chrome-cleaning agent recommen-
ded by Mercedes-Benz for cleaning. Infor-
mation about chrome-cleaning agents can
be obtained from any Mercedes-Benz
Service Centre.
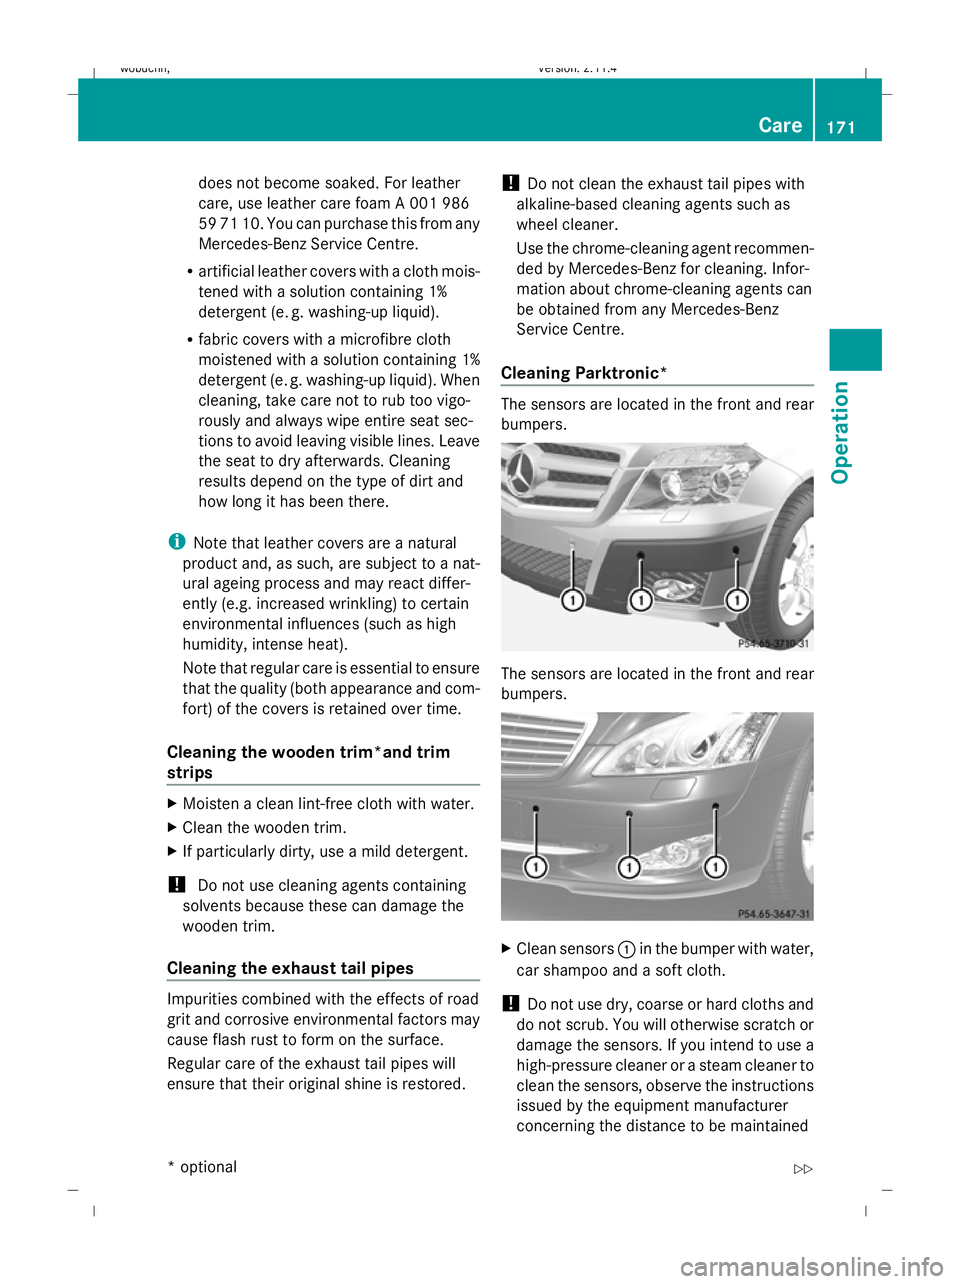
Cleaning Parktronic* The sensors are located in the front and rear
bumpers.
The sensors are located in the front and rear
bumpers.
X
Clean sensors :in the bumper with water,
car shampoo and a soft cloth.
! Do not use dry, coarse or hard cloths and
do not scrub. You will otherwise scratch or
damage the sensors. If you intend to use a
high-pressure cleaner or a steam cleaner to
clean the sensors, observe the instructions
issued by the equipment manufacturer
concerning the distance to be maintained Care
171Operation
* optional
X204_AKB; 1; 5, en-GB
wobuchh,
Version: 2.11.4 2008-10-15T13:20:56+02:00 - Seite 171 ZDateiname: 6515_0671_02_buchblock.pdf; preflight