2008 MERCEDES-BENZ GLK SUV light
[x] Cancel search: lightPage 140 of 261
around the vehicle in the event of sharp brak-
ing, a sudden change in direction or an acci-
dent.
The safety net*, the ball coupling *, the col-
lapsible spare tyre* etc. are stowed beneath
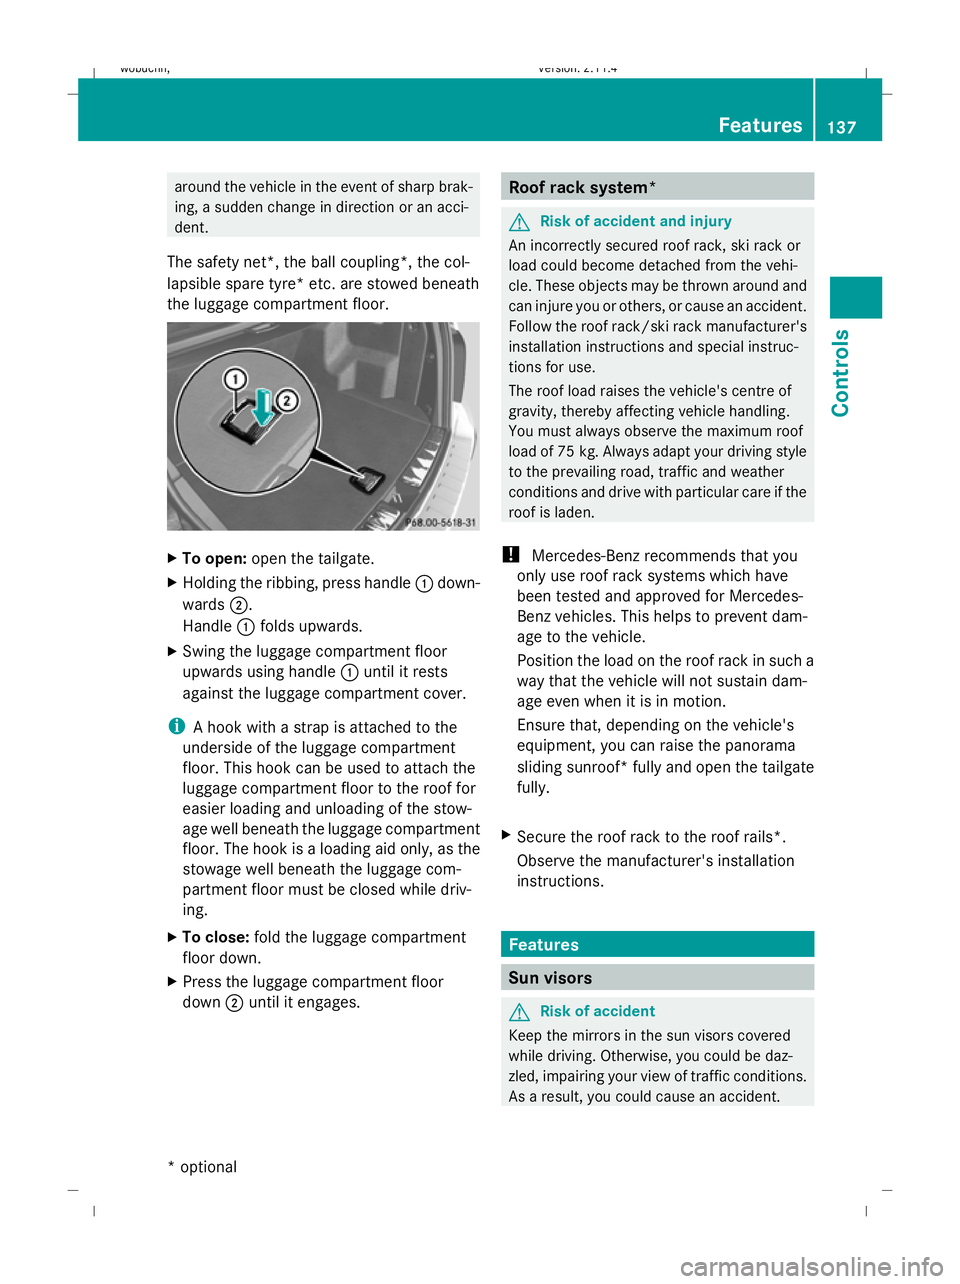
the luggage compartment floor. X
To open: open the tailgate.
X Holding the ribbing, press handle :down-
wards ;.
Handle :folds upwards.
X Swing the luggage compartment floor
upwards using handle :until it rests
against the luggage compartment cover.
i A hook with a strap is attached to the
underside of the luggage compartment
floor. This hook can be used to attach the
luggage compartment floor to the roof for
easier loading and unloading of the stow-
age well beneath the luggage compartment
floor. The hook is a loading aid only, as the
stowage well beneath the luggage com-
partment floor must be closed while driv-
ing.
X To close: fold the luggage compartment
floor down.
X Press the luggage compartment floor
down ;until it engages. Roof rack system*
G
Risk of accident and injury
An incorrectly secured roof rack, ski rack or
load could become detached from the vehi-
cle. These objects may be thrown around and
can injure you or others, or cause an accident.
Follow the roof rack/ski rack manufacturer's
installation instructions and special instruc-
tions for use.
The roof load raises the vehicle's centre of
gravity, thereby affecting vehicle handling.
You must always observe the maximum roof
load of 75 kg. Always adapt your driving style
to the prevailing road, traffic and weather
conditions and drive with particular care if the
roof is laden.
! Mercedes-Benz recommends that you
only use roof rack systems which have
been tested and approved for Mercedes-
Benz vehicles. This helps to prevent dam-
age to the vehicle.
Position the load on the roof rack in such a
way that the vehicle will not sustain dam-
age even when it is in motion.
Ensure that, depending on the vehicle's
equipment, you can raise the panorama
sliding sunroof* fully and open the tailgate
fully.
X Secure the roof rack to the roof rails*.
Observe the manufacturer's installation
instructions. Features
Sun visors
G
Risk of accident
Keep the mirrors in the sun visors covered
while driving. Otherwise, you could be daz-
zled, impairing your view of traffic conditions.
As a result, you could cause an accident. Features
137Controls
* optional
X204_AKB; 1; 5, en-GB
wobuchh, Version: 2.11.4 2008-10-15T13:20:56+02:00 - Seite 137 ZDateiname: 6515_0671_02_buchblock.pdf; preflight
Page 141 of 261
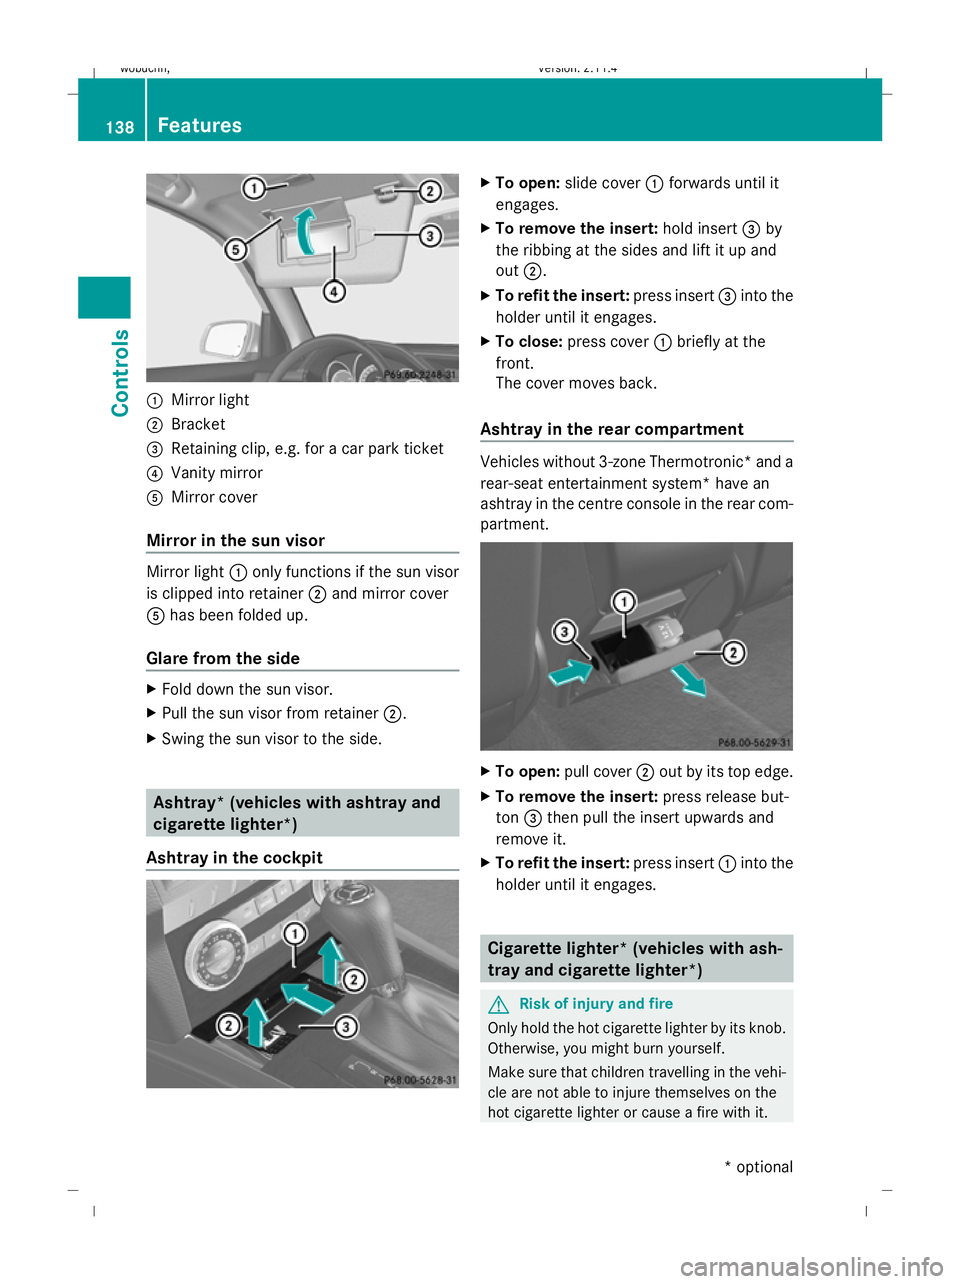
:
Mirror light
; Bracket
= Retaining clip, e.g. for a car park ticket
? Vanity mirror
A Mirror cover
Mirror in the sun visor Mirror light
:only functions if the sun visor
is clipped into retainer ;and mirror cover
A has been folded up.
Glare from the side X
Fold down the sun visor.
X Pull the sun visor from retainer ;.
X Swing the sun visor to the side. Ashtray* (vehicles with ashtray and
cigarette lighter*)
Ashtray in the cockpit X
To open: slide cover :forwards until it
engages.
X To remove the insert: hold insert=by
the ribbing at the sides and lift it up and
out ;.
X To refit the insert: press insert=into the
holder until it engages.
X To close: press cover :briefly at the
front.
The cover moves back.
Ashtray in the rear compartment Vehicles without 3-zone Thermotronic* and a
rear-seat entertainment system* have an
ashtray in the centre console in the rear com-
partment.
X
To open: pull cover ;out by its top edge.
X To remove the insert: press release but-
ton =then pull the insert upwards and
remove it.
X To refit the insert: press insert:into the
holder until it engages. Cigarette lighter* (vehicles with ash-
tray and cigarette lighter*) G
Risk of injury and fire
Only hold the hot cigarette lighter by its knob.
Otherwise, you might burn yourself.
Make sure that children travelling in the vehi-
cle are not able to injure themselves on the
hot cigarette lighter or cause a fire with it. 138 FeaturesControls
* optional
X204_AKB; 1; 5, en-GB
wobuchh,
Version: 2.11.4 2008-10-15T13:20:56+02:00 - Seite 138Dateiname: 6515_0671_02_buchblock.pdf; preflight
Page 142 of 261
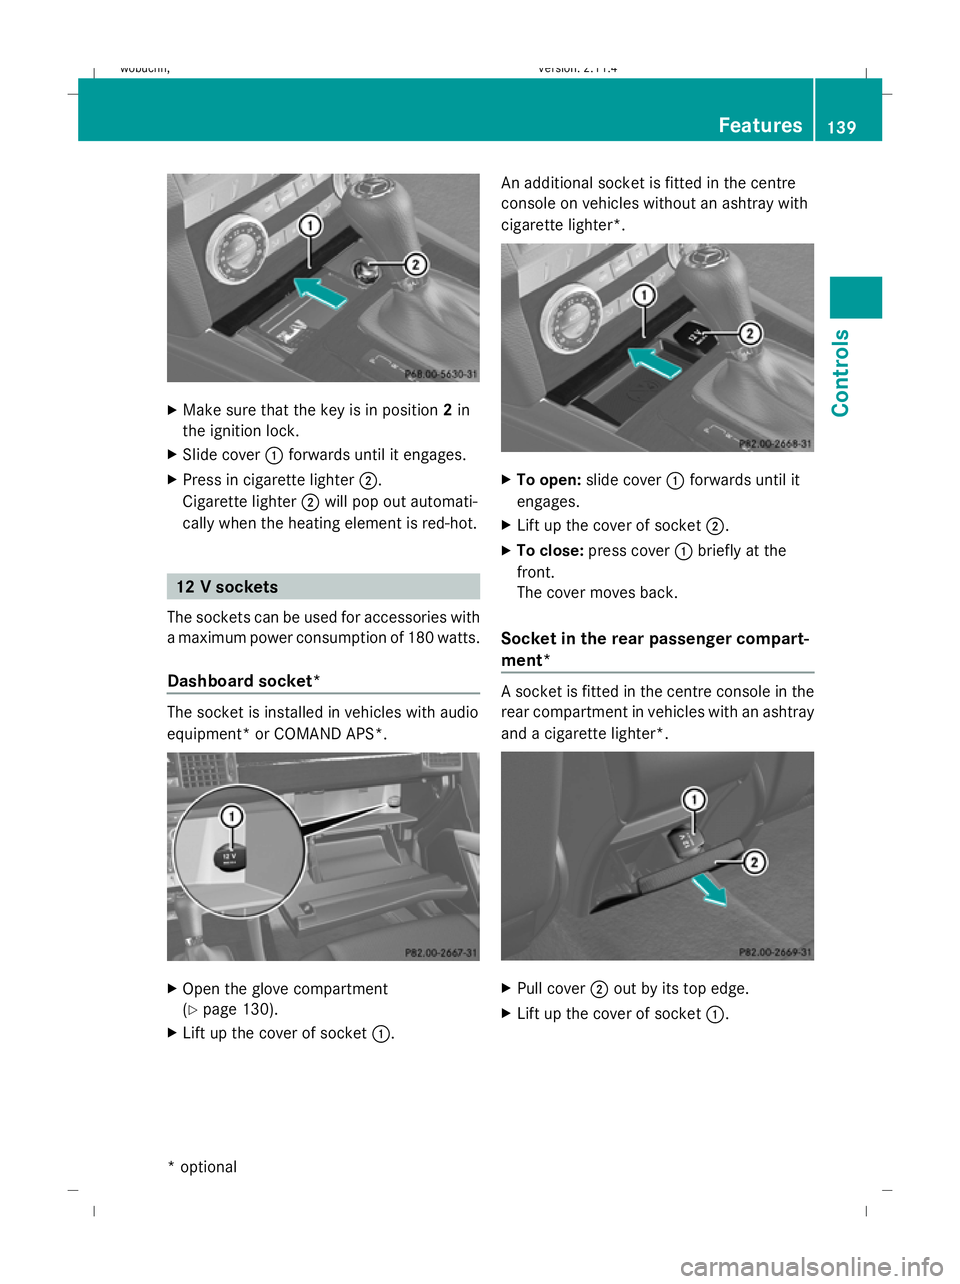
X
Make sure that the key is in position 2in
the ignition lock.
X Slide cover :forwards until it engages.
X Press in cigarette lighter ;.
Cigarette lighter ;will pop out automati-
cally when the heating element is red-hot. 12 V sockets
The sockets can be used for accessories with
a maximum power consumption of 180 watts.
Dashboard socket* The socket is installed in vehicles with audio
equipment* or COMAND APS*. X
Open the glove compartment
(Y page 130).
X Lift up the cover of socket :.An additional socket is fitted in the centre
console on vehicles without an ashtray with
cigarette lighter*.
X
To open: slide cover :forwards until it
engages.
X Lift up the cover of socket ;.
X To close: press cover :briefly at the
front.
The cover moves back.
Socket in the rear passenger compart-
ment* A socket is fitted in the centre console in the
rear compartment in vehicles with an ashtray
and a cigarette lighter*.
X
Pull cover ;out by its top edge.
X Lift up the cover of socket :. Features
139Controls
* optional
X204_AKB; 1; 5, en-GB
wobuchh,
Version: 2.11.4
2008-10-15T13:20:56+02:00 - Seite 139 ZDateiname: 6515_0671_02_buchblock.pdf; preflight
Page 143 of 261
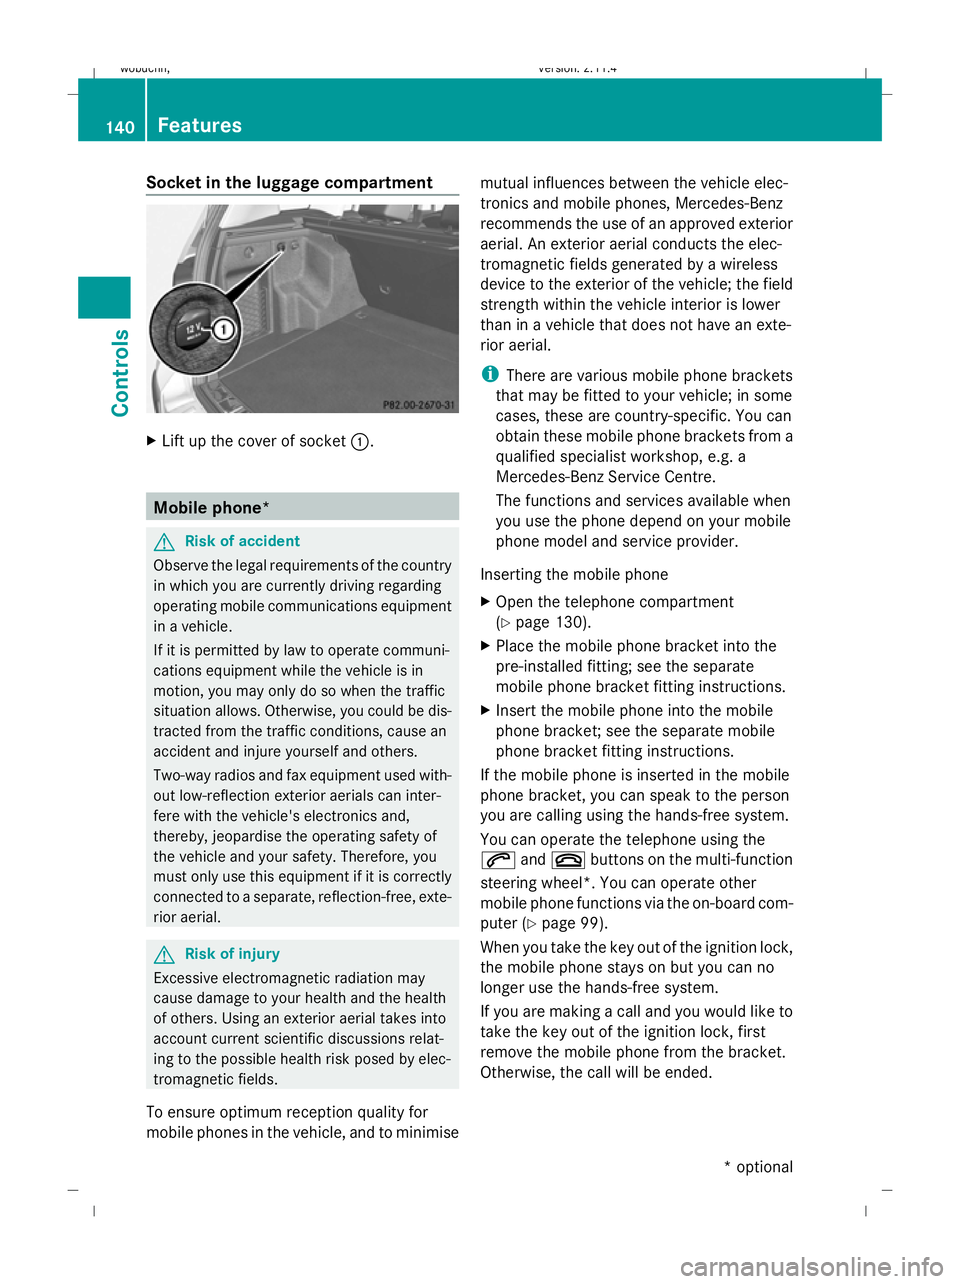
Socket in the luggage compartment
X
Lift up the cover of socket :.Mobile phone*
G
Risk of accident
Observe the legal requirements of the country
in which you are currently driving regarding
operating mobile communications equipment
in a vehicle.
If it is permitted by law to operate communi-
cations equipment while the vehicle is in
motion, you may only do so when the traffic
situation allows. Otherwise, you could be dis-
tracted from the traffic conditions, cause an
accident and injure yourself and others.
Two-way radios and fax equipment used with-
out low-reflection exterior aerials can inter-
fere with the vehicle's electronics and,
thereby, jeopardise the operating safety of
the vehicle and your safety. Therefore, you
must only use this equipment if it is correctly
connected to a separate, reflection-free, exte-
rior aerial. G
Risk of injury
Excessive electromagnetic radiation may
cause damage to your health and the health
of others. Using an exterior aerial takes into
account current scientific discussions relat-
ing to the possible health risk posed by elec-
tromagnetic fields.
To ensure optimum reception quality for
mobile phones in the vehicle, and to minimise mutual influences between the vehicle elec-
tronics and mobile phones, Mercedes-Benz
recommends the use of an approved exterior
aerial. An exterior aerial conducts the elec-
tromagnetic fields generated by a wireless
device to the exterior of the vehicle; the field
strength within the vehicle interior is lower
than in a vehicle that does not have an exte-
rior aerial.
i
There are various mobile phone brackets
that may be fitted to your vehicle; in some
cases, these are country-specific. You can
obtain these mobile phone brackets from a
qualified specialist workshop, e.g. a
Mercedes-Benz Service Centre.
The functions and services available when
you use the phone depend on your mobile
phone model and service provider.
Inserting the mobile phone
X Open the telephone compartment
(Y page 130).
X Place the mobile phone bracket into the
pre-installed fitting; see the separate
mobile phone bracket fitting instructions.
X Insert the mobile phone into the mobile
phone bracket; see the separate mobile
phone bracket fitting instructions.
If the mobile phone is inserted in the mobile
phone bracket, you can speak to the person
you are calling using the hands-free system.
You can operate the telephone using the
6 and~ buttons on the multi-function
steering wheel*. You can operate other
mobile phone functions via the on-board com-
puter (Y page 99).
When you take the key out of the ignition lock,
the mobile phone stays on but you can no
longer use the hands-free system.
If you are making a call and you would like to
take the key out of the ignition lock, first
remove the mobile phone from the bracket.
Otherwise, the call will be ended. 140 FeaturesControls
* optional
X204_AKB; 1; 5, en-GB
wobuchh,
Version: 2.11.4 2008-10-15T13:20:56+02:00 - Seite 140Dateiname: 6515_0671_02_buchblock.pdf; preflight
Page 144 of 261
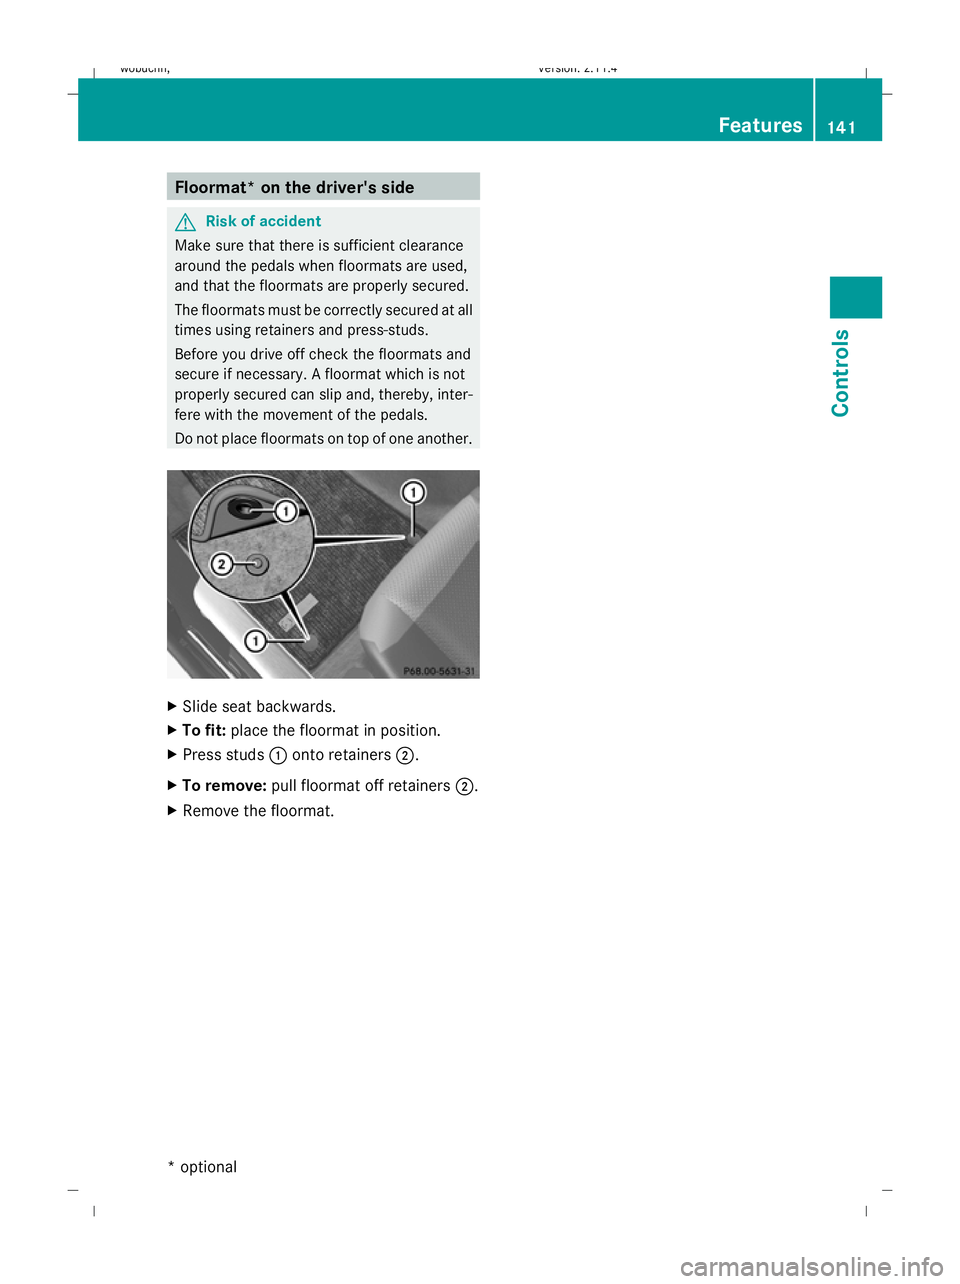
Floormat* on the driver's side
G
Risk of accident
Make sure that there is sufficient clearance
around the pedals when floormats are used,
and that the floormats are properly secured.
The floormats must be correctly secured at all
times using retainers and press-studs.
Before you drive off check the floormats and
secure if necessary. A floormat which is not
properly secured can slip and, thereby, inter-
fere with the movement of the pedals.
Do not place floormats on top of one another. X
Slide seat backwards.
X To fit: place the floormat in position.
X Press studs :onto retainers ;.
X To remove: pull floormat off retainers ;.
X Remove the floormat. Features
141Controls
* optional
X204_AKB; 1; 5, en-GB
wobuchh,
Version: 2.11.4 2008-10-15T13:20:56+02:00 - Seite 141 ZDateiname: 6515_0671_02_buchblock.pdf; preflight
Page 145 of 261

142 X204_AKB; 1; 5, en-GB
wobuchh,
Version: 2.11.4 2008-10-15T13:20:56+02:00 - Seite 142Dateiname: 6515_0671_02_buchblock.pdf; preflight
Page 146 of 261
Running-in notes............................... 144
Refuelling ........................................... 144
Engine compartment ........................146
Tyres and wheels .............................. 150
Winter driving ................................... 155
Driving tips ........................................ 156
Off-road driving ................................. 158
Driving abroad ................................... 162
Trailer towing* .................................. 162
Service ............................................... 167
Care .................................................... 167
143
Operation
X204_AKB; 1; 5, en-GB
wobuchh, Version: 2.11.4
2008-10-15T13:20:56+02:00 - Seite 143 Dateiname: 6515_0671_02_buchblock.pdf; preflight
Page 147 of 261
Running-in notes
The first 1,500 km
G
Risk of accident
New brake pads/linings only have optimal
braking performance after several hundred
kilometres. Until then, compensate for this by
applying greater force to the brake pedal. This
also applies when brake pads/linings or
brake discs have been changed.
If you treat the engine with sufficient care
from the very start, you will be rewarded with
excellent performance for the remainder of
the engine's life.
R Therefore, you should drive at varying road
and engine speeds for the first 1,500 km.
R Avoid heavy loads, e.g. driving at full throt-
tle, during this time. Do not exceed 2
/ 3 of
the maximum permissible engine speed for
each gear.
R Change gear in good time.
R Do not shift down a gear manually in order
to brake.
R try to avoid depressing the accelerator
pedal beyond the pressure point (kick-
down).
R only use ranges 3,2or 1for slow driving,
e.g. in mountainous terrain.
After 1,500 km, you can continuously
increase the engine speed and bring the vehi-
cle up to full road speed.
i You should also observe these notes on
running in if the engine or the axle gear on
your vehicle has been replaced. Refuelling
Refuelling
G
Risk of explosion
Fuel is highly flammable. Fire, naked flames
and smoking are therefore prohibited when
handling fuels.
Switch off the engine before refuelling. G
Risk of injury
Avoid any contact with fuels.
You can damage your health if your skin
comes into direct contact with fuel or if you
inhale fuel vapours. G
Risk of fire
Do not use petrol to refuel vehicles with a die-
sel engine. Never mix diesel with petrol. This
causes damage to the fuel system and engine
and could result in the vehicle catching fire.
! Do not use petrol to refuel vehicles with a
diesel engine. Do not use diesel to refuel
vehicles with a petrol engine. Even a small
quantity of the wrong fuel will damage the
injection system. Damage resulting from
adding the wrong fuel is not covered by the
warranty.
! Do not start the engine if you accidentally
refuel with the wrong fuel. Otherwise, the
fuel could enter the fuel lines. This would
require draining of the fuel tank and fuel
lines. Notify a qualified specialist workshop
and have the fuel tank and fuel lines
drained completely.
When you open or close the vehicle with the
key, the fuel filler flap is automatically
unlocked or locked.
The position of the fuel filler cap is to the rear
on the right. The position of the fuel filler cap
is displayed in the instrument cluster 8.144 RefuellingOperation
X204_AKB; 1; 5, en-GB
wobuchh,
Version: 2.11.4 2008-10-15T13:20:56+02:00 - Seite 144Dateiname: 6515_0671_02_buchblock.pdf; preflight