2008 MERCEDES-BENZ E-CLASS SALOON tow
[x] Cancel search: towPage 271 of 401
Display
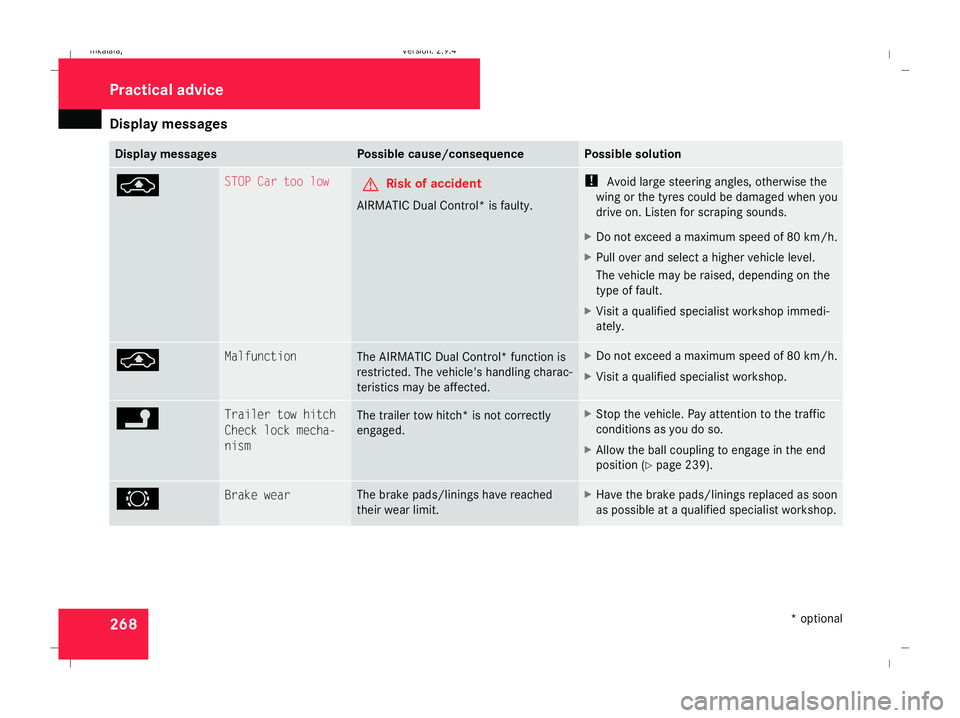
messages 268 Display messages Possible cause/consequence Possible solution
@ STOP Car too low
G
Risk of accident
AIRMATIC Dual Control* is faulty. !
Avoid large steering angles, otherwise the
wing or the tyres could be damaged when you
drive on. Listen for scraping sounds.
X Do not exceed a maximum speed of 80 km/h.
X Pull over and select a higher vehicle level.
The vehicle may be raised, depending on the
type of fault.
X Visit a qualified specialist workshop immedi-
ately. @ Malfunction
The AIRMATIC Dual Control* function is
restricted. The vehicle's handling charac-
teristics may be affected. X
Do not exceed a maximum speed of 80 km/h.
X Visit a qualified specialist workshop. \ Trailer tow hitch
Check lock mecha-
nism
The trailer tow hitch* is not correctly
engaged. X
Stop the vehicle. Pay attention to the traffic
conditions as you do so.
X Allow the ball coupling to engage in the end
position (Y page 239). 2 Brake wear The brake pads/linings have reached
their wear limit. X
Have the brake pads/linings replaced as soon
as possible at a qualified specialist workshop. Practical advi
ce
* optional
211_AKB; 2; 5, en-GB
mkalafa,
Version: 2.9.4 2008-02-29T16:57:07+01:00 - Seite 268Dateiname: 6515_3416_02_buchblock.pdf; preflight
Page 293 of 401
Troubleshooting
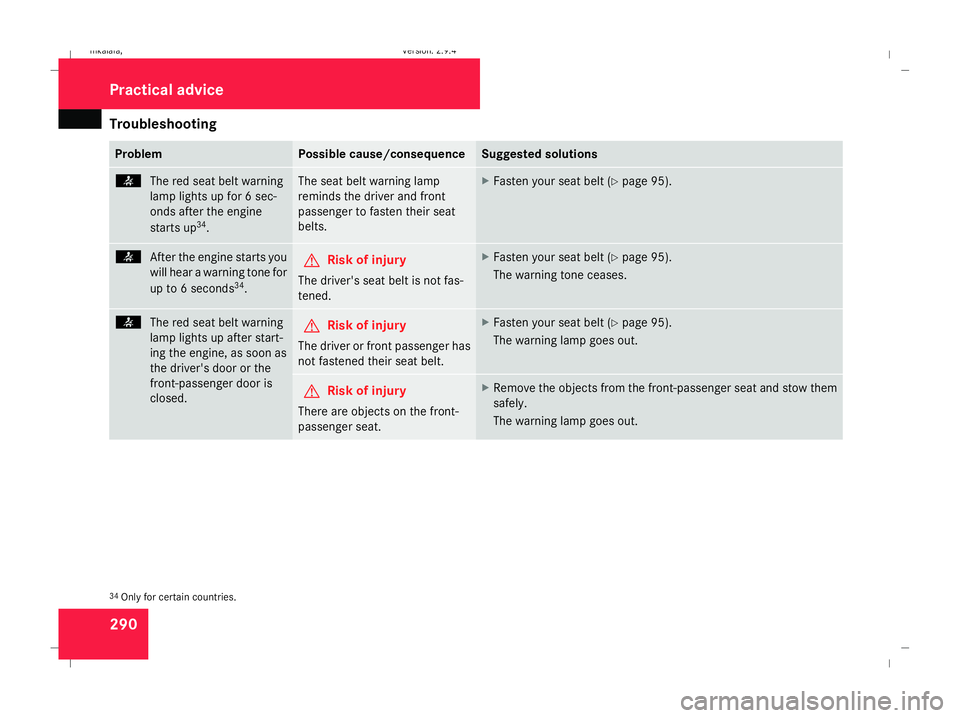
290 Problem Possible cause/consequence Suggested solutions
<
The red seat belt warning
lamp lights up for 6 sec-
onds after the engine
starts up 34
. The seat belt warning lamp
reminds the driver and front
passenger to fasten their seat
belts. X
Fasten your seat belt (Y page 95).<
After the engine starts you
will hear a warning tone for
up to 6 seconds 34
. G
Risk of injury
The driver's seat belt is not fas-
tened. X
Fasten your seat belt (Y page 95).
The warning tone ceases. <
The red seat belt warning
lamp lights up after start-
ing the engine, as soon as
the driver's door or the
front-passenger door is
closed. G
Risk of injury
The driver or front passenger has
not fastened their seat belt. X
Fasten your seat belt (Y page 95).
The warning lamp goes out. G
Risk of injury
There are objects on the front-
passenger seat. X
Remove the objects from the front-passenger seat and stow them
safely.
The warning lamp goes out. 34
Only for certain countries. Practical advice
211_AKB; 2; 5, en-GB
mkalafa
,V ersion: 2.9.4
2008-02-29T16:57:07+01:00 - Seite 290 Dateiname: 6515_3416_02_buchblock.pdf; preflight
Page 294 of 401
Troubleshooting
291Problem Possible cause/consequence Suggested solutions
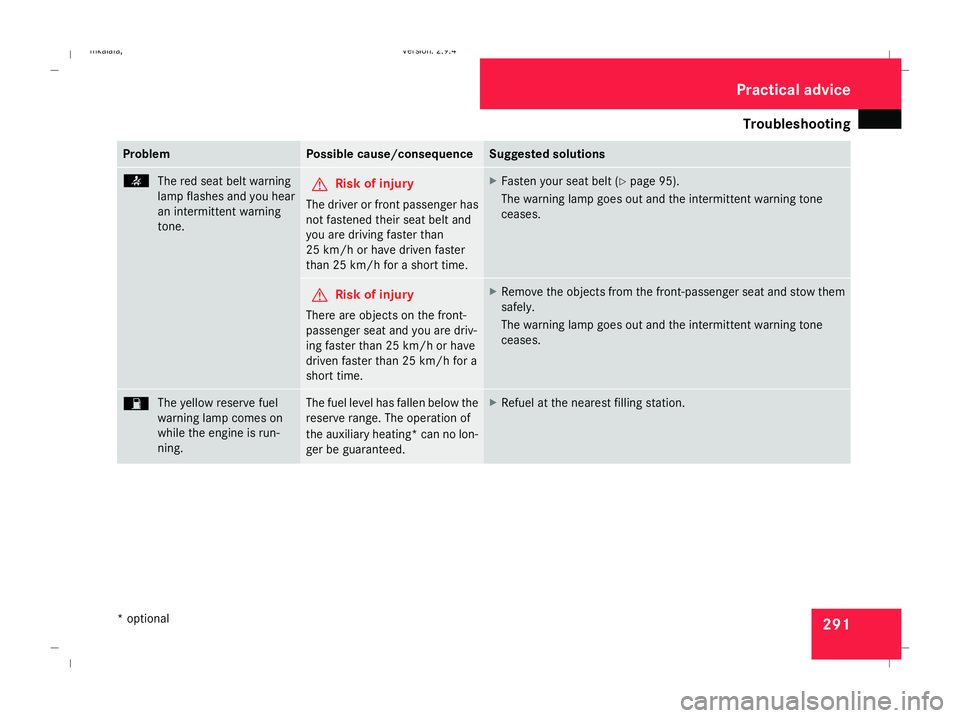
<
The red seat belt warning
lamp flashes and you hear
an intermittent warning
tone. G
Risk of injury
The driver or front passenger has
not fastened their seat belt and
you are driving faster than
25 km/h or have driven faster
than 25 km/h for a short time. X
Fasten your seat belt (Y page 95).
The warning lamp goes out and the intermittent warning tone
ceases. G
Risk of injury
There are objects on the front-
passenger seat and you are driv-
ing faster than 25 km/h or have
driven faster than 25 km/h for a
short time. X
Remove the objects from the front-passenger seat and stow them
safely.
The warning lamp goes out and the intermittent warning tone
ceases. W
The yellow reserve fuel
warning lamp comes on
while the engine is run-
ning. The fuel level has fallen below the
reserve range. The operation of
the auxiliary heating* can no lon-
ger be guaranteed. X
Refuel at the nearest filling station. Practical advice
* optional
211_AKB; 2; 5, en-GB
mkalafa
,V ersion: 2.9.4
2008-02-29T16:57:07+01:00 - Seite 291 ZDateiname: 6515_3416_02_buchblock.pdf; preflight
Page 312 of 401
Resetting triggered NECK-PRO head restraints
309
X
Pull cover 2off the tailgate trim.
X Push release catch 1to the left as far as
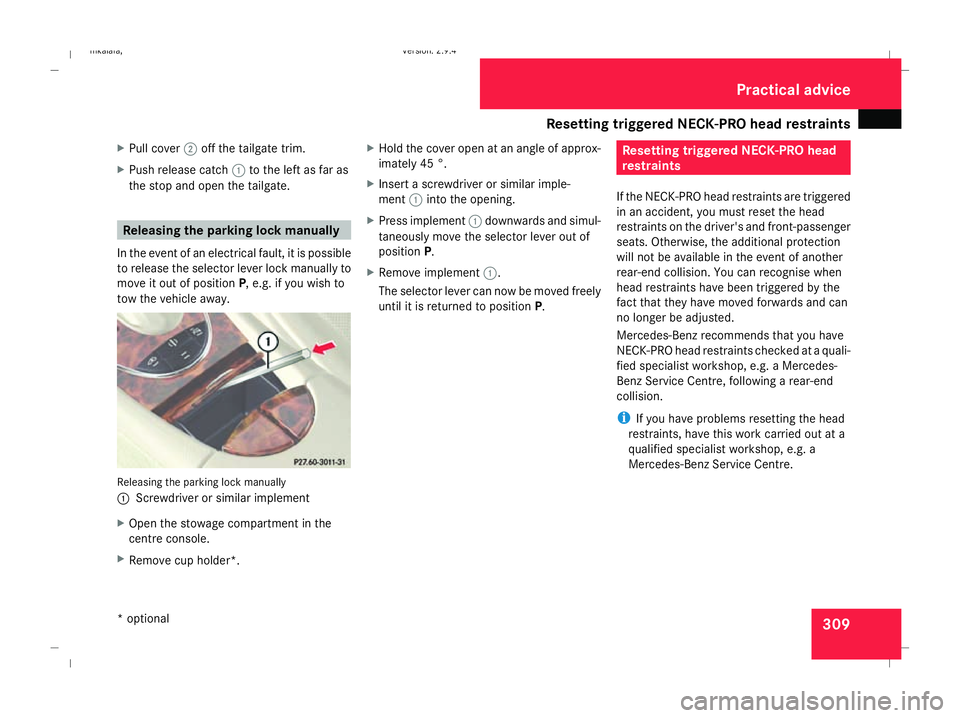
the stop and open the tailgate. Releasing the parking lock manually
In the event of an electrical fault, it is possible
to release the selector lever lock manually to
move it out of position P, e.g. if you wish to
tow the vehicle away. Releasing the parking lock manually
1 Screwdriver or similar implement
X Open the stowage compartment in the
centre console.
X Remove cup holder*. X
Hold the cover open at an angle of approx-
imately 45 °.
X Insert a screwdriver or similar imple-
ment 1into the opening.
X Press implement 1downwards and simul-
taneously move the selector lever out of
position P.
X Remove implement 1.
The selector lever can now be moved freely
until it is returned to position P. Resetting triggered NECK-PRO head
restraints
If the NECK-PRO head restraints are triggered
in an accident, you must reset the head
restraints on the driver's and front-passenger
seats. Otherwise, the additional protection
will not be available in the event of another
rear-end collision. You can recognise when
head restraints have been triggered by the
fact that they have moved forwards and can
no longer be adjusted.
Mercedes-Benz recommends that you have
NECK-PRO head restraints checked at a quali-
fied specialist workshop, e.g. a Mercedes-
Benz Service Centre, following a rear-end
collision.
i If you have problems resetting the head
restraints, have this work carried out at a
qualified specialist workshop, e.g. a
Mercedes-Benz Service Centre. Practical advice
* optional
211_AKB; 2; 5, en-GB
mkalafa
, Version: 2.9.4 2008-02-29T16:57:07+01:00 - Seite 309 ZDateiname: 6515_3416_02_buchblock.pdf; preflight
Page 321 of 401
Flat tyre
318 Make sure that the jack is placed on a firm,
non-slip, level surface. Do not use wooden
blocks or similar as jacking supports. Oth-
erwise, the jack will not be able to achieve
its load-bearing capacity due to the restric-
ted height.
Do not start the engine at any time while
the wheel is being changed.
Do not lie under the vehicle when it is being
supported by the jack. If you do not raise
the vehicle as described, it could slip off the
jack (e.g. if the engine is started or a door
or the boot lid/tailgate is opened or closed)
and you could sustain serious injuries. Using the TIREFIT kit
You can use the TIREFIT kit to seal small
punctures, particularly those in the tyre tread.
You can use TIREFIT in outdoor temperatures
down to -20 °C. G
Risk of accident
In the following situations, your safety is at
particular risk and TIREFIT is unable to pro-
vide breakdown assistance: R
if there are cuts or punctures in the tyre
greater than 4 mm
R if the wheel rim is damaged
R if you have driven at very low tyre pres-
sures or on a flat tyre
Do not drive any further. Consult a qualified
specialist workshop which has the neces-
sary specialist knowledge and tools to carry
out the work required.
Mercedes-Benz recommends that you use
a Mercedes-Benz Service Centre for this
purpose. In particular, work relevant to
safety or on safety-related systems must be
carried out at a qualified specialist work-
shop.
X Do not remove any foreign objects which
have penetrated the tyre, e.g. screws or
nails.
X Remove TIREFIT, the accompanying "max.
80 km/h "sticker and the electric air pump
from the stowage well underneath the
boot/luggage compartment floor
(Y page 254). 1
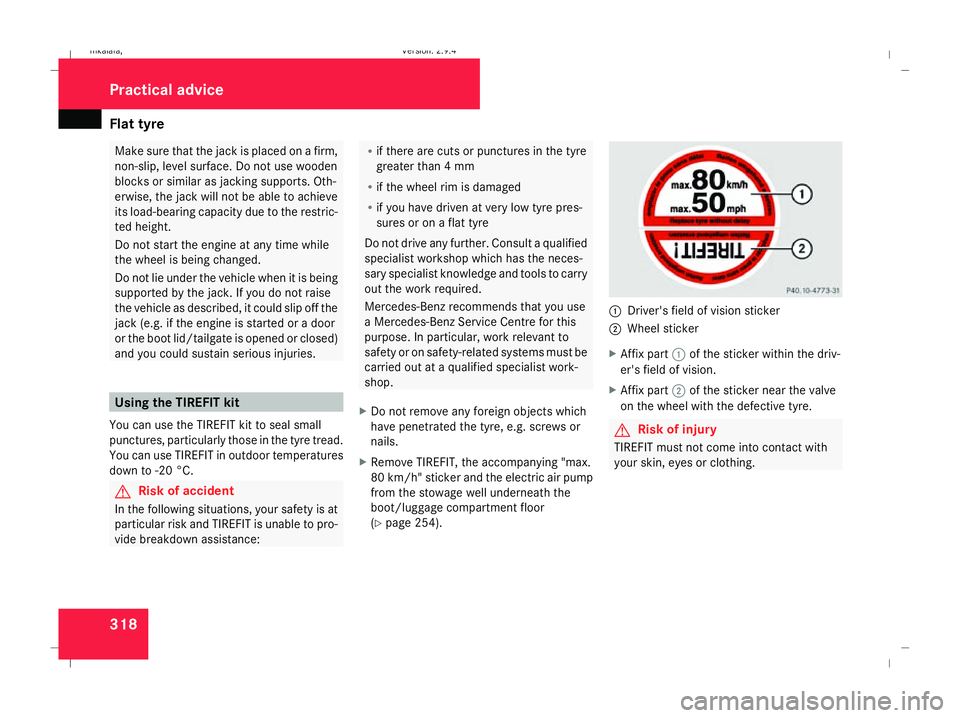
Driver's field of vision sticker
2 Wheel sticker
X Affix part 1of the sticker within the driv-
er's field of vision.
X Affix part 2of the sticker near the valve
on the wheel with the defective tyre. G
Risk of injury
TIREFIT must not come into contact with
your skin, eyes or clothing. Practical advice
211_AKB; 2; 5, en-GB
mkalafa
, Version: 2.9.4 2008-02-29T16:57:07+01:00 - Seite 318Dateiname: 6515_3416_02_buchblock.pdf; preflight
Page 323 of 401

Flat tyre
320a
Pressure release screw
b Pressure gauge
X Make sure pressure release screw aon
pressure gauge bis fully closed.
X Screw filler hose 8onto valve 9.
X Insert plug 5into the socket of the ciga-
rette lighter* (Y page 209) or into a 12V
power socket in your vehicle
(Y page 210).
X Turn the key to position 1(Y page 76) in
the ignition lock. X
Press on/off switch 4on the electric air
pump to I.
The electric air pump is switched on. The
tyre is inflated.
i First, TIREFIT is pumped into the tyre. The
pressure can briefly rise to around 5 bar.
Do not switch off the electric pump dur-
ing this phase.
X Let the electric pump run for five minutes.
The tyre should then have a pressure of at
least 1.8 bar.
! Do not operate the electric air pump for
longer than six minutes without a break.
Otherwise, it may overheat.
The air pump can be operated again once
it has cooled down.
If a pressure of 1.8 bar is not reached after
five minutes:
X Switch off and disconnect the electric air
pump and drive the vehicle forwards or
backwards approximately 10 m.
This distributes the TIREFIT more evenly.
X Remove TIREFIT filler bottle 1from the
electric pump.
X Pump up the tyre again. G
Risk of accident
If a pressure of 1.8 bar is not achieved after
five minutes, the tyre is too badly damaged.
Do not drive any further. Consult a qualified
specialist workshop which has the neces-
sary specialist knowledge and tools to carry
out the work required. Mercedes-Benz rec-
ommends that you use a Mercedes-Benz
Service Centre for this purpose. In particu-
lar, work relevant to safety or on safety-
related systems must be carried out at a
qualified specialist workshop.
If a tyre pressure of 1.8 bar is reached:
X Press on/off switch 4on the electric air
pump to 0.
The electric air pump is switched off.
X Disconnect the electric air pump and stow
it away.
X Fold up the warning triangle and stow it
away.
X Pull away immediately.
This distributes the TIREFIT more evenly
around the tyre.
X Stop after driving for approximately ten
minutes and check the tyre pressure with
the electric air pump. Practical advice
* optional
211_AKB; 2; 5, en-GB
mkalafa,
Version: 2.9.4 2008-02-29T16:57:07+01:00 - Seite 320Dateiname: 6515_3416_02_buchblock.pdf; preflight
Page 325 of 401

Flat tyre
3227
Valve
8 Filler hose
X Remove the cap from valve 7on the faulty
tyre.
X Screw filler hose 8onto valve 7.
X Insert plug 4into the socket of the ciga-
rette lighter* (Y page 209) or into a 12V
power socket in your vehicle
(Y page 210).
X Turn the key to position 1in the ignition
lock. X
Press on/off switch 3on the electric air
pump to I.
The electric air pump is switched on. The
tyre is inflated.
i First, TIREFIT is pumped into the tyre. The
pressure can briefly rise to around 5 bar.
Do not switch off the electric pump dur-
ing this phase.
X Let the electric pump run for five minutes.
The tyre should then have a pressure of at
least 1.8 bar.
! Do not operate the electric air pump for
longer than six minutes without a break.
Otherwise, it may overheat.
The air pump can be operated again once
it has cooled down.
If a pressure of 1.8 bar is not reached after
five minutes:
X Switch off and disconnect the electric air
pump and drive the vehicle forwards or
backwards approximately 10 m.
This distributes the TIREFIT more evenly.
X Remove TIREFIT filler bottle 1from the
electric pump.
X Pump up the tyre again. G
Risk of accident
If a pressure of 1.8 bar is not achieved after
five minutes, the tyre is too badly damaged.
Do not drive any further. Consult a qualified
specialist workshop which has the neces-
sary specialist knowledge and tools to carry
out the work required. Mercedes-Benz rec-
ommends that you use a Mercedes-Benz
Service Centre for this purpose. In particu-
lar, work relevant to safety or on safety-
related systems must be carried out at a
qualified specialist workshop.
If a tyre pressure of 1.8 bar is reached:
X Press on/off switch 3on the electric air
pump to 0.
The electric air pump is switched off.
X Disconnect the electric air pump and stow
it away.
X Fold up the warning triangle and stow it
away.
X Pull away immediately.
This distributes the TIREFIT more evenly
around the tyre.
X Stop after driving for approximately ten
minutes and check the tyre pressure with
the electric air pump. Practical advice
* optional
211_AKB; 2; 5, en-GB
mkalafa,
Version: 2.9.4 2008-02-29T16:57:07+01:00 - Seite 322Dateiname: 6515_3416_02_buchblock.pdf; preflight
Page 327 of 401

Flat tyre
324 required. Mercedes-Benz recommends
that you use a Mercedes-Benz Service
Centre for this purpose. In particular, work
relevant to safety or on safety-related sys-
tems must be carried out at a qualified
specialist workshop.
Preparing the vehicle X
Prepare the vehicle as described
(Y page 317).
X If a trailer is coupled, uncouple it.
X Place the wheels in the straight-ahead posi-
tion.
X Take out the following from the stowage
area beneath the boot/luggage compart-
ment floor:
R the "Minispare"/collapsible emergency
spare wheel* or the spare wheel*
R the vehicle tool kit
R the wheel chock
R the jack
X Secure the vehicle to prevent it from rolling
away.
On level ground: place chocks or similar
under the front and rear of the wheel that is diagonally opposite the wheel you wish
to change.
X On downhill gradients: place chocks or
similar under both wheels of the other axle.
Raising the vehicle 1
Wheel wrench
X Using wheel wrench 1, loosen the bolts on
the wheel you wish to change by about one
full turn. Do not unscrew the bolts com-
pletely. G
Risk of accident
If you fail to position the jack correctly, the
vehicle may: R
slip off the jack
R injure you or others
R be damaged
It is thus important to ensure that the jack
is positioned correctly in the respective
jacking points. Before positioning the jack,
remove any dirt that may have collected in
the jacking points.
The jacking points for the jack are located
behind the wheel housings of the front wheels
and in front of the wheel housings of the rear
wheels. 1
Jacking point
2 Jack
3 Crank
X Position jack 2at jacking point 1. Practical advice
* optional
211_AKB; 2; 5, en-GB
mkalafa,
Version: 2.9.4 2008-02-29T16:57:07+01:00 - Seite 324Dateiname: 6515_3416_02_buchblock.pdf; preflight