2008 MERCEDES-BENZ E-CLASS ESTATE wheel torque
[x] Cancel search: wheel torquePage 17 of 401
14
Switching off the alarm
ATA . . . . . . . . . . . . . . . . . . . . . . . . . .62T
Tailgate Display message . . . . . . . . . . . . . .266
Emergency unlocking . . . . . . . . . . .308
Limiting the opening angl e.. . . . . ..76
Opening/closing (manually) . . . . . . .70
Tail lamps
Display message . . . . . . . . . . . . . .276
Tank capacity . . . . . . . . . . . . . . . . . . .377
Technical data Acceleration . . . . . . . . . . . . . . . . . .354
Engine . . . . . . . . . . . . . . . . . . . . . .348
Speed . . . . . . . . . . . . . . . . . . . . . . .352
Trailer loads . . . . . . . . . . . . . . . . . .376
Tyres . . . . . . . . . . . . . . . . . . . . . . .357
Vehicle dimensions . . . . . . . . . . . .366
Vehicle weights . . . . . . . . . . . . . . .369
Wheels . . . . . . . . . . . . . . . . . . . . . .357
Telephone
see Mobile phone
Telescopic lever . . . . . . . . . . . . . . . . .239
Telescopic rod (Easy-Pack fix kit) ..2 04
Temperature Engine oil (on-board computer) . . .126
Outside temperature . . . . . . . . . . .121 Thermatic
Malfunction indicator lamp . . . . . .283
Thermotronic
Malfunction indicator lamp . . . . . .283
Third brake lamp
Display message . . . . . . . . . . . . . .274
Through-loading feature . . . . . . . . ..195
Tightening torque . . . . . . . . . . . . . ..327
Time Lap time (on-board computer) . . . .127
Setting (on-board computer) . . . . .134
Setting the time (on-board com-
puter) . . . . . . . . . . . . . . . . . . . . . . .134
Timer (on-board computer) . . . . . ..127
TIREFIT kit Storage location . . . . . . . . . . . . . . .255
Using . . . . . . . . . . . . . . . . . . . . . . .318
Total distance recorder
. . . . . . . . . . . . . . . . . . . . . . . . . . . . .27, 29
Resetting the trip meter . . . . . . . . .121
Tow-away protection . . . . . . . . . . . . ..63
Towing . . . . . . . . . . . . . . . . . . . . . . . .339
Towing eye Fitting . . . . . . . . . . . . . . . . . . . . . . .338
Removing . . . . . . . . . . . . . . . . . . . .339
Tow-starting . . . . . . . . . . . . . . . . . . . .339
Trailer 7-pin connector . . . . . . . . . . . . . . .242
Display message . . . . . .268, 272, 273
Power supply . . . . . . . . . . . . . . . . .242 Trailer loads
Technical data . . . . . . . . . . . . . . . .376
Trailer tow hitch . . . . . . . . . . . . . . . .239
Notes on care . . . . . . . . . . . . . . . .248
Trailer towing
Driving tips . . . . . . . . . . . . . . . . . . .240
Mounting dimensions . . . . . . . . . . .375
Parktroni c.. . . . . . . . . . . . . . . . . .161
Transmission output (maximum)
Telephone/two-way radio . . . . . . .345
Transport (vehicle) . . . . . . . . . . . . ..340
Trip computer Menu (on-board computer) . . . . . .139
Trip meter . . . . . . . . . . . . . . . . . . . . . .125
Resetting . . . . . . . . . . . . . . . . . . . .121
Turn signal lamps
Display message . . . . . . . . . .273, 274
TV
Operating (on-board computer) . . .130
Two-way radio
Installatio n.. . . . . . . . . . . . . . . . . .345
Tyre grip . . . . . . . . . . . . . . . . . . . . . . .237
Tyre pressure . . . . . . . . . . . . . . . . . . .229
Calling up (on-board computer) . .232
Display message . . . . . . . . . .262, 278
Table (see Fuel filler flap) . . . . . . . .219
see Tyre pressure
Tyre pressure loss warning system 230
Tyre pressure monitor Warning lamp . . . . . . . . . . . . . . . . .289 Index
211_AKB; 2; 5, en-GB
mkalafa,
Version: 2.9.4 2008-02-29T16:57:07+01:00 - Seite 14Dateiname: 6515_3416_02_buchblock.pdf; preflight
Page 18 of 401
15
Tyre pressures
Table . . . . . . . . . . . . . . . . . . . . . . .356
Tyres
Direction of rotatio n.. . . . . . . . . . .229
General notes . . . . . . . . . . . . . . . . .227
Technical data . . . . . . . . . . . . . . . .357
Tyre tread . . . . . . . . . . . . . . . . . . . . . .229 U
Unit for distance Setting (on-board computer) . . . . .133
Unladen weight
. . . . . . . . . . . . . .369, 370, 372, 373, 374
Unlocking Emergency unlocking . . . . . . . . . . .306
From the inside (central unlocking
button) . . . . . . . . . . . . . . . . . . . . . . .70
Up (display message) . . . . . . . . . . ..126 V
Variable Speedtronic . . . . . . . . . . . ..152
Vehicle Emergency unlocking . . . . . . .306, 307
Individual settings (on-board com-
puter) . . . . . . . . . . . . . . . . . . . . . . .131
Leaving parked up . . . . . . . . . . . . .305
Towing . . . . . . . . . . . . . . . . . . . . . .339
Tow-starting . . . . . . . . . . . . . . . . . .339
Transporting . . . . . . . . . . . . . . . . . .340 Vehicle battery
. . . . . . . . . . . . . . . . .329
Vehicle dimensions . . . . . . . . . . . . ..366
Vehicle electronics . . . . . . . . . . . . ..345
Vehicle identification number
(VIN) . . . . . . . . . . . . . . . . . . . . . .346, 347
Vehicle identification plates . . . . ..346
Vehicle level Display message . . . . . . . . . . . . . .267
Setting (AIRMATIC DC) . . . . . . . . .156
Vehicle tool kit . . . . . . . . . . . . . . . . . .254
Vehicle weights . . . . . . . . . . . . . . . . .369 W
Warning and indicator lamp ABS (yellow) . . . . . . . . . . . . . . . . . .285
LIM (Cruise control) . . . . . . . . . . . .143
LIM (Distronic) . . . . . . . . . . . . . . . .146
LIM (variable Speedtronic) . . . . . . .152
Warning signal
Audible . . . . . . . . . . . . . . . . . . . . . .292
Warning triangle . . . . . . . . . . . . . . . .252
Washer fluid Display message . . . . . . . . . . . . . .281
Wearing seat belts . . . . . . . . . . . . . . ..95
Wheel bolts Tightening torque . . . . . . . . . . . . . .327
Wheel chock
Use . . . . . . . . . . . . . . . . . . . . . . . . .256 Wheels
General notes . . . . . . . . . . . . . . . . .227
Interchanging . . . . . . . . . . . . . . . . .233
Technical data . . . . . . . . . . . . . . . .357
Windowbags . . . . . . . . . . . . . . . . . . . . .46
Windows Cleaning . . . . . . . . . . . . . . . . . . . . .246
Cleaning the windscreen . . . . . . . .246
Side windows . . . . . . . . . . . . . . . . .107
Windscreen
Cleaning . . . . . . . . . . . . . . . . . . . . .246
Infrared reflecting . . . . . . . . . . . . .214
Windscreen washer fluid . . . . . . . ..390
Topping up . . . . . . . . . . . . . . . . . . .226
Windscreen washer fluid reservoir
. . . . . . . . . . . . . . . . . . . . . . . . . .226, 390
Windscreen washer reservoir Capacity . . . . . . . . . . . . . . . . . . . . .390
Windscreen washer system . . . . . ..390
Windscreen wipers . . . . . . . . . . . . ..105
Cleaning . . . . . . . . . . . . . . . . . . . . .246
Malfunction . . . . . . . . . . . . . . . . . .299
Replacing the wiper blades . . . . . .315
Winter diesel . . . . . . . . . . . . . . . . . . .221
Winter driving . . . . . . . . . . . . . .234, 235
Winter tyres . . . . . . . . . . . . . . . . . . . .234
Limiting the speed (on-board com-
puter) . . . . . . . . . . . . . . . . . . . . . . .154 Index
211_AKB; 2; 5, en-GB
mkalafa,
Version: 2.9.4
2008-02-29T16:57:07+01:00 - Seite 15 Dateiname: 6515_3416_02_buchblock.pdf; preflight
Page 63 of 401
Driving safety sys
tems60 ESP
®
(Electronic Stability Program)
ESP ®
monitors driving stability and traction,
i.e. power transmission between the tyres
and the road surface.
If ESP ®
detects that the vehicle is deviating
from the direction desired by the driver, one
or more wheels are braked to stabilise the
vehicle. The engine output is also modified, if
necessary, to keep the vehicle on the desired
course within physical limits. ESP ®
assists
the driver when pulling away on wet or slip-
pery roads. ESP ®
can also stabilise the vehi-
cle during braking.
When ESP ®
intervenes, the vwarning
lamp flashes in the instrument cluster. G
Risk of accident
If the v warning lamp in the instrument
cluster flashes, proceed as follows:
R Do not deactivate ESP ®
under any cir-
cumstances.
R Only depress the accelerator pedal as far
as necessary when pulling away.
R Adapt your driving style to suit the pre-
vailing road and weather conditions.
The vehicle could otherwise go into a skid. ESP
®
cannot reduce the risk of an accident
if you drive too fast. ESP ®
cannot override
the laws of physics.
! If the vehicle is to be towed with the front
or rear axle raised, the ignition must be
switched off (key in position 0or 1in the
ignition lock). Application of the brakes by
ESP ®
could otherwise destroy the brake
system on the front or rear axle.
! Vehicles with 4MATIC* may not be towed
with the front or rear axle raised.
i Only use wheels with the recommended
tyre sizes. Only then will ESP ®
function
properly.
Deactivating/activating ESP ® ESP
®
is activated automatically when the
engine is running.
It may be best to deactivate ESP ®
in the fol-
lowing situations:
R when using snow chains
R in deep snow
R on sand or gravel G
Risk of accident
Activate ESP ®
as soon as the situations
described above no longer apply. ESP ®
will
otherwise not be able to stabilise the vehi-
cle if the vehicle starts to skid or a wheel
starts to spin.
If you deactivate ESP ®
:
R ESP ®
no longer improves driving stability.
R engine torque is not limited and the drive
wheels are able to spin. The spinning
wheels produce a cutting effect for better
traction.
R traction control is still activated.
R ESP ®
still provides support when you
brake.
i If ESP ®
is deactivated and one or more
wheels start to spin, the vwarning lamp
in the instrument cluster flashes. In such
situations ESP ®
will not stabilise the vehi-
cle. Safety
* optional
211_AKB; 2; 5, en-GB
mkalafa
,V ersion: 2.9.4
2008-02-29T16:57:07+01:00 - Seite 60 Dateiname: 6515_3416_02_buchblock.pdf; preflight
Page 236 of 401
Tyres and wheels
233
Restarting the tyre pressure monitor In most cases, the tyre pressure monitor will
automatically detect the new reference val-
ues, e.g. if you have:
R
changed the tyre pressure
R changed the wheels or tyres
R fitted new wheels or tyres
If you wish to define the new reference values
manually:
X Use the table on the inside of the fuel filler
flap to ensure that the tyre pressure is set
correctly in all four tyres for the current
operating conditions.
Also observe the notes in the section on
tyre pressures (Y page 229).
X Make sure that the key is in position 2in
the ignition lock.
The standard display appears in the multi-
function display (Y page 125).
X Press the jork button to select the
Tyre pressure function or wait until the
following message appears:
Tyre pressure displayed only after
driving for a few minutes X
Press the reset button on the left of the
instrument cluster (Y page 243).
The following message appears in the
multi-function display: Check current
tyre pressure?
X Press the æbutton.
The following message appears in the
multi-function display:
Tyre pressure monitor restarted
The tyre pressure monitor has stored the
pressure of the tyres as a new reference
value.
If you wish to cancel the restart:
X Press the çbutton. Interchanging the wheels
G
Risk of accident
Interchange the front and rear wheels only
if they have the same dimensions: for exam-
ple size, offset, etc.
After every wheel interchange/change,
have the tightening torque checked at a
qualified specialist workshop that has the
necessary specialist knowledge and tools
to carry out the work required. Mercedes- Benz recommends that you use a
Mercedes-Benz Service Centre for this pur-
pose. In particular, work relevant to safety
or on safety-related systems must be car-
ried out at a qualified specialist workshop.
The wheels could work loose if they are not
tightened to a torque of 130 Nm.
For safety reasons, Mercedes-Benz recom-
mends that you only use wheel bolts of the
correct size which have been approved for
Mercedes-Benz vehicles.
The wheels may be interchanged every
5,000 km to 10,000 km depending on the
degree of tyre wear, provided that the vehicle
has the same size front and rear tyres. Do not
reverse the direction of tyre rotation.
The wear patterns on the front and rear tyres
differ depending on the operating conditions.
Interchange the wheels before a clear wear
pattern has formed on the tyres. The front
tyres typically wear more on the shoulders
and the rear tyres in the centre.
Clean the contact surfaces of the wheel and
the brake disc thoroughly every time a wheel
is interchanged. Check the tyre pressure and,
if necessary, restart the tyre pressure loss
warning system or the tyre pressure moni-
tor*. Operation
* optional
211_AKB; 2; 5, en-GB
mkalafa
,V ersion: 2.9.4
2008-02-29T16:57:07+01:00 - Seite 233 ZDateiname: 6515_3416_02_buchblock.pdf; preflight
Page 330 of 401
Flat tyre
327
X
Screw union nut 5on air hose 4onto the
valve.
X Insert plug 3into the cigarette lighter
socket* ( Ypage 209) or into a 12V socket
in your vehicle (Y page 210).
X Make sure that the key is in position 2in
the ignition lock.
X Press on/off switch 2on the electric air
pump to I.
The electric air pump is switched on. The
tyre is inflated.
X When a tyre pressure of 3.5 bar has been
reached, press 0on the electric air pump
switch.
The electric air pump is switched off.
! Do not operate the electric air pump for
longer than six minutes without a break.
Otherwise, it may overheat.
The air pump can be operated again once
it has cooled down.
If the tyre pressure is higher than 3.5 bar: X
Open the pressure release screw on the
pressure gauge until the tyre pressure is
correct.
X Disconnect the electric air pump and stow
it away.
Lowering the vehicle X
Lower the vehicle. To do this, turn the crank
of the jack anti-clockwise until the vehicle
is standing firmly on the ground again.
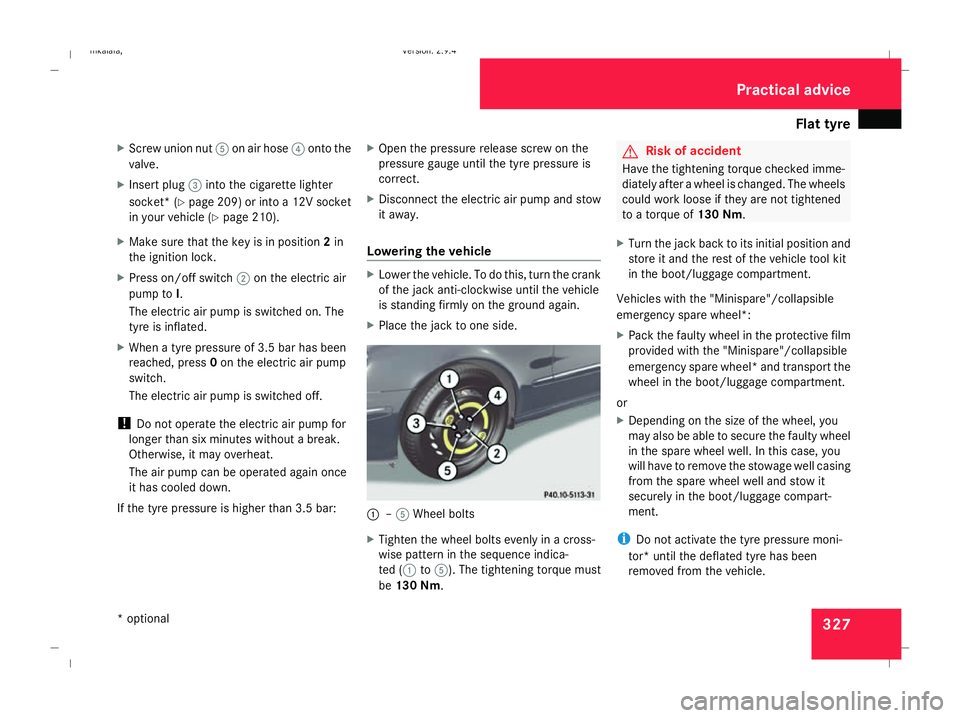
X Place the jack to one side. 1
–5 Wheel bolts
X Tighten the wheel bolts evenly in a cross-
wise pattern in the sequence indica-
ted ( 1to5). The tightening torque must
be 130 Nm . G
Risk of accident
Have the tightening torque checked imme-
diately after a wheel is changed. The wheels
could work loose if they are not tightened
to a torque of 130 Nm.
X Turn the jack back to its initial position and
store it and the rest of the vehicle tool kit
in the boot/luggage compartment.
Vehicles with the "Minispare"/collapsible
emergency spare wheel*:
X Pack the faulty wheel in the protective film
provided with the "Minispare"/collapsible
emergency spare wheel* and transport the
wheel in the boot/luggage compartment.
or
X Depending on the size of the wheel, you
may also be able to secure the faulty wheel
in the spare wheel well. In this case, you
will have to remove the stowage well casing
from the spare wheel well and stow it
securely in the boot/luggage compart-
ment.
i Do not activate the tyre pressure moni-
tor* until the deflated tyre has been
removed from the vehicle. Practical advice
* optional
211_AKB; 2; 5, en-GB
mkalafa,
Version: 2.9.4 2008-02-29T16:57:07+01:00 - Seite 327 ZDateiname: 6515_3416_02_buchblock.pdf; preflight