Page 199 of 401
Loading and stowing
196forward. Otherwise, the backrest uphols-
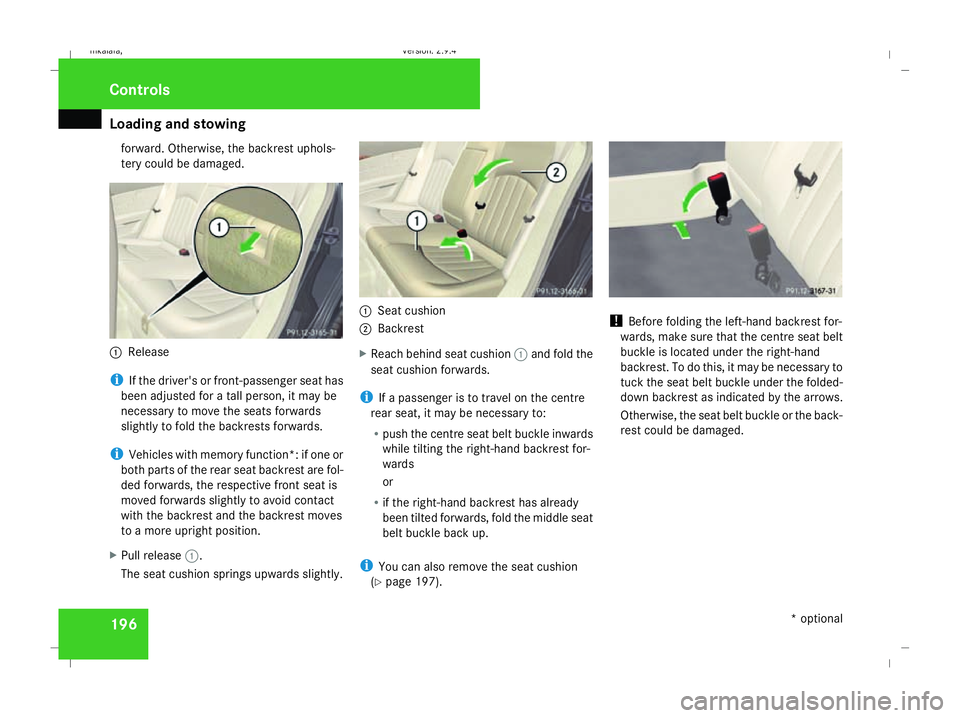
tery could be damaged. 1
Release
i If the driver's or front-passenger seat has
been adjusted for a tall person, it may be
necessary to move the seats forwards
slightly to fold the backrests forwards.
i Vehicles with memory function*: if one or
both parts of the rear seat backrest are fol-
ded forwards, the respective front seat is
moved forwards slightly to avoid contact
with the backrest and the backrest moves
to a more upright position.
X Pull release 1.
The seat cushion springs upwards slightly. 1
Seat cushion
2 Backrest
X Reach behind seat cushion 1and fold the
seat cushion forwards.
i If a passenger is to travel on the centre
rear seat, it may be necessary to:
R push the centre seat belt buckle inwards
while tilting the right-hand backrest for-
wards
or
R if the right-hand backrest has already
been tilted forwards, fold the middle seat
belt buckle back up.
i You can also remove the seat cushion
(Y page 197). !
Before folding the left-hand backrest for-
wards, make sure that the centre seat belt
buckle is located under the right-hand
backrest. To do this, it may be necessary to
tuck the seat belt buckle under the folded-
down backrest as indicated by the arrows.
Otherwise, the seat belt buckle or the back-
rest could be damaged. Controls
* optional
211_AKB; 2; 5, en-GB
mkalafa,
Version: 2.9.4 2008-02-29T16:57:07+01:00 - Seite 196Dateiname: 6515_3416_02_buchblock.pdf; preflight
Page 202 of 401
Loading and stowing
199
is moved forwards slightly to avoid contact
with the backrest and the backrest moves
to a more upright position.
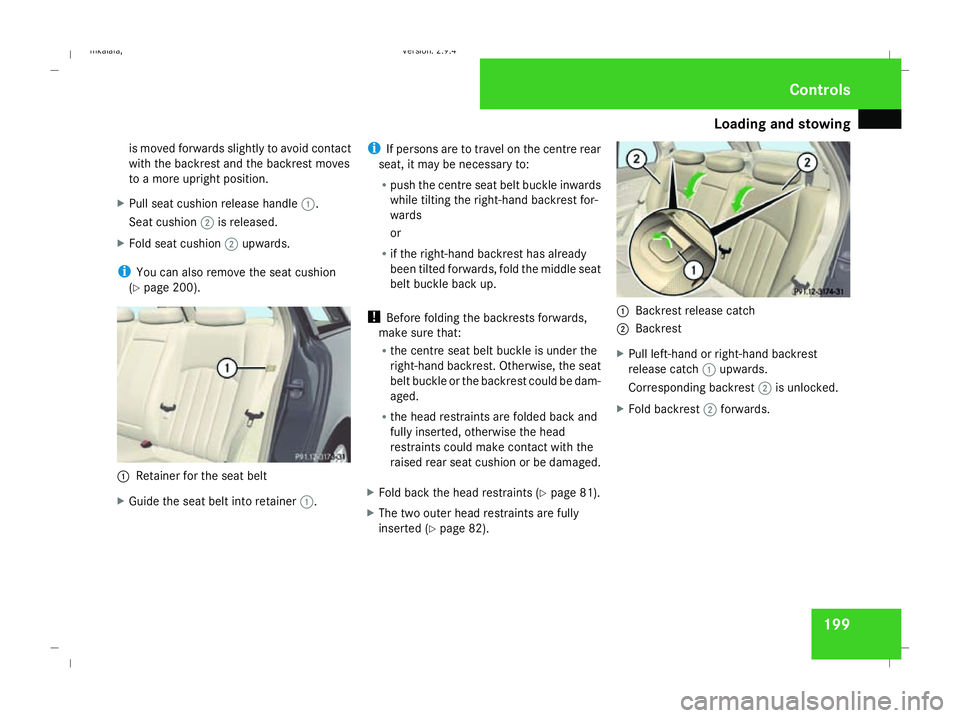
X Pull seat cushion release handle 1.
Seat cushion 2is released.
X Fold seat cushion 2upwards.
i You can also remove the seat cushion
(Y page 200). 1
Retainer for the seat belt
X Guide the seat belt into retainer 1.i
If persons are to travel on the centre rear
seat, it may be necessary to:
R push the centre seat belt buckle inwards
while tilting the right-hand backrest for-
wards
or
R if the right-hand backrest has already
been tilted forwards, fold the middle seat
belt buckle back up.
! Before folding the backrests forwards,
make sure that:
R the centre seat belt buckle is under the
right-hand backrest. Otherwise, the seat
belt buckle or the backrest could be dam-
aged.
R the head restraints are folded back and
fully inserted, otherwise the head
restraints could make contact with the
raised rear seat cushion or be damaged.
X Fold back the head restraints (Y page 81).
X The two outer head restraints are fully
inserted (Y page 82). 1
Backrest release catch
2 Backrest
X Pull left-hand or right-hand backrest
release catch 1upwards.
Corresponding backrest 2is unlocked.
X Fold backrest 2forwards. Controls
211_AKB; 2; 5, en-GB
mkalafa,
Version: 2.9.4 2008-02-29T16:57:07+01:00 - Seite 199 ZDateiname: 6515_3416_02_buchblock.pdf; preflight
Page 206 of 401
Loading and stowing
203
Inserting the mounting elements into the
loading rail Illustration: Estate
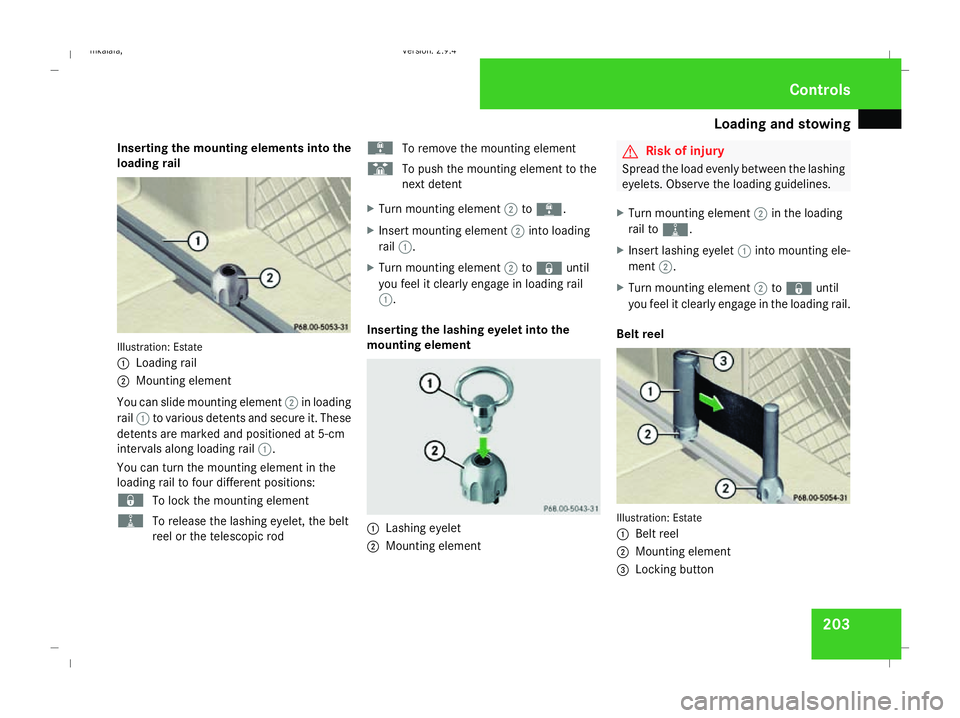
1
Loading rail
2 Mounting element
You can slide mounting element 2in loading
rail 1to various detents and secure it. These
detents are marked and positioned at 5-cm
intervals along loading rail 1.
You can turn the mounting element in the
loading rail to four different positions:
‹ To lock the mounting element
N To release the lashing eyelet, the belt
reel or the telescopic rod L
To remove the mounting element
S To push the mounting element to the
next detent
X Turn mounting element 2toL.
X Insert mounting element 2into loading
rail 1.
X Turn mounting element 2to‹ until
you feel it clearly engage in loading rail
1.
Inserting the lashing eyelet into the
mounting element 1
Lashing eyelet
2 Mounting element G
Risk of injury
Spread the load evenly between the lashing
eyelets. Observe the loading guidelines.
X Turn mounting element 2in the loading
rail to N.
X Insert lashing eyelet 1into mounting ele-
ment 2.
X Turn mounting element 2to‹ until
you feel it clearly engage in the loading rail.
Belt reel Illustration: Estate
1
Belt reel
2 Mounting element
3 Locking button Controls
211_AKB; 2; 5, en-GB
mkalafa,
Version: 2.9.4 2008-02-29T16:57:07+01:00 - Seite 203 ZDateiname: 6515_3416_02_buchblock.pdf; preflight
Page 207 of 401
Loading and stowing
204
i
The belt reel can be used to secure light
loads against the side wall of the boot/lug-
gage compartment to prevent them from
moving around.
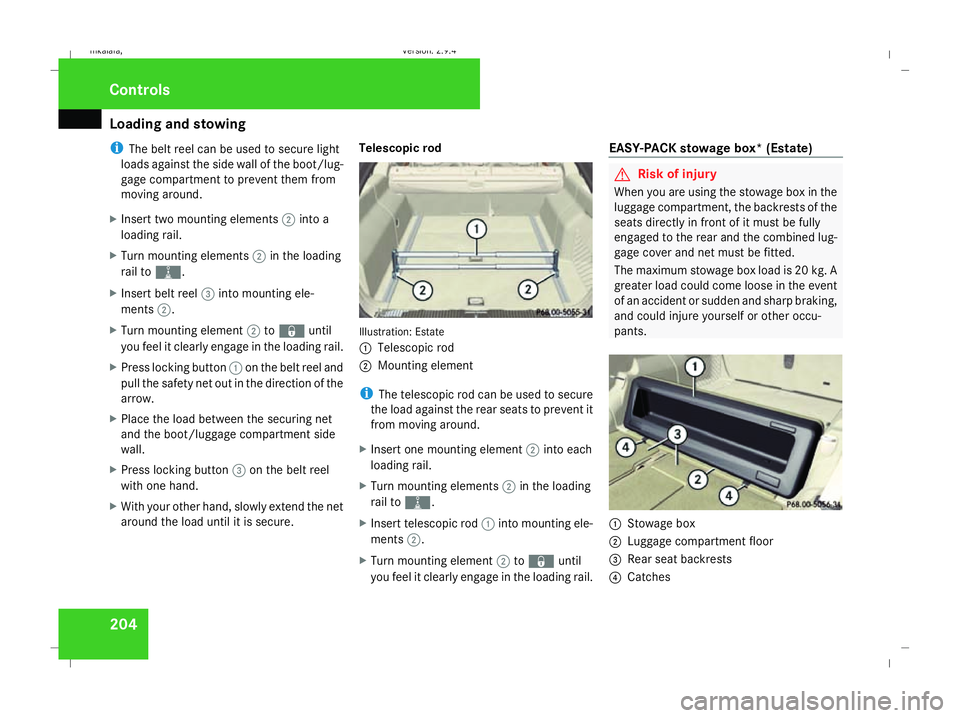
X Insert two mounting elements 2into a
loading rail.
X Turn mounting elements 2in the loading
rail to N.
X Insert belt reel 3into mounting ele-
ments 2.
X Turn mounting element 2to‹ until
you feel it clearly engage in the loading rail.
X Press locking button 1on the belt reel and
pull the safety net out in the direction of the
arrow.
X Place the load between the securing net
and the boot/luggage compartment side
wall.
X Press locking button 3on the belt reel
with one hand.
X With your other hand, slowly extend the net
around the load until it is secure. Telescopic rod Illustration: Estate
1
Telescopic rod
2 Mounting element
i The telescopic rod can be used to secure
the load against the rear seats to prevent it
from moving around.
X Insert one mounting element 2into each
loading rail.
X Turn mounting elements 2in the loading
rail to N.
X Insert telescopic rod 1into mounting ele-
ments 2.
X Turn mounting element 2to‹ until
you feel it clearly engage in the loading rail. EASY-PACK stowage box* (Estate) G
Risk of injury
When you are using the stowage box in the
luggage compartment, the backrests of the
seats directly in front of it must be fully
engaged to the rear and the combined lug-
gage cover and net must be fitted.
The maximum stowage box load is 20 kg. A
greater load could come loose in the event
of an accident or sudden and sharp braking,
and could injure yourself or other occu-
pants. 1
Stowage box
2 Luggage compartment floor
3 Rear seat backrests
4 Catches Controls
211_AKB; 2; 5, en-GB
mkalafa,
Version: 2.9.4 2008-02-29T16:57:07+01:00 - Seite 204Dateiname: 6515_3416_02_buchblock.pdf; preflight
Page 264 of 401
Display
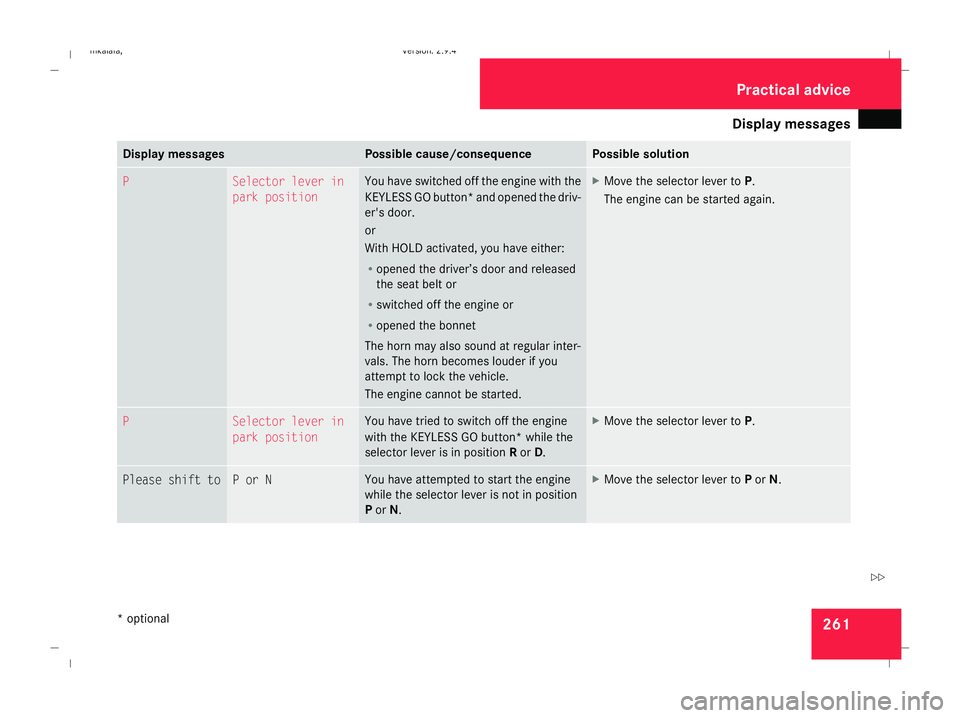
messages 261Display messages Possible cause/consequence Possible solution
P Selector lever in
park position You have switched off the engine with the
KEYLESS GO button* and opened the driv-
er's door.
or
With HOLD activated, you have either:
R
opened the driver’s door and released
the seat belt or
R switched off the engine or
R opened the bonnet
The horn may also sound at regular inter-
vals. The horn becomes louder if you
attempt to lock the vehicle.
The engine cannot be started. X
Move the selector lever to P.
The engine can be started again. P Selector lever in
park position You have tried to switch off the engine
with the KEYLESS GO button* while the
selector lever is in position
Ror D. X
Move the selector lever to P.Please shift to P or N You have attempted to start the engine
while the selector lever is not in position
P
or N. X
Move the selector lever to Por N. Practical advi
ce
* optional
211_AKB; 2; 5, en-GB
mkalafa,
Version: 2.9.4 2008-02-29T16:57:07+01:00 - Seite 261 ZDateiname: 6515_3416_02_buchblock.pdf; preflight
Page 269 of 401
Display
messages 266 Symbol messages
G
Risk of accident and injury
The operating safety of the vehicle could be impaired if service work is carried out incorrectly. There is a risk that you could lose control of
the vehicle and cause an accident. The safety systems may no longer be able to protect you or others as they are designed to do.
Always have maintenance work carried out at a qualified specialist workshop which has the necessary specialist knowledge and tools to
carry out the work required.
Mercedes-Benz recommends that you use a Mercedes-Benz Service Centre for this purpose.
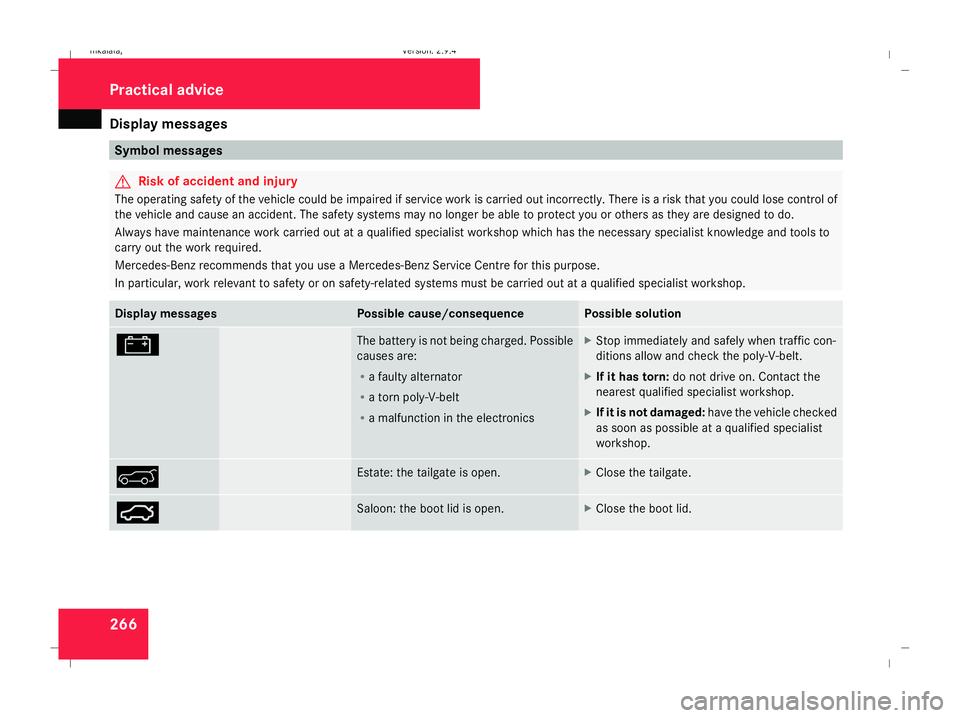
In particular, work relevant to safety or on safety-related systems must be carried out at a qualified specialist workshop. Display messages Possible cause/consequence Possible solution
# The battery is not being charged. Possible
causes are:
R
a faulty alternator
R a torn poly-V-belt
R a malfunction in the electronics X
Stop immediately and safely when traffic con-
ditions allow and check the poly-V-belt.
X If it has torn: do not drive on. Contact the
nearest qualified specialist workshop.
X If it is not damaged: have the vehicle checked
as soon as possible at a qualified specialist
workshop. & Estate: the tailgate is open. X
Close the tailgate. Ê Saloon: the boot lid is open. X
Close the boot lid. Practical advi
ce
211_AKB; 2; 5, en-GB
mkalafa,
Version: 2.9.4 2008-02-29T16:57:07+01:00 - Seite 266Dateiname: 6515_3416_02_buchblock.pdf; preflight
Page 272 of 401
Display
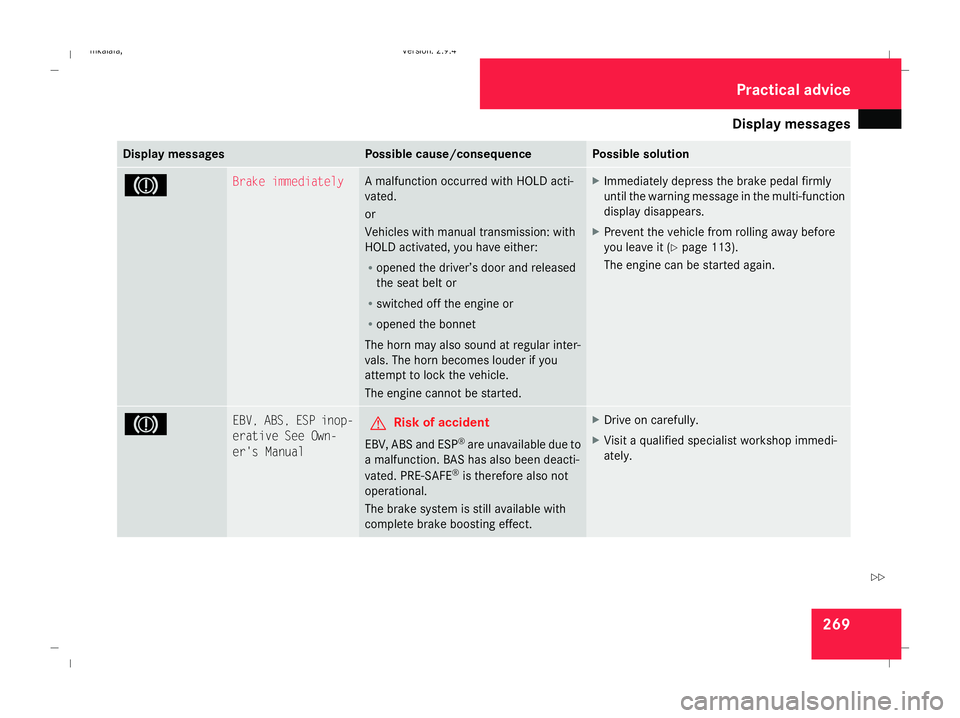
messages 269Display messages Possible cause/consequence Possible solution
3 Brake immediately A malfunction occurred with HOLD acti-
vated.
or
Vehicles with manual transmission: with
HOLD activated, you have either:
R
opened the driver’s door and released
the seat belt or
R switched off the engine or
R opened the bonnet
The horn may also sound at regular inter-
vals. The horn becomes louder if you
attempt to lock the vehicle.
The engine cannot be started. X
Immediately depress the brake pedal firmly
until the warning message in the multi-function
display disappears.
X Prevent the vehicle from rolling away before
you leave it (Y page 113).
The engine can be started again. 3 EBV, ABS, ESP inop-
erative See Own-
er's Manual G
Risk of accident
EBV, ABS and ESP ®
are unavailable due to
a malfunction. BAS has also been deacti-
vated. PRE-SAFE ®
is therefore also not
operational.
The brake system is still available with
complete brake boosting effect. X
Drive on carefully.
X Visit a qualified specialist workshop immedi-
ately. Practical advi
ce
211_AKB; 2; 5, en-GB
mkalafa,
Version: 2.9.4 2008-02-29T16:57:07+01:00 - Seite 269 ZDateiname: 6515_3416_02_buchblock.pdf; preflight
Page 274 of 401
Display
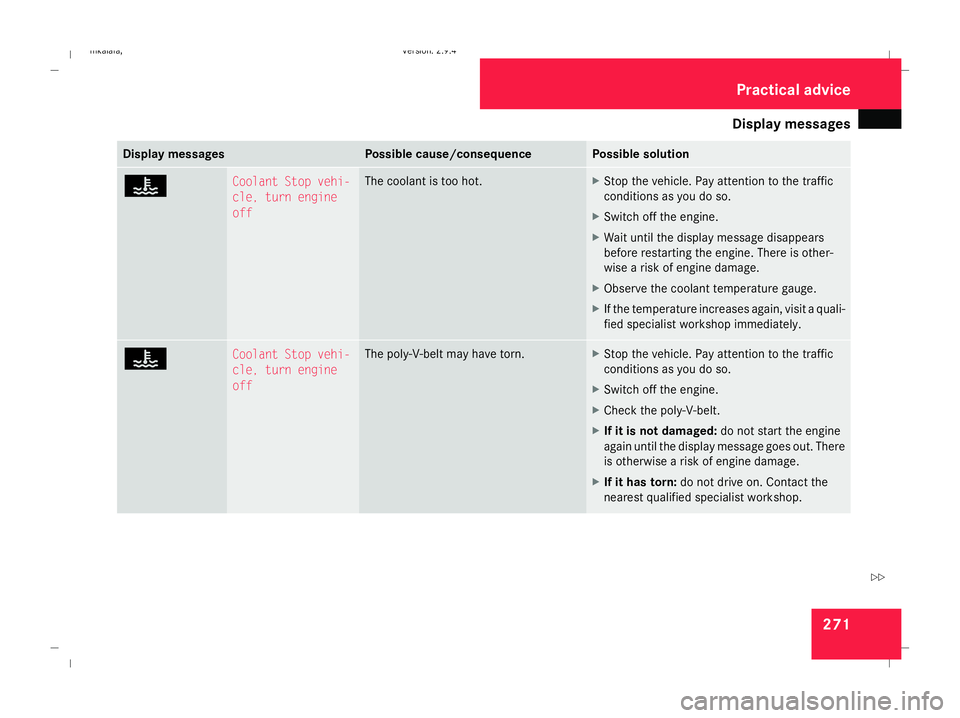
messages 271Display messages Possible cause/consequence Possible solution
D Coolant Stop vehi-
cle, turn engine
off The coolant is too hot. X
Stop the vehicle. Pay attention to the traffic
conditions as you do so.
X Switch off the engine.
X Wait until the display message disappears
before restarting the engine. There is other-
wise a risk of engine damage.
X Observe the coolant temperature gauge.
X If the temperature increases again, visit a quali-
fied specialist workshop immediately. D Coolant Stop vehi-
cle, turn engine
off The poly-V-belt may have torn. X
Stop the vehicle. Pay attention to the traffic
conditions as you do so.
X Switch off the engine.
X Check the poly-V-belt.
X If it is not damaged: do not start the engine
again until the display message goes out. There
is otherwise a risk of engine damage.
X If it has torn: do not drive on. Contact the
nearest qualified specialist workshop. Practical advi
ce
211_AKB; 2; 5, en-GB
mkalafa,
Version: 2.9.4 2008-02-29T16:57:07+01:00 - Seite 271 ZDateiname: 6515_3416_02_buchblock.pdf; preflight