2008 MERCEDES-BENZ E-CLASS ESTATE instrument cluster
[x] Cancel search: instrument clusterPage 135 of 401
On-board computer
132
Resetting to factory settings For safety reasons, not all functions are reset:
permanent Speedtronic can only be set in the
Vehicle menu. The Headlamp mode function
in the Lighting submenu is only reset if the
vehicle is stationary.
X Press the èor· button to select the
Settings... menu.
X Press and hold the reset button on the left-
hand side of the instrument cluster for
approximately three seconds.
A prompt appears in the multi-function dis-
play asking you to press the reset button
again to confirm.
X Press the reset button again.
The functions of most submenus are
restored to the factory settings.
or
X If you want to retain the settings, do not
press the reset button a second time.
After approximately 5 seconds, the Set-
tings... menu appears again. Submenus in the Settings menu X
Press èor· to select the Set-
tings... menu.
X Press the jbutton to call up the selec-
tion of submenus.
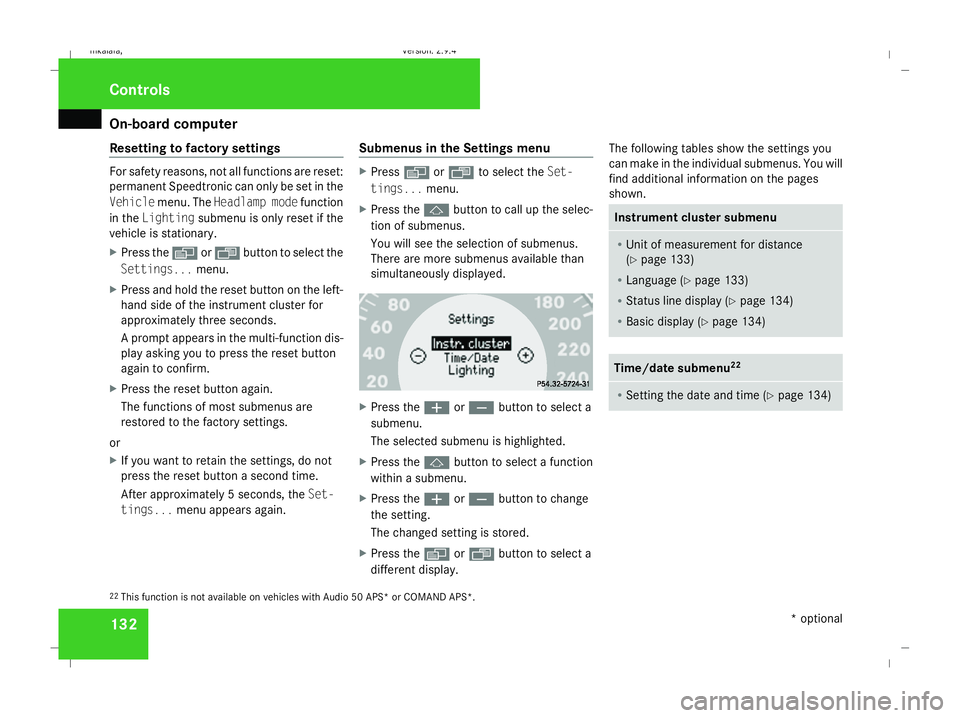
You will see the selection of submenus.
There are more submenus available than
simultaneously displayed. X
Press the æorç button to select a
submenu.
The selected submenu is highlighted.
X Press the jbutton to select a function
within a submenu.
X Press the æorç button to change
the setting.
The changed setting is stored.
X Press the èorÿ button to select a
different display. The following tables show the settings you
can make in the individual submenus. You will
find additional information on the pages
shown. Instrument cluster submenu
R
Unit of measurement for distance
(Y page 133)
R Language (Y page 133)
R Status line display (Y page 134)
R Basic display ( Ypage 134) Time/date submenu
22 R
Setting the date and time (Y page 134)22
This function is not available on vehicles with Audio 50 APS* or COMAND APS*. Controls
* optional
211_AKB; 2; 5, en-GB
mkalafa,
Version: 2.9.4 2008-02-29T16:57:07+01:00 - Seite 132Dateiname: 6515_3416_02_buchblock.pdf; preflight
Page 138 of 401
On-board computer
135
X
Press the èor· button to select the
Settings... menu.
X Press the jbutton to call up the selec-
tion of submenus.
X Press the æorç button to select the
Time/Date submenu.
Setting the time
X Use the jbutton to select Clock,
hours Press R to confirm (orClock,
minutes Press R to confirm ).
X Press the æorç button to set a
value.
X Press the reset button on the left of the
instrument cluster.
The set time is stored.
Setting the date
X Press the jbutton to select Set date
Day (orSet date Month orSet date
Year).
X Press the æorç button to set the
values.
X Press the j,èorÿ button to
select a different display. Setting constant headlamp mode If you have set constant headlamp mode and
the light switch is in position MorU,
the side lamps, dipped-beam headlamps and
licence plate lighting are switched on auto-
matically when the engine is running. Turning
the light switch to a different position
switches on the corresponding lights. Make
sure that the light switch is turned to Bor
U if you switch off constant headlamp
mode while driving in the dark.
In countries in which constant headlamp
mode is a legal requirement, Constantis the
factory setting.
X Press the èor· button to select the
Settings... menu.
X Press the jbutton to call up the selec-
tion of submenus.
X Press the æorç button to select the
Lighting submenu.
X Press the jbutton to select Headlamp
mode. X
Press the æorç button to set the
mode for the headlamps to ManualorCon-
stant (constant headlamp mode).
X Press the j,èorÿ button to
select a different display.
Switching the surround lighting on or
off If the surround lighting is switched on, the
following lights will be switched on automat-
ically in the dark after you have unlocked the
vehicle using the key:
R
the side lamps
R the tail lamps
R the licence plate lighting
R the front foglamps
The surround lighting switches off automati-
cally if you open the driver's door or after 40
seconds.
X Press èor· to select the Set-
tings... menu.
X Press the jbutton to call up the selec-
tion of submenus.
X Press the æorç button to select the
Lighting submenu. Controls
211_AKB; 2; 5, en-GB
mkalafa,
Version: 2.9.4
2008-02-29T16:57:07+01:00 - Seite 135 ZDateiname: 6515_3416_02_buchblock.pdf; preflight
Page 143 of 401
On-board computer
140
X
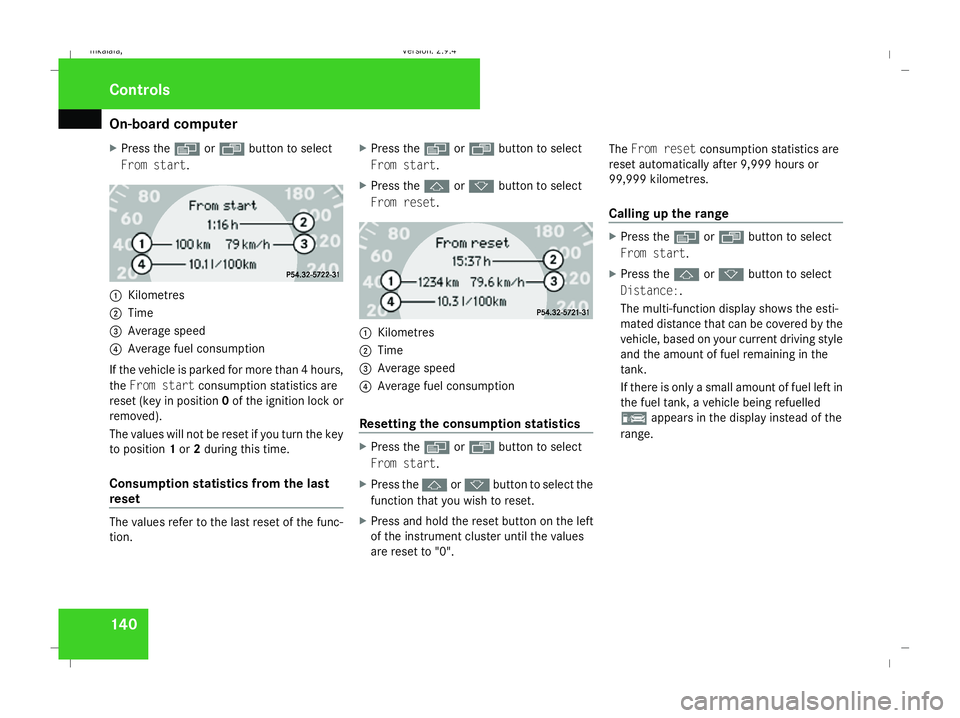
Press the èor· button to select
From start. 1
Kilometres
2 Time
3 Average speed
4 Average fuel consumption
If the vehicle is parked for more than 4 hours,
the From start consumption statistics are
reset (key in position 0of the ignition lock or
removed).
The values will not be reset if you turn the key
to position 1or 2during this time.
Consumption statistics from the last
reset The values refer to the last reset of the func-
tion. X
Press the èor· button to select
From start.
X Press the jork button to select
From reset. 1
Kilometres
2 Time
3 Average speed
4 Average fuel consumption
Resetting the consumption statistics X
Press the èor· button to select
From start.
X Press the jork button to select the
function that you wish to reset.
X Press and hold the reset button on the left
of the instrument cluster until the values
are reset to "0". The
From reset consumption statistics are
reset automatically after 9,999 hours or
99,999 kilometres.
Calling up the range X
Press the èor· button to select
From start.
X Press the jork button to select
Distance:.
The multi-function display shows the esti-
mated distance that can be covered by the
vehicle, based on your current driving style
and the amount of fuel remaining in the
tank.
If there is only a small amount of fuel left in
the fuel tank, a vehicle being refuelled
¿ appears in the display instead of the
range. Controls
211_AKB; 2; 5, en-GB
mkalafa, Version: 2.9.4 2008-02-29T16:57:07+01:00 - Seite 140Dateiname: 6515_3416_02_buchblock.pdf; preflight
Page 149 of 401
Driving sys
tems 146 Distronic does not react to:
R
pedestrians
R stationary obstacles on the road, e.g. sta-
tionary or parked vehicles
R oncoming and crossing traffic
Distronic may not detect narrow vehicles
driving in front, e.g. motorcycles, or vehi-
cles driving on a different line. Therefore,
always pay attention to traffic conditions
even when Distronic is activated. Other-
wise, you may fail to recognise dangers in
time, could cause an accident and injure
yourself and others.
If a slower-moving vehicle is detected in front,
Distronic causes your vehicle to brake and
maintain a preset distance to the vehicle in
front. G
Risk of accident
Distronic cannot take account of road and
traffic conditions. Deactivate, or do not
activate, Distronic if it does not detect the
vehicle in front, or if it no longer detects it.
This is especially the case:
R before corners
R on filter lanes R
when changing to a lane with faster mov-
ing traffic
R in complex driving situations or where
the lanes are diverted, e.g. at motorway/
roadway construction sites
Otherwise, Distronic maintains the current
speed or accelerates to the set speed.
Distronic cannot take account of weather
conditions. Deactivate, or do not activate,
Distronic:
R if the roads are slippery, snow-covered or
icy. The wheels could lose their grip
under braking or acceleration. The vehi-
cle could start to skid.
R if the sensors are dirty or there is poor
visibility, e.g. due to snow, rain or fog.
Distance control may be impaired.
Always pay attention to traffic conditions
even when Distronic is activated. Other-
wise, you may fail to recognise dangers in
time, could cause an accident and injure
yourself and others.
If there is no vehicle in front, Distronic oper-
ates in the same way as cruise control. Dis-
tronic functions in the 30 km/h to
180 km/h range. G
Risk of accident
Distronic brakes your vehicle at a maximum
of 2 m/s 2
, depending on its speed. This
corresponds to approximately 20% of your
vehicle's maximum braking power. You
must also apply the brakes yourself if this
braking power is not sufficient.
If Distronic detects a risk of collision with a
vehicle in front, an intermittent warning
tone sounds. In addition, the ldistance
warning lamp in the instrument cluster
lights up. Brake to avoid a collision.
Cruise control lever With the cruise control lever you can operate
Distronic and variable Speedtronic.
The LIM indicator lamp on the cruise control
lever indicates which system you have selec-
ted:
R
LIM indicator lamp off:
Distronic is selected
R LIM indicator lamp lit:
variable Speedtronic is selected Controls
211_AKB; 2; 5, en-GB
mkalafa
,V ersion: 2.9.4
2008-02-29T16:57:07+01:00 - Seite 146 Dateiname: 6515_3416_02_buchblock.pdf; preflight
Page 152 of 401

Driving sys
tems 149
i
Make sure that you maintain the mini-
mum distance to the vehicle in front
required by law. Adjust the distance to the
vehicle in front if necessary.
Distance warning function Even if Distronic is deactivated, this function
warns you at speeds above 30 km/h if:
R
the distance to the vehicle in front is too
short for the speed you are driving at for
several seconds. The ldistance warn-
ing lamp in the instrument cluster then
lights up.
R you are approaching a vehicle in front at too
great a speed. You then hear an intermit-
tent warning tone, and the ldistance
warning lamp in the instrument cluster
lights up.
You must apply the brakes yourself in order
to maintain the correct distance to the vehicle
and to avoid a collision. G
Risk of accident
Be especially observant of traffic condi-
tions when the ldistance warning lamp
in the instrument cluster lights up or an
intermittent warning tone sounds. Brake or take evasive action as necessary.
i Distronic does not always clearly recog-
nise complex road and traffic conditions.
You may then receive a false distance warn-
ing tone or none at all.
X To activate/deactivate: press button1.
When the function is activated, indicator
lamp 2in the button lights up and a loud-
speaker symbol appears in the display.
When the function is deactivated, indicator
lamp 2in the button goes out and the
loudspeaker symbol disappears from the
multi-function display.
Distronic displays in the speedometer 1
Stored speed When Distronic is activated, one or two seg-
ments in the set speed range light up.
i For design reasons, the speed displayed
in the speedometer may differ slightly from
the speed set for Distronic. 1
Segments
If Distronic detects a vehicle in front, the seg-
ments between the speed of the vehicle in
front and the stored speed light up.
Distronic menu in the on-board com-
puter You can read the current Distronic settings in
the Distronic menu. The reading in the multi-
function display depends on whether Dis-
tronic and the distance warning function are
activated or deactivated. Controls
211_AKB; 2; 5, en-GB
mkalafa
,V ersion: 2.9.4
2008-02-29T16:57:07+01:00 - Seite 149 ZDateiname: 6515_3416_02_buchblock.pdf; preflight
Page 234 of 401
Tyres and wheels
231pressure, e.g. if the tyre is penetrated by a
foreign object.
In the event of a sudden loss of pressure,
bring the vehicle to a halt by braking care-
fully. Do not make any sudden steering
movements when doing so.
While the vehicle is in motion, the tyre pres-
sure loss warning system monitors the set
tyre pressure using the rotational speed of
the wheels. This enables the system to detect
significant pressure loss in a tyre. If the speed
of rotation of a wheel changes as a result of
a loss of pressure, a corresponding warning
message will appear in the multi-function dis-
play.
The function of the tyre pressure loss warning
system is limited or delayed if:
R snow chains are fitted to your vehicle's
tyres
R road conditions are wintry
R you are driving on sand or gravel
R you adopt a very sporty driving style (cor-
nering at high speeds or driving with high
rates of acceleration)
R you are towing a very heavy or large trailer
R you are driving with a heavy load (in the
vehicle or on the roof) Restarting the tyre pressure loss warn-
ing system Restart the tyre pressure loss warning system
if you have:
R
changed the tyre pressure
R changed the wheels or tyres
R fitted new wheels or tyres
X Before restarting, consult the table of tyre
pressures on the inside of the fuel filler flap
to ensure that the tyre pressure in all four
tyres is set correctly for the operating con-
ditions concerned.
X Also observe the notes in the section on
tyre pressures (Y page 229). G
Risk of accident
The tyre pressure loss warning system can
only give reliable warnings if you have set
the correct tyre pressure.
If an incorrect tyre pressure is set, these
incorrect values will be monitored.
A tyre with insufficient pressure results in
an instability of the vehicle when driving,
thus increasing the risk of an accident. X
Make sure that the key is in position 2in
the ignition lock.
The standard display appears in the multi-
function display (Y page 125).
X Press korj to select the tyre pres-
sure function:
Run Flat Indicator active
Menu: R-Button æ
X Press the reset button on the left of the
instrument cluster.
The following message appears in the
multi-function display:
Restart Run Flat Indicator?
Yes Cancel
If you wish to confirm the restart:
X Press the æbutton.
The following message appears in the
multi-function display:
Run Flat Indicator restarted
After a teach-in period, the tyre pressure
loss warning system will monitor the set
tyre pressures of all four tyres.
If you wish to cancel the restart:
X Press the çbutton.
or
X Wait until the message Operation
211_AKB; 2; 5, en-GB
mkalafa
,V ersion: 2.9.4
2008-02-29T16:57:07+01:00 - Seite 231 ZDateiname: 6515_3416_02_buchblock.pdf; preflight
Page 236 of 401
Tyres and wheels
233
Restarting the tyre pressure monitor In most cases, the tyre pressure monitor will
automatically detect the new reference val-
ues, e.g. if you have:
R
changed the tyre pressure
R changed the wheels or tyres
R fitted new wheels or tyres
If you wish to define the new reference values
manually:
X Use the table on the inside of the fuel filler
flap to ensure that the tyre pressure is set
correctly in all four tyres for the current
operating conditions.
Also observe the notes in the section on
tyre pressures (Y page 229).
X Make sure that the key is in position 2in
the ignition lock.
The standard display appears in the multi-
function display (Y page 125).
X Press the jork button to select the
Tyre pressure function or wait until the
following message appears:
Tyre pressure displayed only after
driving for a few minutes X
Press the reset button on the left of the
instrument cluster (Y page 243).
The following message appears in the
multi-function display: Check current
tyre pressure?
X Press the æbutton.
The following message appears in the
multi-function display:
Tyre pressure monitor restarted
The tyre pressure monitor has stored the
pressure of the tyres as a new reference
value.
If you wish to cancel the restart:
X Press the çbutton. Interchanging the wheels
G
Risk of accident
Interchange the front and rear wheels only
if they have the same dimensions: for exam-
ple size, offset, etc.
After every wheel interchange/change,
have the tightening torque checked at a
qualified specialist workshop that has the
necessary specialist knowledge and tools
to carry out the work required. Mercedes- Benz recommends that you use a
Mercedes-Benz Service Centre for this pur-
pose. In particular, work relevant to safety
or on safety-related systems must be car-
ried out at a qualified specialist workshop.
The wheels could work loose if they are not
tightened to a torque of 130 Nm.
For safety reasons, Mercedes-Benz recom-
mends that you only use wheel bolts of the
correct size which have been approved for
Mercedes-Benz vehicles.
The wheels may be interchanged every
5,000 km to 10,000 km depending on the
degree of tyre wear, provided that the vehicle
has the same size front and rear tyres. Do not
reverse the direction of tyre rotation.
The wear patterns on the front and rear tyres
differ depending on the operating conditions.
Interchange the wheels before a clear wear
pattern has formed on the tyres. The front
tyres typically wear more on the shoulders
and the rear tyres in the centre.
Clean the contact surfaces of the wheel and
the brake disc thoroughly every time a wheel
is interchanged. Check the tyre pressure and,
if necessary, restart the tyre pressure loss
warning system or the tyre pressure moni-
tor*. Operation
* optional
211_AKB; 2; 5, en-GB
mkalafa
,V ersion: 2.9.4
2008-02-29T16:57:07+01:00 - Seite 233 ZDateiname: 6515_3416_02_buchblock.pdf; preflight
Page 260 of 401
Display
messages 257Display messages
Notes
The on-board computer shows warnings or
malfunctions in the multi-function display.
Certain display messages are accompanied
by a warning tone or a continuous tone.
The multi-function display shows high-priority
display messages in red. In the following
tables, these display messages are printed in
red.
Please respond in accordance with the dis-
play messages and follow the additional
notes in this Owner's Manual. G
Risk of accident
No further messages can be displayed if the
instrument cluster and/or the multi-func-
tion display fails.
This means that you will not see information
about the driving situation, such as the speed, outside temperature, warning/indi-
cator lamps, display messages or system
failures. The vehicle's handling character-
istics may be affected. Adjust your driving
style and speed accordingly.
Immediately consult a qualified specialist
workshop which has the necessary special-
ist knowledge and tools to carry out the
work required. Mercedes-Benz recom-
mends that you use a Mercedes-Benz
Service Centre for this purpose. In particu-
lar, work relevant to safety or on safety-
related systems must be carried out at a
qualified specialist workshop.
When you stop and park the vehicle, please
observe the instructions provided for HOLD
(Y page 155) and parking ( Ypage 113).
The following tables contain all the display
messages. Hiding display messages After a few seconds, the on-board computer
automatically hides some low priority display
messages. Other messages remain visible in
the multi-function display until you hide them
yourself.
Some high priority display messages cannot
be hidden. The multi-function display shows
these messages continuously until the cau-
ses of the messages have been remedied.
Use the buttons on the multi-function steer-
ing wheel.
X
Use the è,·,jork button
to select another display.
The on-board computer saves certain dis-
play messages in the message mem-
ory (Ypage 131). Practical advice
211_AKB; 2; 5, en-GB
mkalafa,
Version: 2.9.4
2008-02-29T16:57:07+01:00 - Seite 257 ZDateiname: 6515_3416_02_buchblock.pdf; preflight