2008 MERCEDES-BENZ E-CLASS ESTATE remote control
[x] Cancel search: remote controlPage 76 of 401
Opening and closing
73
X
Insert the emergency key element fully into
the boot lock.
X Turn the emergency key element clockwise
to position %.
X Remove the emergency key element. Boot/luggage compartment (vehicles
with remote boot lid closing feature*)
The remote boot lid closing feature* opens
and closes the boot lid/tailgate automati-
cally. You can stop the automatic opening and
closing procedure at any time:
R Saloon: by pulling or pressing the remote
operating button at the driver's seat
Estate: by pulling the remote operating but-
ton at the driver's seat again
R by pressing the ibutton on the key
R by pulling the handle on the boot lid/tail-
gate
R by pressing the closing button in the boot
lid/tailgate
On Estate vehicles, you will hear a warning
tone as the tailgate is opening or closing. G
Risk of poisoning
Exhaust fumes could enter the vehicle inte-
rior if the engine is running and the boot lid
is open. This could poison you. Therefore,
you should make sure that the boot lid/
tailgate is always closed when the engine
is running. G
Risk of accident
Estate
Do not leave children unsupervised in the
vehicle. They could open the tailgate from
the inside and thereby endanger them-
selves and others.
! The boot lid/tailgate swings upwards and
to the rear when opened. Therefore, make
sure that there is sufficient clearance
above and behind the boot lid/tailgate.
Opening from the outside You can only open the boot lid/tailgate after
unlocking it first.
X
To unlock centrally: press thekbut-
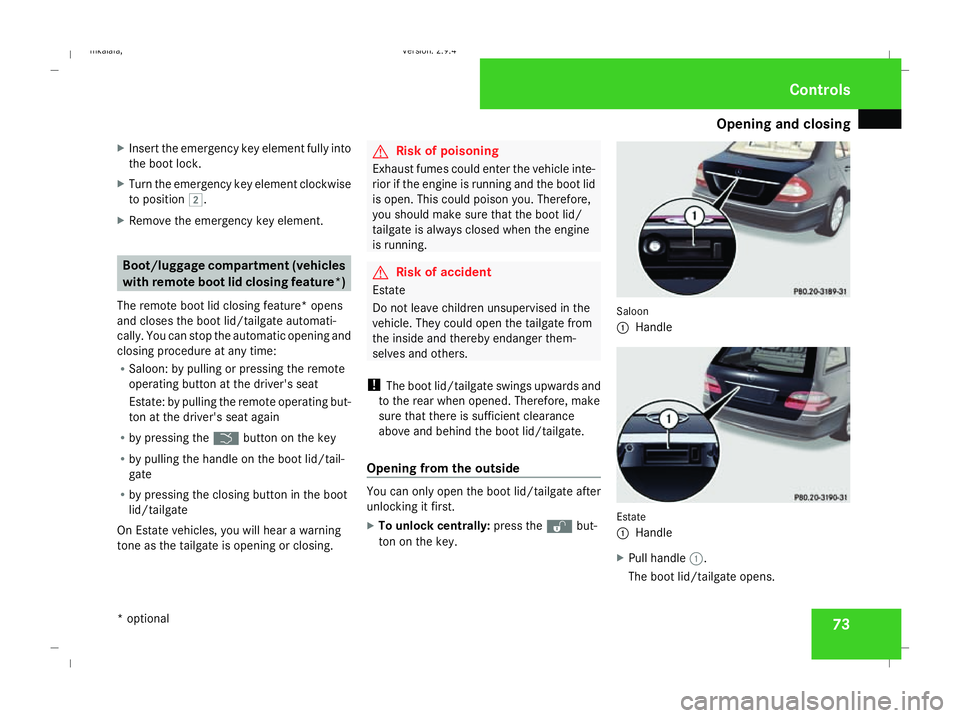
ton on the key. Saloon
1
Handle Estate
1
Handle
X Pull handle 1.
The boot lid/tailgate opens. Controls
* optional
211_AKB; 2; 5, en-GB
mkalafa,
Version: 2.9.4 2008-02-29T16:57:07+01:00 - Seite 73 ZDateiname: 6515_3416_02_buchblock.pdf; preflight
Page 78 of 401
Opening and closing
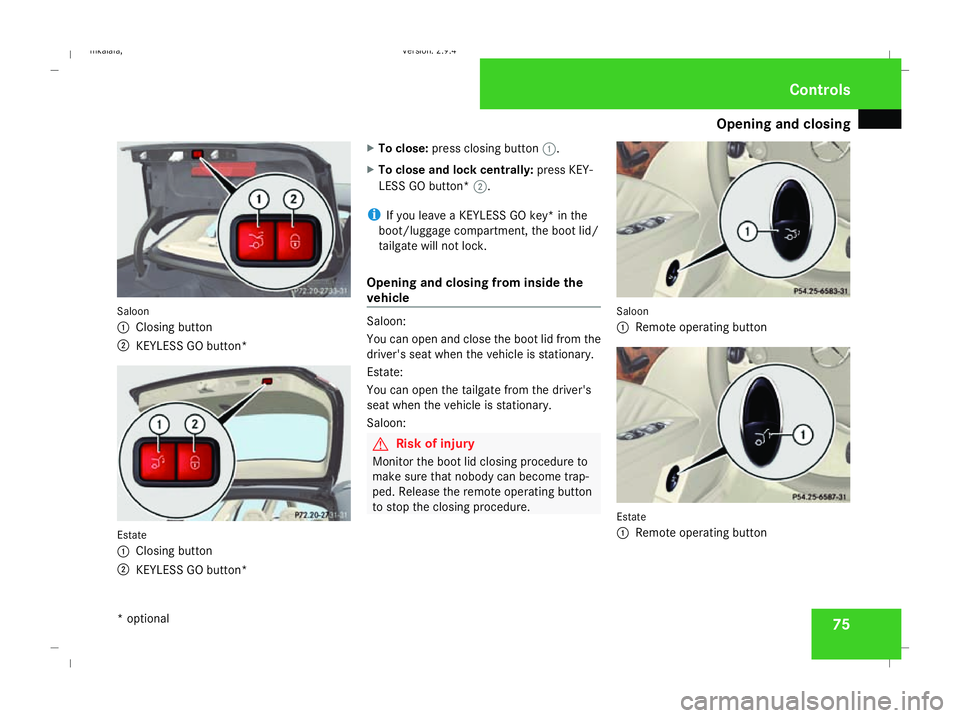
75Saloon
1 Closing button
2 KEYLESS GO button* Estate
1 Closing button
2 KEYLESS GO button* X
To close: press closing button 1.
X To close and lock centrally: press KEY-
LESS GO button* 2.
i If you leave a KEYLESS GO key* in the
boot/luggage compartment, the boot lid/
tailgate will not lock.
Opening and closing from inside the
vehicle Saloon:
You can open and close the boot lid from the
driver's seat when the vehicle is stationary.
Estate:
You can open the tailgate from the driver's
seat when the vehicle is stationary.
Saloon:
G
Risk of injury
Monitor the boot lid closing procedure to
make sure that nobody can become trap-
ped. Release the remote operating button
to stop the closing procedure. Saloon
1
Remote operating button Estate
1
Remote operating button Controls
* optional
211_AKB; 2; 5, en-GB
mkalafa,
Version: 2.9.4 2008-02-29T16:57:07+01:00 - Seite 75 ZDateiname: 6515_3416_02_buchblock.pdf; preflight
Page 140 of 401
On-board computer
137
X
Press the æorç button to select the
Lighting submenu.
X Press the jbutton to select Interior
lighting delayed switch-off.
X Press the æorç button to activate
or deactivate the Interior lighting
delayed switch-off feature.
X Press the j,èorÿ button to
select a different display.
Switching the Intelligent Light Sys-
tem* on/off You can set whether motorway mode, the
active light system and the extended range
foglamps are to be activated using the
Intelligent Light System
function.
X Press the èor· button to select the
Settings... menu.
X Press the jbutton to call up the selec-
tion of submenus.
X Press the æorç button to select the
Lighting submenu.
X Press the jbutton to select Intelli-
gent Light System. X
Press the æorç button to switch
the Intelligent Light System on/off.
X Press the j,èorÿ button to
select a different display.
Activating/deactivating the automatic
door locking feature The
Automatic door locking feature
allows you to set whether your vehicle will
lock centrally from a speed of about
15 km/h upwards.
i For more information on the automatic
locking feature, see (Y page 70).
X Press the èor· button to select the
Settings... menu.
X Press the jbutton to call up the selec-
tion of submenus.
X Press the æorç button to select the
Vehicle submenu.
X Press the jbutton to select Automatic
door locking . X
Press the æorç button to activate
or deactivate the Automatic door lock-
ing feature.
X Press the j,èorÿ button to
select a different display.
Selecting the switch-on time for the
auxiliary heating* This function is only available if the vehicle
has an auxiliary heating system.
The
Auxiliary heat. function allows you to
select three switch-on times. You can set the
exact switch-on time using the other func-
tions in the Heatersubmenu.
The auxiliary heating adopts the Thermatic or
4-zone Thermotronic *temperature setting.
The minimum and maximum temperature set-
tings for the auxiliary heating are 20 † and
24 † respectively.
You can switch off the auxiliary heating by
using the remote control or the auxiliary heat-
ing button on the centre console.
The auxiliary heating is switched off automat-
ically after 50 minutes. This time can be
changed. To do this, visit a qualified specialist
workshop, e.g. a Mercedes-Benz Service
Centre. Controls
* optional
211_AKB; 2; 5, en-GB
mkalafa
,V ersion: 2.9.4
2008-02-29T16:57:07+01:00 - Seite 137 ZDateiname: 6515_3416_02_buchblock.pdf; preflight
Page 180 of 401
Air conditioning
177
X
To deactivate: press theTbutton.
REST is no longer shown in the display.
i The residual heat automatically switches
off after around 30 minutes or if:
R the ignition is switched on
R the battery voltage drops Switching auxiliary heating/ventila-
tion* on/off
G
Risk of poisoning
Exhaust fumes are produced when the aux-
iliary heating is in operation. Inhaling these
exhaust fumes can be poisonous. You
should therefore switch off the auxiliary
heating in confined spaces without an
extraction system, e.g. a garage. G
Risk of fire
When operating the auxiliary heating, parts
of the vehicle may become very hot, and
highly inflammable material such as fuels
could be ignited. Operating the auxiliary
heating is thus prohibited at filling stations
or when your vehicle is being refuelled. You must therefore switch off the auxiliary heat-
ing at filling stations.
The auxiliary heating heats the air in the vehi-
cle interior to a temperature between 20 †
and 24 †, without depending on heat emitted
by the running engine. The auxiliary heating
is operated using fuel directly from the vehi-
cle's fuel tank. For this reason, the tank con-
tent must be at least at reserve fuel level to
ensure that the auxiliary heating functions.
The auxiliary heating/ventilation automati-
cally adjusts to changes in temperature and
weather conditions. For this reason, the aux-
iliary heating could switch from ventilation
mode to heating mode or from heating mode
to ventilation mode.
You cannot use the auxiliary ventilation to
cool the vehicle interior to a temperature
lower than the outside temperature.
Before activating X
Make sure that the key is in position 2in
the ignition lock.
X Set the temperature to a value between
20 † and 24 †.
The auxiliary heating/ventilation can be acti-
vated even when the air conditioning is being controlled manually. Optimum comfort can
be attained when the system is set to auto-
matic mode. Set the desired temperature
within this range. If a higher temperature is
set, the vehicle is heated to 24 †. If a lower
temperature is set, the vehicle is heated to
20 †.
Activating/deactivating the auxiliary
heating/ventilation
The auxiliary heating/ventilation can be acti-
vated or deactivated using the remote control
or the button on the centre console.
The on-board computer can be used to spec-
ify up to three departure times, one of which
may be preselected (Y
page 138). Cont
rols
* optional
211_AKB; 2; 5, en-GB
mkalafa ,V ersion: 2.9.4
2008-02-29T16:57:07+01:00 - Seite 177 ZDateiname: 6515_3416_02_buchblock.pdf; preflight
Page 181 of 401
Air conditioning
178
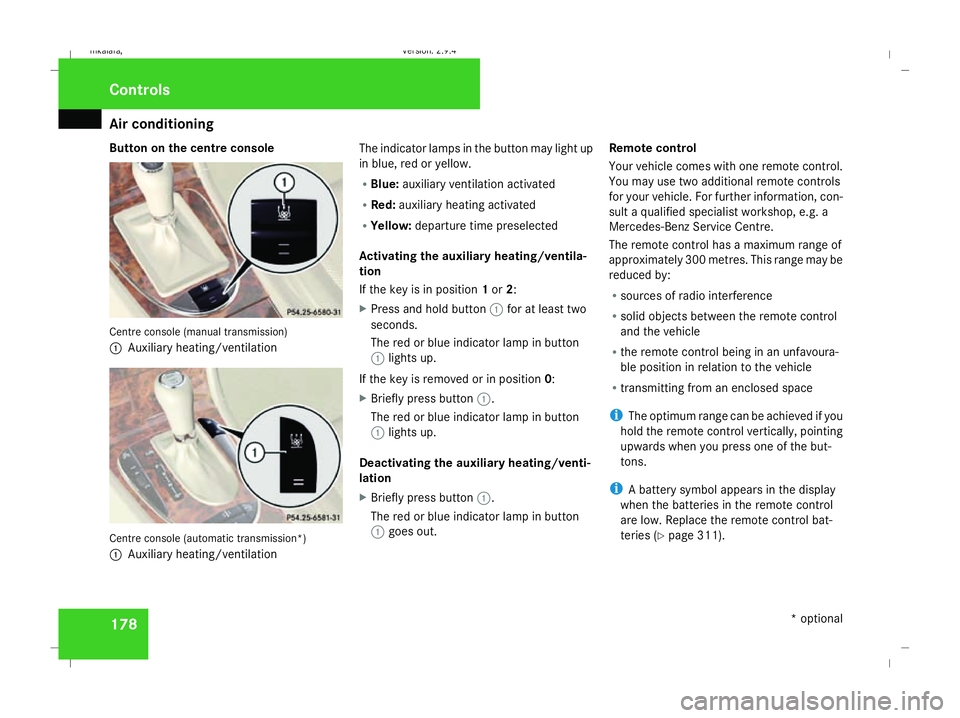
Button on the centre console
Centre console (manual transmission)
1
Auxiliary heating/ventilation Centre console (automatic transmission*)
1 Auxiliary heating/ventilation The indicator lamps in the button may light up
in blue, red or yellow.
R
Blue: auxiliary ventilation activated
R Red: auxiliary heating activated
R Yellow: departure time preselected
Activating the auxiliary heating/ventila-
tion
If the key is in position 1or 2:
X Press and hold button 1for at least two
seconds.
The red or blue indicator lamp in button
1 lights up.
If the key is removed or in position 0:
X Briefly press button 1.
The red or blue indicator lamp in button
1 lights up.
Deactivating the auxiliary heating/venti-
lation
X Briefly press button 1.
The red or blue indicator lamp in button
1 goes out. Remote control
Your vehicle comes with one remote control.
You may use two additional remote controls
for your vehicle. For further information, con-
sult a qualified specialist workshop, e.g. a
Mercedes-Benz Service Centre.
The remote control has a maximum range of
approximately 300 metres. This range may be
reduced by:
R sources of radio interference
R solid objects between the remote control
and the vehicle
R the remote control being in an unfavoura-
ble position in relation to the vehicle
R transmitting from an enclosed space
i The optimum range can be achieved if you
hold the remote control vertically, pointing
upwards when you press one of the but-
tons.
i A battery symbol appears in the display
when the batteries in the remote control
are low. Replace the remote control bat-
teries (Y page 311). Controls
* optional
211_AKB; 2; 5, en-GB
mkalafa
, Version: 2.9.4 2008-02-29T16:57:07+01:00 - Seite 178Dateiname: 6515_3416_02_buchblock.pdf; preflight
Page 182 of 401
Air conditioning
179
i
More information about the auxiliary
heating can be found in the "Practical
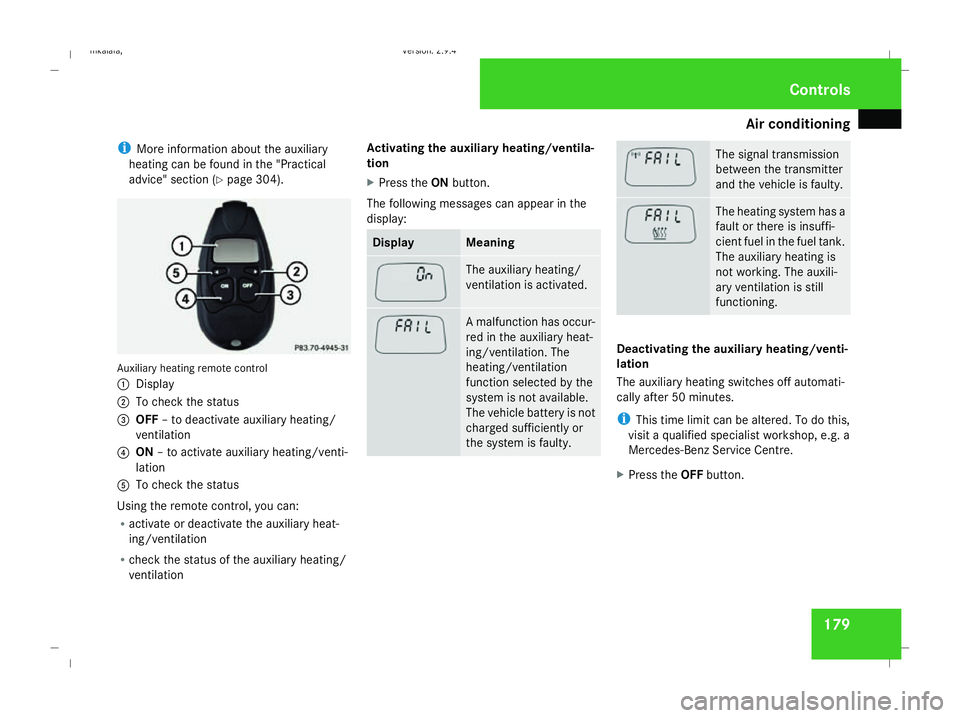
advice" section (Y page 304). Auxiliary heating remote control
1 Display
2 To check the status
3 OFF – to deactivate auxiliary heating/
ventilation
4 ON – to activate auxiliary heating/venti-
lation
5 To check the status
Using the remote control, you can:
R activate or deactivate the auxiliary heat-
ing/ventilation
R check the status of the auxiliary heating/
ventilation Activating the auxiliary heating/ventila-
tion
X
Press the ONbutton.
The following messages can appear in the
display: Display Meaning
The auxiliary heating/
ventilation is activated.
A malfunction has occur-
red in the auxiliary heat-
ing/ventilation. The
heating/ventilation
function selected by the
system is not available.
The vehicle battery is not
charged sufficiently or
the system is faulty. The signal transmission
between the transmitter
and the vehicle is faulty.
The heating system has a
fault or there is insuffi-
cient fuel in the fuel tank.
The auxiliary heating is
not working. The auxili-
ary ventilation is still
functioning.
Deactivating the auxiliary heating/venti-
lation
The auxiliary heating switches off automati-
cally after 50 minutes.
i
This time limit can be altered. To do this,
visit a qualified specialist workshop, e.g. a
Mercedes-Benz Service Centre.
X Press the OFFbutton. Cont
rols
211_AKB; 2; 5, en-GB
mkalafa
, Version: 2.9.4 2008-02-29T16:57:07+01:00 - Seite 179 ZDateiname: 6515_3416_02_buchblock.pdf; preflight
Page 217 of 401
Features
214 Infrared reflecting windscreen*
The infrared reflecting glass prevents the
vehicle interior from becoming too hot. It also
blocks radio waves up into the gigahertz
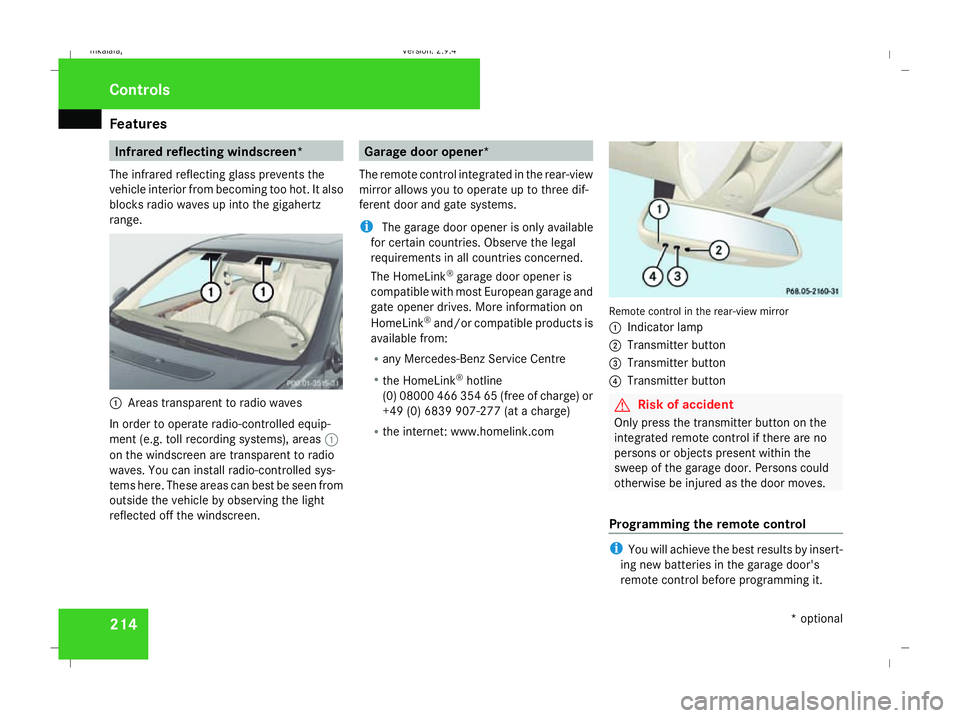
range. 1
Areas transparent to radio waves
In order to operate radio-controlled equip-
ment (e.g. toll recording systems), areas 1
on the windscreen are transparent to radio
waves. You can install radio-controlled sys-
tems here. These areas can best be seen from
outside the vehicle by observing the light
reflected off the windscreen. Garage door opener*
The remote control integrated in the rear-view
mirror allows you to operate up to three dif-
ferent door and gate systems.
i The garage door opener is only available
for certain countries. Observe the legal
requirements in all countries concerned.
The HomeLink ®
garage door opener is
compatible with most European garage and
gate opener drives. More information on
HomeLink ®
and/or compatible products is
available from:
R any Mercedes-Benz Service Centre
R the HomeLink ®
hotline
(0) 08000 466 354 65 (free of charge) or
+49 (0) 6839 907-27 7(at a charge)
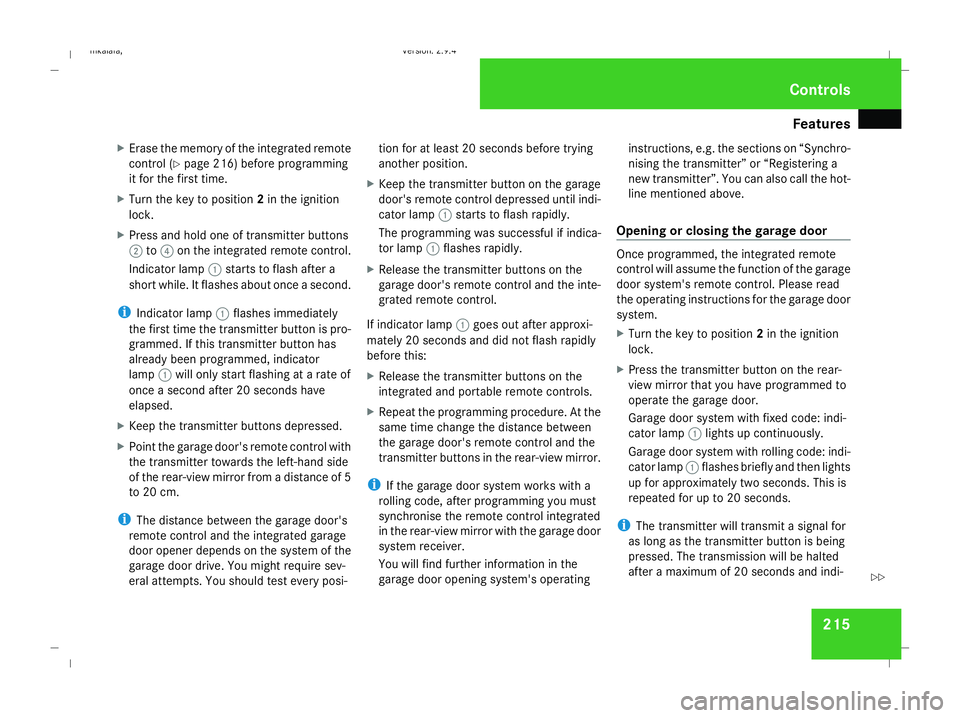
R the internet: www.homelink.com Remote control in the rear-view mirror
1
Indicator lamp
2 Transmitter button
3 Transmitter button
4 Transmitter button G
Risk of accident
Only press the transmitter button on the
integrated remote control if there are no
persons or objects present within the
sweep of the garage door. Persons could
otherwise be injured as the door moves.
Programming the remote control i
You will achieve the best results by insert-
ing new batteries in the garage door's
remote control before programming it. Controls
* optional
211_AKB; 2; 5, en-GB
mkalafa,
Version: 2.9.4 2008-02-29T16:57:07+01:00 - Seite 214Dateiname: 6515_3416_02_buchblock.pdf; preflight
Page 218 of 401
Features
215
X
Erase the memory of the integrated remote
control (Y page 216) before programming
it for the first time.
X Turn the key to position 2in the ignition
lock.
X Press and hold one of transmitter buttons
2 to4 on the integrated remote control.
Indicator lamp 1starts to flash after a
short while. It flashes about once a second.
i Indicator lamp 1flashes immediately
the first time the transmitter button is pro-
grammed. If this transmitter button has
already been programmed, indicator
lamp 1will only start flashing at a rate of
once a second after 20 seconds have
elapsed.
X Keep the transmitter buttons depressed.
X Point the garage door's remote control with
the transmitter towards the left-hand side
of the rear-view mirror from a distance of 5
to 20 cm.
i The distance between the garage door's
remote control and the integrated garage
door opener depends on the system of the
garage door drive. You might require sev-
eral attempts. You should test every posi- tion for at least 20 seconds before trying
another position.
X Keep the transmitter button on the garage
door's remote control depressed until indi-
cator lamp 1starts to flash rapidly.
The programming was successful if indica-
tor lamp 1flashes rapidly.
X Release the transmitter buttons on the
garage door's remote control and the inte-
grated remote control.
If indicator lamp 1goes out after approxi-
mately 20 seconds and did not flash rapidly
before this:
X Release the transmitter buttons on the
integrated and portable remote controls.
X Repeat the programming procedure. At the
same time change the distance between
the garage door's remote control and the
transmitter buttons in the rear-view mirror.
i If the garage door system works with a
rolling code, after programming you must
synchronise the remote control integrated
in the rear-view mirror with the garage door
system receiver.
You will find further information in the
garage door opening system's operating instructions, e.g. the sections on “Synchro-
nising the transmitter” or “Registering a
new transmitter”. You can also call the hot-
line mentioned above.
Opening or closing the garage door Once programmed, the integrated remote
control will assume the function of the garage
door system's remote control. Please read
the operating instructions for the garage door
system.
X
Turn the key to position 2in the ignition
lock.
X Press the transmitter button on the rear-
view mirror that you have programmed to
operate the garage door.
Garage door system with fixed code: indi-
cator lamp 1lights up continuously.
Garage door system with rolling code: indi-
cator lamp 1flashes briefly and then lights
up for approximately two seconds. This is
repeated for up to 20 seconds.
i The transmitter will transmit a signal for
as long as the transmitter button is being
pressed. The transmission will be halted
after a maximum of 20 seconds and indi- Cont
rols
211_AKB; 2; 5, en-GB
mkalafa
,V ersion: 2.9.4
2008-02-29T16:57:07+01:00 - Seite 215 ZDateiname: 6515_3416_02_buchblock.pdf; preflight