Page 74 of 329
Opening and closing
71
i
Do not leave the key in the boot. You
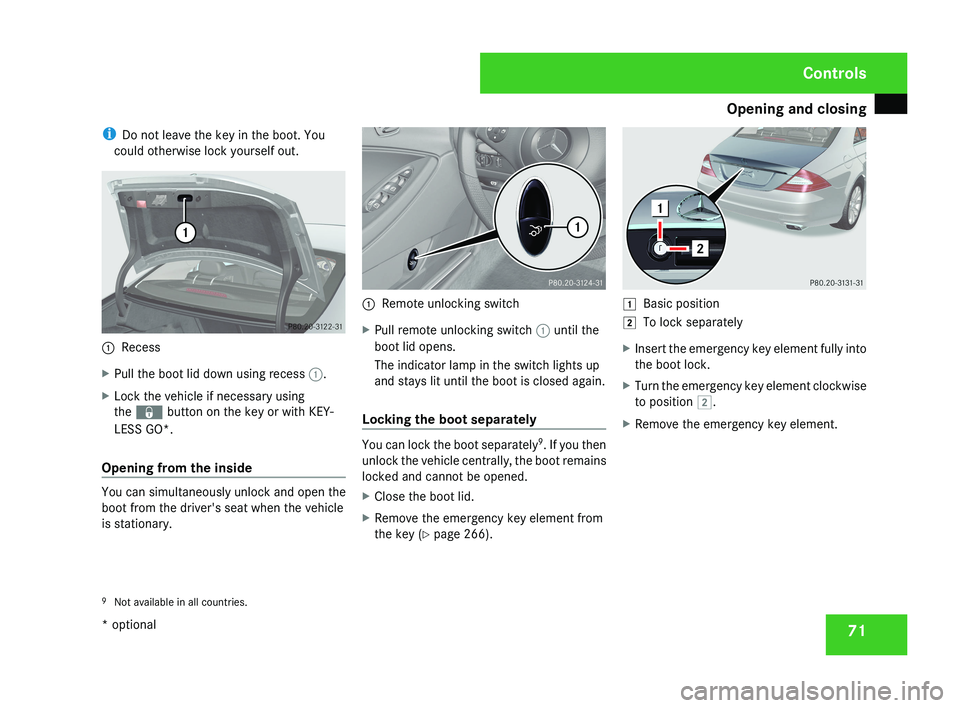
could otherwise lock yourself out.1 Recess
X Pull the boot lid down using recess 1.
X Lock the vehicle if necessary using
the j button on the key or with KEY-
LESS GO*.
Opening from the inside
You can simultaneously unlock and open the
boot from the driver's seat when the vehicle
is stationary.
1 Remote unlocking switch
X Pull remote unlocking switch 1 until the
boot lid opens.
The indicator lamp in the switch lights up
and stays lit until the boot is closed again.
Locking the boot separately
You can lock the boot separately 9
. If you then
unlock the vehicle centrally, the boot remains
locked and cannot be opened.
X Close the boot lid.
X Remove the emergency key element from
the key (Y page 266).
$ Basic position
% To lock separately
X Insert the emergency key element fully into
the boot lock.
X Turn the emergency key element clockwise
to position %.
X Remove the emergency key element.
9 Not available in all countries.
Controls
* optional
219_AKB; 2; 4, en-GB
mkalafa,
2007-11-13T09:28:36+01:00 - Seite 71
Page 75 of 329
Opening and closing
72 Boot (vehicles with remote boot lid
closing feature*)
The remote boot lid closing feature* opens
and closes the boot lid automatically. You can
stop the automatic opening and closing pro-
cedure at any time:
R by pulling or pressing the remote operating
switch at the driver's seat
R by pressing the i button on the key
R by pulling the handle on the boot lid
R by pressing the closing button in the boot
lid G
Risk of poisoning
Exhaust fumes could enter the vehicle inte-
rior if the engine is running and the boot lid
is open. This could poison you. Therefore,
you should make sure that the boot lid is
always closed when the engine is running.
! The boot lid swings upwards when
opened. Therefore, make sure that there is
enough space above the boot lid.
Opening from the outside You can only open the boot lid after unlocking
it first. X
To unlock centrally: press the k but-
ton on the key. 1
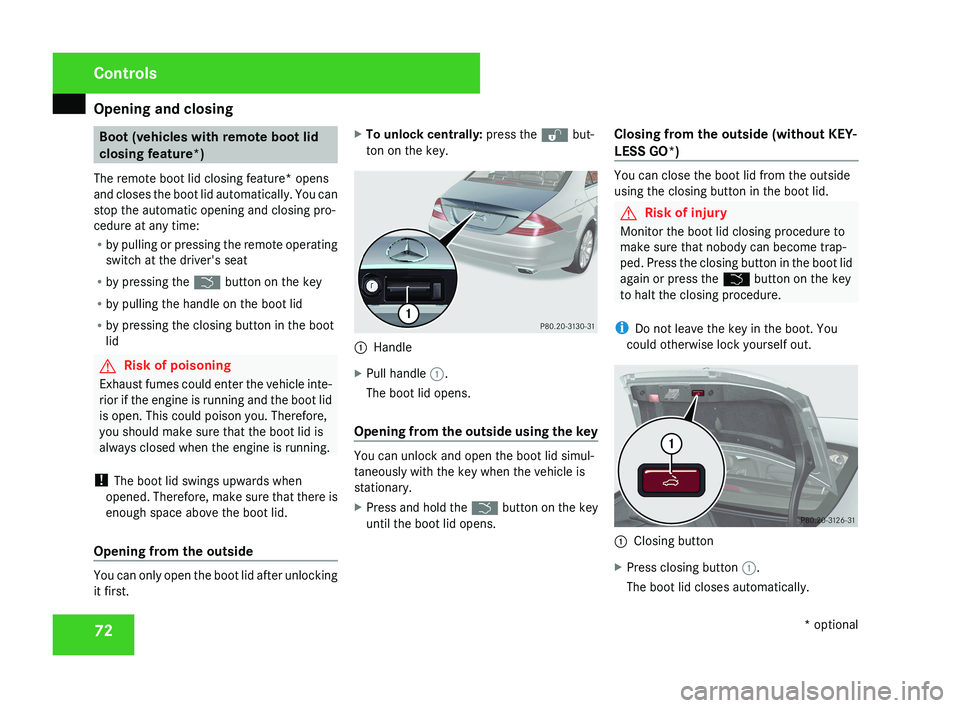
Handle
X Pull handle 1.
The boot lid opens.
Opening from the outside using the key You can unlock and open the boot lid simul-
taneously with the key when the vehicle is
stationary.
X
Press and hold the i button on the key
until the boot lid opens. Closing from the outside (without KEY-
LESS GO*) You can close the boot lid from the outside
using the closing button in the boot lid.
G
Risk of injury
Monitor the boot lid closing procedure to
make sure that nobody can become trap-
ped. Press the closing button in the boot lid
again or press the i button on the key
to halt the closing procedure.
i Do not leave the key in the boot. You
could otherwise lock yourself out. 1
Closing button
X Press closing button 1.
The boot lid closes automatically. Controls
* optional
219_AKB; 2; 4, en-GB
mkalafa,
2007-11-13T09:28:36+01:00 - Seite 72
Page 76 of 329
Opening and closing
73
Closing from the outside and locking
centrally (using KEYLESS GO*) You can close the boot lid from the outside
using the closing button in the boot lid, or you
can close and centrally lock the vehicle simul-
taneously with the KEYLESS GO button*.
G
Risk of injury
Monitor the boot lid closing procedure to
make sure that nobody can become trap-
ped. Press the closing button in the boot lid
again or press the i button on the key
to halt the closing procedure.
i Do not leave the key in the boot. You
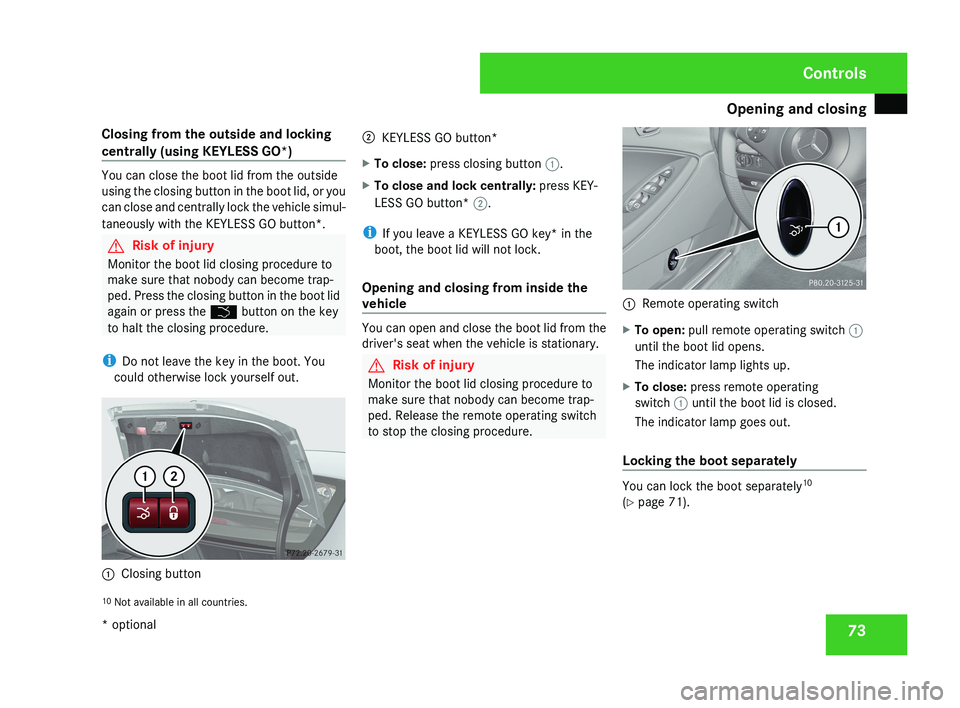
could otherwise lock yourself out. 1
Closing button 2
KEYLESS GO button*
X To close: press closing button 1.
X To close and lock centrally: press KEY-
LESS GO button* 2.
i If you leave a KEYLESS GO key* in the
boot, the boot lid will not lock.
Opening and closing from inside the
vehicle You can open and close the boot lid from the
driver's seat when the vehicle is stationary.
G
Risk of injury
Monitor the boot lid closing procedure to
make sure that nobody can become trap-
ped. Release the remote operating switch
to stop the closing procedure. 1
Remote operating switch
X To open: pull remote operating switch 1
until the boot lid opens.
The indicator lamp lights up.
X To close: press remote operating
switch 1 until the boot lid is closed.
The indicator lamp goes out.
Locking the boot separately You can lock the boot separately
10
(Y page 71).
10 Not available in all countries. Controls
* optional
219_AKB; 2; 4, en-GB
mkalafa,
2007-11-13T09:28:36+01:00 - Seite 73
Page 98 of 329
Lights
95Adjusting the headlamp range (vehi-
cles with halogen headlamps)
The headlamp range control allows you to
adjust the cone of light from the headlamps
according to how your vehicle is laden.
You can only adjust the headlamp range while
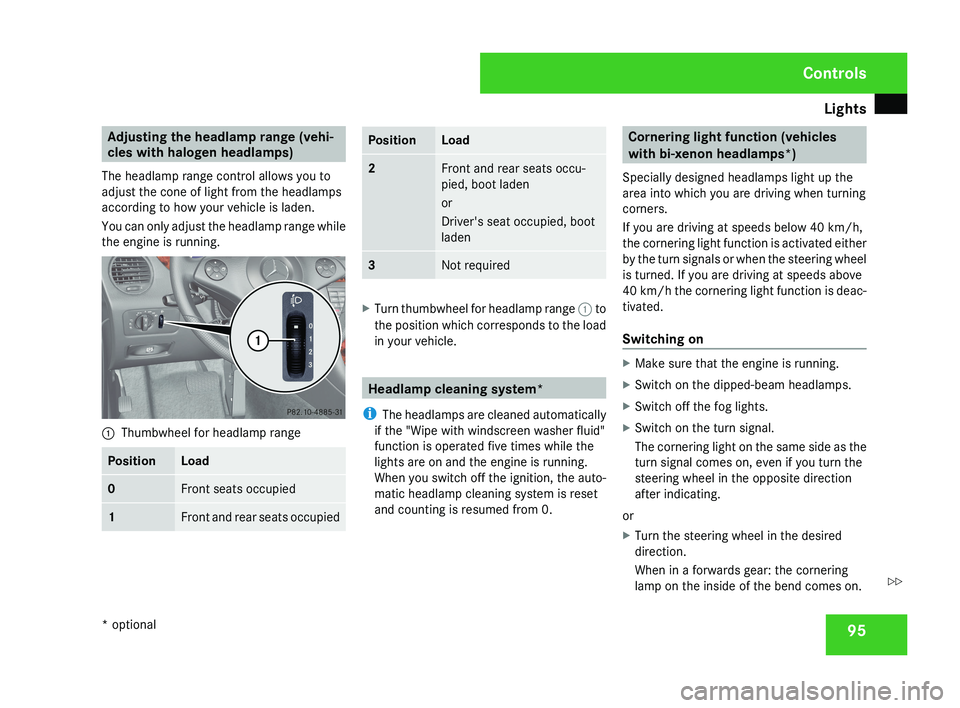
the engine is running.1 Thumbwheel for headlamp range
PositionLoad
0Front seats occupied
1Front and rear seats occupied
PositionLoad
2Front and rear seats occu-
pied, boot laden
or
Driver's seat occupied, boot
laden
3Not required
X
Turn thumbwheel for headlamp range 1 to
the position which corresponds to the load
in your vehicle.
Headlamp cleaning system*
i The headlamps are cleaned automatically
if the "Wipe with windscreen washer fluid"
function is operated five times while the
lights are on and the engine is running.
When you switch off the ignition, the auto-
matic headlamp cleaning system is reset
and counting is resumed from 0.
Cornering light function (vehicles
with bi-xenon headlamps*)
Specially designed headlamps light up the
area into which you are driving when turning
corners.
If you are driving at speeds below 40 km/h,
the cornering light function is activated either
by the turn signals or when the steering wheel
is turned. If you are driving at speeds above
40 km/h the cornering light function is deac-
tivated.
Switching on
X Make sure that the engine is running.
X Switch on the dipped-beam headlamps.
X Switch off the fog lights.
X Switch on the turn signal.
The cornering light on the same side as the
turn signal comes on, even if you turn the
steering wheel in the opposite direction
after indicating.
or
X Turn the steering wheel in the desired
direction.
When in a forwards gear: the cornering
lamp on the inside of the bend comes on.
Controls
* optional
219_AKB; 2; 4, en-GB
mkalafa,
2007-11-13T09:28:36+01:00 - Seite 95
Z
Page 99 of 329
Lights
96When in reverse gear: the cornering light on
the outside of the bend comes on.
Switching off X
Switch off the turn signal.
i The cornering light is activated until you
turn the steering wheel back to the straight-
ahead position and the turn signal switches
off. The cornering light may remain lit for a
short time, but no more than three minutes.
It then goes out, even if the turn signal is
still switched on. Interior lighting
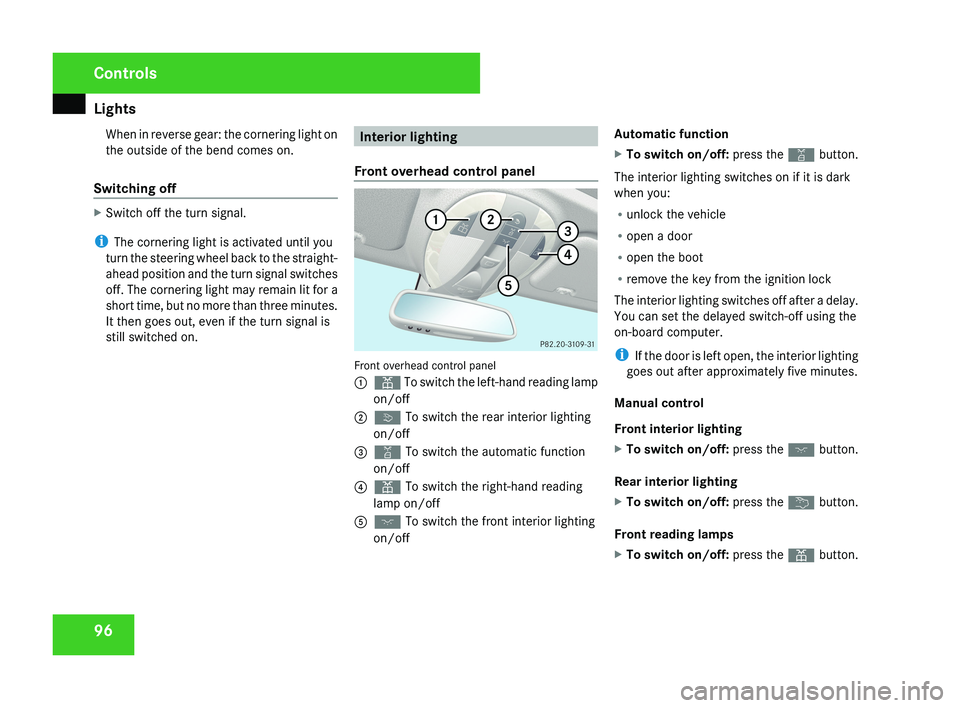
Front overhead control panel Front overhead control panel
1
X To switch the left-hand reading lamp
on/off
2 ò To switch the rear interior lighting
on/off
3 ¡ To switch the automatic function
on/off
4 X To switch the right-hand reading
lamp on/off
5 ð To switch the front interior lighting
on/off Automatic function
X
To switch on/off: press the ¡ button.
The interior lighting switches on if it is dark
when you:
R unlock the vehicle
R open a door
R open the boot
R remove the key from the ignition lock
The interior lighting switches off after a delay.
You can set the delayed switch-off using the
on-board computer.
i If the door is left open, the interior lighting
goes out after approximately five minutes.
Manual control
Front interior lighting
X To switch on/off: press the ð button.
Rear interior lighting
X To switch on/off: press the ¦ button.
Front reading lamps
X To switch on/off: press the X button. Controls
219_AKB; 2; 4, en-GB
mkalafa,
2007-11-13T09:28:36+01:00 - Seite 96
Page 176 of 329
Loading and stowing
173
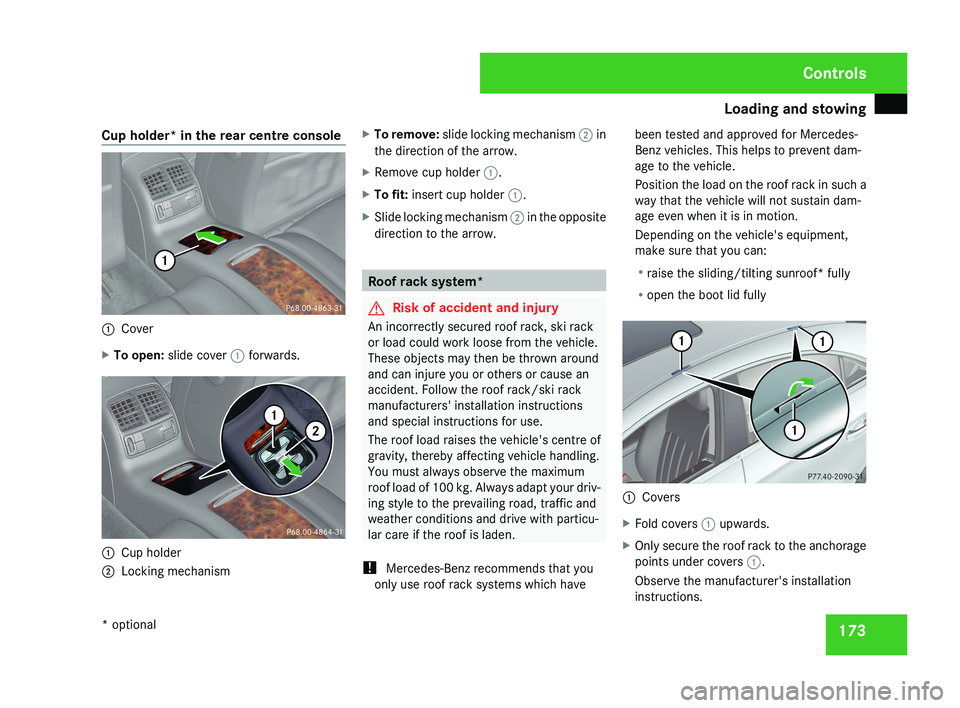
Cup holder* in the rear centre console
1
Cover
X To open: slide cover 1 forwards.1
Cup holder
2 Locking mechanism X
To remove: slide locking mechanism 2 in
the direction of the arrow.
X Remove cup holder 1.
X To fit: insert cup holder 1.
X Slide locking mechanism 2 in the opposite
direction to the arrow. Roof rack system*
G
Risk of accident and injury
An incorrectly secured roof rack, ski rack
or load could work loose from the vehicle.
These objects may then be thrown around
and can injure you or others or cause an
accident. Follow the roof rack/ski rack
manufacturers' installation instructions
and special instructions for use.
The roof load raises the vehicle's centre of
gravity, thereby affecting vehicle handling.
You must always observe the maximum
roof load of 100 kg. Always adapt your driv-
ing style to the prevailing road, traffic and
weather conditions and drive with particu-
lar care if the roof is laden.
! Mercedes-Benz recommends that you
only use roof rack systems which have been tested and approved for Mercedes-
Benz vehicles. This helps to prevent dam-
age to the vehicle.
Position the load on the roof rack in such a
way that the vehicle will not sustain dam-
age even when it is in motion.
Depending on the vehicle's equipment,
make sure that you can:
R
raise the sliding/tilting sunroof* fully
R open the boot lid fully 1
Covers
X Fold covers 1 upwards.
X Only secure the roof rack to the anchorage
points under covers 1.
Observe the manufacturer's installation
instructions. Controls
* optional
219_AKB; 2; 4, en-GB
mkalafa,
2007-11-13T09:28:36+01:00 - Seite 173
Page 177 of 329
Loading and stowing
174 Skibag*
G
Risk of injury
The skibag is designed to carry up to four
pairs of skis. Do not use the skibag to carry
any other type of load.
The skibag must always be secured when
laden. Otherwise, injuries could be caused
by it in the event of an accident.
Unfolding the skibag and loading skis 1
Cover
2 Release catches
X Fold down the rear seat armrest.
X Press release catches 2 together and fold
down cover 1. 1
Skibag
X Pull skibag 1 into the vehicle interior.
The skibag unfolds.
X Open the front stowage compartment in
the rear centre console.
X Remove the rubber cover.
or
X Remove cup holder. 1
Cover
X Fold cover 1 upwards.
X Open the boot lid. 1
Release button
X Press release button 1.
The flap opens downwards. Controls
* optional
219_AKB; 2; 4, en-GB
mkalafa,
2007-11-13T09:28:36+01:00 - Seite 174
Page 178 of 329
Loading and stowing
175Skibag
X
Slide the skis into the skibag from the boot.
1 Strap
X Pull strap 1 tight by the loose end until the
skis are held firmly inside the skibag.
1 Hook
2 Securing ring
X Engage hook 1 in securing ring 2.
X Pull the strap tight by the loose end.
Removing the skis and folding up the
skibag
X Loosen the two straps.
X Remove the hook from the securing ring.
X Take the skis out of the skibag.
X Close the flap in the boot.
X Smooth out the skibag and fold it up.
X Stow the skibag in the rear seat backrest.
X Fold the cover back up. i
You should always close the flap in the
boot if you do not require the skibag. This
will prevent access to the boot from the
vehicle interior.
Removing the skibag
The skibag can be removed for cleaning or
drying.
X Open the boot lid.
1 Button
2 Flap
3 Catch
4 Skibag frame
Controls
219_AKB; 2; 4, en-GB
mkalafa,
2007-11-13T09:28:36+01:00 - Seite 175