2008 MERCEDES-BENZ CLS COUPE boot
[x] Cancel search: bootPage 277 of 329
Changing the bulbs
274
X
Turn housing cover 3 anti-clockwise and
remove it.
X Turn main-beam headlamp bulb holder 4
anti-clockwise until it disengages and then
remove it together with the bulb.
X Turn the bulb anti-clockwise, applying
slight pressure, and remove it from bulb
holder 5.
X Insert the new bulb into bulb holder 5 and
turn it clockwise.
X Pull out bulb holder 5.
X Insert main-beam headlamp bulb
holder 4 into the headlamp and turn it
clockwise until it engages.
X Place housing cover 3 back on and turn it
clockwise until it engages.
Replacing the turn signal lamps X
Switch off the lights.
X Open the bonnet.
X Turn bulb holder 1 anti-clockwise and
remove it along with the bulb.
X Turn the bulb anti-clockwise, applying
slight pressure, and remove it from bulb
holder 1. X
Insert the new bulb into bulb holder 1 and
turn it clockwise.
X Insert bulb holder 1 into the headlamp
and turn it clockwise until it engages. Changing the rear bulbs
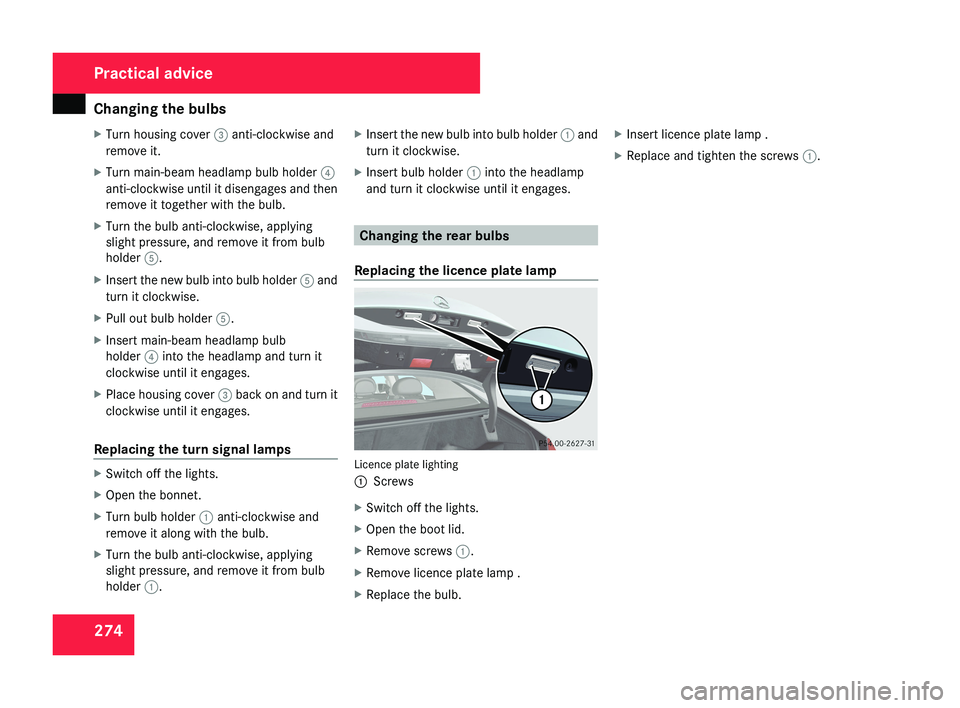
Replacing the licence plate lamp Licence plate lighting
1
Screws
X Switch off the lights.
X Open the boot lid.
X Remove screws 1.
X Remove licence plate lamp .
X Replace the bulb. X
Insert licence plate lamp .
X Replace and tighten the screws 1.Practical advice
219_AKB; 2; 4, en-GB
mkalafa,
2007-11-13T09:28:36+01:00 - Seite 274
Page 280 of 329
Flat tyre
277Do not start the engine at any time while
the wheel is being changed.
Do not lie under the vehicle when it is being
supported by the jack. If you do not raise
the vehicle as described, it could slip off the
jack (e.g. if the engine is started or a door
or the boot lid are opened or closed) and
you could be seriously injured.
Using the TIREFIT kit
You can use the TIREFIT kit to seal small
punctures, particularly those in the tyre tread.
You can use TIREFIT in outdoor temperatures
down to -20 °C. G
Risk of accident
In the following situations, your safety is at
particular risk and TIREFIT is unable to pro-
vide breakdown assistance:
R if there are cuts or punctures in the tyre
greater than 4 mm
R if the wheel rim is damaged
R if you have driven at very low tyre pres-
sures or on a flat tyre
Do not drive any further. Consult a qualified
specialist workshop which has the neces- sary specialist knowledge and tools to carry
out the work required.
Mercedes-Benz recommends that you use
a Mercedes-Benz Service Centre for this
purpose. In particular, work relevant to
safety or on safety-related systems must be
carried out at a qualified specialist work-
shop.
X Do not remove any foreign objects which
have penetrated the tyre, e.g. screws or
nails.
X Remove TIREFIT, the accompanying "max.
80 km/h" sticker and the electric air pump
from the stowage well underneath the boot
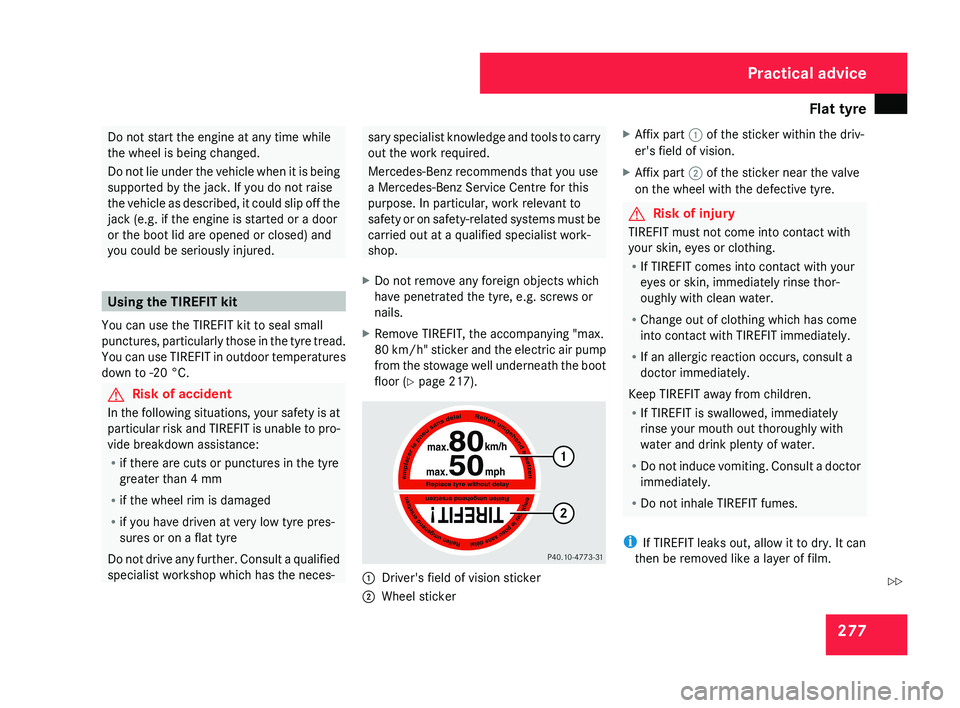
floor ( Y page 217).1
Driver's field of vision sticker
2 Wheel sticker X
Affix part 1 of the sticker within the driv-
er's field of vision.
X Affix part 2 of the sticker near the valve
on the wheel with the defective tyre.
G Risk of injury
TIREFIT must not come into contact with
your skin, eyes or clothing.
R If TIREFIT comes into contact with your
eyes or skin, immediately rinse thor-
oughly with clean water.
R Change out of clothing which has come
into contact with TIREFIT immediately.
R If an allergic reaction occurs, consult a
doctor immediately.
Keep TIREFIT away from children.
R If TIREFIT is swallowed, immediately
rinse your mouth out thoroughly with
water and drink plenty of water.
R Do not induce vomiting. Consult a doctor
immediately.
R Do not inhale TIREFIT fumes.
i If TIREFIT leaks out, allow it to dry. It can
then be removed like a layer of film.
Practical advice
219_AKB; 2; 4, en-GB
mkalafa,
2007-11-13T09:28:36+01:00 - Seite 277
Z
Page 286 of 329
Flat tyre
283required. Mercedes-Benz recommends
that you use a Mercedes-Benz Service
Centre for this purpose. In particular, work
relevant to safety or on safety-related sys-
tems must be carried out at a qualified
specialist workshop.
Preparing the vehicle X
Prepare the vehicle as described
(Y page 276).
X Place the wheels in the straight-ahead posi-
tion.
X Take the following from the stowage well
beneath the boot floor:
R
the "Minispare"/collapsible emergency
spare wheel* or the spare wheel*
R the vehicle tool kit
R the wheel chock
R the jack
X Secure the vehicle to prevent it from rolling
away.
On level ground: place chocks or similar
under the front and rear of the wheel that
is diagonally opposite the wheel you wish
to change. X
On downhill gradients: place chocks or
similar under both wheels of the other axle.
Raising the vehicle 1
Wheel wrench
X Using wheel wrench 1, loosen the bolts on
the wheel you wish to change by about one
full turn. Do not unscrew the bolts com-
pletely. G
Risk of accident
If you fail to position the jack correctly, the
vehicle may:
R slip off the jack
R injure you or others
R be damaged It is thus important to ensure that the jack
is positioned correctly in the respective
jacking points. Before positioning the jack,
remove any dirt that may have collected in
the jacking points.
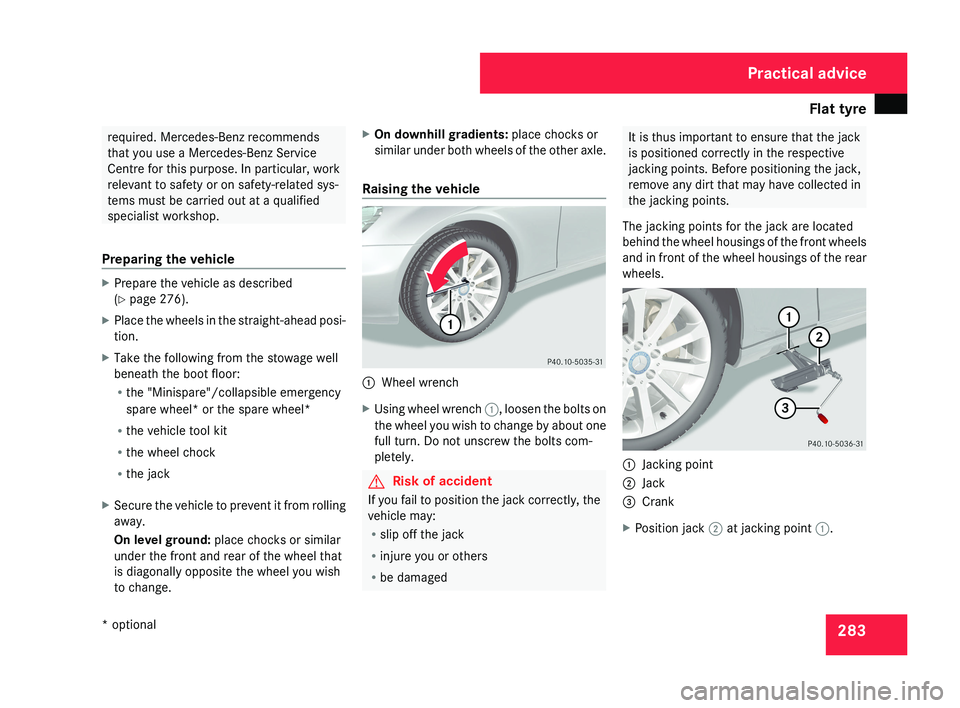
The jacking points for the jack are located
behind the wheel housings of the front wheels
and in front of the wheel housings of the rear
wheels. 1
Jacking point
2 Jack
3 Crank
X Position jack 2 at jacking point 1. Practical advice
* optional
219_AKB; 2; 4, en-GB
mkalafa,
2007-11-13T09:28:36+01:00 - Seite 283
Page 288 of 329
Flat tyre
2851
Wheel bolts for all wheels supplied by the
factory
X Clean the wheel and wheel hub contact
surfaces.
XPlace the "Minispare"/collapsible emer-
gency spare wheel* or the spare wheel
onto the centring pin and push it on.
XTighten the wheel bolts until they are fin-
ger-tight.
X Unscrew the centring pin.
X Tighten the last wheel bolt until it is finger-
tight.
Inflating the collapsible emergency
spare wheel* with the electric air pump
G Risk of accident
Pump up the collapsible emergency spare
wheel before lowering the vehicle, as you
could otherwise damage the wheel rim. The electric air pump is located in the stow-
age well under the boot floor.
X
Take the electric air pump out of the stow-
age well under the boot floor.
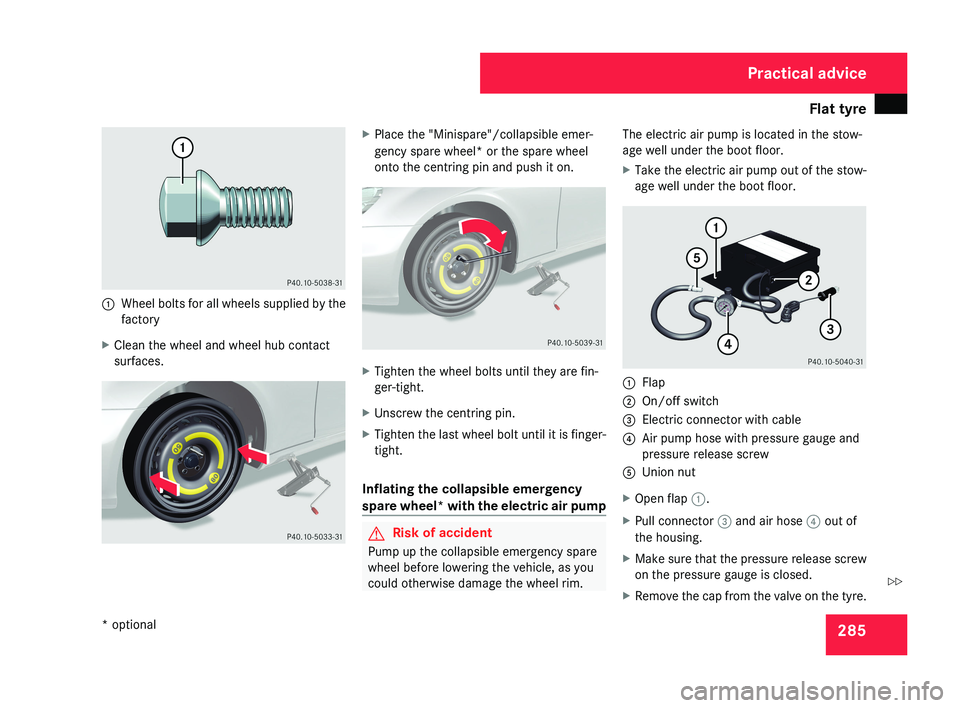
1 Flap
2 On/off switch
3 Electric connector with cable
4 Air pump hose with pressure gauge and
pressure release screw
5 Union nut
X Open flap 1.
X Pull connector 3 and air hose 4 out of
the housing.
X Make sure that the pressure release screw
on the pressure gauge is closed.
X Remove the cap from the valve on the tyre.
Practical advice
* optional
219_AKB; 2; 4, en-GB
mkalafa,
2007-11-13T09:28:36+01:00 - Seite 285
Z
Page 289 of 329

Flat tyre
286
X
Screw union nut 5 on air hose 4 onto the
valve.
X Insert plug 3 into the cigarette lighter
socket* ( Y page 181) or into a 12V socket
in your vehicle ( Y page 182).
X Make sure that the key is in position 2 in
the ignition lock.
X Press on/off switch 2 on the electric air
pump to I.
The electric air pump is switched on. The
tyre is inflated.
X When a tyre pressure of 3.5 bar has been
reached, press 0 on the electric air pump
switch.
The electric air pump is switched off.
! Do not operate the electric air pump for
longer than six minutes without a break.
Otherwise, it may overheat.
The air pump can be operated again once
it has cooled down.
If the tyre pressure is higher than 3.5 bar: X
Open the pressure release screw on the
pressure gauge until the tyre pressure is
correct.
X Disconnect the electric air pump and stow
it away.
Lowering the vehicle X
Lower the vehicle. To do this, turn the crank
of the jack anti-clockwise until the vehicle
is standing firmly on the ground again.
X Place the jack to one side. 1
– 5 Wheel bolts
X Tighten the wheel bolts evenly in a cross-
wise pattern in the sequence indica-
ted ( 1 to 5). The tightening torque must
be 130 Nm. G
Risk of accident
Have the tightening torque checked imme-
diately after a wheel is changed. The wheels
could work loose if they are not tightened
to a tightening torque of 130 Nm.
X Turn the jack back to its initial position and
store it and the rest of the vehicle tool kit
in the boot.
Vehicles with the "Minispare"/collapsible
emergency spare wheel*:
X Wrap the faulty wheel in the protective film
provided with the "Minispare"/collapsible
emergency spare wheel* and transport the
wheel in the boot.
or
X Depending on the size of the wheel, the
faulty wheel may also be secured in the
spare wheel recess. In this case, the stow-
age well casing will have to be removed
from the spare wheel well and stowed in the
boot.
i Do not activate the tyre pressure moni-
tor* until the deflated tyre has been
removed from the vehicle. Practical advice
* optional
219_AKB; 2; 4, en-GB
mkalafa,
2007-11-13T09:28:36+01:00 - Seite 286
Page 292 of 329
Battery
289step out of the vehicle first and touch the
bodywork.
R Do not wipe the battery using a cloth. The
battery may explode as a result of elec-
trostatic charge or through the creation
of sparks.
! Switch the engine off and remove the key
before unscrewing or disconnecting the
terminal clamps from the battery. You may
otherwise destroy electronic components
such as the alternator.
Have the battery checked and, if neces-
sary, replaced at a qualified specialist
workshop, e.g. a Mercedes-Benz Service
Centre, every two years or at least every
20,000 km.
i Mercedes-Benz recommends that you
have all work involving the battery, e.g.
removing, charging and replacing, carried
out at a qualified specialist workshop, e.g.
a Mercedes-Benz Service Centre.
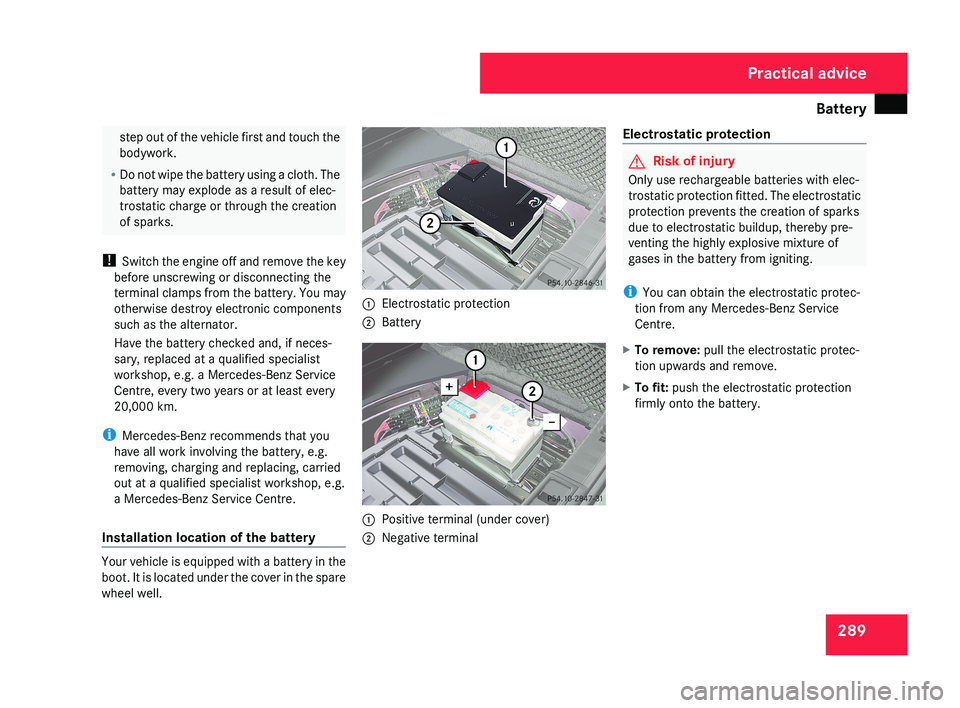
Installation location of the battery Your vehicle is equipped with a battery in the
boot. It is located under the cover in the spare
wheel well. 1
Electrostatic protection
2 Battery 1
Positive terminal (under cover)
2 Negative terminal Electrostatic protection G
Risk of injury
Only use rechargeable batteries with elec-
trostatic protection fitted. The electrostatic
protection prevents the creation of sparks
due to electrostatic buildup, thereby pre-
venting the highly explosive mixture of
gases in the battery from igniting.
i You can obtain the electrostatic protec-
tion from any Mercedes-Benz Service
Centre.
X To remove: pull the electrostatic protec-
tion upwards and remove.
X To fit: push the electrostatic protection
firmly onto the battery. Practical advice
219_AKB; 2; 4, en-GB
mkalafa,
2007-11-13T09:28:36+01:00 - Seite 289
Page 293 of 329
Battery
290 Disconnecting the battery
G
Risk of accident
If the battery is disconnected:
R there
is no brake boosting effect and you
will need to apply more pressure to brake
and the brake pedal travel will be longer;
you may have to depress the brake pedal
with full force
R you can no longer turn the key in the igni-
tion and, on vehicles with KEYLESS
GO*, pressing the KEYLESS GO button*
on the selector lever will have no effect
R the selector lever is locked in position P
! Always disconnect the battery in the
sequence described below. Never swap the
terminal clamps. You may otherwise dam-
age the vehicle electronics.
X Firmly depress the parking brake and move
the selector lever to P.
X Switch off all electrical consumers.
X Turn the key to position 0 in the ignition
lock and remove it.
X Open the boot/luggage compartment.
X Remove the luggage well (Y page 218). X
Remove the battery cover.
X Remove the negative terminal clamp from
the battery.
X Remove the cover from the positive termi-
nal clamp.
X Remove the positive terminal clamp from
the battery.
X Disconnect the breather hose. Removing the battery
X Disconnect the battery ( Y page 290).
X Loosen the bolt which holds the battery in
place.
X Release the strap and remove the battery. Charging and fitting the battery
G
Risk of injury
Only charge the installed battery with a bat-
tery charger which has been tested and
approved
by Mercedes-Benz. These battery
chargers allow the battery to be charged
while it is still installed. Otherwise, the vehi-
cle's electronic system may be damaged.
Only charge the battery in a well-ventilated
area. As the battery is being charged, gases
can escape and generate minor explosions.
This may injure you and other persons or
cause damage to the paintwork or acid cor-
rosion on the vehicle.
You can obtain information about battery
chargers which allow the battery to be
charged when still installed from a qualified
specialist workshop, e.g. a Mercedes-Benz
Service Centre. G
Risk of injury
There is a risk of acid burns during the
charging process due to the gases which
escape from the battery. Do not lean over
the battery during the charging process.
! Only use battery chargers with a maxi-
mum charging voltage of 14.8 V. Practical advice
* optional
219_AKB; 2; 4, en-GB
mkalafa,
2007-11-13T09:28:36+01:00 - Seite 290
Page 298 of 329

Fuses
295Removing the towing eye
X Take the wheel wrench from the vehicle
tool kit ( Y page 217).
X Insert the wheel wrench handle into the
towing eye and turn it anti-clockwise.
X Unscrew the towing eye.
X Replace the cover and press it until it
engages.
X Return the towing eye and the wheel
wrench to the vehicle tool kit. Transporting the vehicle
The towing eyes can be used to pull the vehi-
cle onto a trailer or transporter for transport-
ing purposes.
! Only lash the vehicle down by the wheels
or wheel rims, not by parts of the vehicle
such as axle or steering components. The
vehicle could otherwise be damaged.
X Turn the key to position 2 in the ignition
lock.
X Move the selector lever to N. Fuses
Notes on changing fuses
The
fuses in your vehicle serve to close down
faulty circuits. If a fuse blows, all the compo-
nents on the circuit and their functions will
fail.
i Blown fuses must be replaced with fuses
of the same rating (which can be recog-
nised by the colour and amperage) and
which have the amperage specified in the
fuse allocation chart. A Mercedes-Benz
Service Centre will be happy to advise you. G
Risk of fire
Only use fuses that have been approved for
Mercedes-Benz vehicles and which have
the correct amperage for the system con-
cerned. Do not attempt to repair or bridge
faulty
fuses. A circuit overload could other-
wise cause a fire. Have the cause traced
and rectified at a qualified specialist work-
shop, e.g. a Mercedes-Benz Service Centre.
If the newly inserted fuse also blows, have the
cause traced and rectified at a qualified spe-
cialist workshop, e.g. a Mercedes-Benz
Service Centre. !
Only use fuses that have been approved
for Mercedes-Benz vehicles and which
have the correct amperage for the system
concerned.
Otherwise, components or sys-
tems could be damaged.
The fuses are located in various fuse boxes:
R Main fuse box on the driver's side of the
dashboard
R Fuse box in the boot, on the left-hand side
of the vehicle
Fuse allocation chart The fuse allocation chart is in the main fuse
box in the dashboard. The fuse amperage is
also indicated there. Practical advice
219_AKB; 2; 4, en-GB
mkalafa,
2007-11-13T09:28:36+01:00 - Seite 295