2008 MERCEDES-BENZ CLS COUPE key battery
[x] Cancel search: key batteryPage 84 of 329
Steering wheel
811
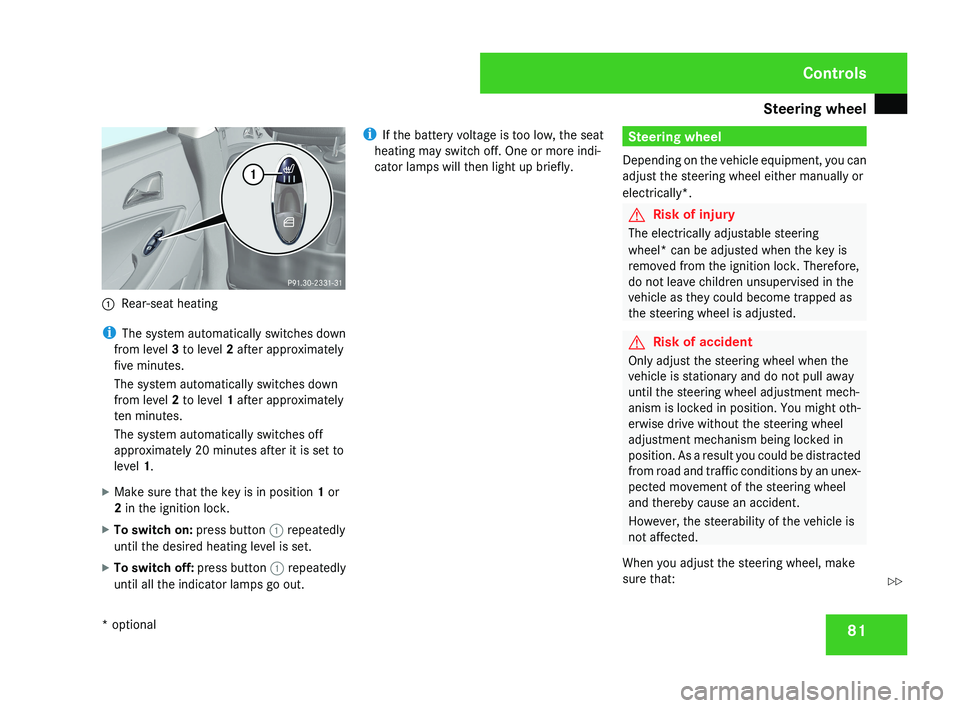
Rear-seat heating
i The system automatically switches down
from level 3 to level 2 after approximately
five minutes.
The system automatically switches down
from level 2 to level 1 after approximately
ten minutes.
The system automatically switches off
approximately 20 minutes after it is set to
level 1.
X Make sure that the key is in position 1 or
2 in the ignition lock.
X To switch on: press button 1 repeatedly
until the desired heating level is set.
X To switch off: press button 1 repeatedly
until all the indicator lamps go out. i
If the battery voltage is too low, the seat
heating may switch off. One or more indi-
cator lamps will then light up briefly.
Steering wheel
Depending on the vehicle equipment, you can
adjust the steering wheel either manually or
electrically*.
G Risk of injury
The electrically adjustable steering
wheel* can be adjusted when the key is
removed from the ignition lock. Therefore,
do not leave children unsupervised in the
vehicle as they could become trapped as
the steering wheel is adjusted.
G Risk of accident
Only adjust the steering wheel when the
vehicle is stationary and do not pull away
until the steering wheel adjustment mech-
anism is locked in position. You might oth-
erwise drive without the steering wheel
adjustment mechanism being locked in
position. As a result you could be distracted
from road and traffic conditions by an unex-
pected movement of the steering wheel
and thereby cause an accident.
However, the steerability of the vehicle is
not affected.
When you adjust the steering wheel, make
sure that:
Controls
* optional
219_AKB; 2; 4, en-GB
mkalafa,
2007-11-13T09:28:36+01:00 - Seite 81
Z
Page 87 of 329
Mirrors
84 Exterior mirrors
G
Risk of accident
The exterior mirrors reduce the size of the
image. Objects are actually closer than
they appear. You could misjudge the dis-
tance from vehicles driving behind and
cause an accident, e.g. when changing
lane. For this reason, make sure of the
actual distance from the vehicle driving
behind by glancing over your shoulder.
The convex exterior mirrors give a larger field
of vision.
At low outside temperatures, the exterior mir-
rors are heated automatically.
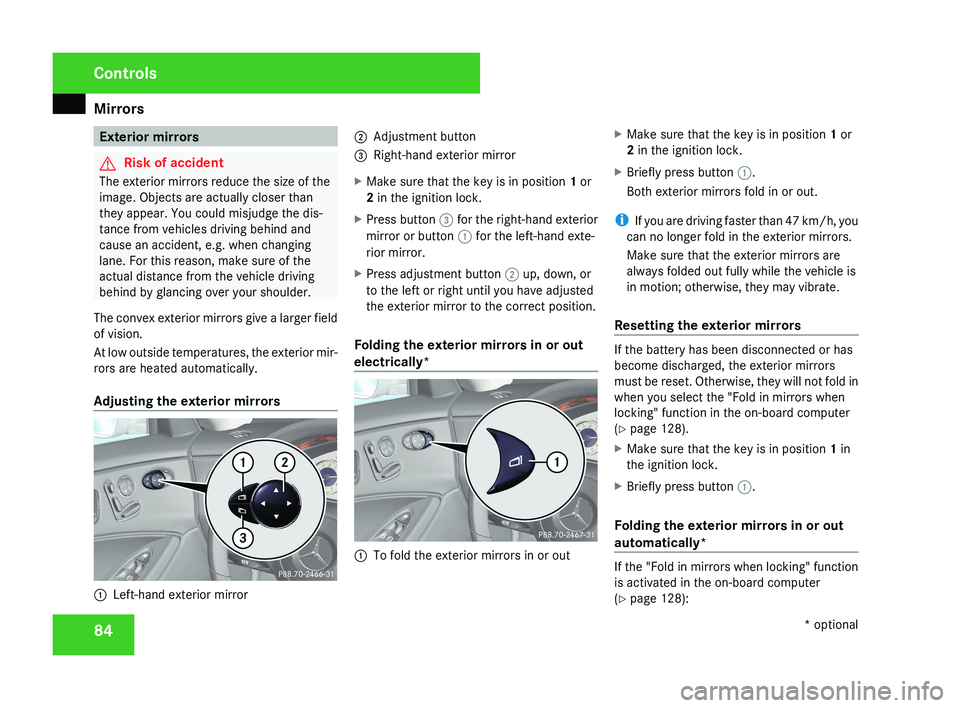
Adjusting the exterior mirrors 1
Left-hand exterior mirror 2
Adjustment button
3 Right-hand exterior mirror
X Make sure that the key is in position 1 or
2 in the ignition lock.
X Press button 3 for the right-hand exterior
mirror or button 1 for the left-hand exte-
rior mirror.
X Press adjustment button 2 up, down, or
to the left or right until you have adjusted
the exterior mirror to the correct position.
Folding the exterior mirrors in or out
electrically* 1
To fold the exterior mirrors in or out X
Make sure that the key is in position 1 or
2 in the ignition lock.
X Briefly press button 1.
Both exterior mirrors fold in or out.
i If you are driving faster than 47 km/h, you
can no longer fold in the exterior mirrors.
Make sure that the exterior mirrors are
always folded out fully while the vehicle is
in motion; otherwise, they may vibrate.
Resetting the exterior mirrors If the battery has been disconnected or has
become discharged, the exterior mirrors
must be reset. Otherwise, they will not fold in
when you select the "Fold in mirrors when
locking" function in the on-board computer
(Y page 128).
X
Make sure that the key is in position 1 in
the ignition lock.
X Briefly press button 1.
Folding the exterior mirrors in or out
automatically* If the "Fold in mirrors when locking" function
is activated in the on-board computer
(Y page 128):Controls
* optional
219_AKB; 2; 4, en-GB
mkalafa,
2007-11-13T09:28:36+01:00 - Seite 84
Page 95 of 329
Lights
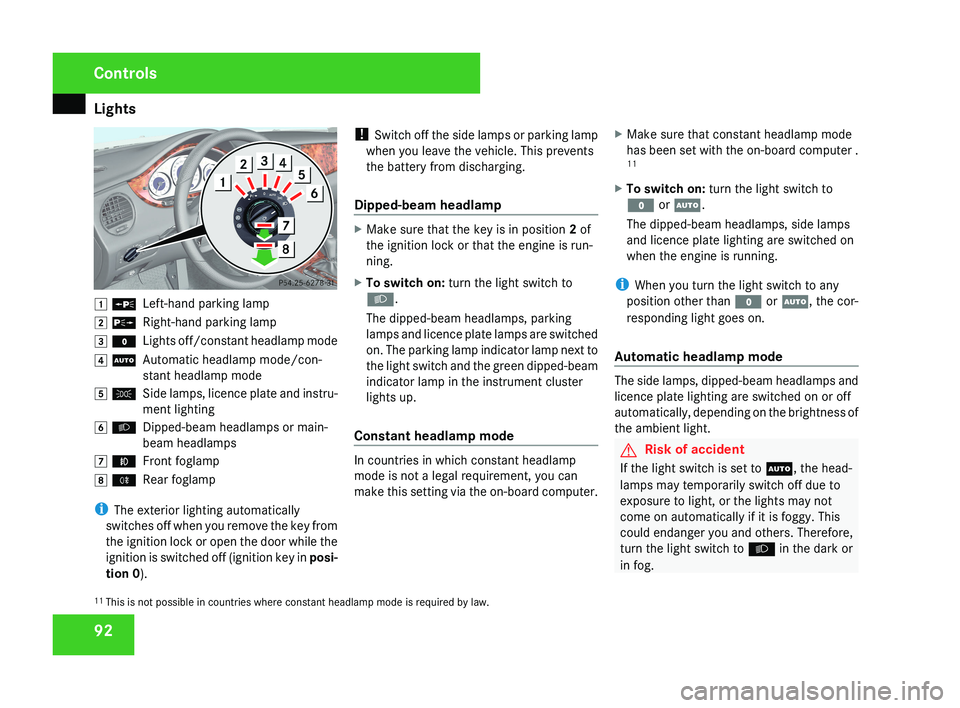
92$ a
Left-hand parking lamp
% g Right-hand parking lamp
& M Lights off/constant headlamp mode
( U Automatic headlamp mode/con-
stant headlamp mode
) C Side lamps, licence plate and instru-
ment lighting
* B Dipped-beam headlamps or main-
beam headlamps
, ¥ Front foglamp
. † Rear foglamp
i The exterior lighting automatically
switches off when you remove the key from
the ignition lock or open the door while the
ignition is switched off (ignition key in posi-
tion 0 ). !
Switch off the side lamps or parking lamp
when you leave the vehicle. This prevents
the battery from discharging.
Dipped-beam headlamp
X Make sure that the key is in position 2 of
the ignition lock or that the engine is run-
ning.
X To switch on: turn the light switch to
B.
The dipped-beam headlamps, parking
lamps and licence plate lamps are switched
on. The parking lamp indicator lamp next to
the light switch and the green dipped-beam
indicator lamp in the instrument cluster
lights up.
Constant headlamp mode
In countries in which constant headlamp
mode is not a legal requirement, you can
make this setting via the on-board computer. X
Make sure that constant headlamp mode
has been set with the on-board computer .
11
X To switch on: turn the light switch to
M or U.
The dipped-beam headlamps, side lamps
and licence plate lighting are switched on
when the engine is running.
i When you turn the light switch to any
position other than M or U, the cor-
responding light goes on.
Automatic headlamp mode
The side lamps, dipped-beam headlamps and
licence plate lighting are switched on or off
automatically, depending on the brightness of
the ambient light.
G Risk of accident
If the light switch is set to U, the head-
lamps may temporarily switch off due to
exposure to light, or the lights may not
come on automatically if it is foggy. This
could endanger you and others. Therefore,
turn the light switch to B in the dark or
in fog.
11 This is not possible in countries where constant headlamp mode is required by law.
Controls
219_AKB; 2; 4, en-GB
mkalafa,
2007-11-13T09:28:36+01:00 - Seite 92
Page 103 of 329
Side windows
100
If a side window locks up again during closing
and has reopened again slightly:
X
Immediately after the window locks up, pull
the switch upwards until the window is fully
closed.
The side window is closed without the anti-
entrapment feature. Resetting the windows
Each side window must be reset if the battery
was disconnected or discharged.
X Make sure that the key is in position 2 in
the ignition lock.
X Pull the switch upwards until the window is
closed, and hold it in this position for
another second. Summer opening
You can ventilate the vehicle before a journey.
To do this, you can use the key to simultane-
ously:
R open the side windows
R open the sliding/tilting sunroof*
R Switch on the seat ventilation*
i The "Summer opening" feature can only
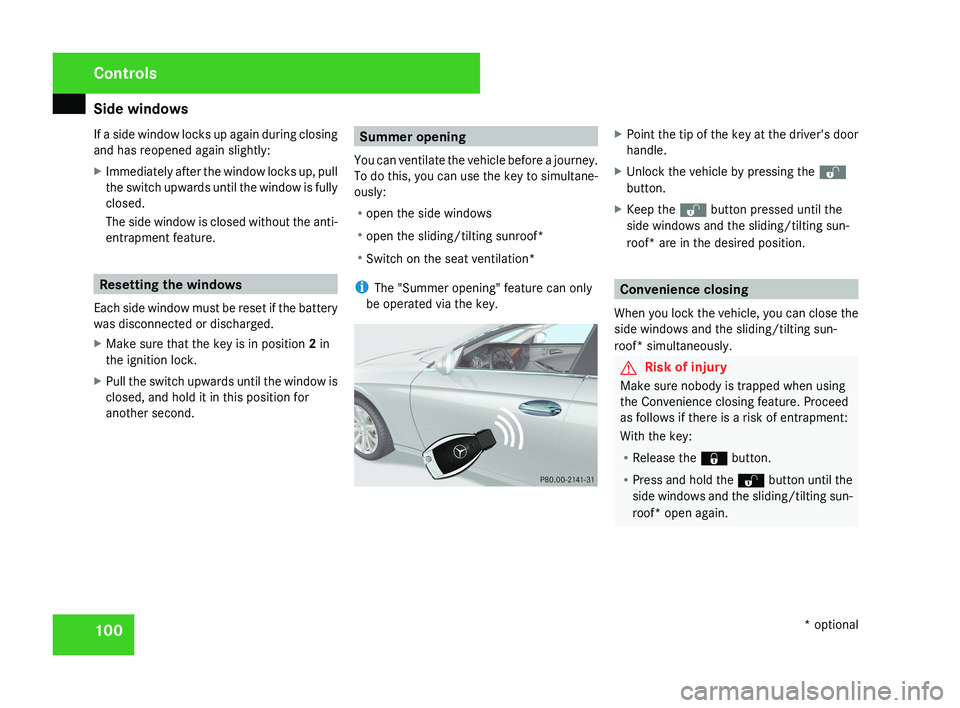
be operated via the key.X Point the tip of the key at the driver's door
handle.
X Unlock the vehicle by pressing the k
button.
X Keep the k button pressed until the
side windows and the sliding/tilting sun-
roof* are in the desired position.
Convenience closing
When you lock the vehicle, you can close the
side windows and the sliding/tilting sun-
roof* simultaneously.
G Risk of injury
Make sure nobody is trapped when using
the Convenience closing feature. Proceed
as follows if there is a risk of entrapment:
With the key:
R Release the j button.
R Press and hold the k button until the
side windows and the sliding/tilting sun-
roof* open again.
Controls
* optional
219_AKB; 2; 4, en-GB
mkalafa,
2007-11-13T09:28:36+01:00 - Seite 100
Page 167 of 329
Air conditioning
164 Windows misted up
Windows misted up on the inside X
Activate the "cooling function with air-
dehumidification" function.
X Activate the automatic mode.
X If the windows continue to mist up, activate
the "demisting" function.
Windows misted up on the outside X
Activate the windscreen wipers.
X 2-zone Thermatic: press and hold the
© or ª button until the a, Ú
or Y symbol is shown in the display.
X 4-zone Thermotronic*: turn the thumb-
wheel for air distribution to the Y or
a symbol.
i You should only select this setting until
the windscreen is clear again. Switching the rear window heating
on/off
G
Risk of accident
Clear all windows of ice or snow before set-
ting off. Impaired visibility could otherwise
endanger yourself and others.
i At very low temperatures, the rear win-
dow heating is only switched on once the
vehicle interior has warmed up.
i The rear window heating has a high cur-
rent draw. You should therefore switch it
off
as soon as the window is clear, as it only
switches itself off automatically after
between six and twenty minutes.
i If the battery voltage is too low, the rear
window heating may switch off.
X Make sure that the key is in position 2 in
the ignition lock.
X Press the ¯ button.
The
indicator lamp in the ¯ switch lights
up or goes out. Activating/deactivating air-recircula-
tion mode
You can deactivate the flow of fresh air if
unpleasant odours are entering the vehicle
from outside. The air already inside the vehi-
cle will then be recirculated. G
Risk of accident
Only switch over to air-recirculation mode
briefly
at low outside temperatures. Other-
wise, the windows could mist up, thus
impairing visibility and endangering your-
self and others. This may prevent you from
observing the traffic conditions, thereby
causing an accident.
X To activate: press the , button.
The indicator lamp in the , button
comes on.
i Air-recirculation mode is activated auto-
matically at high outside temperatures.
When air-recirculation mode is activated
automatically, the indicator lamp in
the , button is not lit.
Outside air is added after about 30
minutes. Controls
* optional
219_AKB; 2; 4, en-GB
mkalafa,
2007-11-13T09:28:36+01:00 - Seite 164
Page 170 of 329
Air conditioning
167
Activating the auxiliary heating/ventila-
tion
If the key is in position 1 or 2:
X
Press and hold button 1 for at least two
seconds.
The red or blue indicator lamp in the button
lights up.
If the key is removed or in position 0:
X Briefly press button 1.
The red or blue indicator lamp in the button
lights up.
Deactivating the auxiliary heating/venti-
lation
X Briefly press button 1.
The red or blue indicator lamp in the button
goes out.
Remote control
Your vehicle comes with one remote control.
You may use two additional remote controls
for your vehicle. For further information, con-
sult a qualified specialist workshop, e.g. a
Mercedes-Benz Service Centre. The remote control has a maximum range of
approximately 300 metres. This range may be
reduced by:
R
sources of radio interference
R solid objects between the remote control
and the vehicle
R the remote control being in an unfavoura-
ble position in relation to the vehicle
R transmitting from an enclosed space
i The optimum range can be achieved if you
hold the remote control vertically, pointing
upwards when you press one of the but-
tons.
i A battery symbol appears in the display
when the batteries in the remote control
are low. Replace the remote control bat-
teries (Y page 270).
i More information about the auxiliary
heating can be found in the "Practical
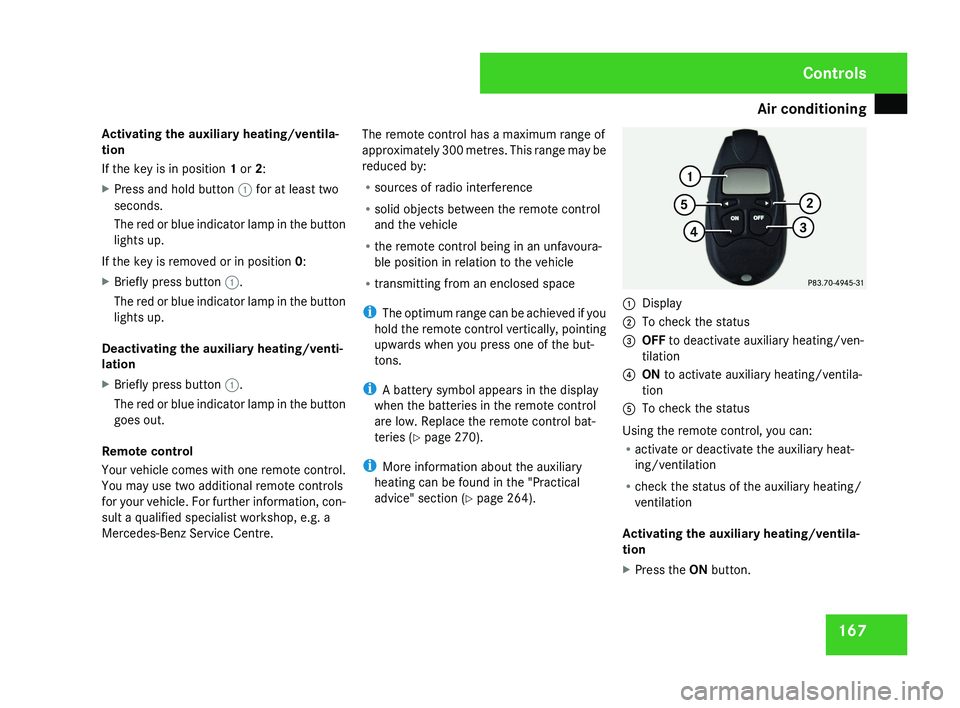
advice" section ( Y page 264).1
Display
2 To check the status
3 OFF to deactivate auxiliary heating/ven-
tilation
4 ON to activate auxiliary heating/ventila-
tion
5 To check the status
Using the remote control, you can:
R activate or deactivate the auxiliary heat-
ing/ventilation
R check the status of the auxiliary heating/
ventilation
Activating the auxiliary heating/ventila-
tion
X Press the ON button.
Controls
219_AKB; 2; 4, en-GB
mkalafa,
2007-11-13T09:28:36+01:00 - Seite 167
Page 174 of 329

Sliding sunroof
171
Lowering and closing X
To lower manually: pull the switch in the
direction of arrow 2 and hold it until the
sliding/tilting
sunroof is in the desired posi-
tion.
X To lower fully: pull the switch briefly
beyond the pressure point in the direction
of arrow 2 and release it.
X To stop: push or pull the switch in any
direction.
Rain closing feature The sliding/tilting sunroof closes automati-
cally:
R
if it starts to rain
R at extreme outside temperatures
R after 12 hours
R if
there is a malfunction in the power supply
The rear of the sliding/tilting sunroof is then
raised in order to ventilate the interior of the
vehicle.
i The sliding/tilting sunroof is opened
slightly again if it is obstructed while being
closed by the rain closing feature. The rain
closing feature is then deactivated. i
The
sliding/tilting sunroof does not close
if:
R it is raised at the rear
R it is blocked
R no rain is falling on the windscreen (e.g.
because the vehicle is under a bridge or
in a carport)
Opening and closing the cover The cover functions as a sunblind. When you
open the sliding/tilting sunroof, the cover
moves back with it.
When the sliding/tilting sunroof is closed or
raised at the rear, you can open or close the
cover manually.
Resetting the sliding/tilting sunroof
Reset the sliding/tilting sunroof if it does not
move smoothly, or if the battery was discon-
nected or flat:
X
Remove the fuse for the sliding/tilting sun-
roof in the main fuse box (Y page 296).
X Reinsert the fuse.
X Make sure that the key is in position 2 in
the ignition lock. X
Press the switch in the direction of
arrow 3
and hold it until the sliding/tilting
sunroof is fully raised at the rear.
X Keep the switch pressed for an additional
second.
X Make sure that the sliding/tilting sunroof
can be opened or closed fully again
(Y page 170).
X If this is not the case, consult a qualified
specialist workshop. Controls
219_AKB; 2; 4, en-GB
mkalafa,
2007-11-13T09:28:36+01:00 - Seite 171
Page 187 of 329
Features
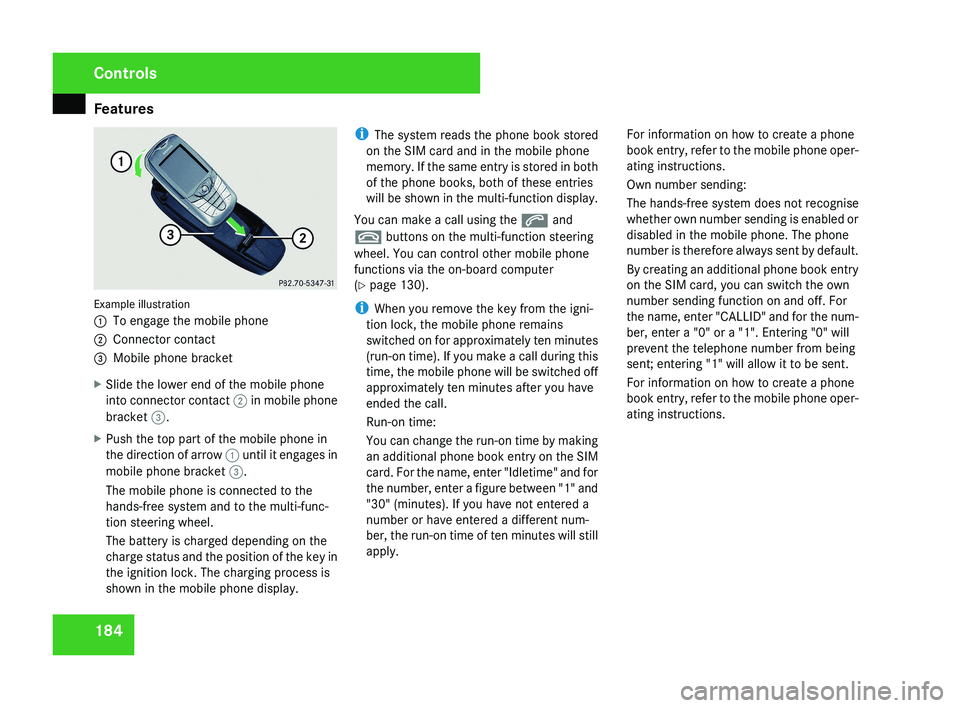
184Example illustration
1
To engage the mobile phone
2 Connector contact
3 Mobile phone bracket
X Slide the lower end of the mobile phone
into connector contact 2 in mobile phone
bracket 3.
X Push the top part of the mobile phone in
the direction of arrow 1 until it engages in
mobile phone bracket 3.
The mobile phone is connected to the
hands-free system and to the multi-func-
tion steering wheel.
The battery is charged depending on the
charge status and the position of the key in
the ignition lock. The charging process is
shown in the mobile phone display. i
The system reads the phone book stored
on the SIM card and in the mobile phone
memory. If the same entry is stored in both
of the phone books, both of these entries
will be shown in the multi-function display.
You can make a call using the s and
t buttons on the multi-function steering
wheel. You can control other mobile phone
functions via the on-board computer
(Y page 130).
i When you remove the key from the igni-
tion lock, the mobile phone remains
switched on for approximately ten minutes
(run-on time). If you make a call during this
time, the mobile phone will be switched off
approximately ten minutes after you have
ended the call.
Run-on time:
You can change the run-on time by making
an additional phone book entry on the SIM
card. For the name, enter "Idletime" and for
the number, enter a figure between "1" and
"30" (minutes). If you have not entered a
number or have entered a different num-
ber, the run-on time of ten minutes will still
apply. For information on how to create a phone
book entry, refer to the mobile phone oper-
ating instructions.
Own number sending:
The hands-free system does not recognise
whether own number sending is enabled or
disabled in the mobile phone. The phone
number is therefore always sent by default.
By creating an additional phone book entry
on the SIM card, you can switch the own
number sending function on and off. For
the name, enter "CALLID" and for the num-
ber, enter a "0" or a "1". Entering "0" will
prevent the telephone number from being
sent; entering "1" will allow it to be sent.
For information on how to create a phone
book entry, refer to the mobile phone oper-
ating instructions.
Controls
219_AKB; 2; 4, en-GB
mkalafa,
2007-11-13T09:28:36+01:00 - Seite 184