2008 MERCEDES-BENZ CLS COUPE ignition
[x] Cancel search: ignitionPage 64 of 329
Anti-theft systems
61Anti-theft systems
Immobiliser
The immobiliser prevents your vehicle from
being started without the correct key.
Activating the immobiliser X
With the key: remove the key from the
ignition lock.
X With KEYLESS GO*: press the KEYLESS
GO button on the selector lever.
The engine switches off.
Deactivating the immobiliser X
With the key: turn the key to position 2 in
the ignition lock.
X With KEYLESS GO*: press the KEYLESS
GO button on the selector lever twice with-
out depressing the brake.
i The immobiliser is always deactivated
when you start the engine. ATA* (anti-theft alarm system)
A visual and audible alarm is triggered if the
alarm system is primed and you open:
R a door
R a door using the emergency key element
R the boot lid
R the bonnet
The alarm is not switched off even if you close
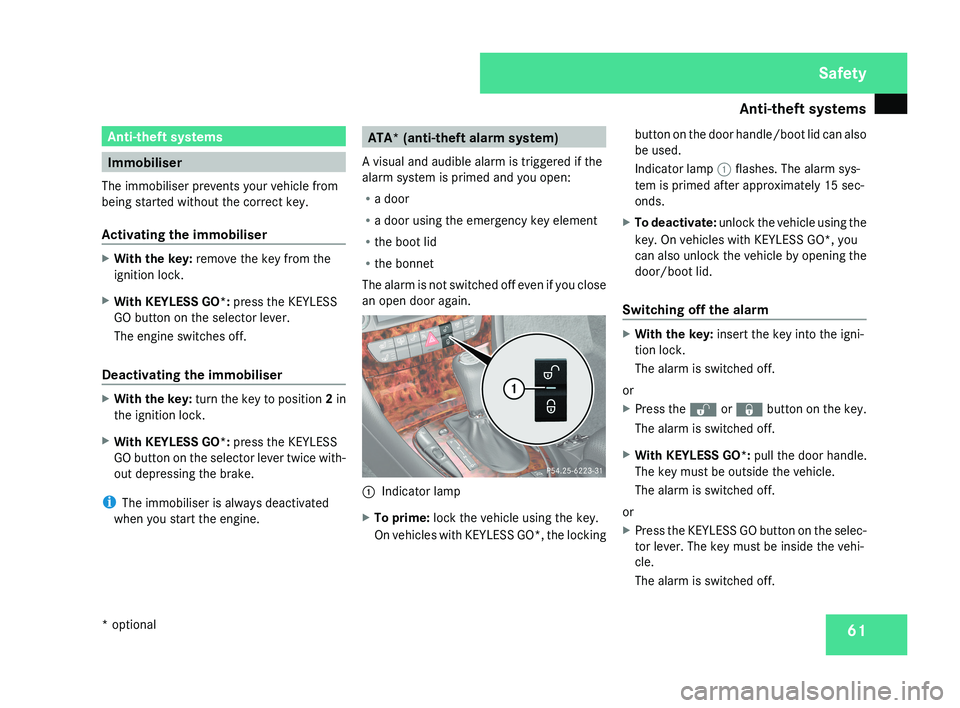
an open door again. 1
Indicator lamp
X To prime: lock the vehicle using the key.
On vehicles with KEYLESS GO*, the locking button on the door handle/boot lid can also
be used.
Indicator lamp 1 flashes. The alarm sys-
tem is primed after approximately 15 sec-
onds.
X To deactivate: unlock the vehicle using the
key. On vehicles with KEYLESS GO*, you
can also unlock the vehicle by opening the
door/boot lid.
Switching off the alarm X
With the key: insert the key into the igni-
tion lock.
The alarm is switched off.
or
X Press the Œ or ‹ button on the key.
The alarm is switched off.
X With KEYLESS GO*: pull the door handle.
The key must be outside the vehicle.
The alarm is switched off.
or
X Press the KEYLESS GO button on the selec-
tor lever. The key must be inside the vehi-
cle.
The alarm is switched off. Safety
* optional
219_AKB; 2; 4, en-GB
mkalafa,
2007-11-13T09:28:36+01:00 - Seite 61
Page 65 of 329
Anti-theft systems
62 Tow-away protection*
An audible and visual alarm is triggered if your
vehicle's angle of inclination is altered while
tow-away protection is primed. This happens
if the vehicle is jacked up on one side, for
example.
Priming tow-away protection X
Lock the vehicle using the key. On vehicles
with KEYLESS GO*, the locking button on
the door handle/boot lid can also be used.
Tow-away protection is primed after
approximately 30 seconds.
To deactivate tow-away protection When you unlock your vehicle using the key
or KEYLESS GO*, tow-away protection is
automatically deactivated.
Deactivate tow-away protection manually to
prevent a false alarm if your vehicle:
R
is being transported
R is being loaded, e.g. onto a ferry or car
transporter
R is being parked on a movable surface, e.g.
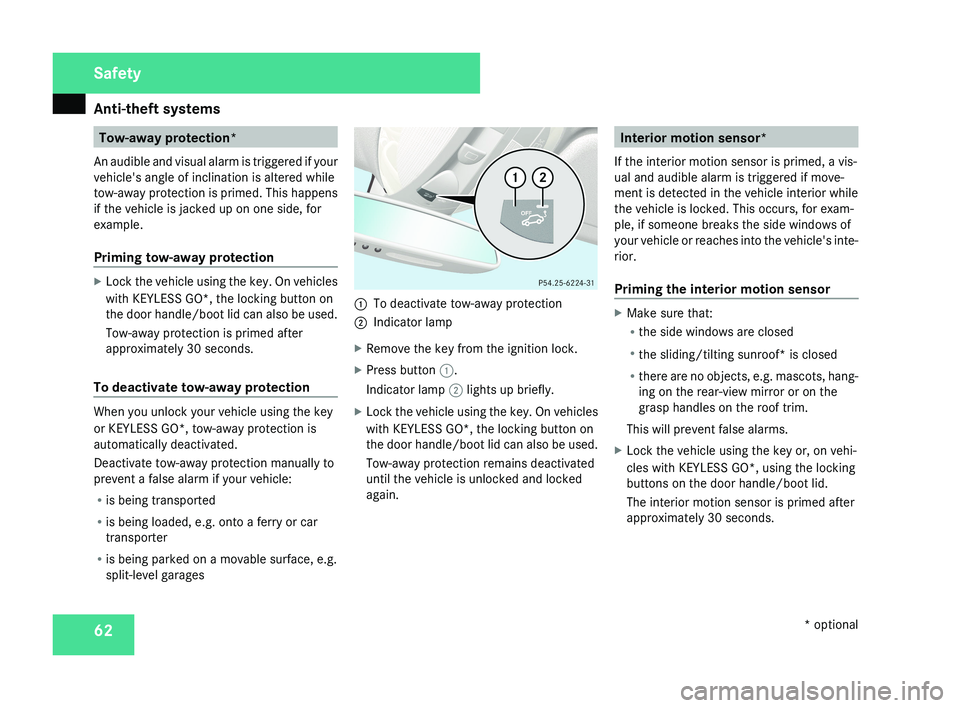
split-level garages 1
To deactivate tow-away protection
2 Indicator lamp
X Remove the key from the ignition lock.
X Press button 1.
Indicator lamp 2 lights up briefly.
X Lock the vehicle using the key. On vehicles
with KEYLESS GO*, the locking button on
the door handle/boot lid can also be used.
Tow-away protection remains deactivated
until the vehicle is unlocked and locked
again. Interior motion sensor*
If the interior motion sensor is primed, a vis-
ual and audible alarm is triggered if move-
ment is detected in the vehicle interior while
the vehicle is locked. This occurs, for exam-
ple, if someone breaks the side windows of
your vehicle or reaches into the vehicle's inte-
rior.
Priming the interior motion sensor X
Make sure that:
R
the side windows are closed
R the sliding/tilting sunroof* is closed
R there are no objects, e.g. mascots, hang-
ing on the rear-view mirror or on the
grasp handles on the roof trim.
This will prevent false alarms.
X Lock the vehicle using the key or, on vehi-
cles with KEYLESS GO*, using the locking
buttons on the door handle/boot lid.
The interior motion sensor is primed after
approximately 30 seconds. Safety
* optional
219_AKB; 2; 4, en-GB
mkalafa,
2007-11-13T09:28:36+01:00 - Seite 62
Page 66 of 329
Anti-theft systems
63
To deactivate the interior motion sen-
sor To prevent a false alarm, deactivate the inte-
rior motion sensor if you lock your vehicle and
R
people or animals remain in the vehicle
R the windows remain open
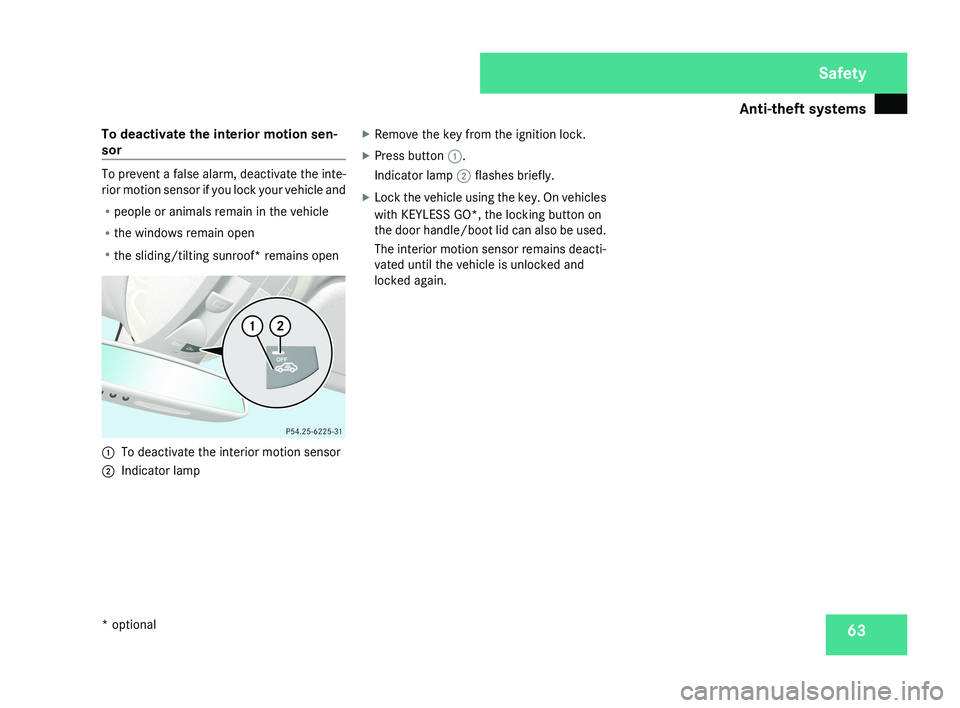
R the sliding/tilting sunroof* remains open 1
To deactivate the interior motion sensor
2 Indicator lamp X
Remove the key from the ignition lock.
X Press button 1.
Indicator lamp 2 flashes briefly.
X Lock the vehicle using the key. On vehicles
with KEYLESS GO*, the locking button on
the door handle/boot lid can also be used.
The interior motion sensor remains deacti-
vated until the vehicle is unlocked and
locked again. Safety
* optional
219_AKB; 2; 4, en-GB
mkalafa,
2007-11-13T09:28:36+01:00 - Seite 63
Page 72 of 329
Opening and closing
69
approximately six seconds until the battery
check lamp flashes twice.
The KEYLESS GO key will now function as fol-
lows:
X To unlock the driver's door: pull the door
handle on the driver's door.
X To unlock centrally: pull the door handle
on the front-passenger door or on the rear
doors.
X To lock centrally: press locking button
1 on the door handle.
Restoring the factory settings X
Press the k and j buttons simulta-
neously for approximately six seconds until
the battery check lamp flashes twice.
Locking from the boot* On vehicles with KEYLESS GO* and remote
boot lid closing*, you can close the boot lid
automatically and thereby centrally lock your
vehicle (
Y page 73). Opening the doors from the inside
You can open a door from the inside at any
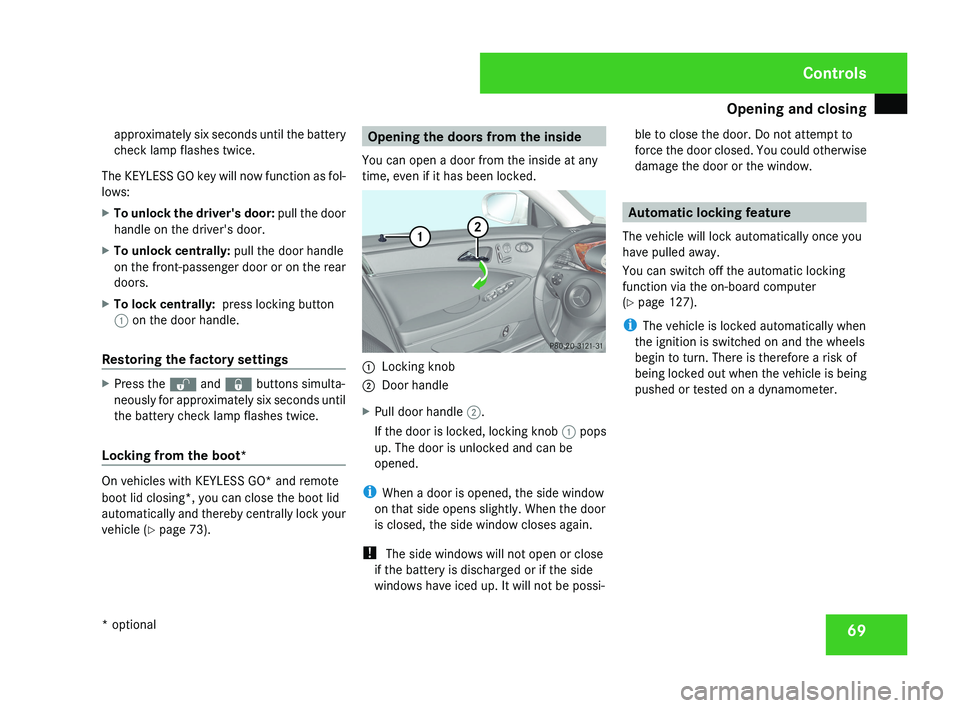
time, even if it has been locked. 1
Locking knob
2 Door handle
X Pull door handle 2.
If the door is locked, locking knob 1 pops
up. The door is unlocked and can be
opened.
i When a door is opened, the side window
on that side opens slightly. When the door
is closed, the side window closes again.
! The side windows will not open or close
if the battery is discharged or if the side
windows have iced up. It will not be possi- ble to close the door. Do not attempt to
force the door closed. You could otherwise
damage the door or the window. Automatic locking feature
The vehicle will lock automatically once you
have pulled away.
You can switch off the automatic locking
function via the on-board computer
(Y page 127).
i The vehicle is locked automatically when
the ignition is switched on and the wheels
begin to turn. There is therefore a risk of
being locked out when the vehicle is being
pushed or tested on a dynamometer. Controls
* optional
219_AKB; 2; 4, en-GB
mkalafa,
2007-11-13T09:28:36+01:00 - Seite 69
Page 77 of 329
Key positions
74 Key positions
KeyIgnition lock
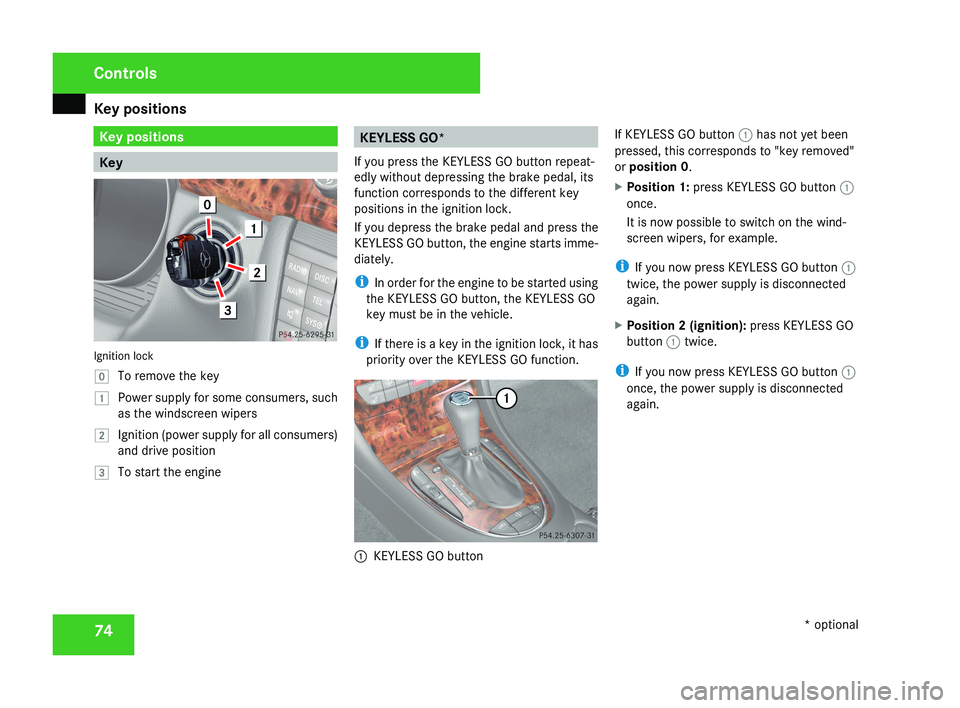
}
To remove the key
$ Power supply for some consumers, such
as the windscreen wipers
% Ignition (power supply for all consumers)
and drive position
& To start the engine
KEYLESS GO*
If you press the KEYLESS GO button repeat-
edly without depressing the brake pedal, its
function corresponds to the different key
positions in the ignition lock.
If you depress the brake pedal and press the
KEYLESS GO button, the engine starts imme-
diately.
i In order for the engine to be started using
the KEYLESS GO button, the KEYLESS GO
key must be in the vehicle.
i If there is a key in the ignition lock, it has
priority over the KEYLESS GO function.
1 KEYLESS GO button If KEYLESS GO button
1 has not yet been
pressed, this corresponds to "key removed"
or position 0 .
X Position 1: press KEYLESS GO button 1
once.
It is now possible to switch on the wind-
screen wipers, for example.
i If you now press KEYLESS GO button 1
twice, the power supply is disconnected
again.
X Position 2 (ignition): press KEYLESS GO
button 1 twice.
i If you now press KEYLESS GO button 1
once, the power supply is disconnected
again.
Controls
* optional
219_AKB; 2; 4, en-GB
mkalafa,
2007-11-13T09:28:36+01:00 - Seite 74
Page 78 of 329
Seats
75Seats
Depending on the vehicle's equipment, seat
adjustments can be made either manually/
electrically or electrically*. G
Risk of injury
The seats can still be adjusted when there
is no key in the ignition lock. For this rea-
son, children should never be left unsuper-
vised in the vehicle. They could become
trapped by a seat adjustment movement. G
Risk of accident
Only adjust the driver's seat when the vehi-
cle is stationary. You will otherwise be dis-
tracted from the road and traffic conditions
and you could lose control of the vehicle as
a result of the seat moving. This could
cause an accident. G
Risk of injury
Make sure that nobody can become trap-
ped as you adjust the seat.
Observe the notes concerning the airbag
system.
Secure children as recommended; see the
"Children in the vehicle" section. !
When you move the seats, make sure that
there are no objects in the footwell or
behind the seats. Otherwise, you could
damage the seats and the objects.
i The head restraints in the front seats are
fitted with the NECK-PRO system
(Y page 49). For this reason, it is not pos-
sible to remove the head restraints from
the front seats.
For design reasons, the rear-compartment
head restraints cannot be removed.
Please contact a Mercedes-Benz Service
Centre for more information. Adjusting the seats manually and
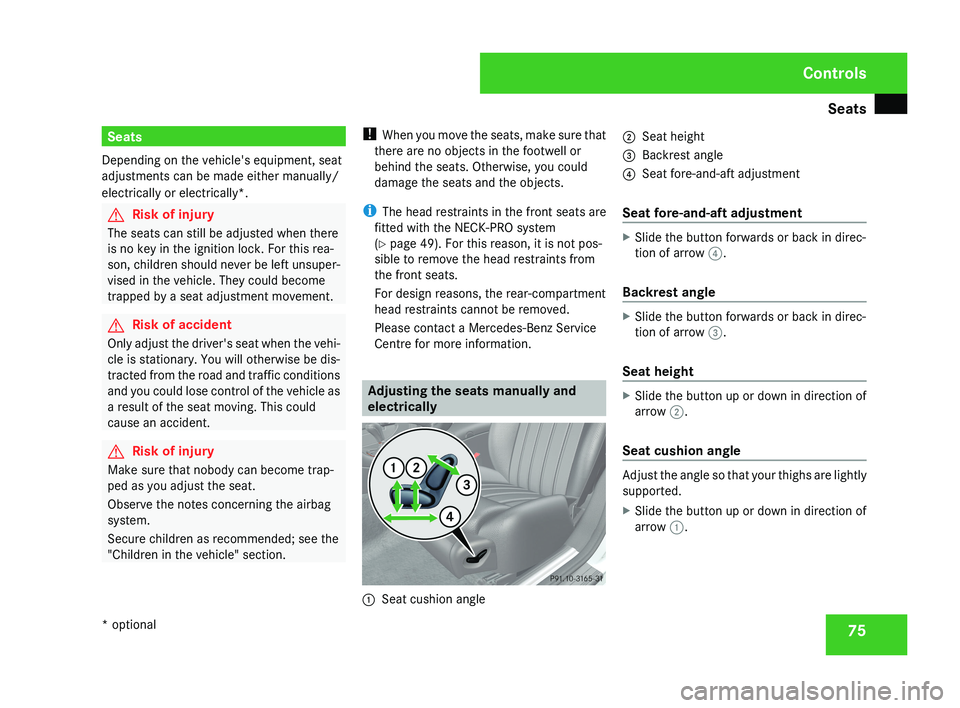
electrically1
Seat cushion angle 2
Seat height
3 Backrest angle
4 Seat fore-and-aft adjustment
Seat fore-and-aft adjustment
X Slide the button forwards or back in direc-
tion of arrow 4.
Backrest angle
X Slide the button forwards or back in direc-
tion of arrow 3.
Seat height
X Slide the button up or down in direction of
arrow 2.
Seat cushion angle
Adjust the angle so that your thighs are lightly
supported.
X Slide the button up or down in direction of
arrow 1.
Controls
* optional
219_AKB; 2; 4, en-GB
mkalafa,
2007-11-13T09:28:36+01:00 - Seite 75
Page 82 of 329
Seats
79
Folding back the head restraints from
the front
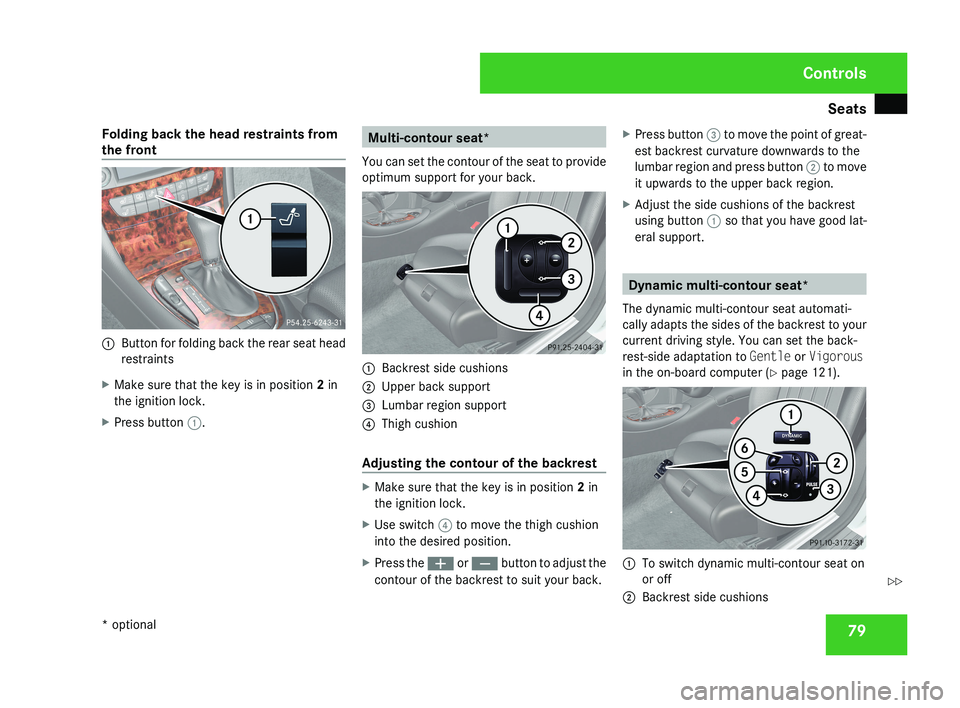
1
Button for folding back the rear seat head
restraints
X Make sure that the key is in position 2 in
the ignition lock.
X Press button 1. Multi-contour seat*
You can set the contour of the seat to provide
optimum support for your back. 1
Backrest side cushions
2 Upper back support
3 Lumbar region support
4 Thigh cushion
Adjusting the contour of the backrest X
Make sure that the key is in position 2 in
the ignition lock.
X Use switch 4 to move the thigh cushion
into the desired position.
X Press the æ or ç button to adjust the
contour of the backrest to suit your back. X
Press button 3 to move the point of great-
est backrest curvature downwards to the
lumbar region and press button 2 to move
it upwards to the upper back region.
X Adjust the side cushions of the backrest
using button 1 so that you have good lat-
eral support. Dynamic multi-contour seat*
The dynamic multi-contour seat automati-
cally adapts the sides of the backrest to your
current driving style. You can set the back-
rest-side adaptation to Gentle or Vigorous
in the on-board computer (Y page 121). 1
To switch dynamic multi-contour seat on
or off
2 Backrest side cushions Controls
* optional
219_AKB; 2; 4, en-GB
mkalafa,
2007-11-13T09:28:36+01:00 - Seite 79 Z
Page 83 of 329
Seats
80
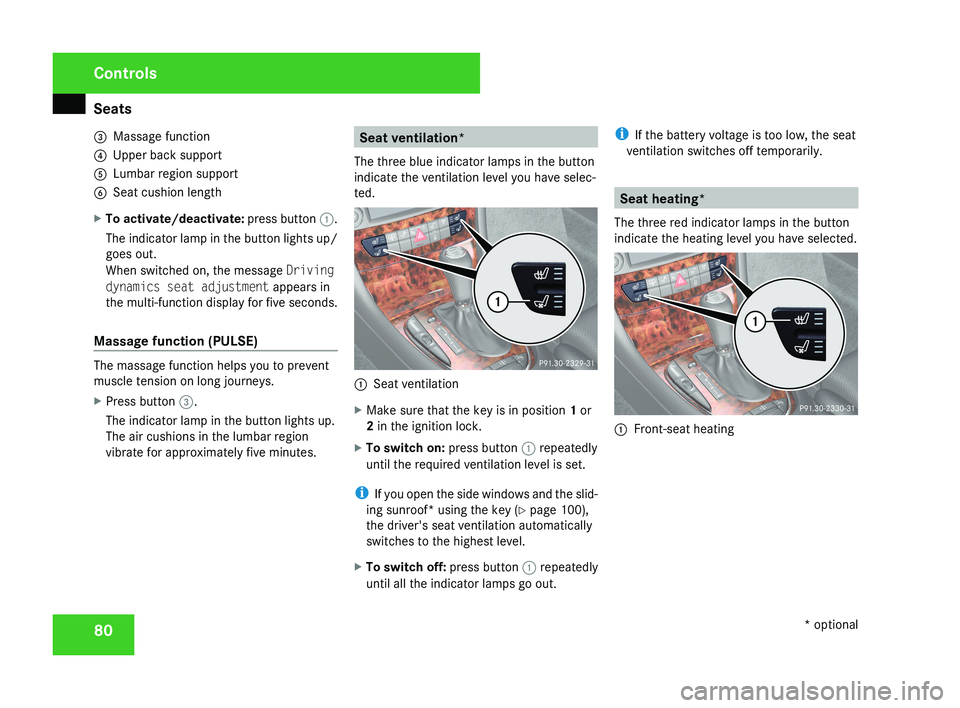
3
Massage function
4 Upper back support
5 Lumbar region support
6 Seat cushion length
X To activate/deactivate: press button 1.
The indicator lamp in the button lights up/
goes out.
When switched on, the message Driving
dynamics seat adjustment appears in
the multi-function display for five seconds.
Massage function (PULSE) The massage function helps you to prevent
muscle tension on long journeys.
X
Press button 3.
The indicator lamp in the button lights up.
The air cushions in the lumbar region
vibrate for approximately five minutes. Seat ventilation*
The three blue indicator lamps in the button
indicate the ventilation level you have selec-
ted. 1
Seat ventilation
X Make sure that the key is in position 1 or
2 in the ignition lock.
X To switch on: press button 1 repeatedly
until the required ventilation level is set.
i If you open the side windows and the slid-
ing sunroof* using the key ( Y page 100),
the driver's seat ventilation automatically
switches to the highest level.
X To switch off: press button 1 repeatedly
until all the indicator lamps go out. i
If the battery voltage is too low, the seat
ventilation switches off temporarily. Seat heating*
The three red indicator lamps in the button
indicate the heating level you have selected. 1
Front-seat heating Controls
* optional
219_AKB; 2; 4, en-GB
mkalafa,
2007-11-13T09:28:36+01:00 - Seite 80