2008 MERCEDES-BENZ CLS COUPE ignition
[x] Cancel search: ignitionPage 107 of 329
Transmission
104
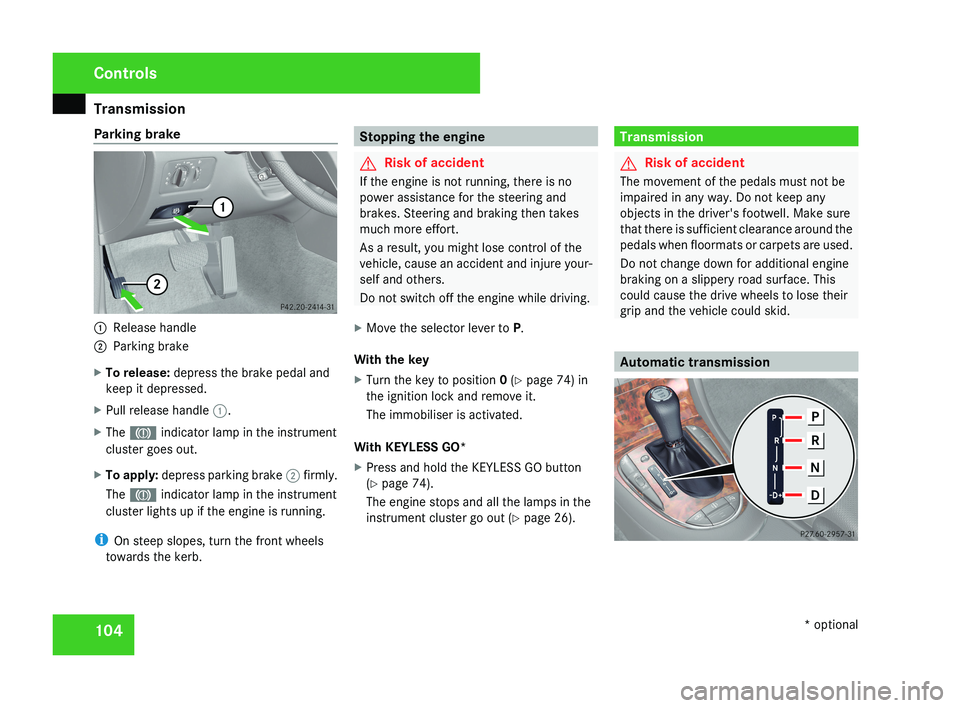
Parking brake
1
Release handle
2 Parking brake
X To release: depress the brake pedal and
keep it depressed.
X Pull release handle 1.
X The 3 indicator lamp in the instrument
cluster goes out.
X To apply: depress parking brake 2 firmly.
The 3 indicator lamp in the instrument
cluster lights up if the engine is running.
i On steep slopes, turn the front wheels
towards the kerb. Stopping the engine
G
Risk of accident
If the engine is not running, there is no
power assistance for the steering and
brakes. Steering and braking then takes
much more effort.
As a result, you might lose control of the
vehicle, cause an accident and injure your-
self and others.
Do not switch off the engine while driving.
X Move the selector lever to P.
With the key
X Turn the key to position 0 (Y page 74) in
the ignition lock and remove it.
The immobiliser is activated.
With KEYLESS GO*
X Press and hold the KEYLESS GO button
(Y page 74).
The engine stops and all the lamps in the
instrument cluster go out ( Y page 26). Transmission
G
Risk of accident
The movement of the pedals must not be
impaired in any way. Do not keep any
objects in the driver's footwell. Make sure
that there is sufficient clearance around the
pedals when floormats or carpets are used.
Do not change down for additional engine
braking on a slippery road surface. This
could cause the drive wheels to lose their
grip and the vehicle could skid. Automatic transmissionControls
* optional
219_AKB; 2; 4, en-GB
mkalafa,
2007-11-13T09:28:36+01:00 - Seite 104
Page 108 of 329
Transmission
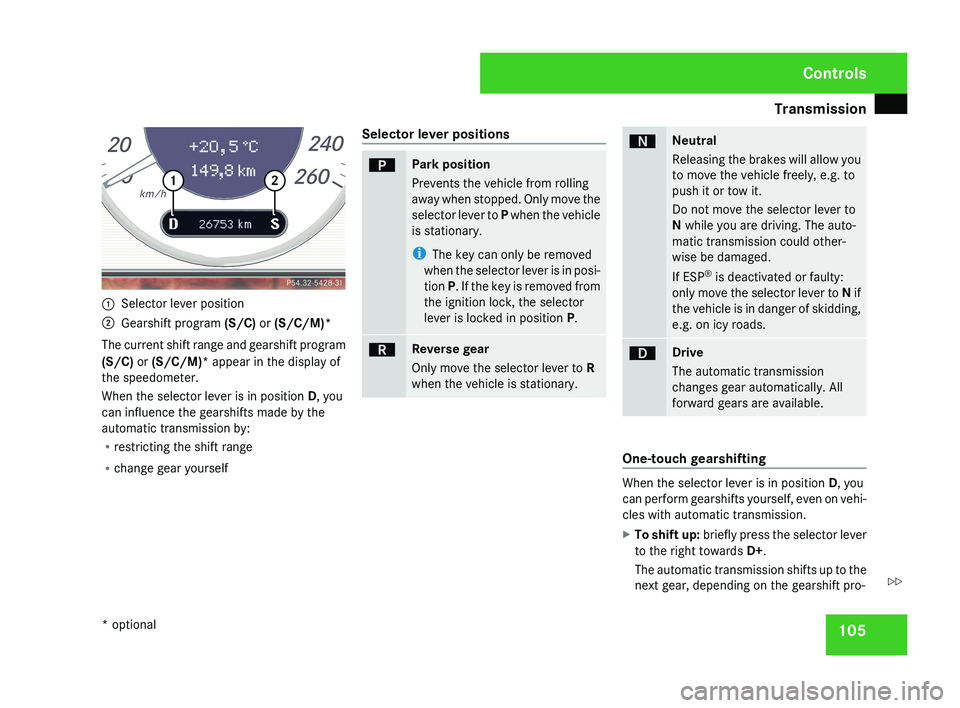
1051
Selector lever position
2 Gearshift program (S/C) or (S/C/M)*
The current shift range and gearshift program
(S/C) or (S/C/M)* appear in the display of
the speedometer.
When the selector lever is in position D, you
can influence the gearshifts made by the
automatic transmission by:
R restricting the shift range
R change gear yourself Selector lever positions
ìPark position
Prevents the vehicle from rolling
away when stopped. Only move the
selector lever to
P when the vehicle
is stationary.
i The key can only be removed
when the selector lever is in posi-
tion P. If the key is removed from
the ignition lock, the selector
lever is locked in position P.
íReverse gear
Only move the selector lever to R
when the vehicle is stationary.
ëNeutral
Releasing the brakes will allow you
to move the vehicle freely, e.g. to
push it or tow it.
Do not move the selector lever to
N while you are driving. The auto-
matic transmission could other-
wise be damaged.
If ESP®
is deactivated or faulty:
only move the selector lever to N if
the vehicle is in danger of skidding,
e.g. on icy roads.
êDrive
The automatic transmission
changes gear automatically. All
forward gears are available.
One-touch gearshifting
When the selector lever is in position D, you
can perform gearshifts yourself, even on vehi-
cles with automatic transmission.
X To shift up: briefly press the selector lever
to the right towards D+ .
The automatic transmission shifts up to the
next gear, depending on the gearshift pro-
Controls
* optional
219_AKB; 2; 4, en-GB
mkalafa,
2007-11-13T09:28:36+01:00 - Seite 105
Z
Page 113 of 329
Instrument cluster
110 Activating the multi-function display
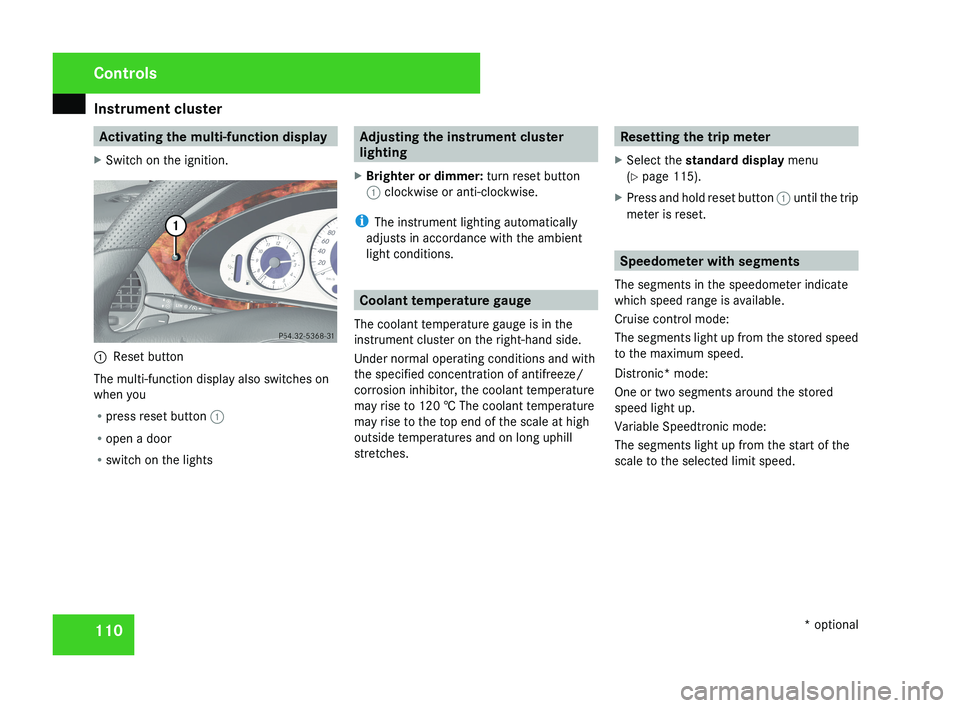
X Switch on the ignition.1 Reset button
The multi-function display also switches on
when you
R press reset button 1
R open a door
R switch on the lights
Adjusting the instrument cluster
lighting
X Brighter or dimmer: turn reset button
1 clockwise or anti-clockwise.
i The instrument lighting automatically
adjusts in accordance with the ambient
light conditions.
Coolant temperature gauge
The coolant temperature gauge is in the
instrument cluster on the right-hand side.
Under normal operating conditions and with
the specified concentration of antifreeze/
corrosion inhibitor, the coolant temperature
may rise to 120 † The coolant temperature
may rise to the top end of the scale at high
outside temperatures and on long uphill
stretches.
Resetting the trip meter
X Select the standard display menu
(Y page 115).
X Press and hold reset button 1 until the trip
meter is reset.
Speedometer with segments
The segments in the speedometer indicate
which speed range is available.
Cruise control mode:
The segments light up from the stored speed
to the maximum speed.
Distronic* mode:
One or two segments around the stored
speed light up.
Variable Speedtronic mode:
The segments light up from the start of the
scale to the selected limit speed.
Controls
* optional
219_AKB; 2; 4, en-GB
mkalafa,
2007-11-13T09:28:36+01:00 - Seite 110
Page 120 of 329

On-board computer
1171
Gear indicator
2 On-board voltage
RACETIMER
The RACETIMER allows time measurements
to be saved.
While you have the RACETIMER displayed,
you will not be able to adjust the volume using
the æ and ç buttons.
X Press the j button repeatedly until the
RACETIMER appears.
1 Gear indicator
2 RACETIMER 3
Lap
You can start the RACETIMER when the
engine is running or if the key is in position
2 in the ignition lock.
X To start: press the æ button to start the
RACETIMER.
X To display the intermediate time: press
the ç button to show the intermediate
time.
The intermediate time is displayed for five
seconds.
X To stop: press the æ button to stop the
RACETIMER.
The RACETIMER interrupts timing when you
stop the vehicle and turn the key to position
1 in the ignition lock. When you turn the key
to position 2 or 3 and then press the æ
button, timing is continued.
Storing the lap time and starting a new lap
It is possible to store a maximum of nine laps. X
Press the ç button to show the inter-
mediate time during timing.
The intermediate time is displayed for five
seconds.
X Press the ç button again within 5 sec-
onds.
The displayed intermediate time is stored
as a lap time.
Timing starts for a new lap. The new lap is
timed from when the intermediate time is
called up.
1 Gear indicator
2 RACETIMER
3 Fastest lap time (best lap)
4 Lap
Controls
219_AKB; 2; 4, en-GB
mkalafa,
2007-11-13T09:28:36+01:00 - Seite 117
Page 124 of 329
On-board computer
121Distronic* menu
You can read the current Distronic settings in
the Distronic menu. (Y page 135)
i Menu overview: see ( Y page 114).Message memory menu
Previous display messages can be called up
in
the Message memory menu. You will only
see the Message memory menu if there are
any display messages. G
Risk of accident
The on-board computer only records and
displays messages and warnings from cer-
tain systems. For this reason, you should
always make sure that your vehicle is safe
to
drive. You could otherwise cause an acci-
dent by driving an unsafe vehicle.
Switching off the ignition clears the Message
memory except for the highest priority dis-
play messages. The on-board computer will
delete these display messages only after the
reason for the message has been rectified.
i Menu overview: see ( Y page 114). Displaying messages Use the buttons on the multi-function steer-
ing wheel.
X
Press the è or · button repeatedly
until either the original menu or the Mes-
sage memory menu appears.
If the Message memory menu does not
appear, there are no display messages.
If there are messages, the following mes-
sage may appear in the multi-function dis-
play, for example: 2 messages.
X Press the j or k
button to call up a
display message.
You can scroll through the display mes-
sages in sequence. The possible display
messages are explained in the "Practical
advice" section ( Y page 219). Settings menu
There are two functions in the Settings...
menu:
the To reset: Press reset button
for 3 seconds function, which you can use
to reset most settings to the factory settings.
There are also submenus in which you can
make individual settings for your vehicle.
i Menu overview: see ( Y page 114).
Use the buttons on the multi-function steer-
ing wheel.
Resetting to factory settings For safety reasons, not all functions are reset:
permanent
Speedtronic can only be set in the
Vehicle menu. The Headlamp mode function
in the Lighting submenu is only reset if the
vehicle is stationary.
X Press the è
or · button to select the
Settings... menu.
X Press and hold the reset button on the left-
hand side of the instrument cluster for
approximately three seconds.
A
prompt appears in the multi-function dis-
play asking you to press the reset button
again to confirm. Controls
* optional
219_AKB; 2; 4, en-GB
mkalafa,
2007-11-13T09:28:36+01:00 - Seite 121 Z
Page 129 of 329
On-board computer
126
X
Press the æ or ç button to switch
the Surround lighting function on or
off.
X Press the j, è or ÿ button to
select a different display.
Setting the ambient lighting X
Press the è or · button to select the
Settings... menu.
X Press the j
button to call up the selec-
tion of submenus.
X Press the æ
or ç button to select the
Lighting submenu.
X Press the j button to select Ambient
light.
X Press the æ
or ç button to adjust the
brightness to any level from 0 (off) to 5
(bright).
X Press the j, è or ÿ button to
select a different display.
Activating or deactivating the exterior
lighting delayed switch-off You can set whether the exterior lighting
should remain on for 15 seconds after the doors are closed when it is dark using the
Headlamps delayed switch-off function.
If none of the doors are opened after the
engine
is switched off or if an open door is not
closed, the exterior lighting goes out after
60 seconds.
When you have set a delayed switch-off time
and then switch off the engine, the following
remain lit:
R the side lamps
R the tail lamps
R the licence plate lighting
R the front foglamps
R the lights* in the exterior mirrors
X Press the è
or · button to select the
Settings... menu.
X Press the j
button to call up the selec-
tion of submenus.
X Press the æ
or ç button to select the
Lighting submenu.
X Press the j
button to select Headlamps
delayed switch-off. X
Press the æ or ç button to activate
or deactivate the Headlamps delayed
switch-off feature.
X Press the j, è or ÿ button to
select a different display.
To temporarily deactivate the delayed switch-
off:
X Before leaving the vehicle, turn the key to
position 0 in the ignition lock.
X Turn the key to position 2 in the ignition
lock and back to position 0.
Delayed
switch-off is deactivated. It is reac-
tivated as soon as you start the engine
again.
Activating or deactivating the interior
lighting delayed switch-off The
Interior
lighting delayed switch-
off function allows you to set whether the
interior lighting should remain on for 10 sec-
onds after the key is removed from the igni-
tion lock when it is dark.
X Press the è
or · button to select the
Settings... menu.
X Press the j
button to call up the selec-
tion of submenus. Controls
* optional
219_AKB; 2; 4, en-GB
mkalafa,
2007-11-13T09:28:36+01:00 - Seite 126
Page 130 of 329
On-board computer
127
X
Press the æ or ç button to select the
Lighting submenu.
X Press the j button to select Interior
lighting delayed switch-off.
X Press the æ or ç button to activate
or deactivate the Interior lighting
delayed switch-off feature.
X Press the j, è or ÿ button to
select a different display.
Activating/deactivating the automatic
door locking feature The Automatic door locking feature
allows you to set whether your vehicle will
lock centrally from a speed of about
15 km/h
upwards.
i For more information on the automatic
locking feature, see ( Y page 69).
X Press the è
or · button to select the
Settings... menu.
X Press the j
button to call up the selec-
tion of submenus.
X Press the æ
or ç button to select the
Vehicle submenu. X
Press the j
button to select Automatic
door locking.
X Press the æ or ç button to switch
the Automatic door locking feature on
or off.
X Press the j, è or ÿ button to
select a different display.
Selecting the switch-on time for the
auxiliary heating* This function is only available if the vehicle
has an auxiliary heating system.
The
Auxiliary
heat. function allows you to
select three switch-on times. You can set the
exact switch-on time using the other func-
tions in the Heater submenu.
The auxiliary heating adopts the Thermatic or
4-zone Thermotronic* temperature setting.
The minimum and maximum temperature set-
tings for the auxiliary heating are 20 † and
24 † respectively.
You can switch off the auxiliary heating by
using the remote control or the auxiliary heat-
ing button on the centre console.
The auxiliary heating is switched off automat-
ically after 50 minutes. This time can be
changed. To do this, visit a qualified specialist workshop, e.g. a Mercedes-Benz Service
Centre. G
Risk of fire and poisoning
The operation of the auxiliary heating pro-
duces hot, toxic exhaust fumes. The fuel
vapours produced during refuelling could
ignite on the hot exhaust system.
Do not switch on the auxiliary heating at
filling stations or in enclosed spaces, for
instance,
a garage, if there is no air extrac-
tion system.
You could otherwise endanger yourself and
others.
The Auxiliary heat. function can be called
up directly.
X Turn the key to position 1
or 2 in the ignition
lock.
X Press the button for the auxiliary heating on
the centre console
(Y page 166).
or
X Press the è
or · button to select the
Settings... menu.
X Press the j
button to call up the selec-
tion of submenus.
X Press the æ
or ç button to select the
Heater submenu. Controls
* optional
219_AKB; 2; 4, en-GB
mkalafa,
2007-11-13T09:28:36+01:00 - Seite 127 Z
Page 131 of 329
On-board computer
128
X
Press the j button to select Auxiliary
heat..
X Press the æ or ç button to select
one of the three switch-on times or Timer
off (auxiliary heating switched off).
When
a switch-on time is selected, the yel-
low indicator lamp lights up in the auxiliary
heating button.
X Press the j, è or ÿ button to
select a different display.
Changing the switch-on time for the
auxiliary heating* This function is only displayed if you have
selected
a switch-on time. Here you can enter
the time at which the auxiliary heating is to
be switched on.
X Press the è
or · button to select the
Settings... menu.
X Press the j
button to call up the selec-
tion of submenus.
X Press the æ
or ç button to select the
Heater submenu.
X Press the j
button to select Switch-on
time X Set hours. X
Press the æ or ç button to set the
hour.
X Press the j
button to select Switch-on
time X Set minutes.
X Press the æ or ç button to set the
minutes.
After changing from one menu to another
the new time setting is stored. The yellow
indicator lamp lights up on the button for
the
auxiliary heating on the centre console.
X Press the j, è or ÿ button to
select a different display.
Activating or deactivating the easy-
entry/exit feature* i
For more information on the easy-entry/
exit feature, see ( Y page 83). G
Risk of injury
When the easy-entry/exit feature is active,
the
steering wheel moves. There is a risk of
occupants becoming trapped. Before acti-
vating the easy-entry/exit feature, make
sure that nobody can become trapped.
Do not leave children unsupervised in the
vehicle, even if they are secured in a child restraint system. The children could open
the driver's door and thereby unintention-
ally activate the easy-entry/exit feature
and become trapped.
X Press the è
or · button to select the
Settings... menu.
X Press the j
button to call up the selec-
tion of submenus.
X Press the æ
or ç button to select the
Convenience submenu.
X Press the j button to select the EASY-
ENTRY system.
X Press the æ or ç button to activate
or deactivate the EASY-ENTRY system.
X Press the j, è or ÿ button to
select a different display.
Activating or deactivating the fold-in
mirrors when locking*
function The
Fold
in mirrors when locking func-
tion allows you to determine whether the
exterior mirrors should fold in when you lock
the vehicle. When you switch on the ignition,
the exterior mirrors fold out again. Controls
* optional
219_AKB; 2; 4, en-GB
mkalafa,
2007-11-13T09:28:36+01:00 - Seite 128