2008 MERCEDES-BENZ CLS COUPE headlamp
[x] Cancel search: headlampPage 95 of 329
Lights
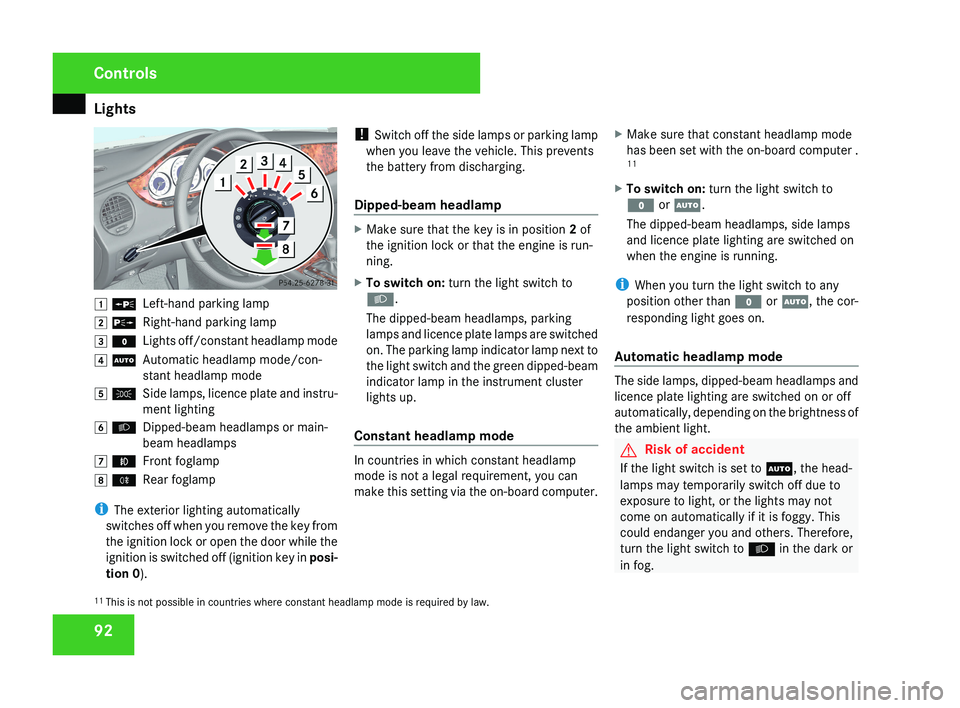
92$ a
Left-hand parking lamp
% g Right-hand parking lamp
& M Lights off/constant headlamp mode
( U Automatic headlamp mode/con-
stant headlamp mode
) C Side lamps, licence plate and instru-
ment lighting
* B Dipped-beam headlamps or main-
beam headlamps
, ¥ Front foglamp
. † Rear foglamp
i The exterior lighting automatically
switches off when you remove the key from
the ignition lock or open the door while the
ignition is switched off (ignition key in posi-
tion 0 ). !
Switch off the side lamps or parking lamp
when you leave the vehicle. This prevents
the battery from discharging.
Dipped-beam headlamp
X Make sure that the key is in position 2 of
the ignition lock or that the engine is run-
ning.
X To switch on: turn the light switch to
B.
The dipped-beam headlamps, parking
lamps and licence plate lamps are switched
on. The parking lamp indicator lamp next to
the light switch and the green dipped-beam
indicator lamp in the instrument cluster
lights up.
Constant headlamp mode
In countries in which constant headlamp
mode is not a legal requirement, you can
make this setting via the on-board computer. X
Make sure that constant headlamp mode
has been set with the on-board computer .
11
X To switch on: turn the light switch to
M or U.
The dipped-beam headlamps, side lamps
and licence plate lighting are switched on
when the engine is running.
i When you turn the light switch to any
position other than M or U, the cor-
responding light goes on.
Automatic headlamp mode
The side lamps, dipped-beam headlamps and
licence plate lighting are switched on or off
automatically, depending on the brightness of
the ambient light.
G Risk of accident
If the light switch is set to U, the head-
lamps may temporarily switch off due to
exposure to light, or the lights may not
come on automatically if it is foggy. This
could endanger you and others. Therefore,
turn the light switch to B in the dark or
in fog.
11 This is not possible in countries where constant headlamp mode is required by law.
Controls
219_AKB; 2; 4, en-GB
mkalafa,
2007-11-13T09:28:36+01:00 - Seite 92
Page 96 of 329
Lights
93The automatic headlamp feature is only an
aid.
The driver is responsible for the vehicle
lighting at all times. G
Risk of accident
When it is dark or foggy, turn the light
switch quickly from U to B. You
could otherwise cause an accident if the
headlamps were to switch off temporarily.
X To switch on: turn the light switch to
U.
The side lamps are switched on and off
automatically when the key is in position
1 in the ignition lock.
The dipped-beam headlamps, side lamps
and licence plate lighting are switched on
automatically when the engine is running.
When the dipped-beam headlamps are
switched
on, the indicator lamp next to the
light switch and the green dipped-beam
indicator lamp in the instrument cluster
light up. Front foglamps/rear foglamp G
Risk of accident
If you suspect that driving conditions will be
foggy, turn the light switch to B before
you start your journey. Otherwise, your
vehicle may not be visible and you could
therefore endanger yourself and others. G
Risk of accident
When it is dark or foggy, turn the light
switch quickly from U to B. You
could otherwise cause an accident if the
headlamps were to switch off temporarily.
i When the light switch is set to U you
cannot switch on the front or rear fog-
lamps.
X Make sure that the key is in position 2 in
the ignition lock.
X To switch on the front foglamps: turn
the
light switch to the B or C position.
X Pull the light switch out to the first stop.
The ¥ green indicator lamp next to the
light switch lights up. X
To switch on the rear foglamp: turn the
light switch to the B position.
X Pull the light switch out to the second stop.
The †
yellow indicator lamp next to the
light switch lights up.
X To switch off the front foglamps/rear
foglamp: push in the light switch to the
stop.
The
corresponding indicator lamp goes out. Controls
219_AKB; 2; 4, en-GB
mkalafa,
2007-11-13T09:28:36+01:00 - Seite 93
Page 97 of 329
Lights
94 Combination switch (turn signals,
main-beam headlamps and headlamp
flasher)
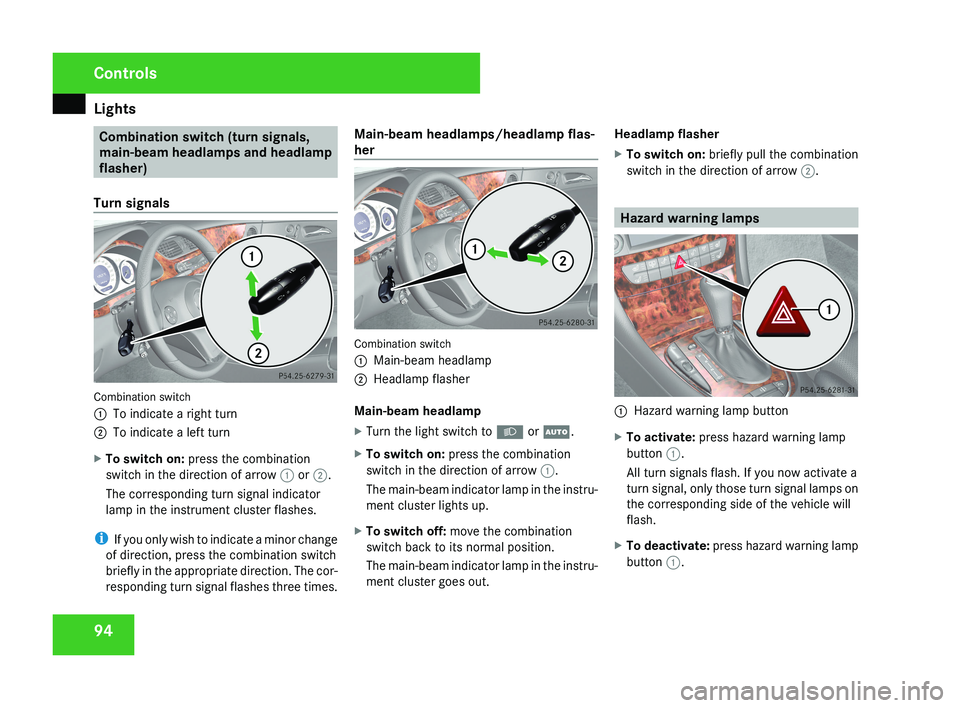
Turn signals Combination switch
1
To indicate a right turn
2 To indicate a left turn
X To switch on: press the combination
switch in the direction of arrow 1 or 2.
The corresponding turn signal indicator
lamp in the instrument cluster flashes.
i If you only wish to indicate a minor change
of direction, press the combination switch
briefly in the appropriate direction. The cor-
responding turn signal flashes three times. Main-beam headlamps/headlamp flas-
her
Combination switch
1
Main-beam headlamp
2 Headlamp flasher
Main-beam headlamp
X Turn the light switch to B or U.
X To switch on: press the combination
switch in the direction of arrow 1.
The main-beam indicator lamp in the instru-
ment cluster lights up.
X To switch off: move the combination
switch back to its normal position.
The main-beam indicator lamp in the instru-
ment cluster goes out. Headlamp flasher
X
To switch on: briefly pull the combination
switch in the direction of arrow 2. Hazard warning lamps
1
Hazard warning lamp button
X To activate: press hazard warning lamp
button 1.
All turn signals flash. If you now activate a
turn signal, only those turn signal lamps on
the corresponding side of the vehicle will
flash.
X To deactivate: press hazard warning lamp
button 1. Controls
219_AKB; 2; 4, en-GB
mkalafa,
2007-11-13T09:28:36+01:00 - Seite 94
Page 98 of 329
Lights
95Adjusting the headlamp range (vehi-
cles with halogen headlamps)
The headlamp range control allows you to
adjust the cone of light from the headlamps
according to how your vehicle is laden.
You can only adjust the headlamp range while
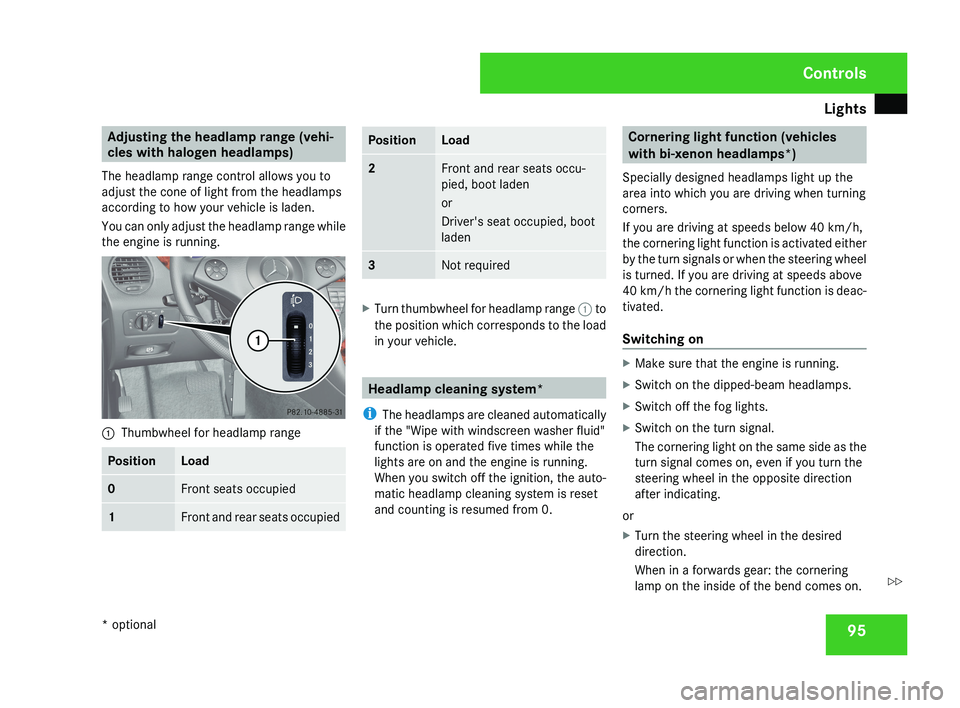
the engine is running.1 Thumbwheel for headlamp range
PositionLoad
0Front seats occupied
1Front and rear seats occupied
PositionLoad
2Front and rear seats occu-
pied, boot laden
or
Driver's seat occupied, boot
laden
3Not required
X
Turn thumbwheel for headlamp range 1 to
the position which corresponds to the load
in your vehicle.
Headlamp cleaning system*
i The headlamps are cleaned automatically
if the "Wipe with windscreen washer fluid"
function is operated five times while the
lights are on and the engine is running.
When you switch off the ignition, the auto-
matic headlamp cleaning system is reset
and counting is resumed from 0.
Cornering light function (vehicles
with bi-xenon headlamps*)
Specially designed headlamps light up the
area into which you are driving when turning
corners.
If you are driving at speeds below 40 km/h,
the cornering light function is activated either
by the turn signals or when the steering wheel
is turned. If you are driving at speeds above
40 km/h the cornering light function is deac-
tivated.
Switching on
X Make sure that the engine is running.
X Switch on the dipped-beam headlamps.
X Switch off the fog lights.
X Switch on the turn signal.
The cornering light on the same side as the
turn signal comes on, even if you turn the
steering wheel in the opposite direction
after indicating.
or
X Turn the steering wheel in the desired
direction.
When in a forwards gear: the cornering
lamp on the inside of the bend comes on.
Controls
* optional
219_AKB; 2; 4, en-GB
mkalafa,
2007-11-13T09:28:36+01:00 - Seite 95
Z
Page 124 of 329
On-board computer
121Distronic* menu
You can read the current Distronic settings in
the Distronic menu. (Y page 135)
i Menu overview: see ( Y page 114).Message memory menu
Previous display messages can be called up
in
the Message memory menu. You will only
see the Message memory menu if there are
any display messages. G
Risk of accident
The on-board computer only records and
displays messages and warnings from cer-
tain systems. For this reason, you should
always make sure that your vehicle is safe
to
drive. You could otherwise cause an acci-
dent by driving an unsafe vehicle.
Switching off the ignition clears the Message
memory except for the highest priority dis-
play messages. The on-board computer will
delete these display messages only after the
reason for the message has been rectified.
i Menu overview: see ( Y page 114). Displaying messages Use the buttons on the multi-function steer-
ing wheel.
X
Press the è or · button repeatedly
until either the original menu or the Mes-
sage memory menu appears.
If the Message memory menu does not
appear, there are no display messages.
If there are messages, the following mes-
sage may appear in the multi-function dis-
play, for example: 2 messages.
X Press the j or k
button to call up a
display message.
You can scroll through the display mes-
sages in sequence. The possible display
messages are explained in the "Practical
advice" section ( Y page 219). Settings menu
There are two functions in the Settings...
menu:
the To reset: Press reset button
for 3 seconds function, which you can use
to reset most settings to the factory settings.
There are also submenus in which you can
make individual settings for your vehicle.
i Menu overview: see ( Y page 114).
Use the buttons on the multi-function steer-
ing wheel.
Resetting to factory settings For safety reasons, not all functions are reset:
permanent
Speedtronic can only be set in the
Vehicle menu. The Headlamp mode function
in the Lighting submenu is only reset if the
vehicle is stationary.
X Press the è
or · button to select the
Settings... menu.
X Press and hold the reset button on the left-
hand side of the instrument cluster for
approximately three seconds.
A
prompt appears in the multi-function dis-
play asking you to press the reset button
again to confirm. Controls
* optional
219_AKB; 2; 4, en-GB
mkalafa,
2007-11-13T09:28:36+01:00 - Seite 121 Z
Page 125 of 329
On-board computer
122
X
Press the reset button again.
The functions of most submenus are
restored to the factory settings.
or
X If you want to retain the settings, do not
press the reset button a second time.
After approximately 5 seconds, the Set-
tings... menu appears again.
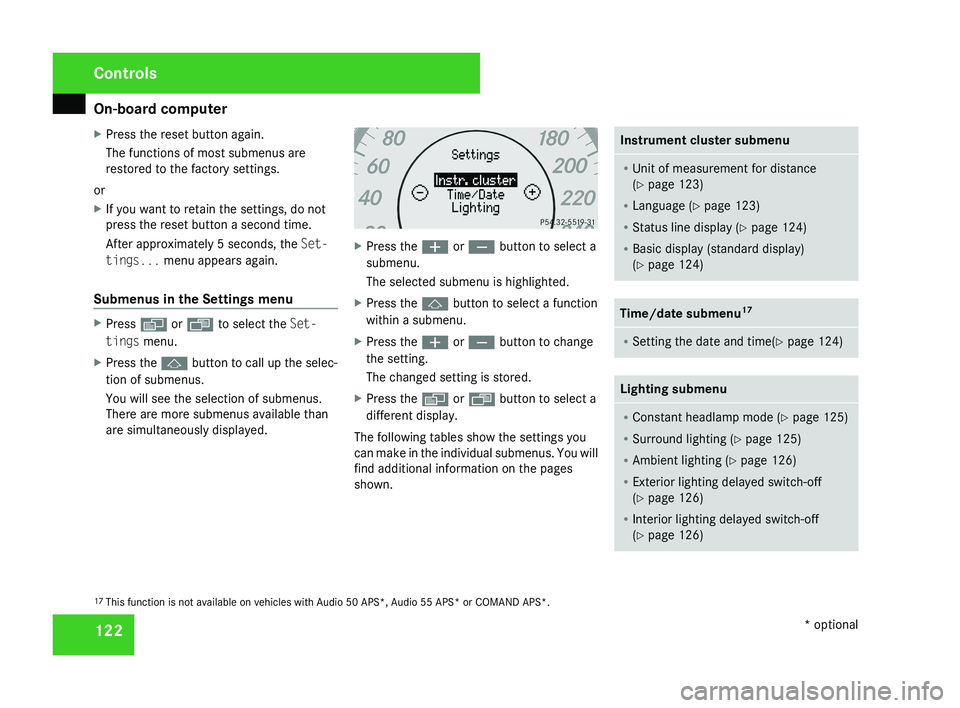
Submenus in the Settings menu X
Press è or · to select the Set-
tings menu.
X Press the j button to call up the selec-
tion of submenus.
You will see the selection of submenus.
There are more submenus available than
are simultaneously displayed. X
Press the æ or ç button to select a
submenu.
The selected submenu is highlighted.
X Press the j button to select a function
within a submenu.
X Press the æ or ç button to change
the setting.
The changed setting is stored.
X Press the è or ÿ button to select a
different display.
The following tables show the settings you
can make in the individual submenus. You will
find additional information on the pages
shown. Instrument cluster submenu
R
Unit of measurement for distance
(Y page 123)
R Language (Y page 123)
R Status line display ( Y page 124)
R Basic display (standard display)
(Y page 124) Time/date submenu
17 R
Setting the date and time(Y page 124) Lighting submenu
R
Constant headlamp mode (Y page 125)
R Surround lighting ( Y page 125)
R Ambient lighting (Y page 126)
R Exterior lighting delayed switch-off
(Y page 126)
R Interior lighting delayed switch-off
(Y page 126) 17
This function is not available on vehicles with Audio 50 APS*, Audio 55 APS* or COMAND APS*. Controls
* optional
219_AKB; 2; 4, en-GB
mkalafa,
2007-11-13T09:28:36+01:00 - Seite 122
Page 128 of 329
On-board computer
125
X
Press the è or · button to select the
Settings... menu.
X Press the j
button to call up the selec-
tion of submenus.
X Press the æ
or ç button to select the
Time/Date submenu.
Setting the time
X Use j to select Clock, hours Con-
firm by press. R (or Clock, minutes
Confirm by press. R).
X Press the æ or ç button to set a
value.
X Press the reset button on the left of the
instrument cluster.
The set time is stored.
Setting the date
X Press the j
button to select Set date
Day (or Set date Month or Set date
Year).
X Press the æ or ç button to set the
values.
X Press the j, è or ÿ button to
select a different display. Setting constant headlamp mode If you have set constant headlamp mode and
the light switch is in position M orU,
the
side lamps, dipped-beam headlamps and
licence plate lighting are switched on auto-
matically when the engine is running. Turning
the light switch to a different position
switches on the corresponding lights.
For safety reasons, it is only possible to set
this function when the vehicle is stationary.
In countries in which constant headlamp
mode is a legal requirement, Constant is the
factory setting.
X Press the è
or · button to select the
Settings... menu.
X Press the j
button to call up the selec-
tion of submenus.
X Press the æ
or ç button to select the
Lighting submenu.
X Press the j button to select Headlamp
mode.
X Press the æ or ç button to set the
mode
for the headlamps to Manual or Con-
stant (constant headlamp mode).
X Press the j, è or ÿ button to
select a different display. Switching the surround lighting on or
off If the surround lighting is switched on, the
following lights will be switched on automat-
ically
in the dark after you have unlocked the
vehicle using the key:
R the side lamps
R the tail lamps
R the licence plate lighting
R the front foglamps
R the lights* in the exterior mirrors
The surround lighting switches off automati-
cally if you open the driver's door or after 40
seconds.
X Press the è
or · button to select the
Settings... menu.
X Press the j
button to call up the selec-
tion of submenus.
X Press the æ
or ç button to select the
Lighting submenu.
X Press the j button to select the Sur-
round lighting function. Controls
* optional
219_AKB; 2; 4, en-GB
mkalafa,
2007-11-13T09:28:36+01:00 - Seite 125 Z
Page 129 of 329
On-board computer
126
X
Press the æ or ç button to switch
the Surround lighting function on or
off.
X Press the j, è or ÿ button to
select a different display.
Setting the ambient lighting X
Press the è or · button to select the
Settings... menu.
X Press the j
button to call up the selec-
tion of submenus.
X Press the æ
or ç button to select the
Lighting submenu.
X Press the j button to select Ambient
light.
X Press the æ
or ç button to adjust the
brightness to any level from 0 (off) to 5
(bright).
X Press the j, è or ÿ button to
select a different display.
Activating or deactivating the exterior
lighting delayed switch-off You can set whether the exterior lighting
should remain on for 15 seconds after the doors are closed when it is dark using the
Headlamps delayed switch-off function.
If none of the doors are opened after the
engine
is switched off or if an open door is not
closed, the exterior lighting goes out after
60 seconds.
When you have set a delayed switch-off time
and then switch off the engine, the following
remain lit:
R the side lamps
R the tail lamps
R the licence plate lighting
R the front foglamps
R the lights* in the exterior mirrors
X Press the è
or · button to select the
Settings... menu.
X Press the j
button to call up the selec-
tion of submenus.
X Press the æ
or ç button to select the
Lighting submenu.
X Press the j
button to select Headlamps
delayed switch-off. X
Press the æ or ç button to activate
or deactivate the Headlamps delayed
switch-off feature.
X Press the j, è or ÿ button to
select a different display.
To temporarily deactivate the delayed switch-
off:
X Before leaving the vehicle, turn the key to
position 0 in the ignition lock.
X Turn the key to position 2 in the ignition
lock and back to position 0.
Delayed
switch-off is deactivated. It is reac-
tivated as soon as you start the engine
again.
Activating or deactivating the interior
lighting delayed switch-off The
Interior
lighting delayed switch-
off function allows you to set whether the
interior lighting should remain on for 10 sec-
onds after the key is removed from the igni-
tion lock when it is dark.
X Press the è
or · button to select the
Settings... menu.
X Press the j
button to call up the selec-
tion of submenus. Controls
* optional
219_AKB; 2; 4, en-GB
mkalafa,
2007-11-13T09:28:36+01:00 - Seite 126