Page 402 of 509
401 Practical hints
What to do if …?
Display Possible cause/consequencePossible solution
;ReleaseYou are driving with the parking brake set.�Release the parking brake (�page 130).
(USA only)Parking Brake
!
(Canada only)
;
(USA only)
3
EBR, ABS, and ESP
Inoperative
See Operator’s Manu-
alEBP, ABS and ESP® are switched off due to
a malfunction. BAS and the hill start assist
are also switched off.
The brake system still functions normally
but without the ABS and ESP
® available.
�Continue driving with added caution.
Wheels may lock during hard braking, re-
ducing steering capability.
�Have the system checked at an authorized
Mercedes-Benz Center as soon as possible.
Failure to follow these instructions increases
the risk of an accident.
(Canada only)
Page 408 of 509
 is not recognized while the engine is
running")
407 Practical hints
What to do if …?
Display Possible cause/consequencePossible solution
IKey Not
DetectedThe SmartKey with KEYLESS-GO* (Canada
only) is not recognized while the engine is
running because the SmartKey with
KEYLESS-GO* (Canada only) is not in the
vehicle.�Stop the vehicle in a safe location or as soon
as it is safe to do.
�Search for the SmartKey.
Otherwise the vehicle cannot be centrally
locked nor can the engine be started again
after the engine is stopped.
The SmartKey with KEYLESS-GO* (Canada
only) is not recognized while the engine is
running because there is strong radio-fre-
quency interference.�Stop the vehicle in a safe location or as soon
as it is safe to do.
�Remove KEYLESS-GO* button (Canada only)
from the starter switch (
�page 83).
�Operate the vehicle with the SmartKey in the
starter switch.
IKey
Not DetectedThe SmartKey with KEYLESS-GO* (Canada
only) is momentarily not recognized.�Change the position of the SmartKey in the
vehicle.
�If necessary, operate vehicle using SmartKey
with KEYLESS-GO* (Canada only) in starter
switch under KEYLESS-GO* button (Canada
only) (
�page 83).
Page 409 of 509

408 Practical hints
What to do if …?
Display Possible cause/consequencePossible solution
IReplace
Key BatteryThe batteries in the SmartKey with
KEYLESS-GO* are discharged.�Replace the batteries (�page 428).
Key Detected
In VehicleA SmartKey with KEYLESS-GO* (Canada
only) left in the vehicle was recognized
while locking the vehicle from the outside.�Take the SmartKey with KEYLESS-GO* out of
the vehicle.
Obtain
A New KeyThe SmartKey with KEYLESS-GO* (Canada
only) must be replaced.�Contact an authorized Mercedes-Benz Cen-
ter as soon as possible.
Remove "Start"
Button
And Insert KeyThe KEYLESS-GO* system (Canada only) is
malfunctioning.�Remove KEYLESS-GO* button (Canada only)
from the starter switch (
�page 83).
�Operate the vehicle with the SmartKey in the
starter switch.
IClose Doors
To Lock VehicleYou wanted to lock the vehicle but not all
doors were closed.�Close doors and lock vehicle again.
Key Does Not
Belong to VehicleYou have insert an incorrect key in the start-
er switch.�Remove key and insert the correct key.
Don’t Forget
Your KeyThis display appears (for a maximum of
60 seconds) if the driver’s door is opened
with the engine turned off and no SmartKey
in the starter switch.
This message is only a reminder.�Take the SmartKey or SmartKey with
KEYLESS-GO* (Canada only) with you when
leaving the vehicle.
Page 421 of 509
420 Practical hints
Where will I find ...?
First aid kit
Depending on the equipment configura-
tion, the first-aid kit will be located either in
the open storage department in the trunk
or behind the cover panel on the left-hand
side of the trunk.
1Rotary handle
2Cover
�Opening: Turn the handle1 counter-
clockwise.
�Fold the cover2 downward.
�Remove the first aid kit.Vehicle jack, vehicle tool kit, luggage
bowl, Minispare wheel
The vehicle jack, Minispare wheel, vehicle
tool kit, and the luggage bowl are stored in
the compartment underneath the trunk
floor.
Vehicle tool kit
The vehicle tool kit includes:
�One towing eye bolt
�One wheel wrench
�Collapsible wheel chock
�One pair of gloves
iCheck expiration dates and contents for
completeness at least once a year and replace
missing/expired items.
Page 422 of 509

421 Practical hints
Where will I find ...?
1Tab
2Removing
3Vehicle tool kit, jack and collapsible
wheel chock
4 Opening
5Tab
6Luggage bowl
�Removing: Lift up trunk floor cover
and engage trunk floor handle in upper
edge of trunk.
�Pull tab1 in direction of arrow2 and
lift up vehicle tool kit3.
You can now remove the vehicle tool
kit3 from luggage bowl6.
�Opening: Pull tab5 in direction of
arrow4 and open the vehicle tool kit
cover.
You can now remove the tools and
accessories from vehicle tool kit3.
�Closing: Store the tools and
accessories in vehicle tool kit3.
�Press the vehicle tool kit cover down
until it engage.
�Installing: Slide the vehicle tool kit3
into the recess in luggage bowl6.
�Press vehicle tool kit3 down until
tab1 engage in luggage bowl6.
�Disengage trunk floor handle from up-
per edge of trunk and lower trunk floor.Vehicle jack
!To prevent damage, always disengage trunk
floor handle from trunk lid and lower trunk floor
before closing the trunk.
Warning!G
The jack is designed exclusively for jacking
up the vehicle at the jack take-up brackets
built into both sides of the vehicle. To help
avoid personal injury, use the jack only to lift
the vehicle during a wheel change. Never
get beneath the vehicle while it is supported
by the jack. Keep hands and feet away from
the area under the lifted vehicle. Always
firmly depress the parking brake and block
wheels before raising vehicle with jack.
Do not release the parking brake while the
vehicle is raised. Be certain that the jack is
always vertical (plumb line) when in use,
especially on hills. Always try to use the jack
on level surface. Make sure the jack arm is
fully seated in the jack take-up bracket.
Always lower the vehicle onto sufficient
capacity jackstands before working under
the vehicle.
��
Page 423 of 509
422 Practical hints
Where will I find ...?
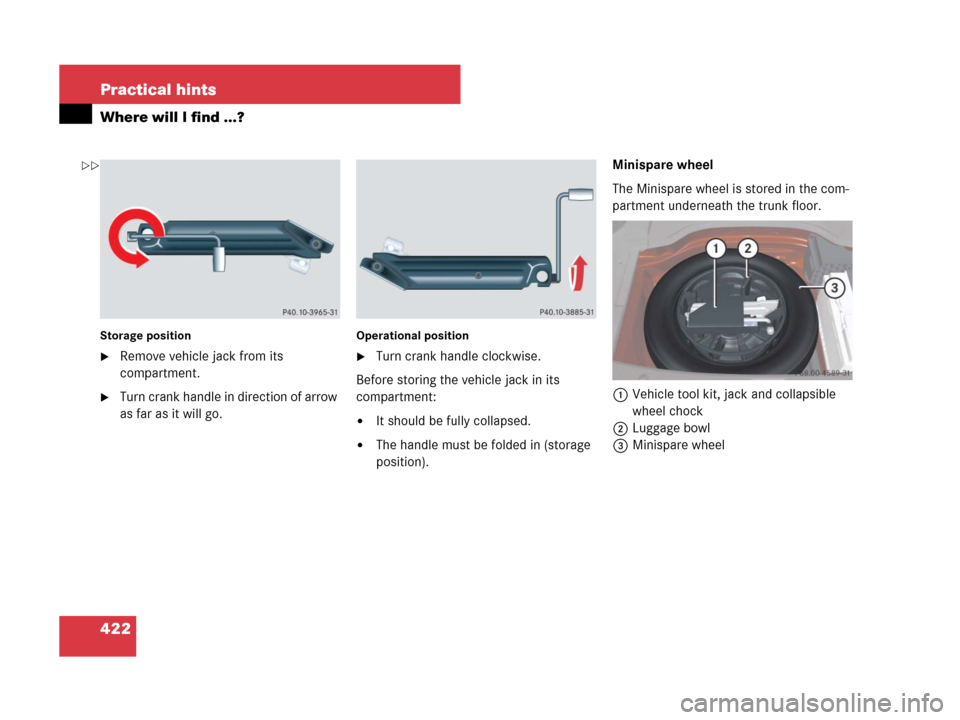
Storage position
�Remove vehicle jack from its
compartment.
�Turn crank handle in direction of arrow
as far as it will go.
Operational position
�Turn crank handle clockwise.
Before storing the vehicle jack in its
compartment:
�It should be fully collapsed.
�The handle must be folded in (storage
position).Minispare wheel
The Minispare wheel is stored in the com-
partment underneath the trunk floor.
1Vehicle tool kit, jack and collapsible
wheel chock
2Luggage bowl
3Minispare wheel
��
Page 424 of 509
423 Practical hints
Where will I find ...?
Removing the Minispare wheel
�Remove vehicle tool kit1
(
�page 421).
�Turn luggage bowl2 counterclock-
wise and remove it.
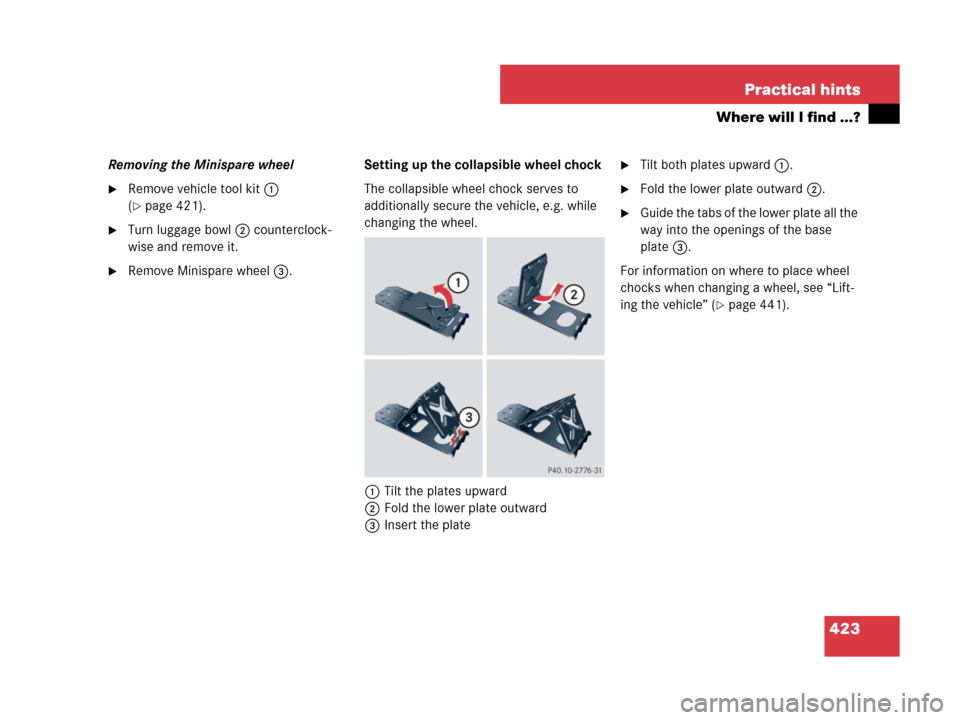
�Remove Minispare wheel3.Setting up the collapsible wheel chock
The collapsible wheel chock serves to
additionally secure the vehicle, e.g. while
changing the wheel.
1Tilt the plates upward
2Fold the lower plate outward
3Insert the plate
�Tilt both plates upward1.
�Fold the lower plate outward2.
�Guide the tabs of the lower plate all the
way into the openings of the base
plate3.
For information on where to place wheel
chocks when changing a wheel, see “Lift-
ing the vehicle” (
�page 441).
Page 425 of 509
424 Practical hints
Unlocking/locking in an emergency
Unlocking the vehicle
If you cannot unlock the vehicle with the
SmartKey or KEYLESS-GO* (Canada only),
unlock the driver’s door and the trunk us-
ing the mechanical key. Removing the mechanical key
1Mechanical key locking tab
2Mechanical key
�Move locking tab1 in the direction of
arrow.
�Slide mechanical key2 out of the
housing.Unlocking the driver’s door
�Insert mechanical key2 into the driv-
er’s door lock until it stops.
�Turn mechanical key2 counterclock-
wise to position 1.
The locking knob moves up, the driver’s
door is unlocked.
�Pull the door handle to open the driv-
er’s door.
iUnlocking the vehicle with the mechanical
key and opening the driver’s door or the trunk
with the mechanical key will trigger the anti-theft
alarm system (
�page 66).
To cancel the alarm, insert the SmartKey or
SmartKey with KEYLESS-GO* (Canada only) in
the starter switch.
1Unlocking
2Mechanical key


,
unlock the driver’s door and the trunk")