Page 426 of 509
425 Practical hints
Unlocking/locking in an emergency
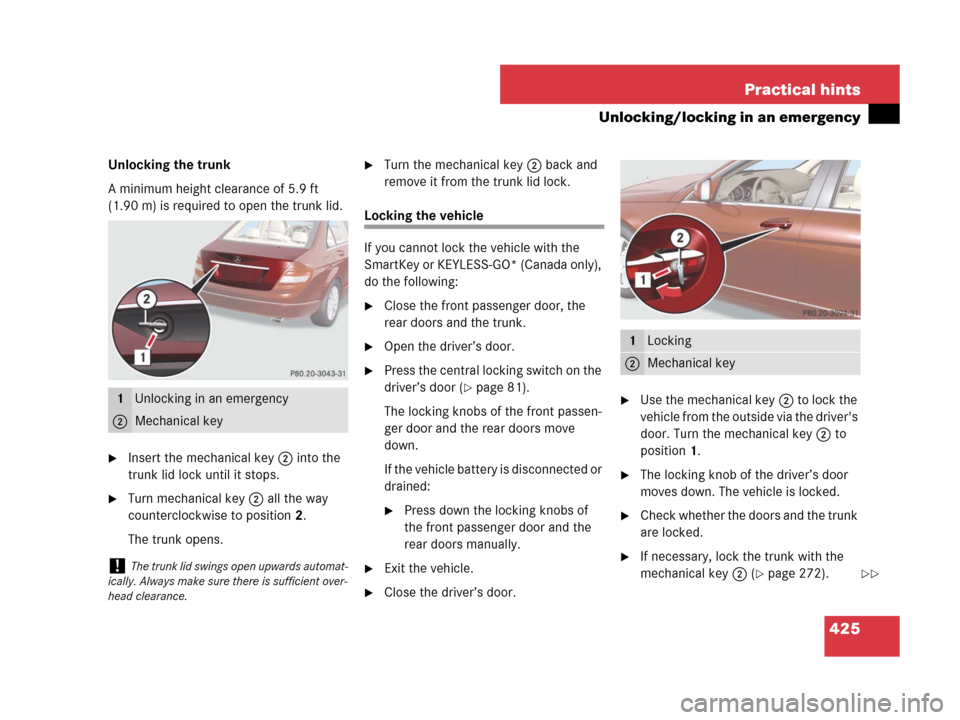
Unlocking the trunk
A minimum height clearance of 5.9 ft
(1.90 m) is required to open the trunk lid.
�Insert the mechanical key2 into the
trunk lid lock until it stops.
�Turn mechanical key2 all the way
counterclockwise to position 2.
The trunk opens.
�Turn the mechanical key2 back and
remove it from the trunk lid lock.
Locking the vehicle
If you cannot lock the vehicle with the
SmartKey or KEYLESS-GO* (Canada only),
do the following:
�Close the front passenger door, the
rear doors and the trunk.
�Open the driver’s door.
�Press the central locking switch on the
driver’s door (
�page 81).
The locking knobs of the front passen-
ger door and the rear doors move
down.
If the vehicle battery is disconnected or
drained:
�Press down the locking knobs of
the front passenger door and the
rear doors manually.
�Exit the vehicle.
�Close the driver’s door.
�Use the mechanical key2 to lock the
vehicle from the outside via the driver's
door. Turn the mechanical key2 to
position1.
�The locking knob of the driver’s door
moves down. The vehicle is locked.
�Check whether the doors and the trunk
are locked.
�If necessary, lock the trunk with the
mechanical key2 (
�page 272).
1Unlocking in an emergency
2Mechanical key
!The trunk lid swings open upwards automat-
ically. Always make sure there is sufficient over-
head clearance.
1Locking
2Mechanical key
��
Page 427 of 509
426 Practical hints
Unlocking/locking in an emergency
Fuel filler flap
�Open the fuse box in the trunk
(
�page 458).
1Release cable
�Pull on the release cable1.
�Open the fuel filler flap.Manually unlocking the transmission
gear selector lever
In case of power failure, the transmission
gear selector lever can be manually un-
locked, e.g. to tow the vehicle.
1Selector lever cover
2Unlocking mechanism
�Apply the parking brake firmly.
�Push the selector lever cover1 to the
left and pull it up and off.
�Push the unlocking mechanism2
down and move the selector lever out
of positionP at the same time.The selector lever can now move freely
until reset to positionP.
iThis procedure does not arm the anti-theft
alarm system nor does it lock the fuel filler flap.
iThe gear selector lever is locked again when
moving it to positionP.
��
Page 429 of 509
428 Practical hints
Replacing SmartKey batteries
If the batteries in the SmartKey/SmartKey
with KEYLESS-GO* are discharged, the ve-
hicle can no longer be locked or unlocked.
It is recommended to have the batteries re-
placed at an authorized Mercedes-Benz
Center.Batteries contain materials that can harm
the environment if disposed of improperly.
Recycling of batteries is the preferred
method of disposal. Many states require
sellers of batteries to accept old batteries
for recycling.
Replacement batteries: Lithium, type
CR 2025 or equivalent.
�Remove the mechanical key from the
SmartKey (
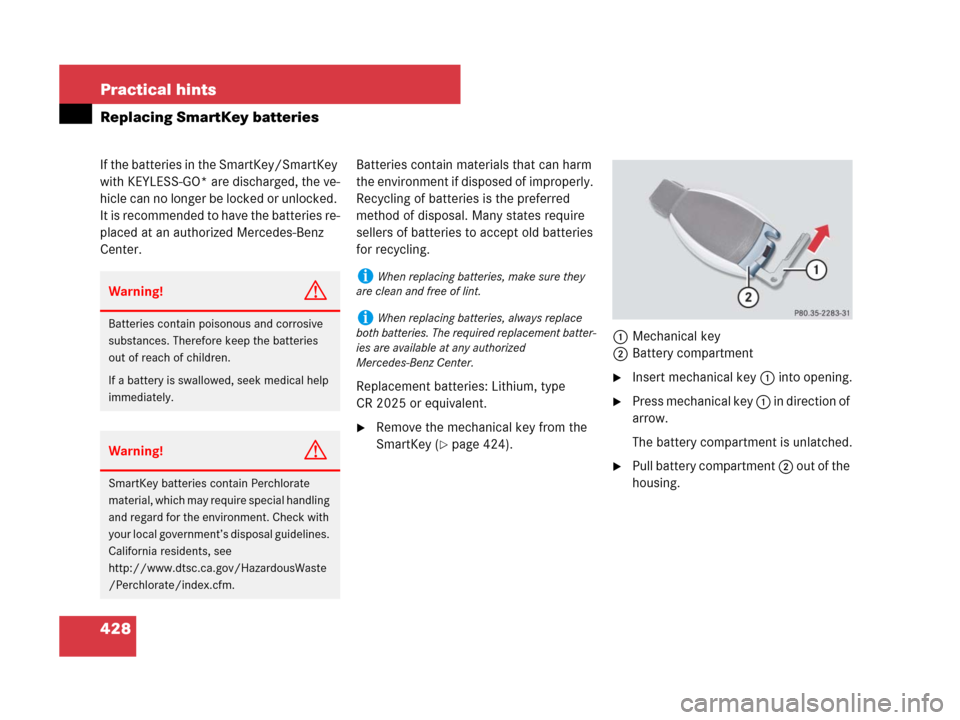
�page 424).1Mechanical key
2Battery compartment
�Insert mechanical key 1 into opening.
�Press mechanical key 1 in direction of
arrow.
The battery compartment is unlatched.
�Pull battery compartment 2 out of the
housing.
Warning!G
Batteries contain poisonous and corrosive
substances. Therefore keep the batteries
out of reach of children.
If a battery is swallowed, seek medical help
immediately.
Warning!G
SmartKey batteries contain Perchlorate
material, which may require special handling
and regard for the environment. Check with
your local government’s disposal guidelines.
California residents, see
http://www.dtsc.ca.gov/HazardousWaste
/Perchlorate/index.cfm.
iWhen replacing batteries, make sure they
are clean and free of lint.
iWhen replacing batteries, always replace
both batteries. The required replacement batter-
ies are available at any authorized
Mercedes-Benz Center.
Page 430 of 509
429 Practical hints
Replacing SmartKey batteries
3Batteries
4Contact springs
�Pull out batteries3.
�Using a line-free cloth, insert new bat-
teries 3 under contact springs 4 with
the positive terminal (+) side facing up.
�Return battery compartment 2 into
housing until it locks into place.
�Slide the mechanical key back into the
SmartKey.
�Check the operation of the SmartKey
or SmartKey with KEYLESS-GO*.
Page 434 of 509
433 Practical hints
Replacing bulbs
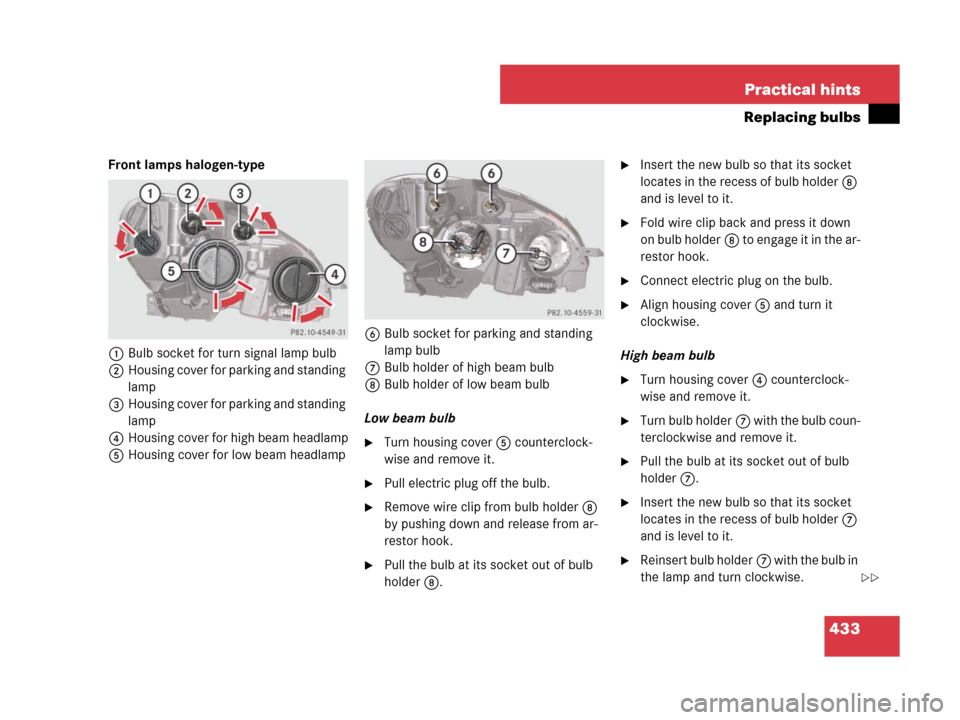
Front lamps halogen-type
1Bulb socket for turn signal lamp bulb
2Housing cover for parking and standing
lamp
3Housing cover for parking and standing
lamp
4Housing cover for high beam headlamp
5Housing cover for low beam headlamp6Bulb socket for parking and standing
lamp bulb
7Bulb holder of high beam bulb
8Bulb holder of low beam bulb
Low beam bulb
�Turn housing cover5 counterclock-
wise and remove it.
�Pull electric plug off the bulb.
�Remove wire clip from bulb holder8
by pushing down and release from ar-
restor hook.
�Pull the bulb at its socket out of bulb
holder8.
�Insert the new bulb so that its socket
locates in the recess of bulb holder8
and is level to it.
�Fold wire clip back and press it down
on bulb holder8 to engage it in the ar-
restor hook.
�Connect electric plug on the bulb.
�Align housing cover5 and turn it
clockwise.
High beam bulb
�Turn housing cover4 counterclock-
wise and remove it.
�Turn bulb holder7 with the bulb coun-
terclockwise and remove it.
�Pull the bulb at its socket out of bulb
holder7.
�Insert the new bulb so that its socket
locates in the recess of bulb holder7
and is level to it.
�Reinsert bulb holder7 with the bulb in
the lamp and turn clockwise.
��
Page 435 of 509
434 Practical hints
Replacing bulbs
�Align housing cover4 and turn it
clockwise.
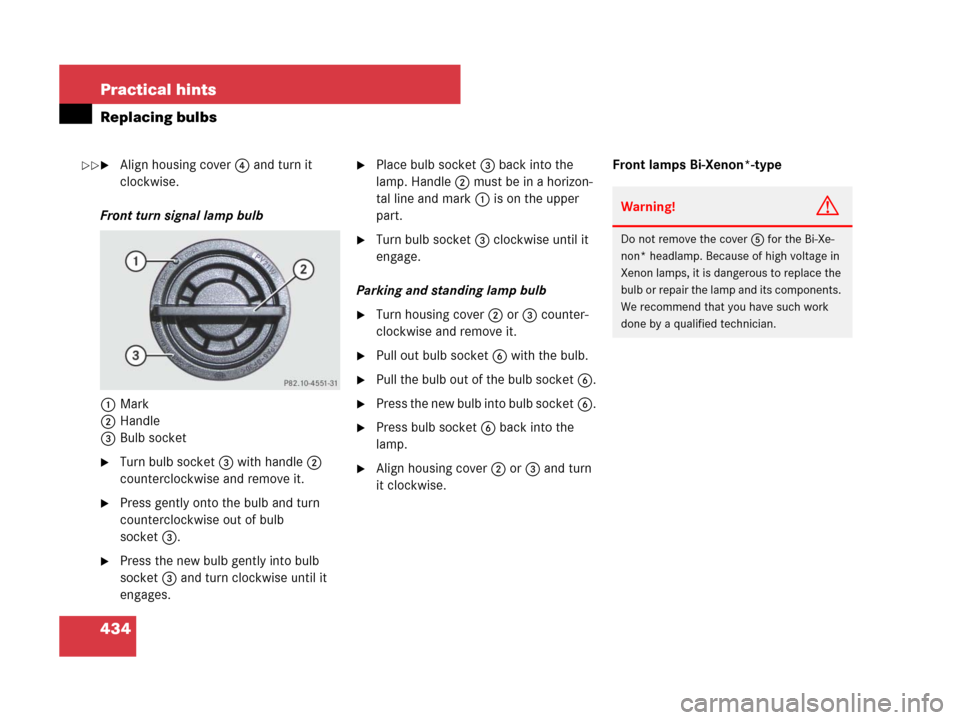
Front turn signal lamp bulb
1Mark
2Handle
3Bulb socket
�Turn bulb socket3 with handle2
counterclockwise and remove it.
�Press gently onto the bulb and turn
counterclockwise out of bulb
socket3.
�Press the new bulb gently into bulb
socket3 and turn clockwise until it
engages.
�Place bulb socket3 back into the
lamp. Handle2 must be in a horizon-
tal line and mark1 is on the upper
part.
�Turn bulb socket3 clockwise until it
engage.
Parking and standing lamp bulb
�Turn housing cover2 or3 counter-
clockwise and remove it.
�Pull out bulb socket6 with the bulb.
�Pull the bulb out of the bulb socket6.
�Press the new bulb into bulb socket6.
�Press bulb socket6 back into the
lamp.
�Align housing cover2 or3 and turn
it clockwise.Front lamps Bi-Xenon*-type
Warning!G
Do not remove the cover5 for the Bi-Xe-
non* headlamp. Because of high voltage in
Xenon lamps, it is dangerous to replace the
bulb or repair the lamp and its components.
We recommend that you have such work
done by a qualified technician.
��
Page 436 of 509
435 Practical hints
Replacing bulbs
1Bulb socket for turn signal lamp bulb
2Housing cover for parking and standing
lamp
3Housing cover for parking and standing
lamp
4Housing cover for high beam flasher
5Housing cover for Bi-Xenon headlamp6Bulb socket for parking and standing
lamp bulb
7Bulb holder for high beam flasher bulb
7Bulb holder for high beam bulbHigh beam bulb for high beam flasher
�Turn housing cover4 counterclock-
wise and remove it.
�Pull electric plug off the bulb.
�Pull out bulb holder7 with the bulb.
�Pull the bulb at its socket out of bulb
holder7.
�Insert the new bulb so that its socket
locates in the recess of bulb holder7
and is level to it.
�Reinsert bulb holder7 with the bulb in
the lamp.
�Connect electric plug on the bulb.
�Align housing cover4 and turn it
clockwise.
Page 437 of 509
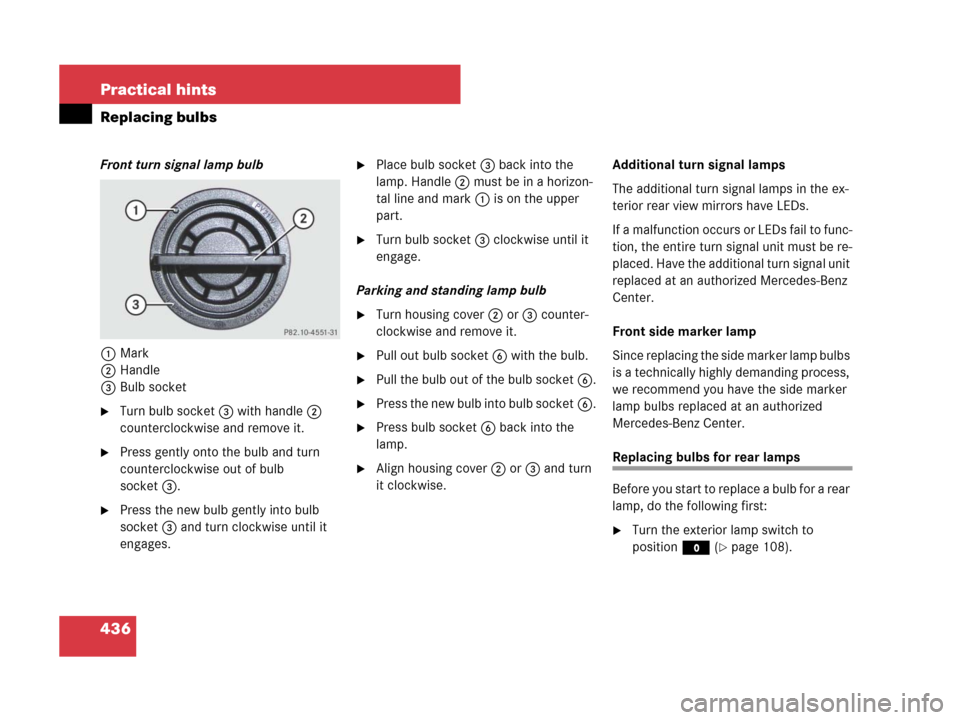
436 Practical hints
Replacing bulbs
Front turn signal lamp bulb
1Mark
2Handle
3Bulb socket
�Turn bulb socket3 with handle2
counterclockwise and remove it.
�Press gently onto the bulb and turn
counterclockwise out of bulb
socket3.
�Press the new bulb gently into bulb
socket3 and turn clockwise until it
engages.
�Place bulb socket3 back into the
lamp. Handle2 must be in a horizon-
tal line and mark1 is on the upper
part.
�Turn bulb socket3 clockwise until it
engage.
Parking and standing lamp bulb
�Turn housing cover2 or3 counter-
clockwise and remove it.
�Pull out bulb socket6 with the bulb.
�Pull the bulb out of the bulb socket6.
�Press the new bulb into bulb socket6.
�Press bulb socket6 back into the
lamp.
�Align housing cover2 or3 and turn
it clockwise.Additional turn signal lamps
The additional turn signal lamps in the ex-
terior rear view mirrors have LEDs.
If a malfunction occurs or LEDs fail to func-
tion, the entire turn signal unit must be re-
placed. Have the additional turn signal unit
replaced at an authorized Mercedes-Benz
Center.
Front side marker lamp
Since replacing the side marker lamp bulbs
is a technically highly demanding process,
we recommend you have the side marker
lamp bulbs replaced at an authorized
Mercedes-Benz Center.Replacing bulbs for rear lamps
Before you start to replace a bulb for a rear
lamp, do the following first:
�Turn the exterior lamp switch to
positionM (
�page 108).