Page 8 of 509

Contents
At the gas station .............................. 322
Refueling ...................................... 322
Check regularly and
before a long trip.......................... 324
Engine compartment ......................... 325
Hood ............................................ 325
Engine oil ..................................... 327
Transmission fluid level ................ 328
Coolant level ................................ 329
Windshield washer system and
headlamp cleaning system* ......... 330
Tires and wheels ................................ 331
Important guidelines .................... 331
Tire care and maintenance........... 332
Direction of rotation ..................... 334
Loading the vehicle ...................... 334
Recommended tire
inflation pressure ......................... 339
Checking tire inflation pressure ... 341
Tire labeling.................................. 348
Load identification ....................... 352
DOT,
Tire Identification Number (TIN) ... 352
Maximum tire load ....................... 353
Maximum tire inflation pressure .. 354Uniform Tire Quality Grading
Standards (U.S. vehicles) .............. 354
Tire ply material ............................ 356
Tire and loading terminology......... 356
Rotating tires ................................ 359
Winter driving ..................................... 360
Winter tires ................................... 360
Snow chains.................................. 361
Maintenance....................................... 362
Maintenance
service indicator message ............ 362
Calling up the maintenance
service indicator display ............... 363
Resetting the maintenance
service indicator ........................... 363
Vehicle care........................................ 364
Cleaning and care of vehicle ......... 364
Practical hints.................................. 373
What to do if …? ................................. 374
Lamps in instrument cluster ......... 374
Air bag off indicator lamp ............. 385
Vehicle status messages in
the multifunction display .............. 387
Where will I find ...? ............................ 420
First aid kit.................................... 420
Vehicle jack, vehicle tool kit,
luggage bowl, Minispare wheel ..... 420
Unlocking/locking in an emergency .. 424
Unlocking the vehicle ................... 424
Locking the vehicle ....................... 425
Fuel filler flap ................................ 426
Manually unlocking the
transmission gear selector lever ... 426
Resetting activated head restraints.... 427
Replacing SmartKey batteries ............ 428
Replacing bulbs .................................. 430
Bulbs............................................. 431
Replacing bulbs for front lamps .... 432
Replacing bulbs for rear lamps ..... 436
Replacing wiper blades ...................... 438
Removing wiper blades ................. 439
Installing wiper blades .................. 439
Page 325 of 509

324 Operation
At the gas station
Check regularly and before a long trip
1Coolant level
2Brake fluid
3Windshield washer and headlamp
cleaning system*Windshield washer system and head-
lamp cleaning system*
For more information on refilling the wash-
er reservoir, see “Windshield washer sys-
tem and headlamp cleaning system*”
(
�page 330).
Coolant
For more information on coolant, see
“Coolant level” (
�page 329) and see “Fu-
els, coolants, lubricants, etc.”
(
�page 476).
Brake fluid
For information on brake fluid, see “Brake
fluid” (
�page 480).Engine oil level
For more information on engine oil, see
“Engine oil” (
�page 327).
Vehicle lighting
Check function and cleanliness. For more
information on replacing light bulbs, see
“Replacing bulbs” (
�page 430).
For more information, see “Lighting”
(
�page 108).
Tire inflation pressure
For information on tire inflation pressure,
see “Checking tire inflation pressure”
(
�page 341).iOpening the hood (�page 325).!If you find that the brake fluid in the brake
fluid reservoir has fallen to the minimum mark or
below, have the brake system checked for brake
pad thickness and leaks immediately. Notify an
authorized Mercedes-Benz Center immediately.
Do not add brake fluid as this will not solve the
problem. For more information, see “Practical
hints” (
�page 376) and (�page 400).
Page 374 of 509
373 Practical hints
What to do if …?
Where will I find ...?
Unlocking/locking in an emergency
Resetting activated head restraints
Replacing SmartKey batteries
Replacing bulbs
Replacing wiper blades
Flat tire
Battery
Jump starting
Towing the vehicle
Fuses
Page 375 of 509

374 Practical hints
What to do if …?
Lamps in instrument cluster
General information:
If any of the following lamps in the instru-
ment cluster fails to come on during the
bulb self-check when switching on the igni-
tion, have the respective bulb checked and
replaced if necessary.
ProblemPossible cause/consequenceSuggested solution
-The yellow Antilock
Brake System (ABS)
indicator lamp comes on
while the engine is
running.The ABS has detected a malfunction and
has switched off. The BAS, ESP® and EBP
are also switched off (see messages in mul-
tifunction display).
The brake system is still functioning nor-
mally but without the systems specified
above.
If the ABS control unit is malfunctioning,
other systems such as navigation system*
or the automatic transmission* may also be
malfunctioning.
�Continue driving with added caution.
Wheels will lock during hard braking, re-
ducing steering capability.
�Read and observe messages in the mul-
tifunction display (
�page 387).
�Have the system checked at an autho-
rized Mercedes-Benz Center as soon as
possible.
Failure to follow these instructions
increases the risk of an accident.
Page 410 of 509
409 Practical hints
What to do if …?
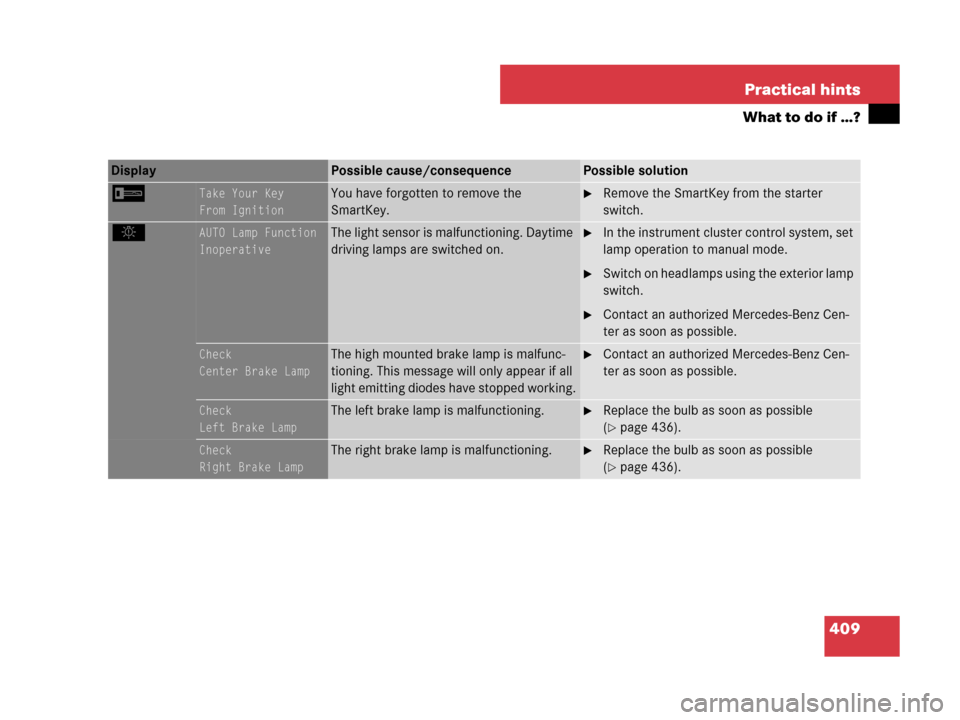
ITake Your Key
From IgnitionYou have forgotten to remove the
SmartKey.�Remove the SmartKey from the starter
switch.
.AUTO Lamp Function
InoperativeThe light sensor is malfunctioning. Daytime
driving lamps are switched on.�In the instrument cluster control system, set
lamp operation to manual mode.
�Switch on headlamps using the exterior lamp
switch.
�Contact an authorized Mercedes-Benz Cen-
ter as soon as possible.
Check
Center Brake LampThe high mounted brake lamp is malfunc-
tioning. This message will only appear if all
light emitting diodes have stopped working.�Contact an authorized Mercedes-Benz Cen-
ter as soon as possible.
Check
Left Brake LampThe left brake lamp is malfunctioning.�Replace the bulb as soon as possible
(
�page 436).
Check
Right Brake LampThe right brake lamp is malfunctioning.�Replace the bulb as soon as possible
(
�page 436).
Display Possible cause/consequencePossible solution
Page 411 of 509

410 Practical hints
What to do if …?
Display Possible cause/consequencePossible solution
.Check Left
Cornering LightThe left-hand corner-illuminating lamp is
malfunctioning.�Contact an authorized Mercedes-Benz
Center as soon as possible.
Check Right
Cornering LightThe right-hand corner-illuminating lamp is
malfunctioning.�Contact an authorized Mercedes-Benz
Center as soon as possible.
Check
Left Fog LampThe left front fog lamp is malfunctioning.�Contact an authorized Mercedes-Benz Cen-
ter as soon as possible.
Check
Right Fog LampThe right front fog lamp is malfunctioning.�Contact an authorized Mercedes-Benz Cen-
ter as soon as possible.
Check
Rear Left
Fog LampThe left rear fog lamp is malfunctioning.�Contact an authorized Mercedes-Benz Cen-
ter as soon as possible.
Check
Left High BeamThe left high beam lamp is malfunctioning.�Replace the bulb as soon as possible
(
�page 433).
Check
Right High BeamThe right high beam lamp is malfunctioning.�Replace the bulb as soon as possible
(
�page 433).
Page 431 of 509
430 Practical hints
Replacing bulbs
Safe vehicle operation depends on proper
exterior lighting and signaling. It is there-
fore essential that all bulbs and lamp
assemblies are in good working order at all
times.Correct headlamp adjustment is extremely
important. Have headlamps checked and
readjusted at regular intervals and when a
bulb has been replaced. See an authorized
Mercedes-Benz Center for headlamp
adjustment.iIf the headlamps or front fog lamps are
fogged up on the inside as a result of high
humidity, driving the vehicle a distance with the
lights on should clear up the fogging.
iBackup bulbs will be brought into use when
lamps malfunction. Read and observe the mes-
sages in the multifunction display (
�page 413).
Page 432 of 509
431 Practical hints
Replacing bulbs
Bulbs Front lamps Rear lamps
LampType
1Additional turn signal
lampLED
2Turn signal lampPY 21 W
3Halogen headlamp:
Low beam
Bi-Xenon* headlamp:
Low and high beam
1
1Regarding vehicles with Bi-Xenon headlamps*, do
not replace the Bi-Xenon bulbs yourself.
H7 (55 W)
D1S-35 W
4Halogen headlamp:
High beam/high beam
flasher
Bi-Xenon* headlamp:
High beam flasher
H7 (55 W)
H7 (55 W)
5Front fog lamp
Corner-illuminating
front fog lamp*H11 (55 W)
H11 (55 W)
6Side marker lampW 5 W
7Parking and standing
lamp2 x
W5W-BV
LampType
8High mounted brake
lampLED
9Side markerW 5 W
aTurn signal lampPY 21 W
bBrake lamp, parking
and standing lamp, tail
lamp2 x P 21 W
cBackup lampP 21 W
dLicense plate lampsW 5 W
eRear fog lamp
(driver’s side only),
Side markerP 21 W
W 5 W