Page 433 of 509
432 Practical hints
Replacing bulbs
Notes on bulb replacement
�Only use 12 volt bulbs of the same type
and with the specified watt rating.
�Switch lights off before changing a bulb
to prevent short circuits.
�Always use a clean lint-free cloth when
handling bulbs.
�Your hands should be dry and free of oil
and grease.
�If the newly installed bulb does not
come on, visit an authorized
Mercedes-Benz Center.Have the LEDs and bulbs for the following
lamps replaced at an authorized
Mercedes-Benz Center.
�Additional turn signal lamps in the exte-
rior rear view mirrors
�High mounted brake lamp
�Bi-Xenon* lamps
�Front fog lamps
�Front side marker lamps
�License plate lamps
Replacing bulbs for front lamps
Before you start to replace a bulb for a
front lamp, do the following first:
�Turn the exterior lamp switch to
positionM (
�page 108).
�Open the hood (�page 325).
Warning!G
Keep bulbs out of reach of children.
Bulbs and bulb sockets can be very hot. Al-
low the lamp to cool down before changing
a bulb.
Halogen lamps contain pressurized gas. A
bulb can explode if you:
�touch or move it when hot
�drop the bulb
�scratch the bulb
Wear eye and hand protection.
Because of high voltage in Xenon lamps, it is
dangerous to replace the bulb or repair the
lamp and its components. We recommend
that you have such work done by a qualified
technician.!Do not replace the LEDs yourself. You could
otherwise damage the LEDs or parts of the
vehicle. Only have the LEDs replaced at an au-
thorized Mercedes-Benz Center.
Page 434 of 509
433 Practical hints
Replacing bulbs
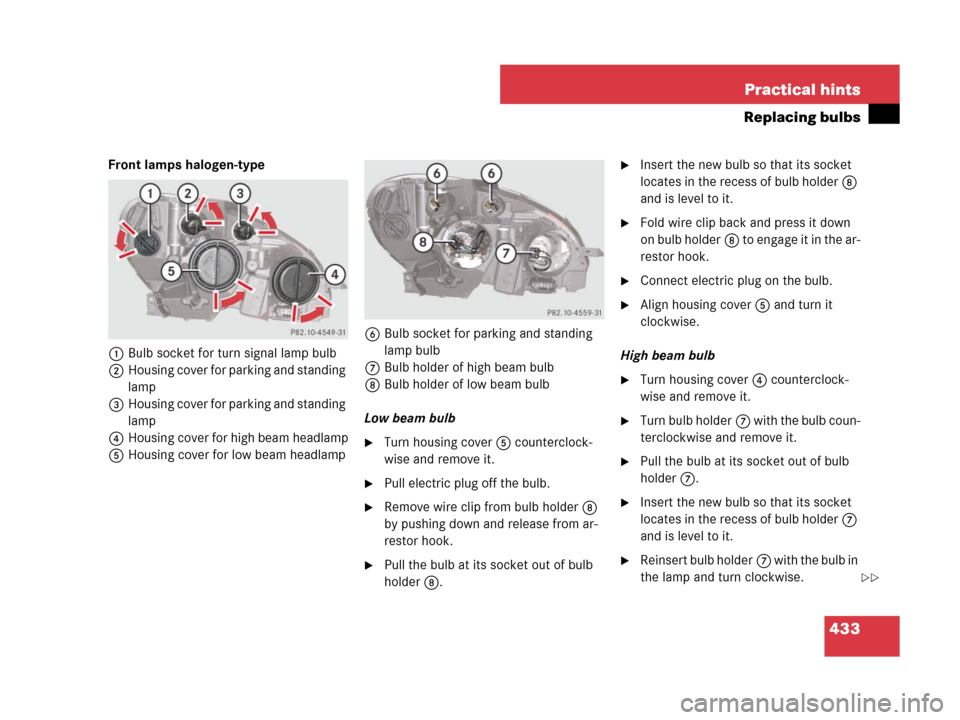
Front lamps halogen-type
1Bulb socket for turn signal lamp bulb
2Housing cover for parking and standing
lamp
3Housing cover for parking and standing
lamp
4Housing cover for high beam headlamp
5Housing cover for low beam headlamp6Bulb socket for parking and standing
lamp bulb
7Bulb holder of high beam bulb
8Bulb holder of low beam bulb
Low beam bulb
�Turn housing cover5 counterclock-
wise and remove it.
�Pull electric plug off the bulb.
�Remove wire clip from bulb holder8
by pushing down and release from ar-
restor hook.
�Pull the bulb at its socket out of bulb
holder8.
�Insert the new bulb so that its socket
locates in the recess of bulb holder8
and is level to it.
�Fold wire clip back and press it down
on bulb holder8 to engage it in the ar-
restor hook.
�Connect electric plug on the bulb.
�Align housing cover5 and turn it
clockwise.
High beam bulb
�Turn housing cover4 counterclock-
wise and remove it.
�Turn bulb holder7 with the bulb coun-
terclockwise and remove it.
�Pull the bulb at its socket out of bulb
holder7.
�Insert the new bulb so that its socket
locates in the recess of bulb holder7
and is level to it.
�Reinsert bulb holder7 with the bulb in
the lamp and turn clockwise.
��
Page 435 of 509
434 Practical hints
Replacing bulbs
�Align housing cover4 and turn it
clockwise.
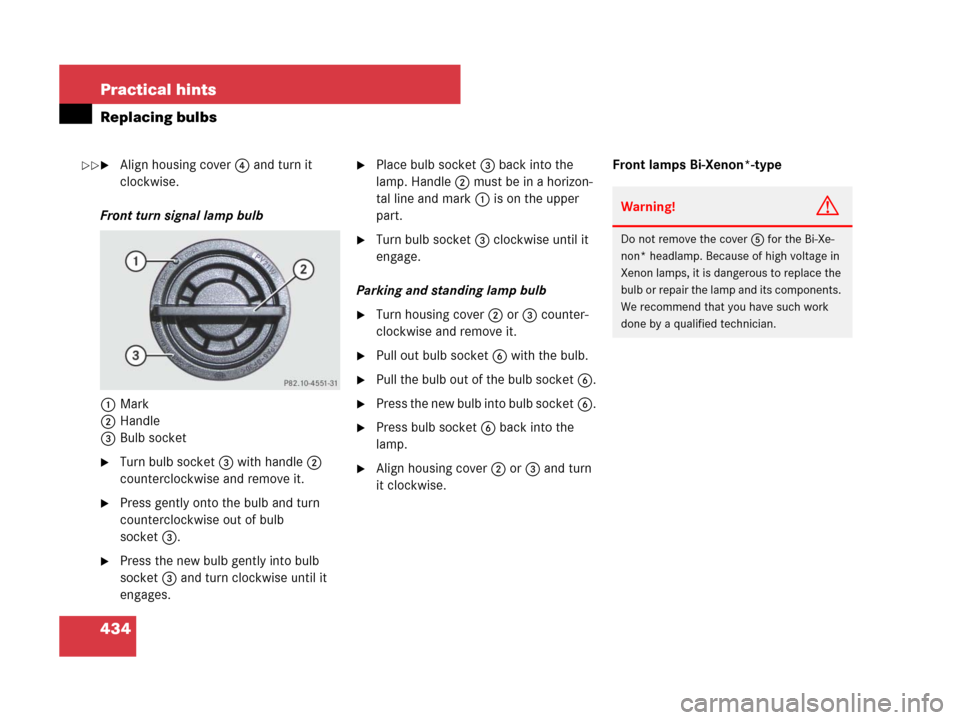
Front turn signal lamp bulb
1Mark
2Handle
3Bulb socket
�Turn bulb socket3 with handle2
counterclockwise and remove it.
�Press gently onto the bulb and turn
counterclockwise out of bulb
socket3.
�Press the new bulb gently into bulb
socket3 and turn clockwise until it
engages.
�Place bulb socket3 back into the
lamp. Handle2 must be in a horizon-
tal line and mark1 is on the upper
part.
�Turn bulb socket3 clockwise until it
engage.
Parking and standing lamp bulb
�Turn housing cover2 or3 counter-
clockwise and remove it.
�Pull out bulb socket6 with the bulb.
�Pull the bulb out of the bulb socket6.
�Press the new bulb into bulb socket6.
�Press bulb socket6 back into the
lamp.
�Align housing cover2 or3 and turn
it clockwise.Front lamps Bi-Xenon*-type
Warning!G
Do not remove the cover5 for the Bi-Xe-
non* headlamp. Because of high voltage in
Xenon lamps, it is dangerous to replace the
bulb or repair the lamp and its components.
We recommend that you have such work
done by a qualified technician.
��
Page 436 of 509
435 Practical hints
Replacing bulbs
1Bulb socket for turn signal lamp bulb
2Housing cover for parking and standing
lamp
3Housing cover for parking and standing
lamp
4Housing cover for high beam flasher
5Housing cover for Bi-Xenon headlamp6Bulb socket for parking and standing
lamp bulb
7Bulb holder for high beam flasher bulb
7Bulb holder for high beam bulbHigh beam bulb for high beam flasher
�Turn housing cover4 counterclock-
wise and remove it.
�Pull electric plug off the bulb.
�Pull out bulb holder7 with the bulb.
�Pull the bulb at its socket out of bulb
holder7.
�Insert the new bulb so that its socket
locates in the recess of bulb holder7
and is level to it.
�Reinsert bulb holder7 with the bulb in
the lamp.
�Connect electric plug on the bulb.
�Align housing cover4 and turn it
clockwise.
Page 437 of 509
436 Practical hints
Replacing bulbs
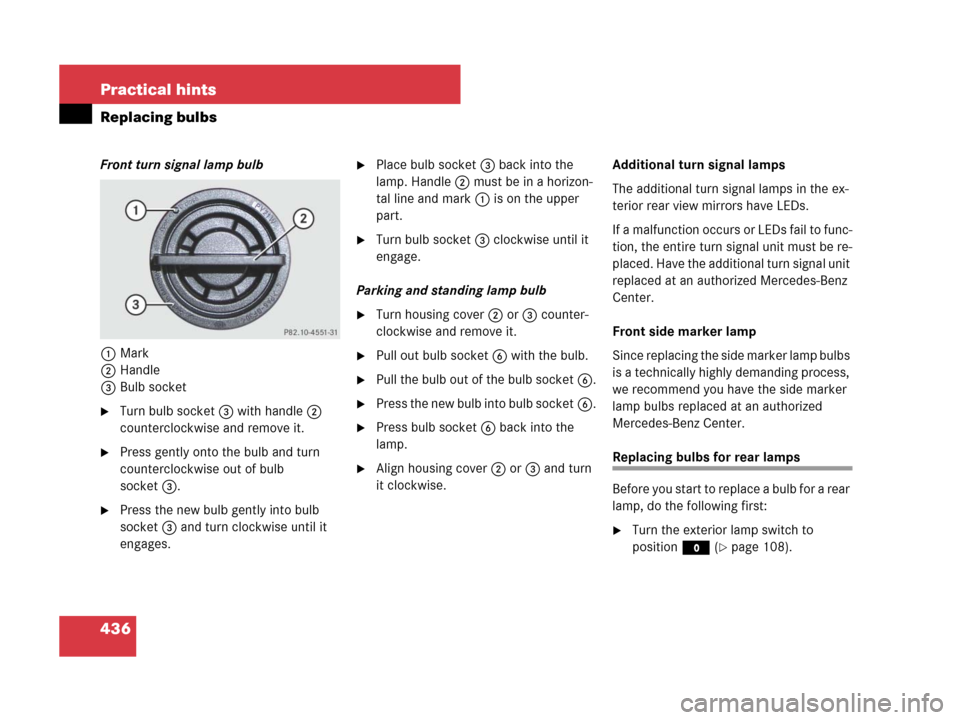
Front turn signal lamp bulb
1Mark
2Handle
3Bulb socket
�Turn bulb socket3 with handle2
counterclockwise and remove it.
�Press gently onto the bulb and turn
counterclockwise out of bulb
socket3.
�Press the new bulb gently into bulb
socket3 and turn clockwise until it
engages.
�Place bulb socket3 back into the
lamp. Handle2 must be in a horizon-
tal line and mark1 is on the upper
part.
�Turn bulb socket3 clockwise until it
engage.
Parking and standing lamp bulb
�Turn housing cover2 or3 counter-
clockwise and remove it.
�Pull out bulb socket6 with the bulb.
�Pull the bulb out of the bulb socket6.
�Press the new bulb into bulb socket6.
�Press bulb socket6 back into the
lamp.
�Align housing cover2 or3 and turn
it clockwise.Additional turn signal lamps
The additional turn signal lamps in the ex-
terior rear view mirrors have LEDs.
If a malfunction occurs or LEDs fail to func-
tion, the entire turn signal unit must be re-
placed. Have the additional turn signal unit
replaced at an authorized Mercedes-Benz
Center.
Front side marker lamp
Since replacing the side marker lamp bulbs
is a technically highly demanding process,
we recommend you have the side marker
lamp bulbs replaced at an authorized
Mercedes-Benz Center.Replacing bulbs for rear lamps
Before you start to replace a bulb for a rear
lamp, do the following first:
�Turn the exterior lamp switch to
positionM (
�page 108).
Page 438 of 509
437 Practical hints
Replacing bulbs
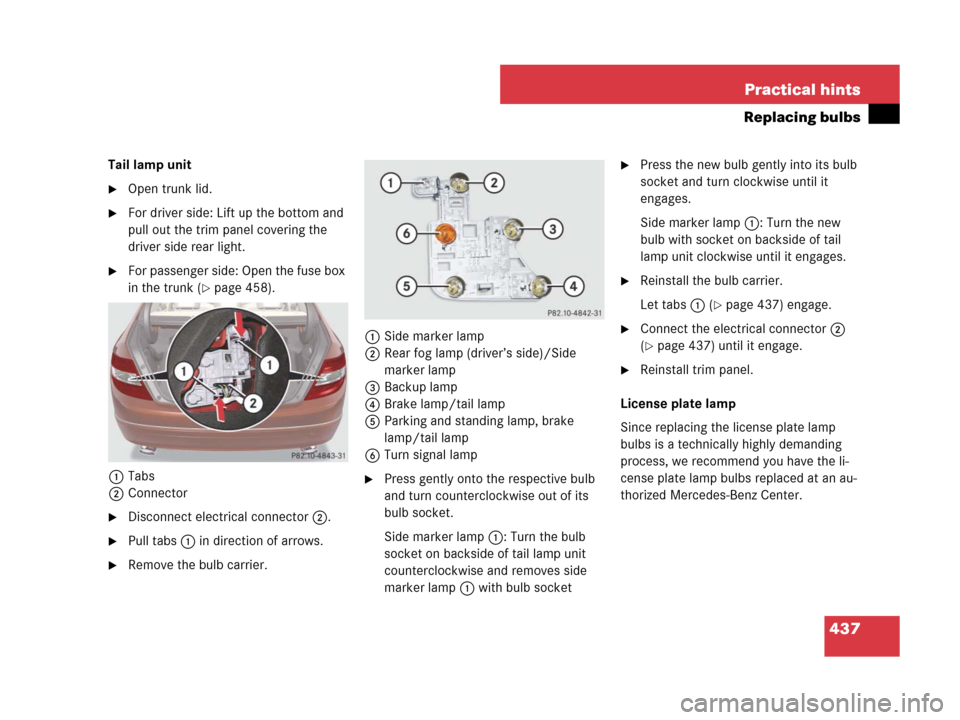
Tail lamp unit
�Open trunk lid.
�For driver side: Lift up the bottom and
pull out the trim panel covering the
driver side rear light.
�For passenger side: Open the fuse box
in the trunk (
�page 458).
1Tabs
2Connector
�Disconnect electrical connector2.
�Pull tabs1 in direction of arrows.
�Remove the bulb carrier.1Side marker lamp
2Rear fog lamp (driver’s side)/Side
marker lamp
3Backup lamp
4Brake lamp/tail lamp
5Parking and standing lamp, brake
lamp/tail lamp
6Turn signal lamp
�Press gently onto the respective bulb
and turn counterclockwise out of its
bulb socket.
Side marker lamp1: Turn the bulb
socket on backside of tail lamp unit
counterclockwise and removes side
marker lamp1 with bulb socket
�Press the new bulb gently into its bulb
socket and turn clockwise until it
engages.
Side marker lamp1: Turn the new
bulb with socket on backside of tail
lamp unit clockwise until it engages.
�Reinstall the bulb carrier.
Let tabs1 (
�page 437) engage.
�Connect the electrical connector2
(
�page 437) until it engage.
�Reinstall trim panel.
License plate lamp
Since replacing the license plate lamp
bulbs is a technically highly demanding
process, we recommend you have the li-
cense plate lamp bulbs replaced at an au-
thorized Mercedes-Benz Center.
Page 489 of 509

488 Index
Phone cook 233
Radio operation 194
Satellite radio* operation 200
Sound settings 189
Surround sound* (Canada only) 190
SYS menu 192
SYS menu, Bluetooth
® settings 192
SYS menu, display settings 192
SYS menu, language settings 193
SYS menu, reset to factory
settings 193
Telephone menu* 222
Volume 189
Auto-dimming*, Rear view mirrors 100
Automatic central locking 80
Activating/deactivating
(Control system) 173
Automatic climate control (3-zone) see Cli-
mate control system
Automatic headlamp mode 109, 172
Automatic lighting control, Interior
lighting 115
Automatic shift program 144Automatic transmission
Accelerator position 142
Emergency operation (limp-home
mode) 146
Fluid 476, 477
Fluid level 328
Gear ranges 143
Gear shifting malfunctions 146
Hill start assist system 246
Kickdown 142
Shifting procedure 139
Starting the engine 127
Transmission fluid 328
Automatic transmission*
Automatic shift program 144
Gear selector lever 138
Gear selector lever control one-touch
gearshifting 145
Gear selector lever positions 140
Program mode selector switch 144
Aux socket 220B
Backrest 281
Backup lamps
Replacing bulbs 430, 431
Bar 356
BAS 60
Batteries, SmartKey
Checking battery condition 78
Replacing 428
Batteries, SmartKey with KEYLESS-GO*
(Canada only)
Checking battery condition 78
Replacing 428
Battery 448
Battery, vehicle 446
Charging 449
Discharged, Jump starting 451
Disconnecting 448
Message in display 399
Reconnecting 450
Removing 449
Bead 356
Beverage holder see Cup holder
Page 490 of 509

489 Index
Bluetooth®
Settings (Audio system) 192
Telephone* (Audio system) 222
Brake assist system (BAS) 60
Brake fluid 324, 478, 480
Brake lamp
High mounted 431
Replacing bulbs 431, 436
Brake pads
Message in display 399
Brake warning lamp 27
Brakes 312
Warning lamp 27, 376
Break-in period 310
Bulbs, replacing see Replacing bulbsC
California retail buyers and lessees,
important notice for 11
Can holder see Cup holder
Capacities and recommended
fuel/lubricants 476
Cargo area see Trunk
Carpets, Cleaning and care of 371
Catalytic converter 319
CD
CD changer* 208
CD player 160, 208
MP3 playback options 220
MP3, selecting a track 219
Playback options 220
Selecting a track 219
Submenu overview 208
CD changer* 208
CD player 160, 208
Centigrade see Temperature display
mode 167
Central locking
Automatic 80, 173
Locking/unlocking from inside 81
Locking/unlocking switches 81
Central locking/unlocking switches 80Certification label 462
Change of address or ownership 12
Checking tire pressure electronically
Tire Pressure Monitoring System
(TPMS), (USA only) 344
Children in the vehicle 51
Air bags 51
Front passenger front air bag off
indicator lamp 45, 385
Infant and child restraint systems 51
LATCH-type child seat anchors 55
Override switch for rear door window
operation 57
Tether attachment points 54
Cigarette lighter 292
Climate control system 250, 259
3-zone automatic climate control
(Canada only) 259
Air conditioning, Cooling 258, 267
Air distribution 254, 263
Air recirculation mode 257, 265
Air volume 254, 263
Air volume, rear 268
Automatic mode 253
Deactivating/Reactivating 252
Defrosting 264